cards · Christmas · Fall · Memory Box · Stencils · Winter

Frosted Pine trees and Maple Leaves…

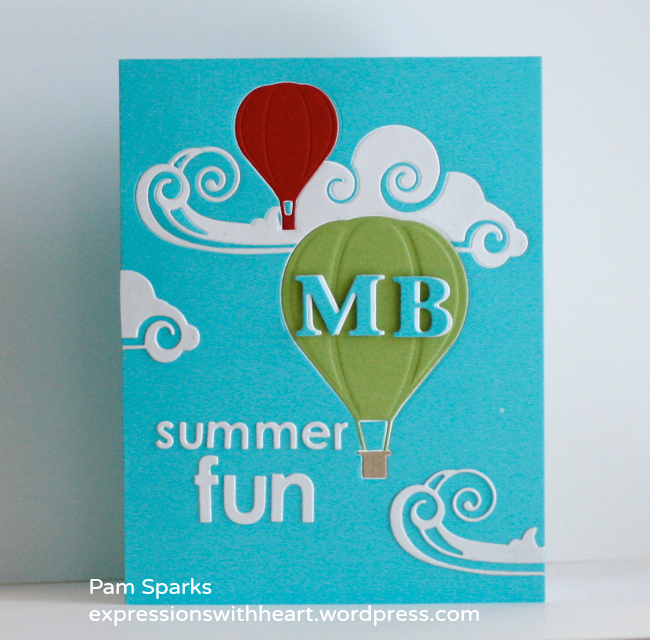
A couple cards I posted on the Memory Box blog today…


PamSparksMerryTrees700

No, I’m not ready for the sparkly, fluffy stuff but I sure like it on cards! lol

For the starry background, I applied Imagine Crafts Delicata Silver ink through the Stardust Stencil with Imagine Crafts large round ink Dauber onto a Memory Box A-2 Sapphire Notecard.

I die cut and embossed the Frosted Pine die five times in Memory Box Dill card-stock.  I went over the embossed snow areas with Dries White glue, shook on and tapped off the glitter and let it dry.

Merry is die cut from a Memory Box White notecard.

The word Christmas is left over from the Grand Merry Christmas Script die card I made and posted last week HERE.

I used two of the holly leaves from the HO HO Holly Leaves die and a couple red glitter domes finish it off.
Now for some Fall colors!


PamSparksHappyFall700

Very simple but maybe a nice, easy to mail, ‘flat’ card! Gotta love that once in awhile! lol

The card base is a Memory Box Lagoon A-2 Notecard with a 5 1/4 inch x 4 inch panel from a Memory Box Parchment Notecard layered on top. I used Gathered Twigs Distress ink to edge the panel and all the leaves, letters and the Woodland Branch die.

I used the new Marvelous Maple Leaves die and cut the small leaf in 3 Memory Box card-stock colors, Meadow, Sweetcorn and Jack O Lantern. The large leaf is cut once out of Jack O Lantern.

Upper and lower case Classic Alphabet dies for happy FALL.


PamSparksHappyFallClose

Our daughters call their baby diaper inserts ‘flats’, so I can call my flat cards ‘flats’!  lol  Children are a blessing even when they create a lot of laundry!  I guess we big people make a lot of laundry too!  Now how did I get off on that! lol

I’ll link up to some challenges and call it a post!  ttul!  TFL!

(my merry Christmas card at the top)

Merry Monday Christmas Challenge – the words have it

Simon Says Stamp – Make your own background 

Divas By Design – Anything Goes 

Sister Act Card Challenge – Anything Goes 

Paper Creators Crafts – Early Christmas

(my happy FALL card)

2 Cute Ink Challenges – Fall 


Dies and Supplies I used on these cards…


cards · CAS · Die Piecing · Memory Box · Shopping · Spring · Stencils · Summer · Techniques

More New Memory Box and SALES!!!


First up…the SALES!!! 

I use my Perfect Layers tools all the time!  Perfect Paper Crafting is offering an awesome deal!  If you haven’t gotten yours yet…don’t miss this opportunity to get a deal on the new set of Mini Rulers and the mat!  You will not be sorry!  LOVE them!   If you already have them, maybe you want another set or what an awesome gift for a stamper friend!
Click the box below to check it out!

2422News__60202.1401665389.451.416

I have admired and been tempted to buy for some time the New stamp and die sets from Simon Says Stamp.  I still don’t have any but if I have time to shop tomorrow, I want to but where to start!   In case you didn’t know and want to shop too… here’s the deal and a link to the sale. 

1_121

thanks for shopping through my links! 

❤❤❤


PamSparksButterflies

Cards! Here’s another card using the NEW Summer 2014 Memory Box release. I started with the Floating Butterflies die cut out of a Memory Box white notecard. Next I cut out two of the inner lines with a scissors so I would have one complete butterfly.  Here’s a picture of the die so you can see the lines I cut off.

6a00d83454a17469e201a3fd197a36970b-800wi


I cut the Floating Butterflies Background die from a Memory Box Sweetcorn notecard. Using the Butterfly Vine stencil, I inked up the complete butterfly first, with Wild Honey Distress ink and the mini round ink blending tool.  Then moved the stencil to fit over the other two butterflies, making sure not to ink into the complete butterfly I stenciled first.

I die cut the Bursting Berry Vine and Blushing Flower Branch from a Memory Box Kraft notecard. I inked them with Gathered Twigs Distress ink and the mini ink blending tool and then colored the leaves with YG Copics.

Cut the Blushing Flower Branch again with little pieces of Memory Box Lavender notecard placed over the flowers, emboss them with a stylus or run it back through the Big Shot with a tan mat and shims.  Leaving the flowers in the die, flip it over and ink through the die with Dusty Concord Distress ink and an ink blending tool.


PamSparksButterfliesClose


Using a variety of Memory Box butterfly dies… cut some butterfly bodies in lavender card…ink them a little with Dusty Concord Distress ink too.

The word ‘fly’ is cut from the Library Alphabet Tags set.

I glued with Tombow Mono Multi, Scrapbook Adhesives mounting squares and the ATG gun.

A2 size card…

Linking up to the NBUS Challenge HERE…  all of the dies have never been used!

button aqua

❤❤❤

Over on the Memory Box  facebook page this a.m., I posted the Floating Butterflies card and a gal said she wanted to see something with the Curling Cloud die.  So I took the challenge for this afternoon!

I inlaid the Mini Hot Air Balloon and Beautiful Balloon dies with the Curling Cloud, cut the Memory Box initials with the Classic Uppercase Alphabet dies, cut summer with the Alphabet Soup die and fun with Parker Lowercase Alphabet dies.


PamSparksMBSummerFun650


Another Curling Cloud glued on top of the card to finish it off.

It’s an A2 size card – Memory Box Lagoon notecard for the card base, white, cranberry and meadow for the cuts.


PamSparksMBSummerFunClose


So when it’s hot and humid… I stay in the house and keep cool!  How about you?  So my Summer fun is not in the air but on the ground, in the house playing with Memory dies, stencils and stamps!

I still have 3 class cards to post next week, some new Printworks stamps to play with and it’s time to color again!

TFL! and happy weekend…hope you get to make something too!

Here’s what I used to make these cards…


cards · Distress Ink coloring · Distress Stains · Memory Box · Perfect Layers Tools · Poppystamps · rubber stamps · Spring · Stencils · Techniques

Memory Box Stencils and Dies…

Hi everyone!  There is a Stencil Blog Blitz going on over on the Memory Box Blog, HERE.  Every day there is a chance to win a stencil,  just by leaving a comment on the blog post each day.

ca615aa4-37f5-4221-8c4f-5bc3e18724b5


In today’s post, Laura is showing the Pop Dots Stencil.  I have a card made with it and the poppystamps Mod Flower Background die matches up with it perfectly!  I embossed the stencil by running a piece of card-stock through the big shot,  then laying the stencil back over the embossed piece as a mask,  I used several colors of Distress Stains to color the circles…Spun Sugar, Peeled Paint, Barn Door and Broken China.

PamSparksModFlowerDistressStains
Then I added a banner cut with poppystamps Classic Ribbons die,  I stamped on it with a Memory Box Washi Chevron stamp and  Wishing You a Happy Day stamps

PamSparksModFlowerClose
Some Doodlebug Sequins to embellish and then glued together with Tombow Mono Multi glue.

I posted a stencil card on the Memory Box Blog  for the Blog Blitz on Saturday, using the Texture, Line Up stencil, Delphinium and Stems mini stencils from the Garden collection.

PamSparksStencilFleur
I inked through the stencils with Distress Inks and the new Round Ink Blending Tools. (they are awesome by the way!)

Then I cut the Rhone Butterfly Wings die in the panel and layered Lagoon card-stock under it.

The Blooming Branch die is glued on behind the Classic Ribbons Banner and the word FLEUR is cut with the new Urban Uppercase Alphabet die set.

PamSparksStencilFleurClose2

And I have found that I LOVE to spatter!  Two colors of spray mist spattered on the panel.  Shake the mists side to side to mix, unscrew the cap and tap with your finger to spatter the ink off the tube.  Works great!

I used my Perfect Layers mini Rulers  and Cutting mat to cut the mat for the floral scene.  Link over on the right… love these rulers!

I have more cards to post and photos and cards from the Great Yosemite Stamp Escape too!  I’ll be back soon!

Thanks for stopping by, it’s good to be back. I have missed you ALL!

p.s. I still haven’t been able to get Google to recover my You Tube Channel.  It’s so discouraging. This is for sure one time when technology is not my friend.  boo.

There is one video on my blog Facebook page though.  I wish I’d loaded them all to FB!  Who’d a thunk!

Supplies I used on these cards…


cards · Memory Box · Perfect Layers Tools · rubber stamps · Stencils · Winners

Giveaway Winner and Memory Box Butterfly Vine…

PamSparksButterflyStencilCollage

Such a habit… I always seem to put a photo at the top of the post!  hehe  Oh well… go ahead…scroll down and see who the winner is!

Here’s the Butterfly Vine stencil debossed into Strathmore Bristol card-stock… It really worked great… the other side was nicely embossed, so you could use either side.

It was great to use the debossed side because the stencil stayed in the grooves while I misted it with three colors of Glimmer Mist. Patina, Frosty Nights and Mistletoe.

Let that dry…

Then I replaced the stencil in the grooves again and stamped with a variety of Memory Box stamps inked with Distress Ink pads. One of the stamps, Vintage Scroll has been discontinued.  Sorry about that… some shops still have it in stock.

I used the Perfect Layers ⅛ inch ruler to mat the stenciled and inked piece on black card-stock.

Here’s a close up…

PamSparksButterflyStencilCollageClose

I really like the definition the debossing/embossing gives… like letterpress without the ink.

I layered it up like this in my Big Shot…

Multi purpose Platform set on Tab 1

Clear Cutting Mat

Spellbinder Tan Embossing mat

Bristol card-stock (I very lightly spritzed it with water on both sides – spritzing on the back side helps keep it from curling)

Butterfly Vine Stencil

Clear Cutting Mat

5 pieces of 5 ½ x 8 ½ in. 65# cover card-stock, stacked together and placed on top (shims)

Then run it through!

NOW FOR the WINNER of the MB Lunette and Oriel Butterfly dies from SLS!!!

Screen Shot 2014-03-09 at 10.57.45 AM

#30 is Linda Ward!  Congrats Linda!  It’s your lucky day!
Watch your email, I’ll be contacting you for your mailing address.

Thank you everyone for stopping by, linking up and shopping at Starlitstudio.net!

*** Linking up to…
Clips N Cuts blog  – giveaway
ETA – 
Moxie Fab World – Styling with Stencils Challenge

Supplies I used on my card…

cards · Hero Arts · Memory Box · Stencils · Washi Tape

Prim Poppy Goes Postal…

PamSparksPrimPoppyAirmail650

Hello!  My ‘Day 4’ card for the Stenciled Online Class.

I dry embossed using Mister Huey’s Chevron Stencil…ran it through the Big Shot like this… multi purpose platform tab 1, cutting plate, stencil, card-stock, tan mat, 3 to 5 pieces of 65# card-stock for shimming then another cutting plate on top… run it through.   One thing I do if my spray bottle is right there… I spritz with water so it embosses a tad bit more.  Then inked the panel with Walnut Stain Distress ink using the Ink Blending Tool.

Some Little B airmail Washi Tape, an airmail mini envelope from Impress Rubber Stamps.com, some airmail twine, Memory Box Prim Poppy die cut from green and red then pieced together and an old Hero Arts hello stamp!  I used the Tiny Attacher to staple on the sentiment piece.

Linking to the Daring Cardmakers Challenge – Stripes

I hope to make some more from the inspiration shared in this class.  Thanks for stopping by!

Supplies I used…