cards · CAS · Die Piecing · Distress Ink coloring · Fall · Halloween · Memory Box · Ornament · Oxide Inks · Tags

Memory Box NEW Halloween/Fall Release!

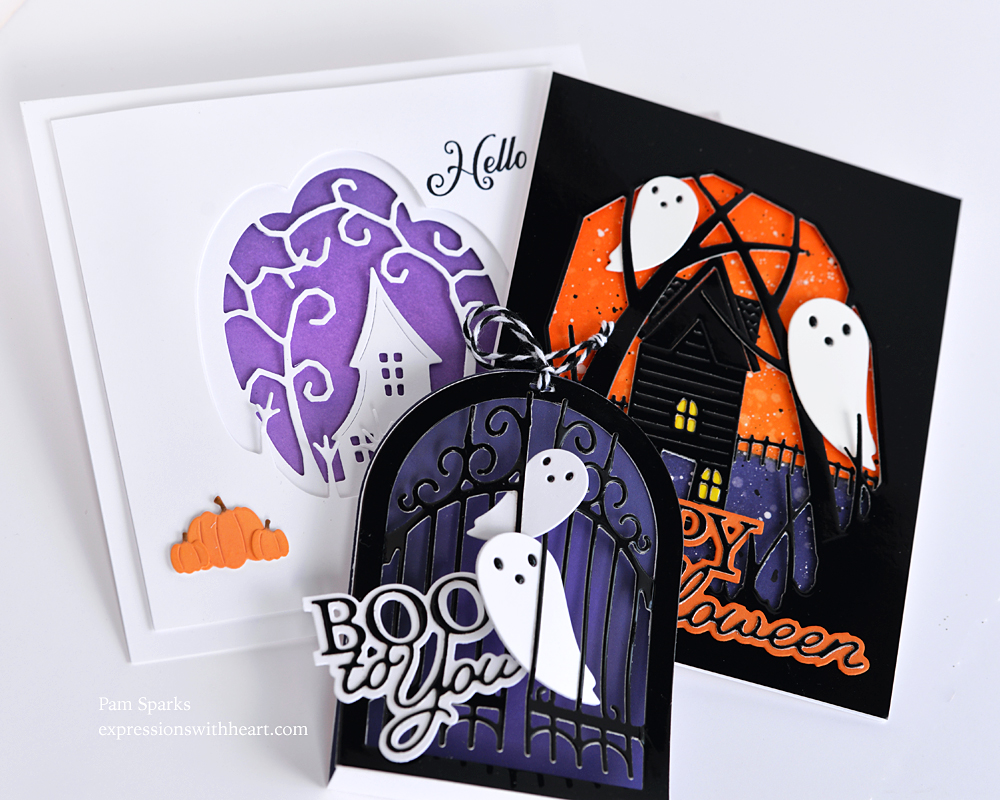
BOO! aka Hello! Time to get inky for Fall!  Sharing three projects I made with the NEW Memory Box release!

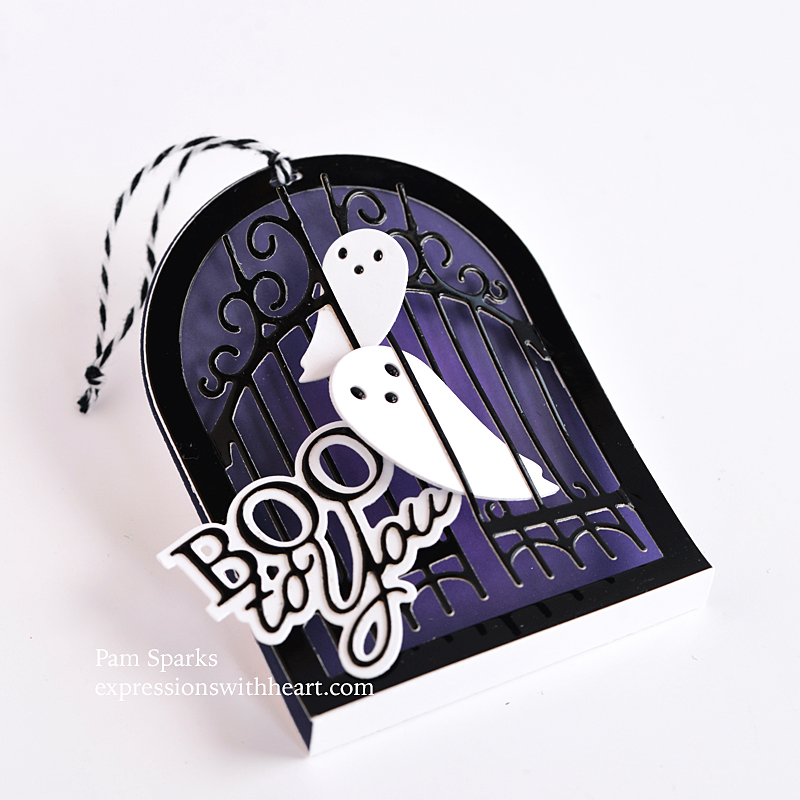
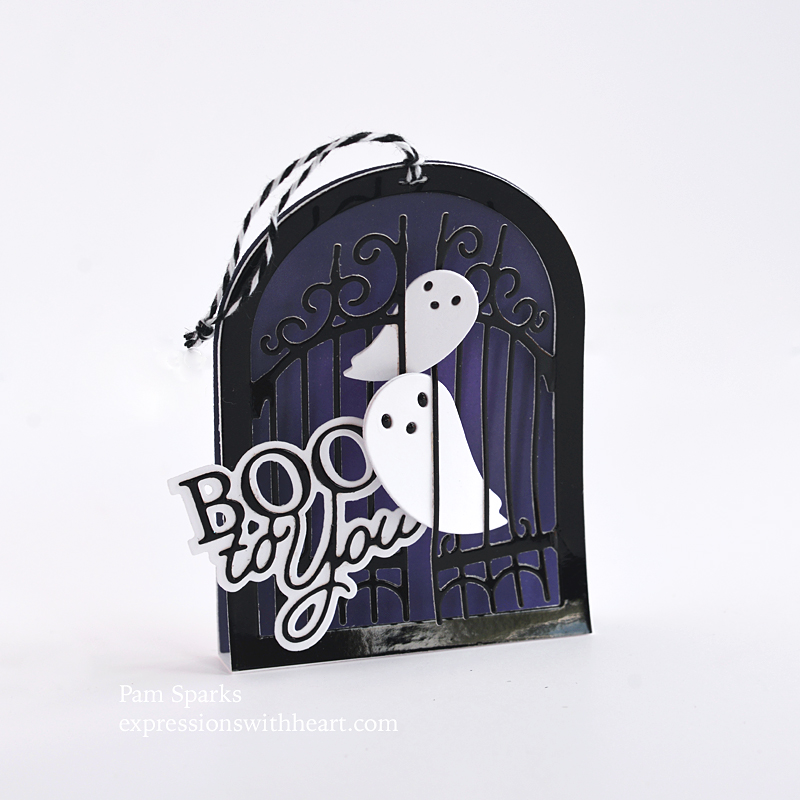
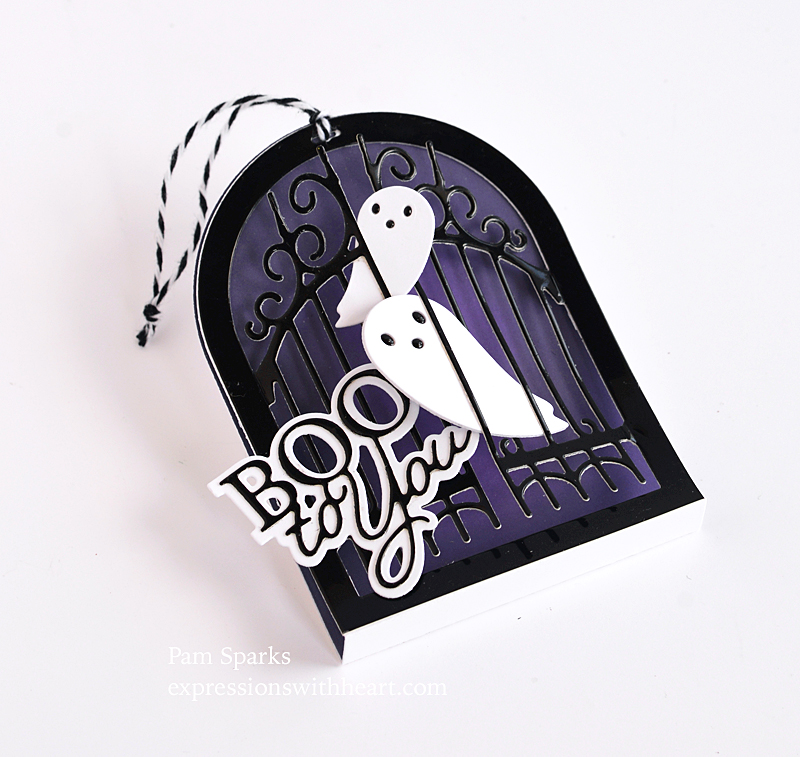
I’ll start with this cute BOO to YOU!  The Fancy Gate Globe is NEW.  I paired it with the Snowglobe Backer die to make this hanging or it stands too, tag.

The ghosts are from the NEW Ghosts in the Forest die set and the sentiment is the NEW Boo Posh Script!  So cute!

I inked a background piece I cut with the Nested Globes die set and inked with purple inks and an ink blending brush. (it’s a brighter purple IRL)

This was a quick tag to make!

Linking my tag to the Everybody Art Challenge – Tag

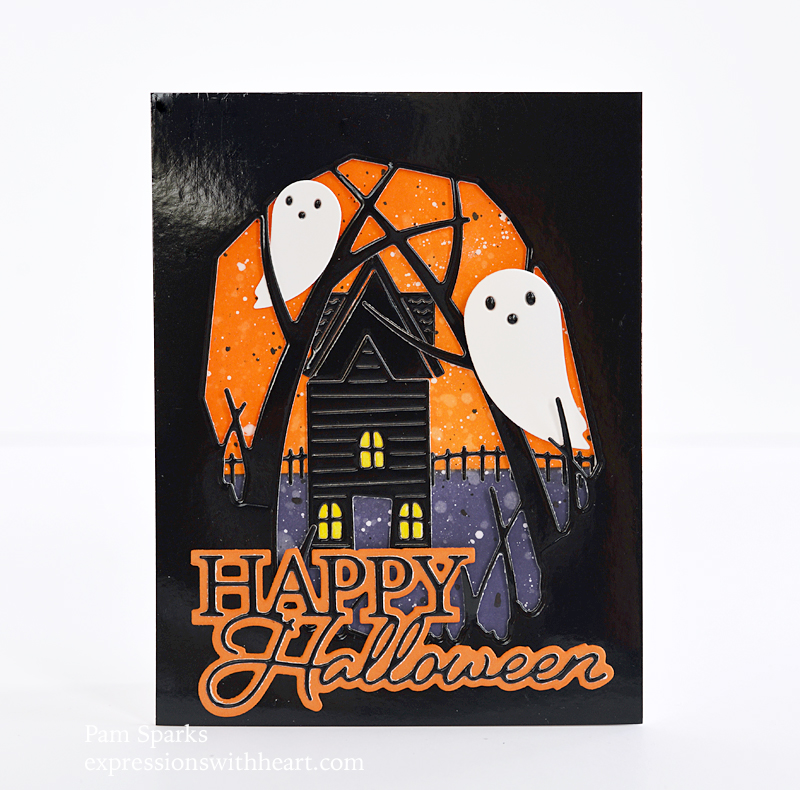
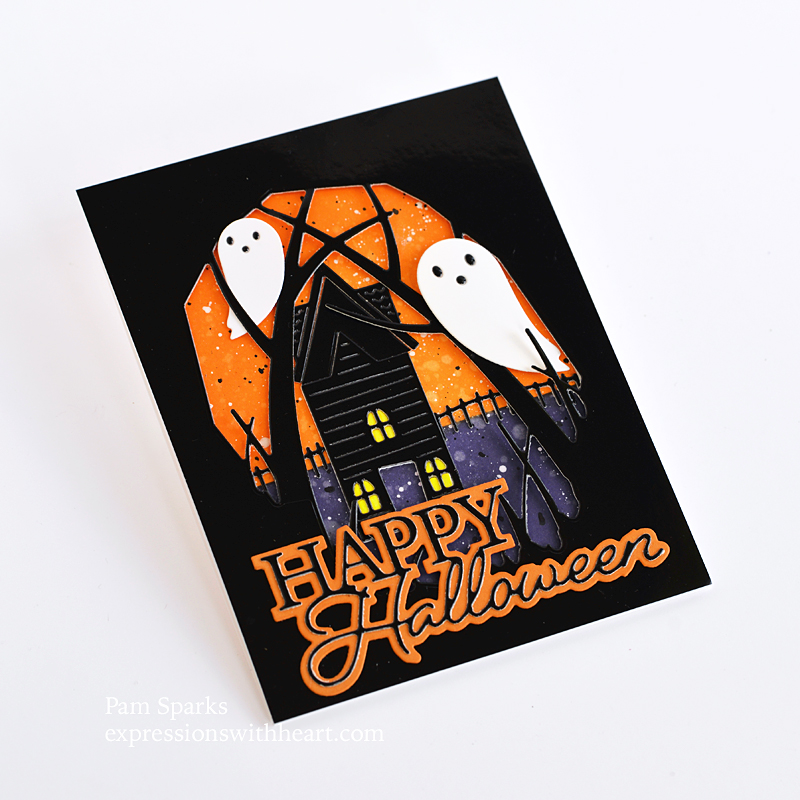
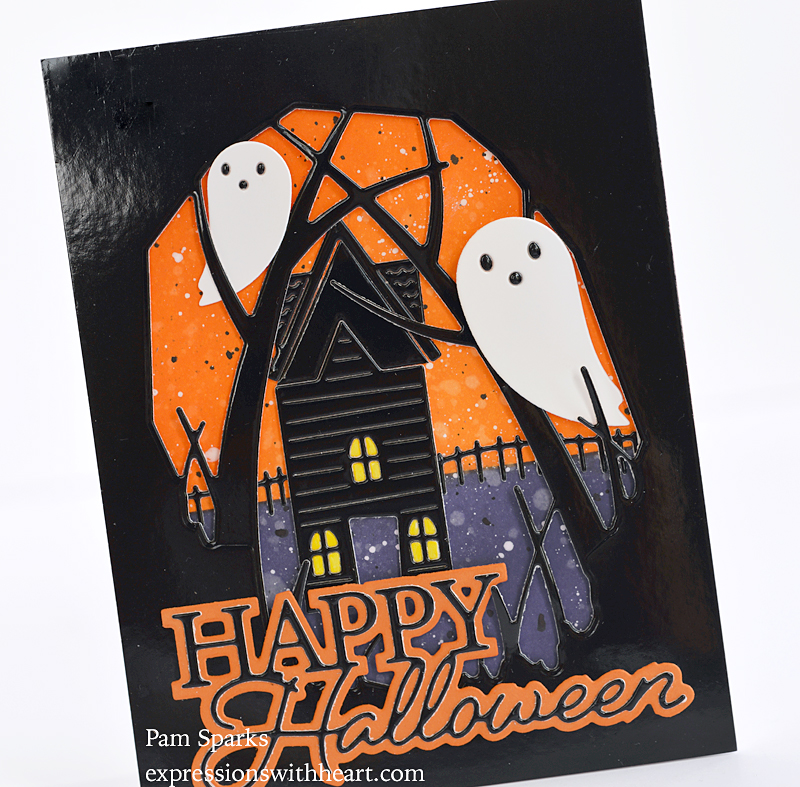
Next up is an A2 size card I made with the NEW Ghosts in the Forest die set.

I die cut the scene out of Memory Box’s black glossy cardstock and the ghosts out of white glossy cardstock.  I love how it looks IRL.

I inked an A2 size panel for the back with oranges and purples and spattered water, white paint and black paint on to it.

I added the NEW Rickety House die cut in the same glossy black cardstock.  For the windows, I die cut the house in white and left the windows in the cut, colored them with a Copic yellow marker, then glued the white to the back of the black house.

I used the NEW Happy Halloween Posh Script die for the sentiment.  Die cut in black glossy and an orange from my scraps.

Not really spooky but sure is cute!

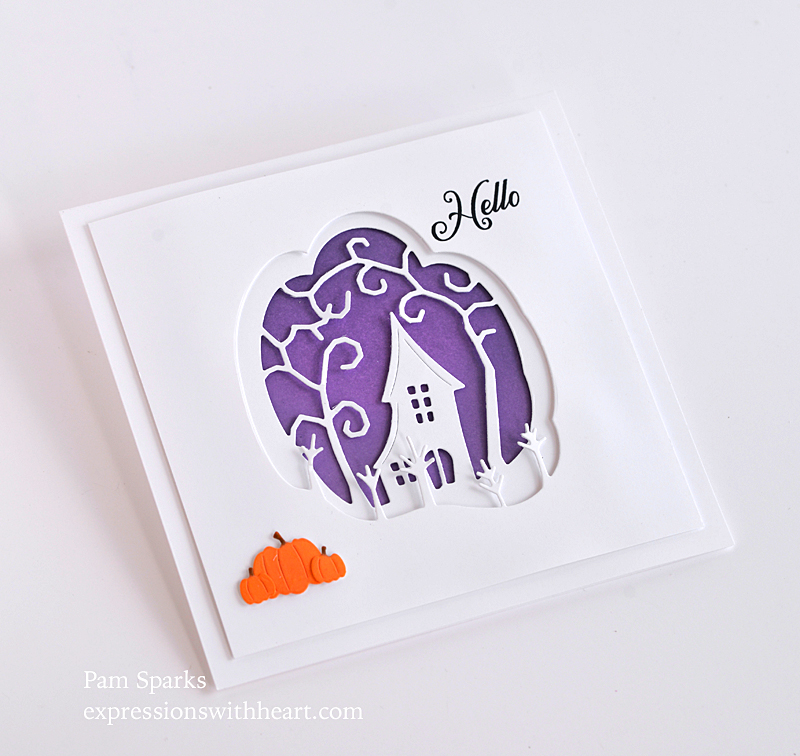
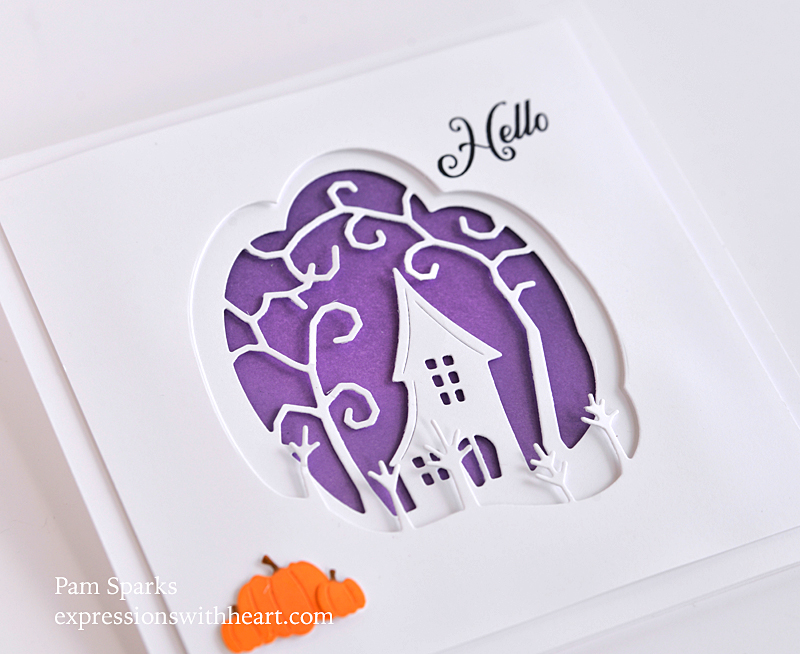
Next up is the NEW Creepy Cabin die!  This one is really CAS and probably took me the longest because I couldn’t decide whether to color it or not! lol  In the end, leaving it white won out.

It’s not so creepy anyway! haha

I inked a purple-ish background, cut everything in white.

I used the Wooded Glen Collage die from a previous release for the top layer.  Then a few pumpkins I got inky from the Pile of Pumpkins die.  The stems I colored with a Copic marker.

Layered them up with that thin thin foam mounting tape I like.

Oh, I stamped Hello from the Halloween Pumpkin clear stamp set from a previous release.

This card is 5 ½ inches square. A nice size… I like it!

I’ll link everything below.

And thank you so much for clicking over.  I’ll be back…so much I want to make!

ttul,

Here’s what I used to make these three cards…

Memory Box – 94623 Fancy Gate Globe…
[ STR | SSS ]
Memory Box – 94532 Nested Globes…
[ STR ]
Memory Box – 94491 Snowglobe Backer…
[ STR | SSS ]
Memory Box – 94587 Boo Posh Script…
[ STR | SSS ]
Memory Box – 94622 Ghosts in the…
[ STR | SSS ]
Memory Box – 94632 Rickety House…
[ STR | SSS ]
Memory Box – 94585 Happy Halloween…
[ STR | SSS ]
Memory Box – 94634 Creepy Cabin craft…
[ STR | SSS ]
Memory Box – 94505 Wooded Glen…
[ STR ]
Poppystamps – 2403 Pile of Pumpkins…
[ STR ]
Memory Box – CL5264-D Halloween…
[ STR | SSS ]
Scrapbook Adhesives Crafty Foam Tape…
[ STR ]
Tombow Mono Multi Liquid Glue
[ STR | SBC | SSS ]
Memory Box – SH44004 Black Glossy…
[ STR | SSS ]
Hammermill WHITE 100 LB SMOOTH…
[ SSS ]
Simon Says Stamp Cardstock WHITE…
[ SSS ]
Sizzix – White and Gray – Big Shot…
[ SBC ]
Sizzix – Big Shot Accessory – Tool…
[ SBC ]

cards · Christmas · Die Embossing · Die Piecing · Distress Ink coloring · Memory Box · Oxide Inks · Techniques · Wreath Building

Merry Christmas in July, Holly Wreath Card and Tutorial

Salutations of the season to all!  And just like that, it’s the end of July!  Let’s get a head start on Christmas cards! 

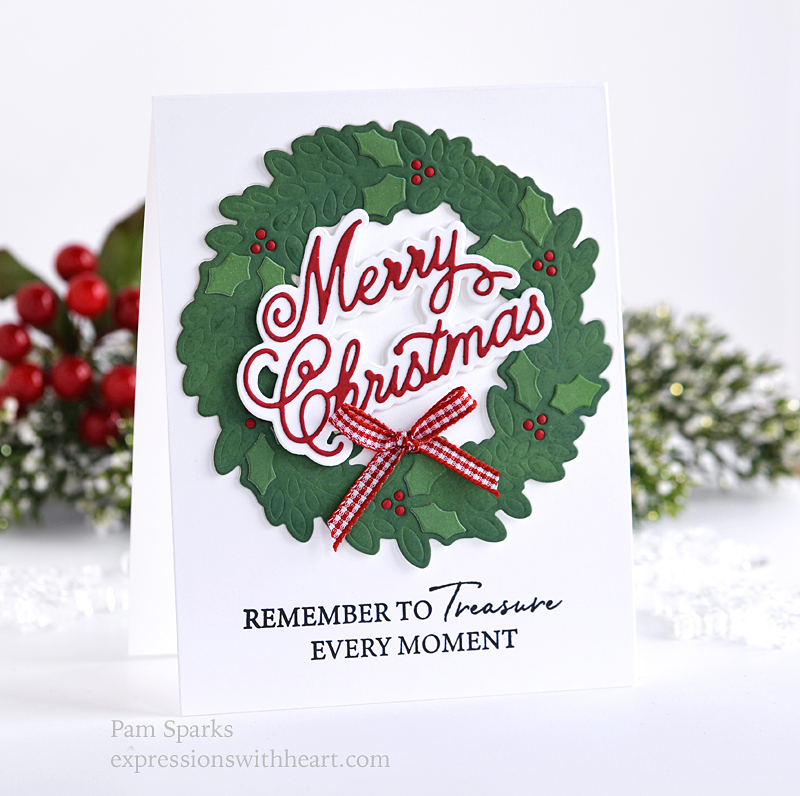
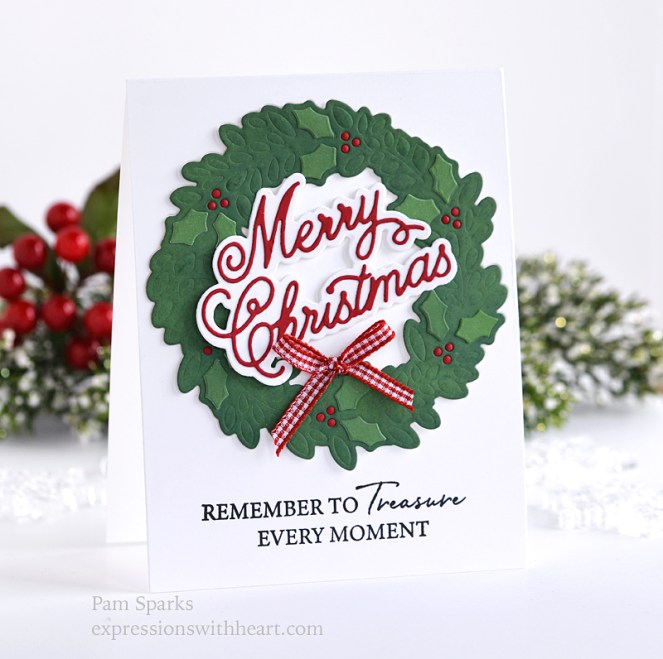
My card today is from the NEW Birch Press Design Festive Floral release!

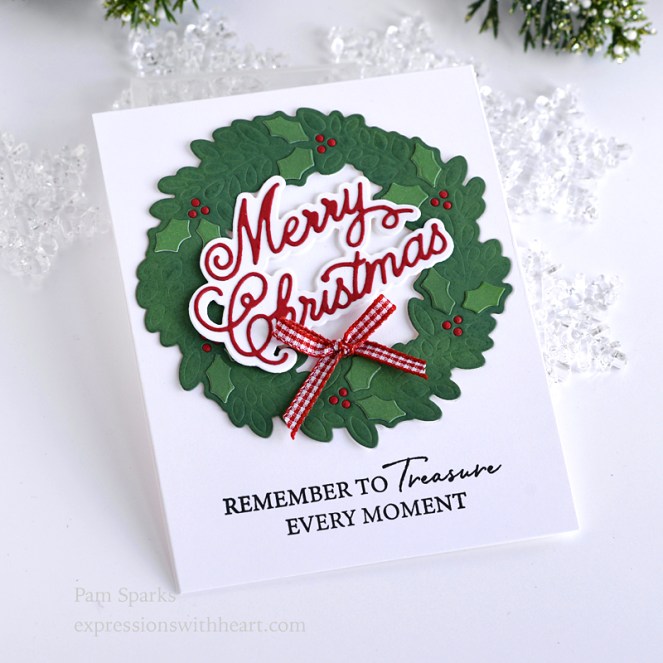
I’m using the NEW Holly Wreath Plate die set. Keep reading for a tutorial how I made the wreath without layering!  First the finished card pictures…
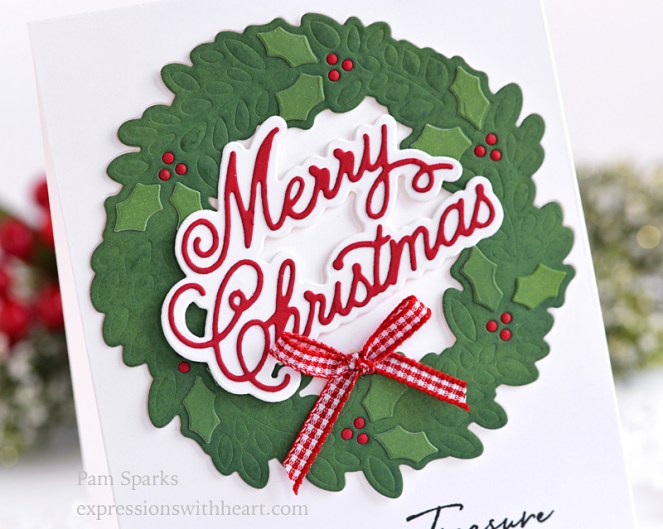
 

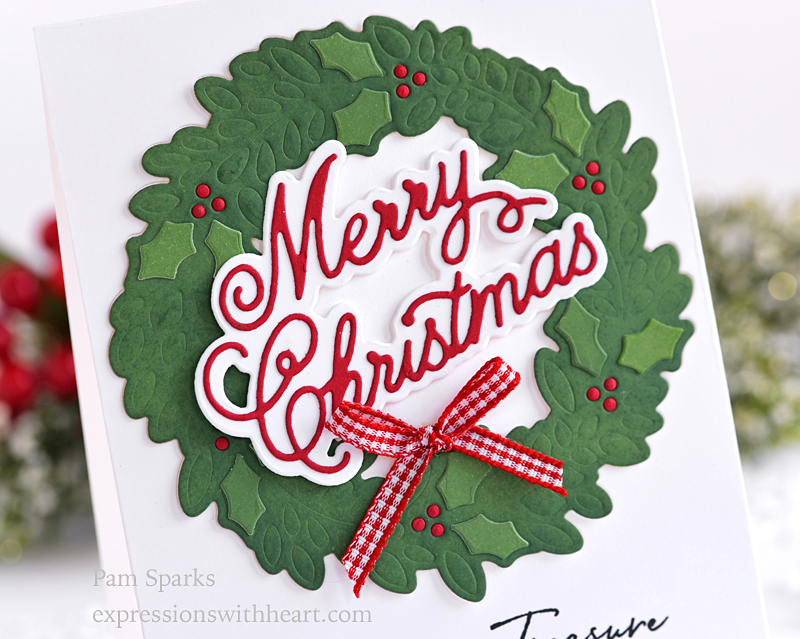
Close up showing the NEW Handwritten Merry Christmas and Outline die set… so beautiful! I love how he included the dot of the ‘i’ onto the ‘t’!  No gluing tiny dots this time!  (well except on the wreath hohoho)
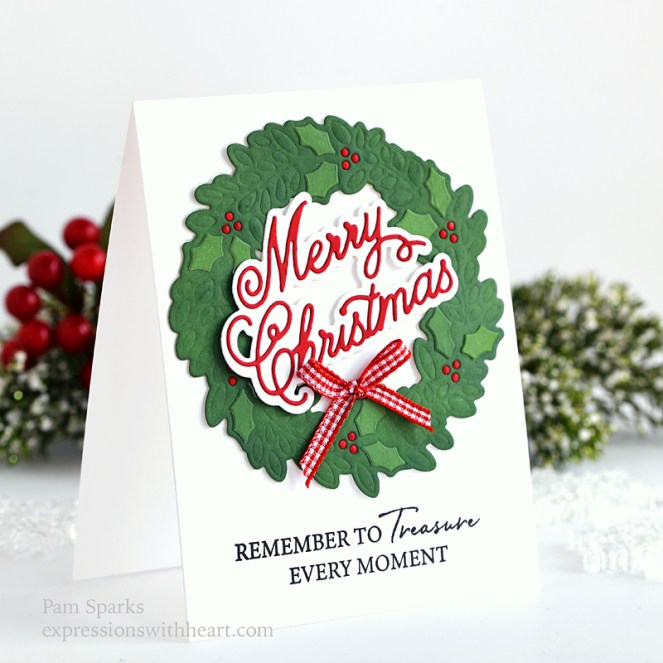
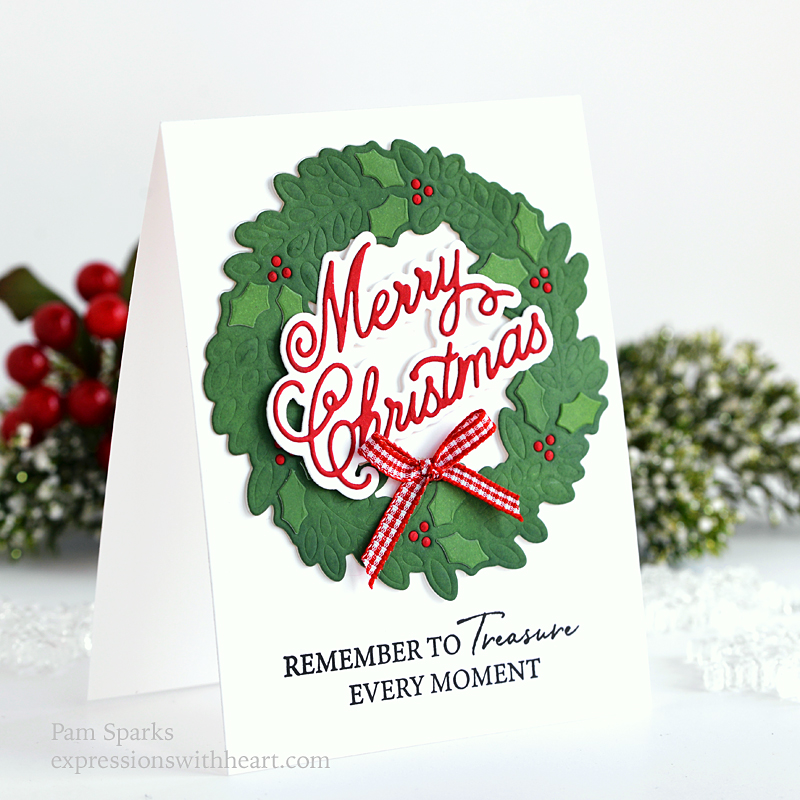
A shot from the side…

Sentiment from Birch Press Design Kind Hearts clear stamp set. (gorgeous sentiments in this one)
Here’s how I made this card in pictures…hope it works!  Let me know what you think!  Was it worth it?
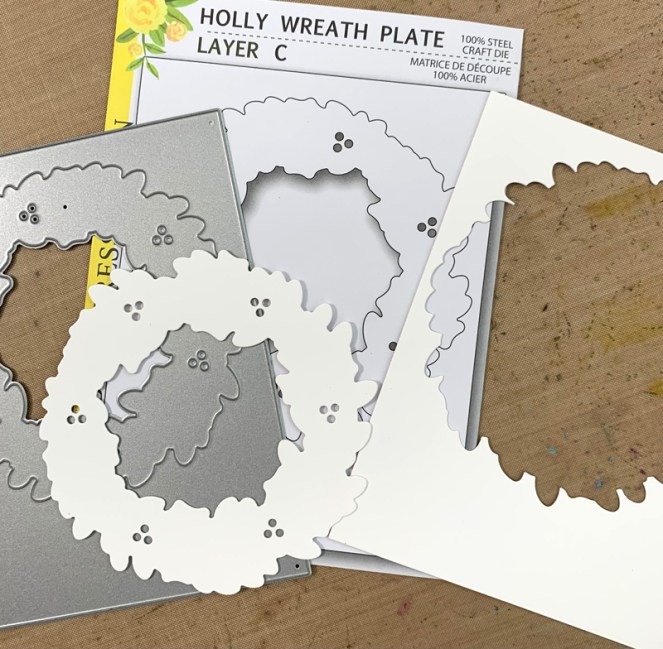
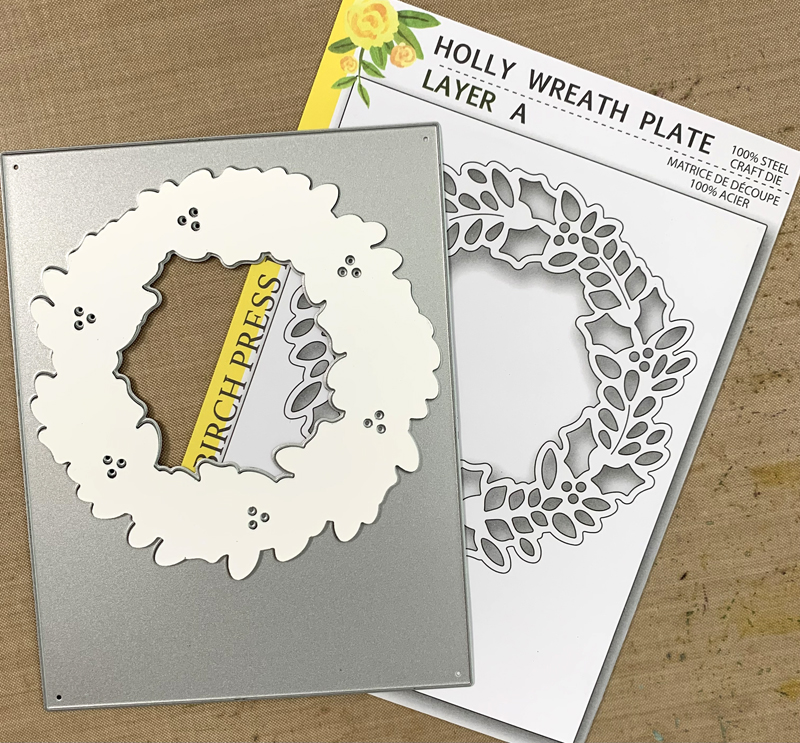
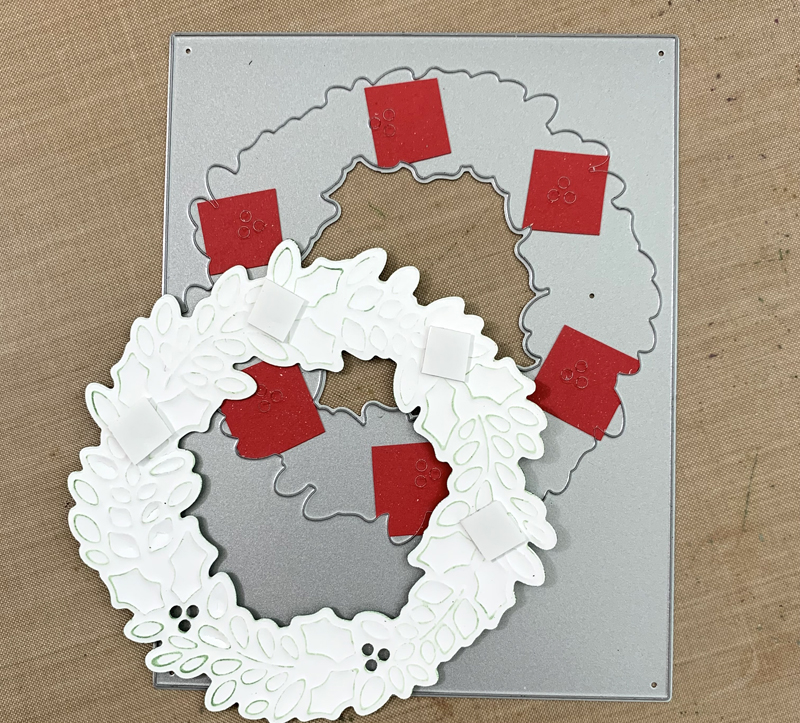
I started by die cutting Layer C in Hammermill 100# Color Copy Cover cardstock.  Keep both pieces.
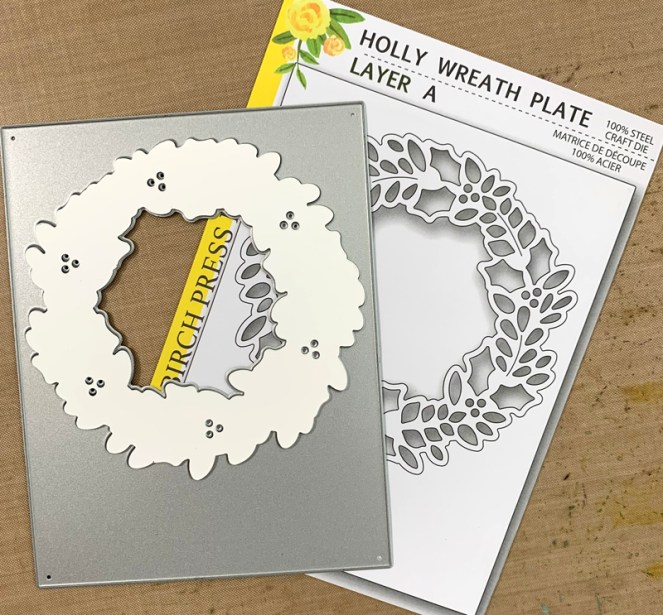
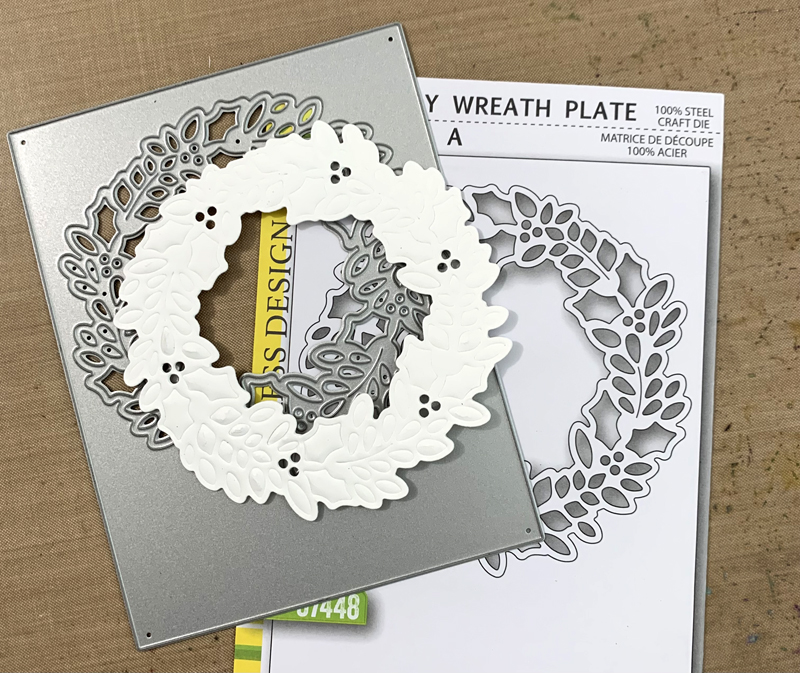
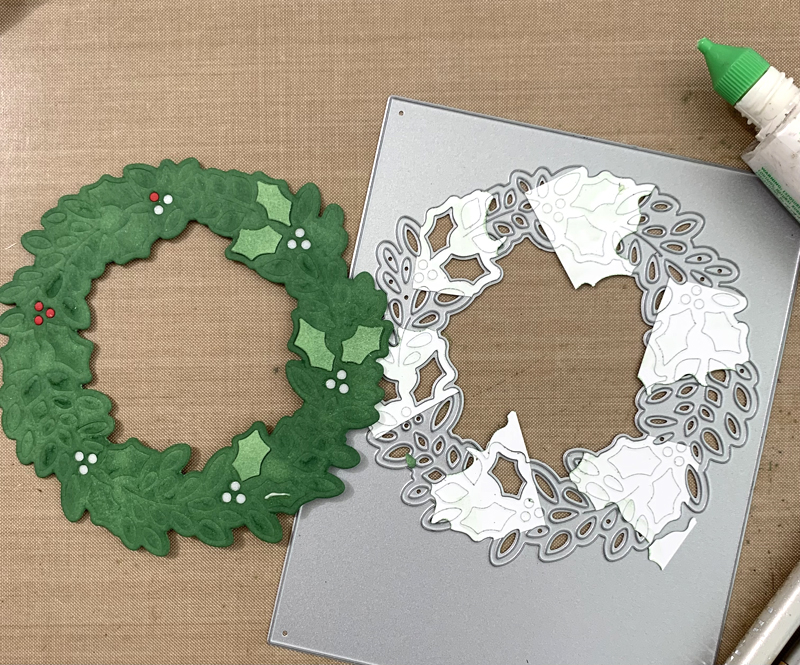
Now, using Layer A (the plate with all the detail), lay the plain wreath you die cut with Layer C into layer A die, right side into the die.
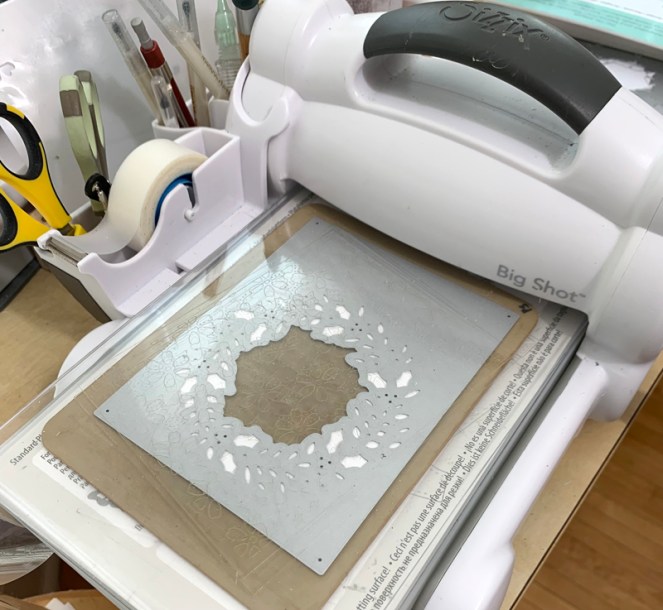
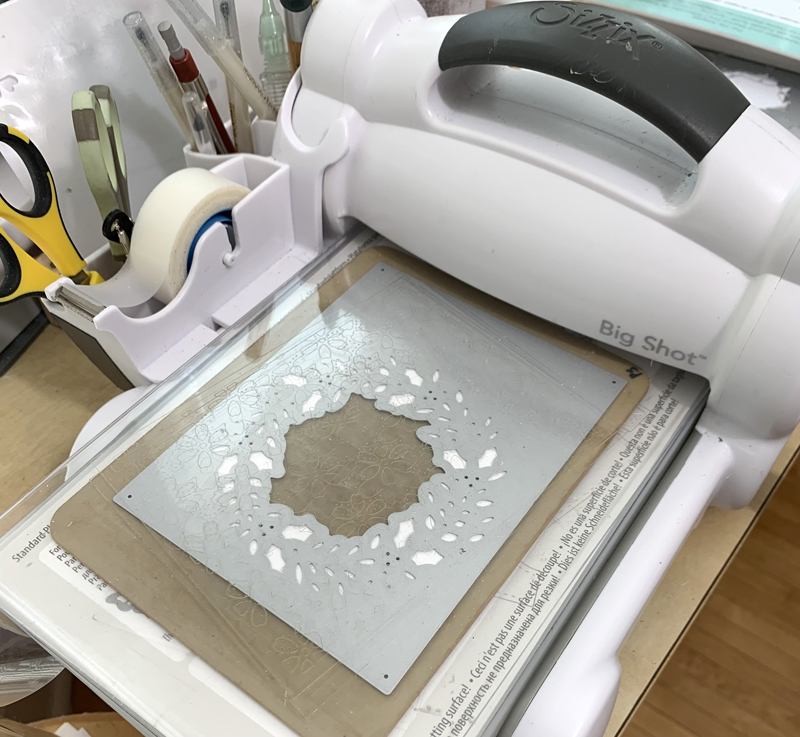
Next we are going to emboss the plain wreath die cut by running it through the die cut machine. From the bottom up you’ll need the standard platform, clear cutting plate, tan (squishy) mat, die cut in the die with cutting blades facing into the mat and on top a clear cutting plate.

(If you have the older multi purpose platform, use it like you would a regular embossing folder. Fold the top layer back.)
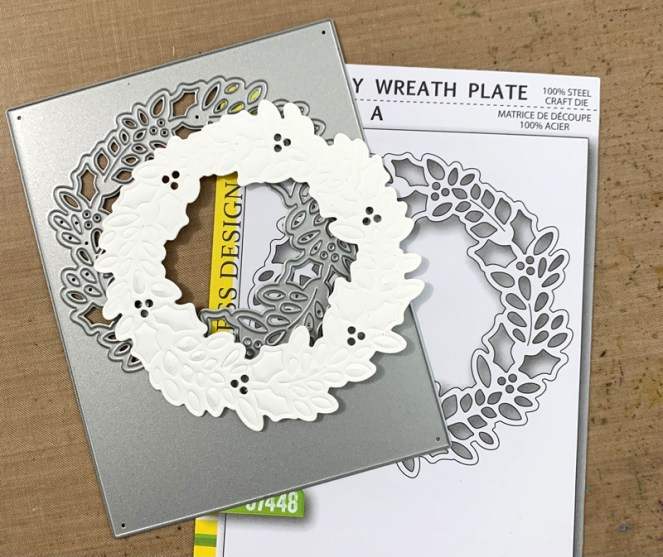
Look how cool this is… it’s embossed!
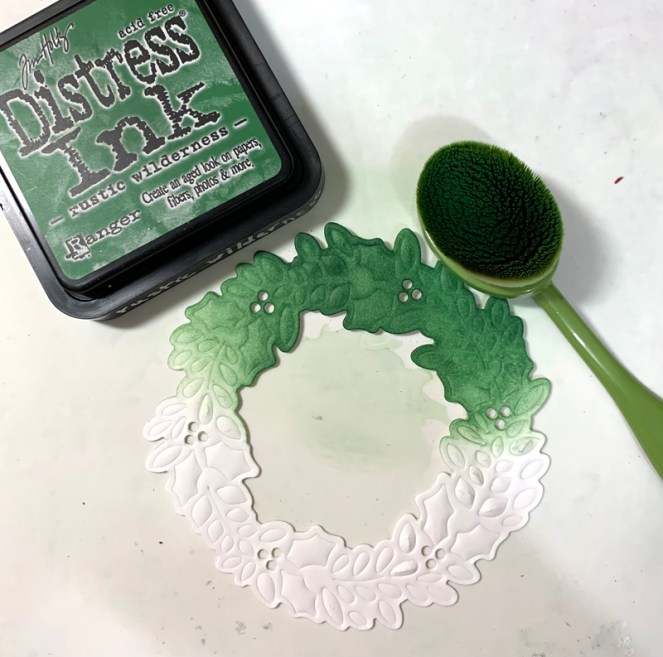
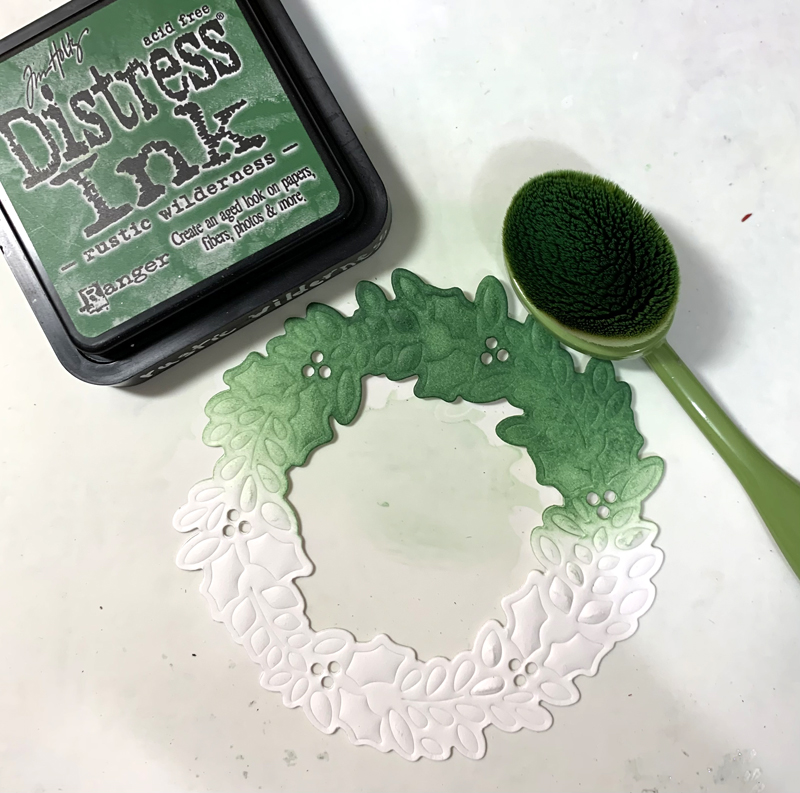
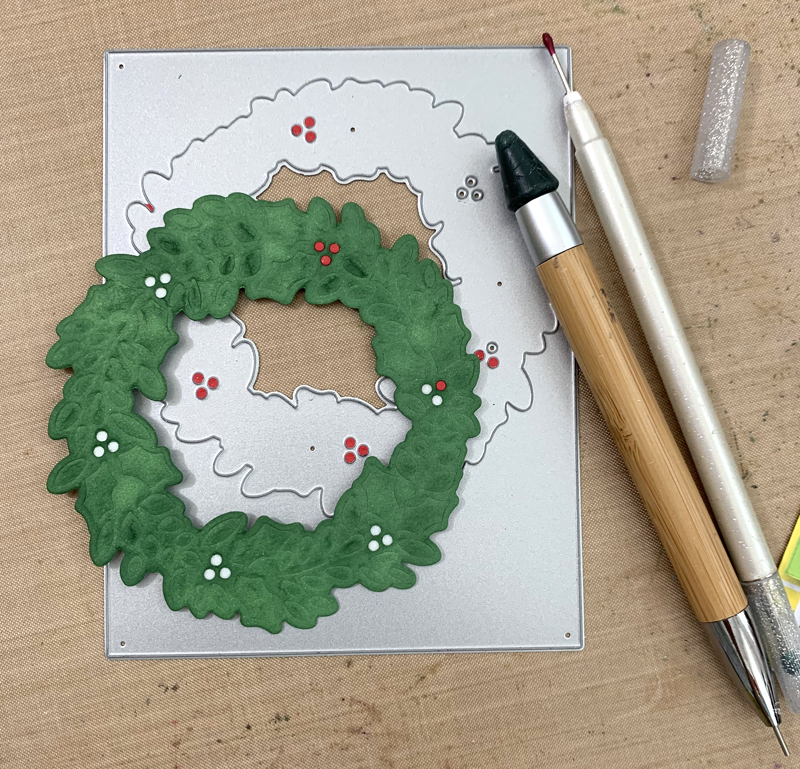
Now we’re going to ink the wreath with Distress ink.  In my picture I grabbed regular Distress ink but when I was making my card, I used Distress Oxide Rustic Wilderness.  ugh.  My regular are out in plain view and my oxide are in a drawer now. Change is hard! lol  I used my oxide brush with regular ink.  There go my eyes rolling at myself again!
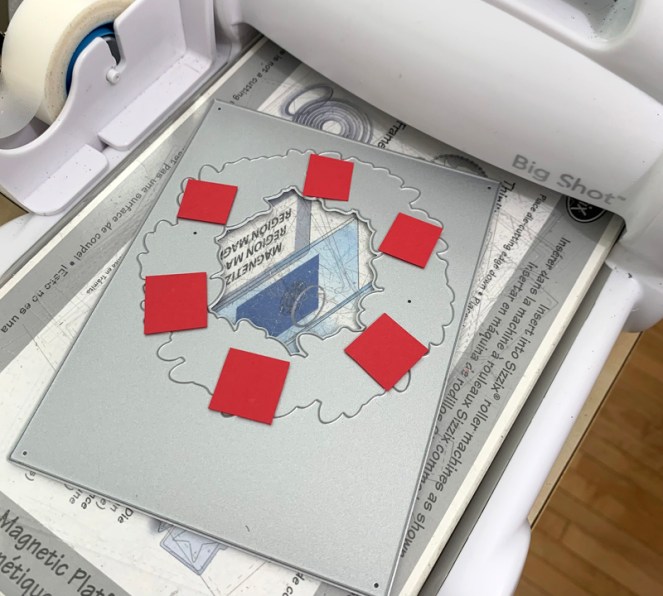
Back to layer C – die cut scraps of red cardstock for the berries.
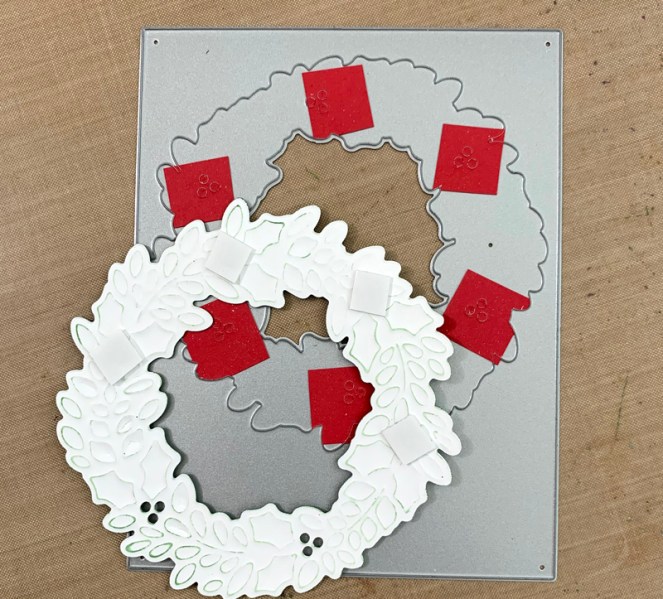
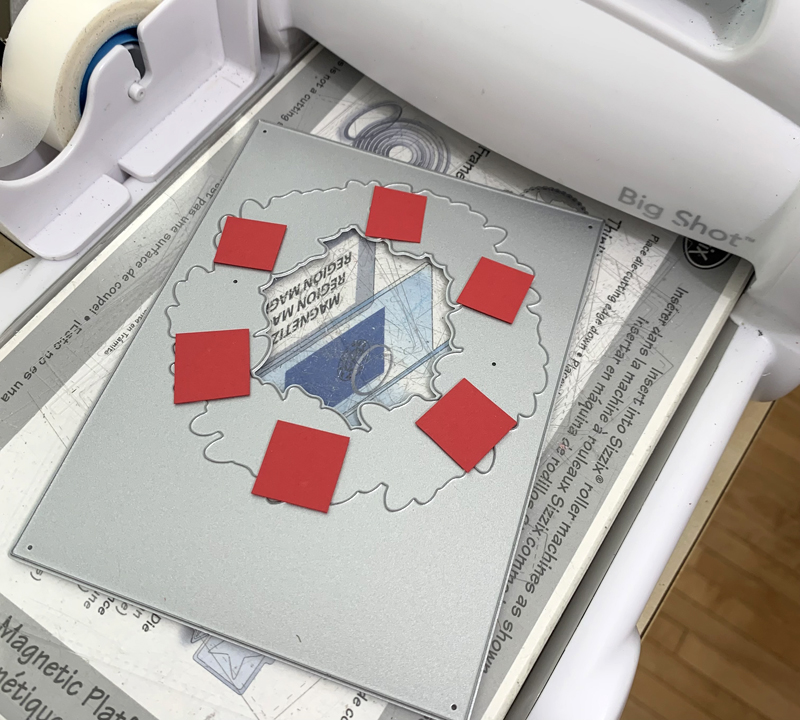
Here you see the back of the inked, embossed wreath…I placed pieces of thin mounting tape over the berry holes.  Link below… I love this mounting tape!
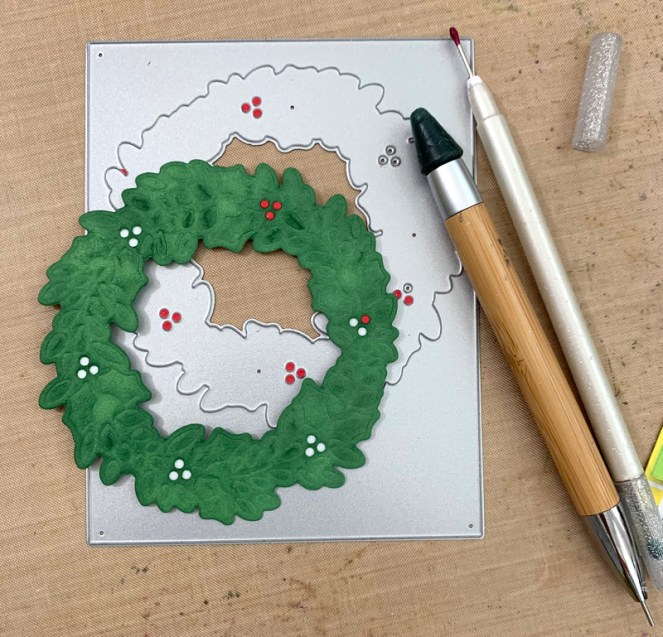
Then turn the wreath over and using a pickup tool of your choice add the berries to the holes and they will stick in place!  Easy!
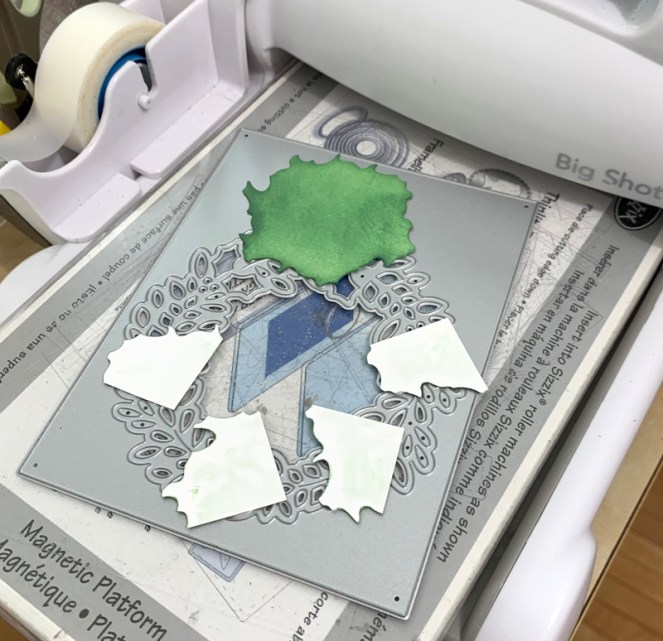
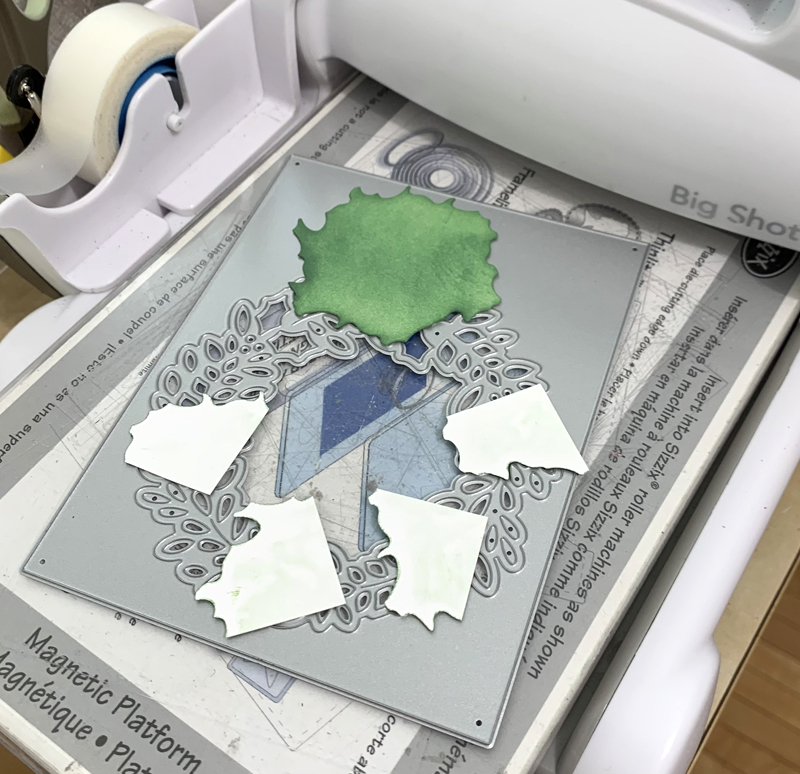
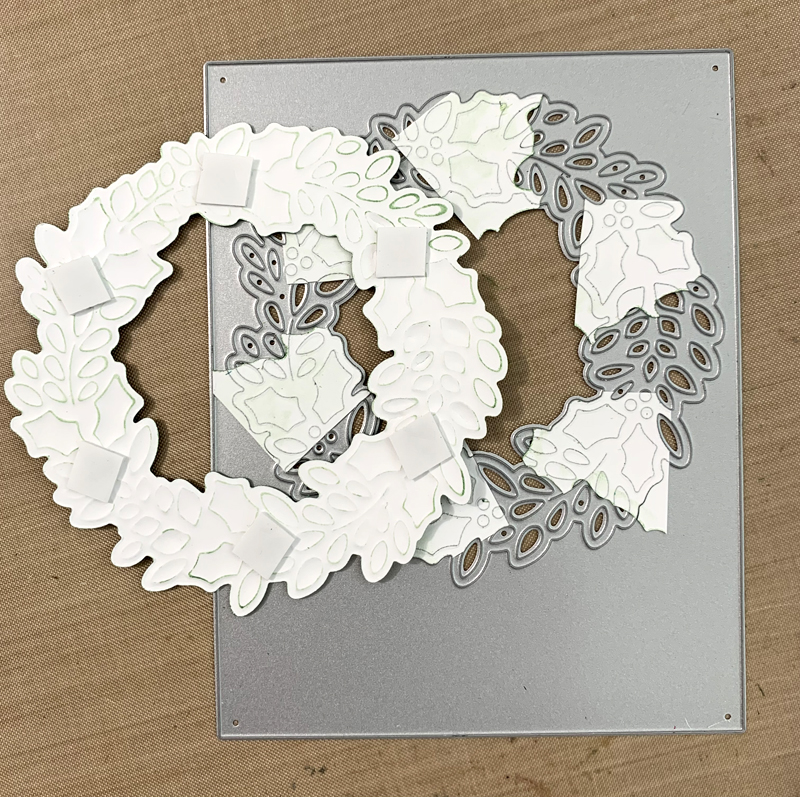
Ink scraps of white cardstock with Rustic Wilderness Distress ink, cut into pieces to lay over the holly leaves on layer A and run it through the machine.
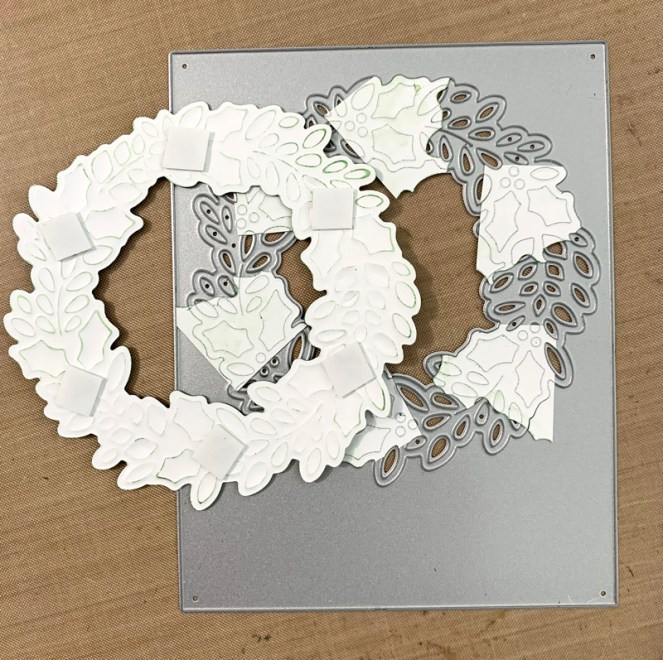
Turn wreath back over and line it up to layer A to match up your Holly. Then turn it right side up and glue on the Holly.
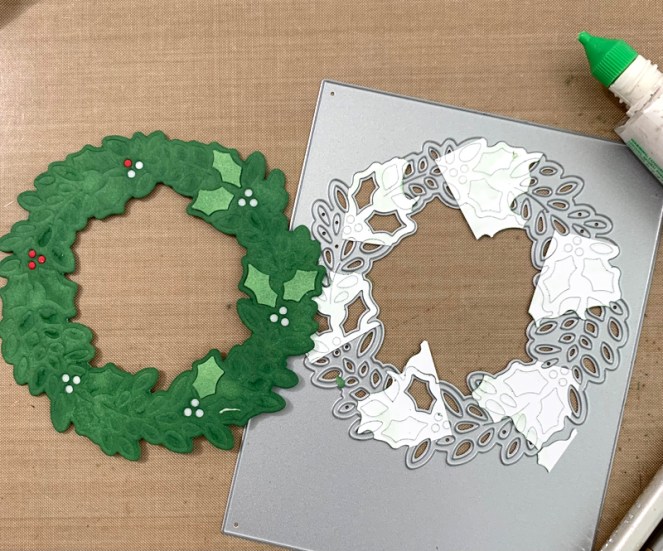
Remember it’s opposite…
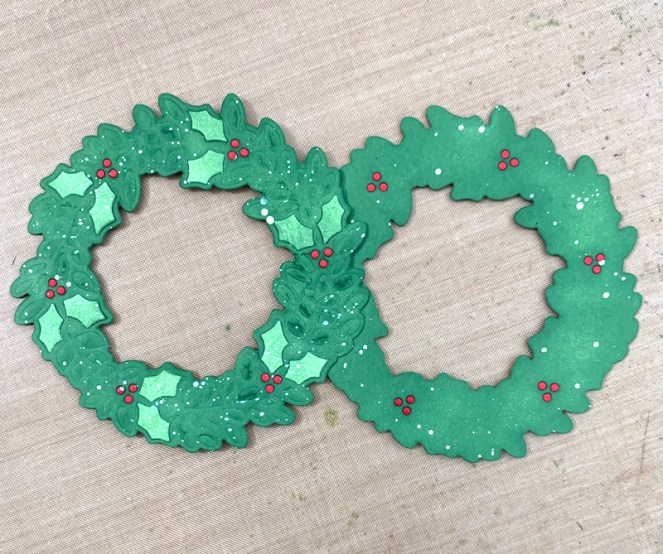
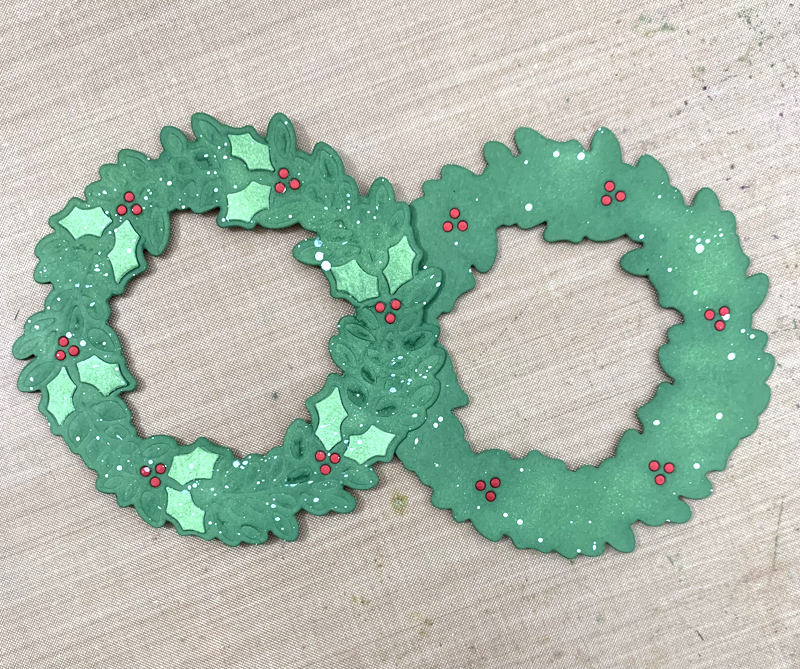
No earthly idea why in this picture the green is a funky color! lol

I wanted to show that the wreath is super fun just inking the solid wreath without embossing too.  At the last minute I thought to splatter it with some white spray ink.  I didn’t go back and splatter my card though.

So I’m showing three variations using these dies differently than they were intended!  Let’s make Christmas cardmaking fun! lol

Holler if you have any questions.  I have some old videos showing how to do embossing with dies too.

Linking to some challenges…

ABC Christmas Challenge – N is for NEW,  O is for OLD (mine is new)

Addicted to Stamps and More – any occasion

Crafty Gals Corner – Christmas in July #233

Simon Says Stamp Wednesday Challenge – Anything Goes

Thank you for stopping by!

Here’s what I used to make this card…

Birch Press Design – 57478…
[ STR | SSS ]
Birch Press Design – 57450 Holly…
[ STR | SSS ]
Birch Press Design – CL8162 Kind…
[ STR | SSS ]
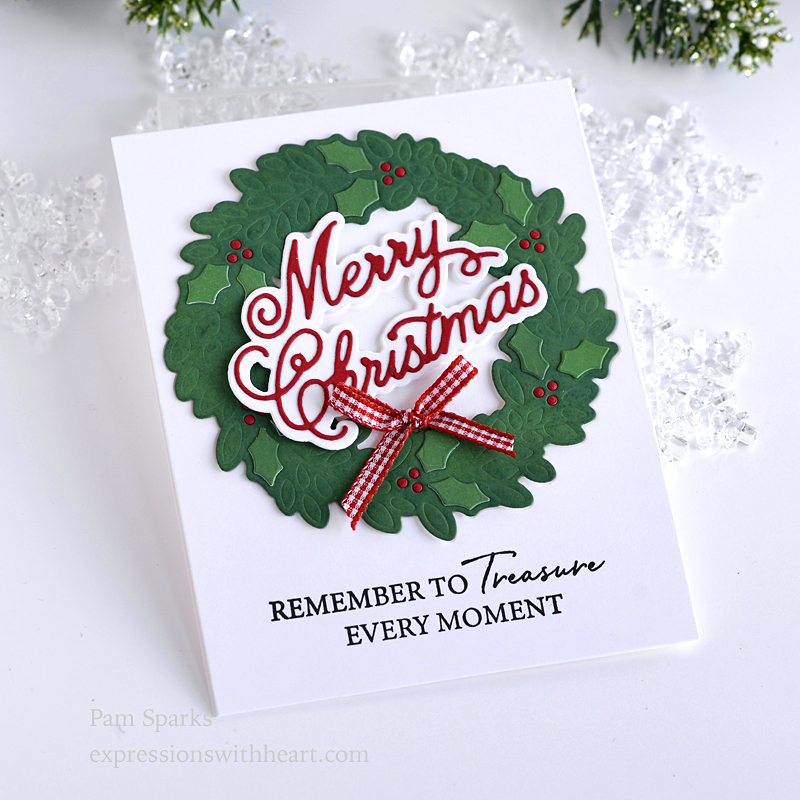
Tombow Mono Multi Liquid Glue
[ STR | SBC | SSS ]
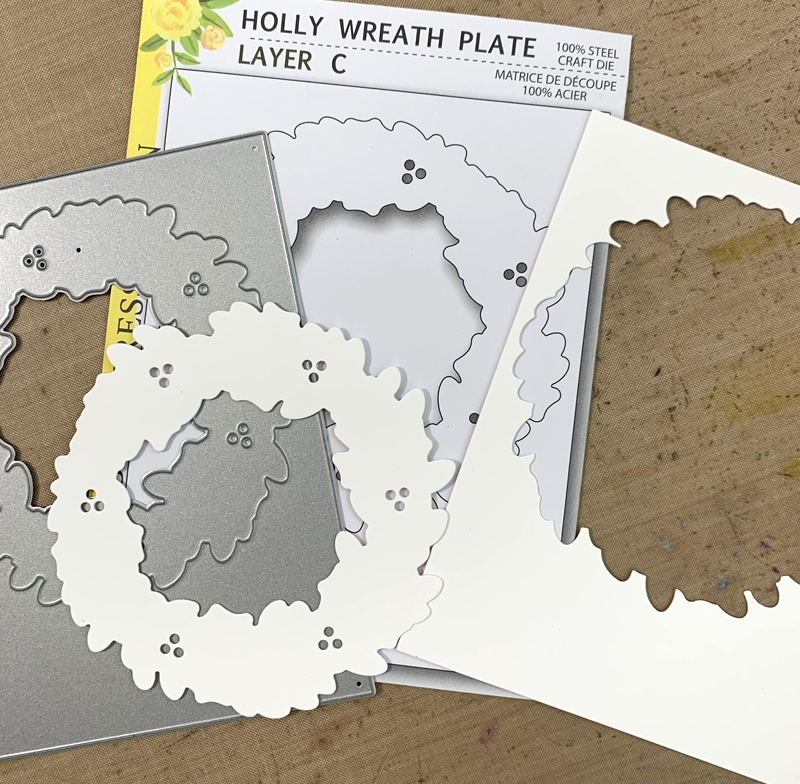
W 023 Spellbinders WIZARD TAN…
[ SSS ]
Sizzix MULTIPURPOSE PLATFORM STANDARD…
[ SSS ]
Sizzix – White and Gray – Big Shot…
[ SBC ]
Sizzix – Big Shot Accessory – Tool…
[ SBC ]
Sizzix Cutting Pads – standard
[ STR | SBC ]
Ranger Ink – Tim Holtz – Distress…
[ SBC | SSS ]
Ranger Ink – Tim Holtz – Distress Ink…
[ SBC | SSS ]
TE Blender Brushes
[ TE ]
Ranger Ink Jet Black Archival Ink Pad
[ SBC | SSS ]
Gingham Red 3/8″
[ RSN ]
Scrapbook Adhesives Crafty Foam Tape…
[ STR ]

All Occasion · cards · CAS · copics · Die Piecing · Distress Ink coloring · Oxide Inks · Shopping · Simon Says Stamp · Summer

Time for a NEW release from Simon Says Stamp…. Dream Big!

Hi everyone!  Bringing you everything ‘dreamy’ with this release in Summery July!  Check it all out HERE

I received the Tropical Leaf Bunch die to play with.  It’s from Simon Says Stamp but designed by Memory Box!  I love it when I get the designs by MB!

You deserve a break but I don’t mean at Mc Donalds! lol   I’m not a beach person but I’ve probably not been at the right beach to appreciate it! 

Here I kept it very CAS (clean and simple). 

I die cut a rectangle out of copy paper so I could ink blend an area centerish on the front of my A2 size cardbase.

I blended oxide inks with my blue and brown brushes without putting on more ink because I wanted it very light.

Then I did some splattering with Prize Ribbon and Ground Espresso Distress inks and then a little white acrylic after the ink splatters were dry.

I die cut three of the Tropical Leaf Bunch, glued them together and then directly to the cardbase.

The beach chair is from last months SSS release.  I stamped it and fussy cut it by hand, colored it with Copics and glued it directly to the cardbase. Details about this set in my post HERE

Then I stamped the sentiment from the beach stamp set and added Memory Box Fairy Jewels from the Pastel set. 

Thanks so much for stopping by my blog today!  Hope you enjoy the new release and here’s the 

code for $5 off through 8/15…  5BUCKS

Have a great weekend!  Do any of you have an ebike?  We’re going to go looking at them this afternoon.

ttul,

p.s. links to the new products are in bold and the SSS picture in my post!  Thank you for looking/shopping through my links!  I appreciate it!

cards · Christmas · Die Piecing · Distress Ink coloring · Mini Slim Card · Spellbinders dies · Winter

Winter Garden Release Letterbox Card…

Special Delivery!  All the fun things of the season right there!  Snail mail, snowflakes, jingle bells and snow!

I went with a Mini Slimline Card for this one.  I used Spellbinders Precision Layering Mini Slimline A and B sets to cut my layers.  I really like these dies because they are heavier and hold the rectangle shape better than the thin silver ones do. I don’t like it when I die cut layers and they’re wonky!

I tore a piece of white cardstock for the mailbox to stand in (snowdrift) and die cut it with the same layer die as the blue background size.  I used Prize Ribbon Regular Distress Ink to ink up the background this time.  I spattered on some water droplets.  I like to spray water into the palm of my left hand, then I rub both my hands together so they’re both wet, then I clap over the inked background to spatter the water drops. I let it sit a minute, then lay a paper towel over it to get the extra water.

Then I spattered on some diluted white acrylic paint.

I die cut the mailbox post from woodgrain cardstock and the mailbox from silver mirror cardstock.

I die cut the sentiment from gold glitter cardstock and white cardstock, then glued the gold on top of the white.

The jingles bells and ‘garland’ are from the NEW More Holiday Decor die set.  I love how cute the little bow is on the super cute jingle bells I die cut in silver mirror cardstock also.

I love that there’s just enough dimension to add perspective.  It’ll still mail in an envelope for one stamp.

I used the thin mounting tape, I’ll link below, behind the mailbox post and box on this card and yesterdays.

Finished size is 3 ½ in. x 6 ½ in.   So happy to have a start on Christmas cards!  I can’t believe we’re half way through July! I need to get more done!

I’ll be back soon….we have to keep making!

Here’s what I used to make this card…

Spellbinders – Winter Garden…
[ SBC | SSS | SPL ]
Spellbinders – Celebrate The Season…
[ SBC | SSS | SPL ]
Spellbinders – Celebrate The Season…
[ SBC | SSS | SPL ]
Kaleidoscope Snowflake | Small Die of…
[ SPL ]
Spellbinders – Precision Layering…
[ SBC | SSS | SPL ]
Spellbinders – Precision Layering…
[ SBC | SSS | SPL ]
Hammermill WHITE 100 LB SMOOTH…
[ SSS ]
Ranger Ink – Tim Holtz – Distress Ink…
[ SBC | SSS ]
Ranger 4oz Distress Sprayer by Tim Holtz
[ STR | SBC | SSS ]
American Crafts Glitter Cardstock – Gold
[ STR ]
Bazzill Foil Cardstock – Silver 12×12
[ STR ]
Platinum 6 Die Cutting and Embossing…
[ SPL | SSS ]
Scrapbook Adhesives Crafty Foam Tape…
[ STR ]
Scor-Tape; Scor Tape
[ STR ]
Tombow Mono Multi Liquid Glue
[ STR | SBC | SSS ]

All Occasion · cards · Die Piecing · Distress Ink coloring · Embossing Folders · Masculine · Memory Box · Oxide Inks · Summer · Thinking of You

Sending You Some Vitamin Sea!

Hi everyone! Check out the latest release from Memory Box, ‘June Island Vacation’!  I had fun playing with these products!

I embossed the fish with the NEW Ocean Fish 3D Embossing Folder, then I used the NEW coordinating Ocean Fish stencil set to color the fish!  It worked great!

I have no idea what colors these fish should be! lol  I used my mug of dye ink blender brushes!  I didn’t add any ink, I just used the ink that was in the brushes and used the green, blue and bluegreen brushes over yellow.  Orange and red together on the other!

The Ocean Fish Folder comes with matching dies, so I die cut the fish after coloring.

For the background piece, I used the Memory Box Underwater 3d embossing folder on white cardstock, then used my Distress Oxide blender brushes to add color.  Again, just the color that was in the brushes.  I guess I was too lazy to get out the ink pads!  Funny girl yesterday! lol

I used mounting tape to mount the fish to the background piece and added some clear Fairy Drops.

The sentiment is heat embossed from the Deep Blue Ocean clear stamp set released last year.  Awesome sentiments and images in this set.  Dies to match too!

I saw Memory Box Dave’s card on the Memory Box website using the Kelp Collage die, also from last year so I used it too!

The last thing I did was add some clear glitter pen to the fish.  I love how it makes it look like shimmery fish!

This will be a fun card to send to someone feeling under the weather.  I love vitamin C anyway… it’s a staple around this house! lol

Linking to some challenges…

Simon Says Stamp Wednesday Challenge – Make your own background

Shopping Our Stash Challenge – Blending In

Double D Challenges – Creatures In/Under the Sea

Thank you so much for stopping by!  I hope you enjoyed my card and it made you smile.

ttul!

Here’s what I used to make this card…

Memory Box OCEAN FISH 3D Embossing…
[ SSS | STR ]
Memory Box – 88623 Ocean Fish Stencil
[ STR | SSS ]
Memory Box – 94561 Kelp Collage craft…
[ STR | SSS ]
Memory Box – EF1012 Underwater 3D…
[ STR | SSS ]
Memory Box – CL5268D Deep Blue Ocean…
[ STR | SSS ]
Memory Box Clear Stamps DEEP BLUE…
[ SSS ]
Memory Box – Fairy Drops – clear…
[ STR | SSS ]
Gina K Designs SET OF 10 BLENDING…
[ SSS ]
Simon Says Stamp Blending Brush SET…
[ SSS ]
Spectrum Noir CLEAR OVERLAY Sparkle…
[ SSS ]