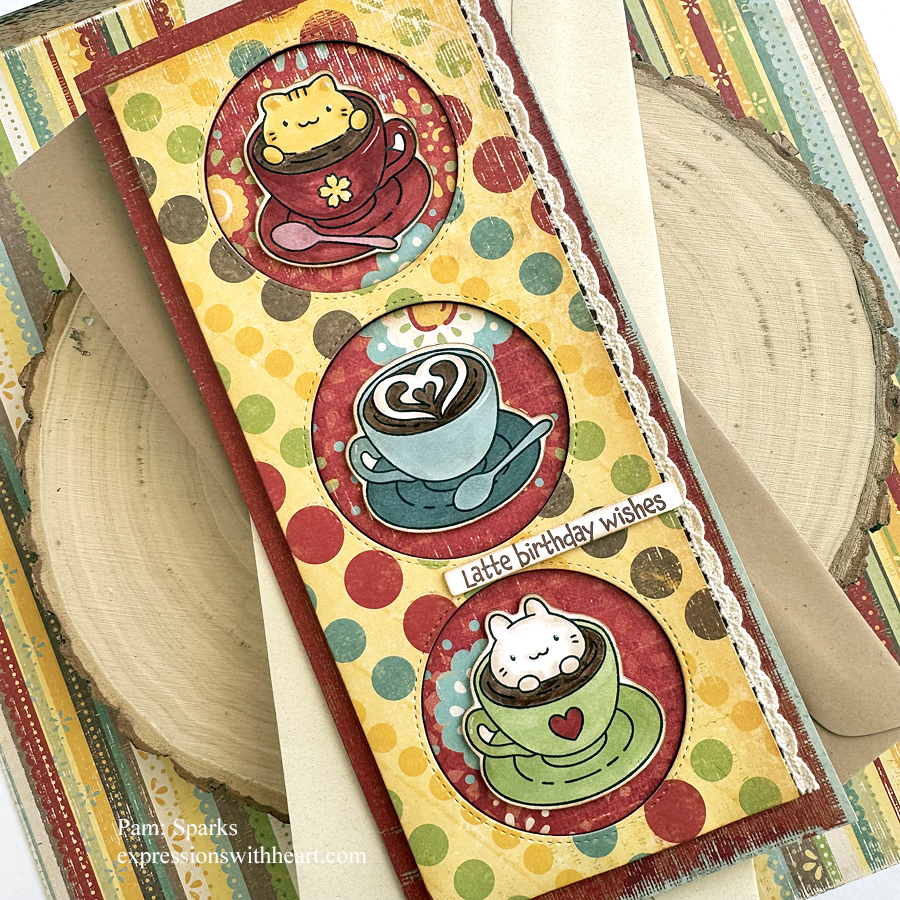
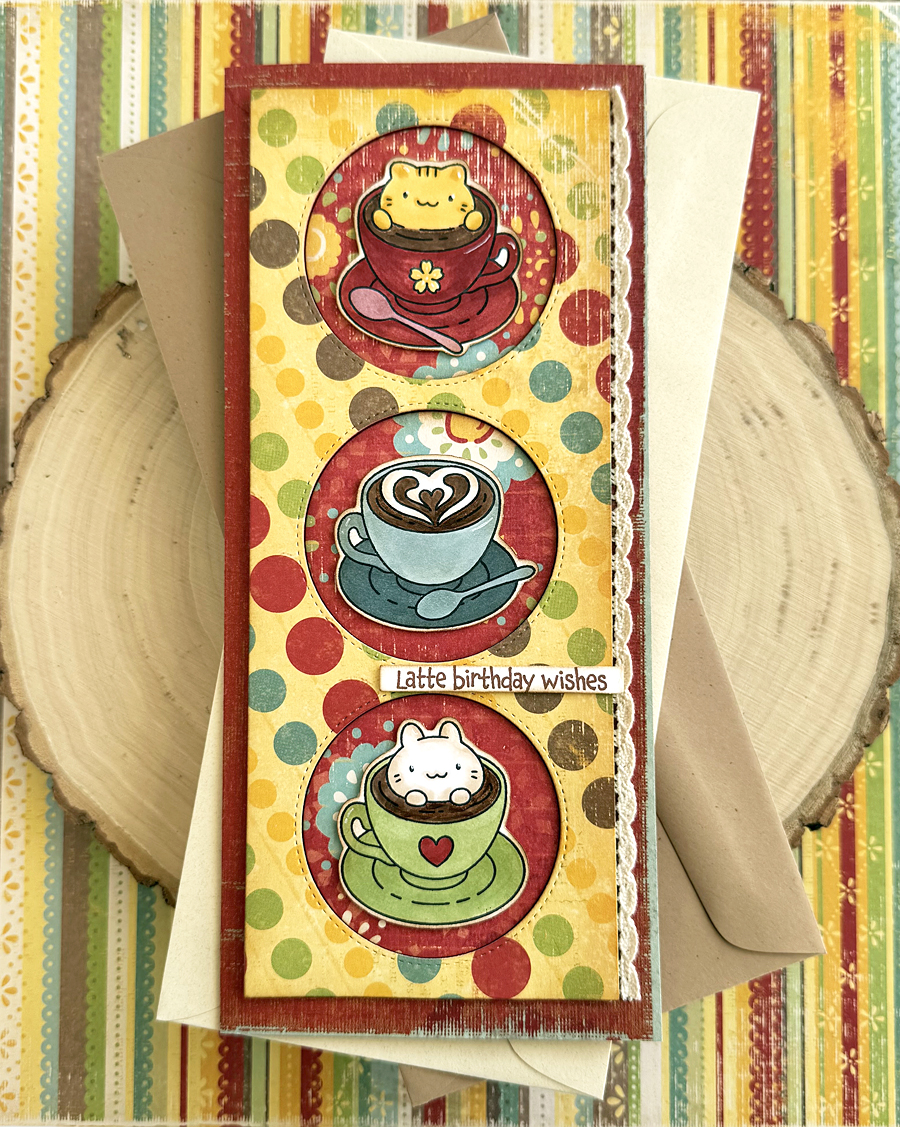
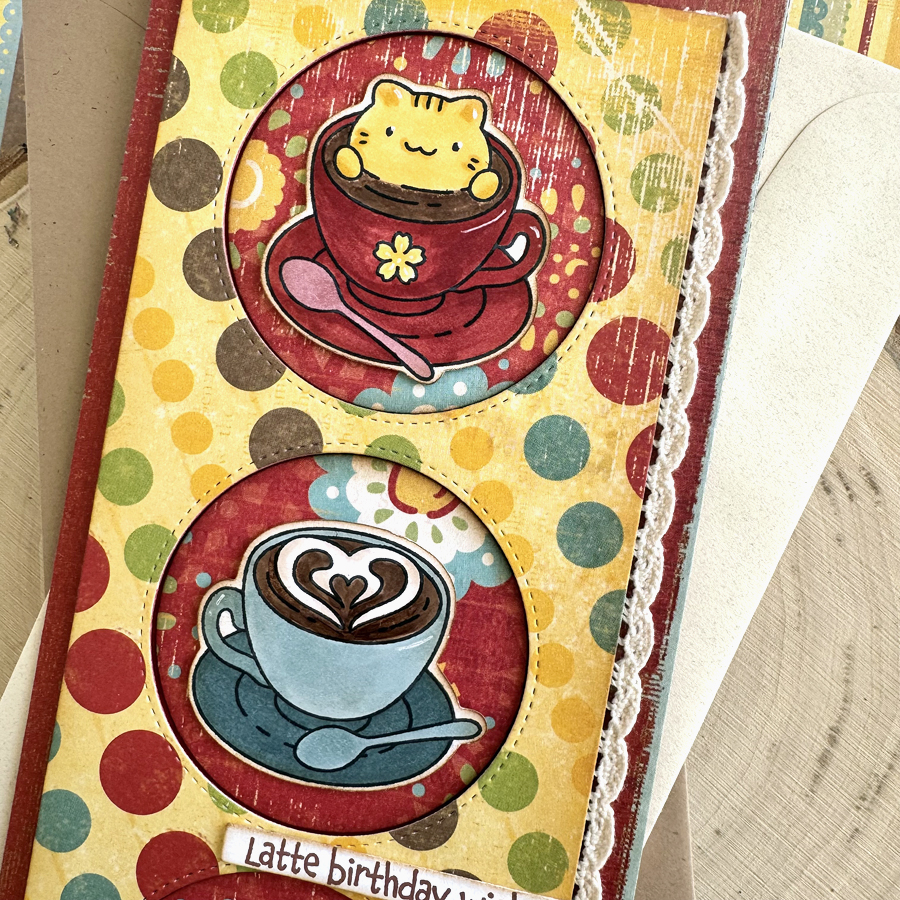
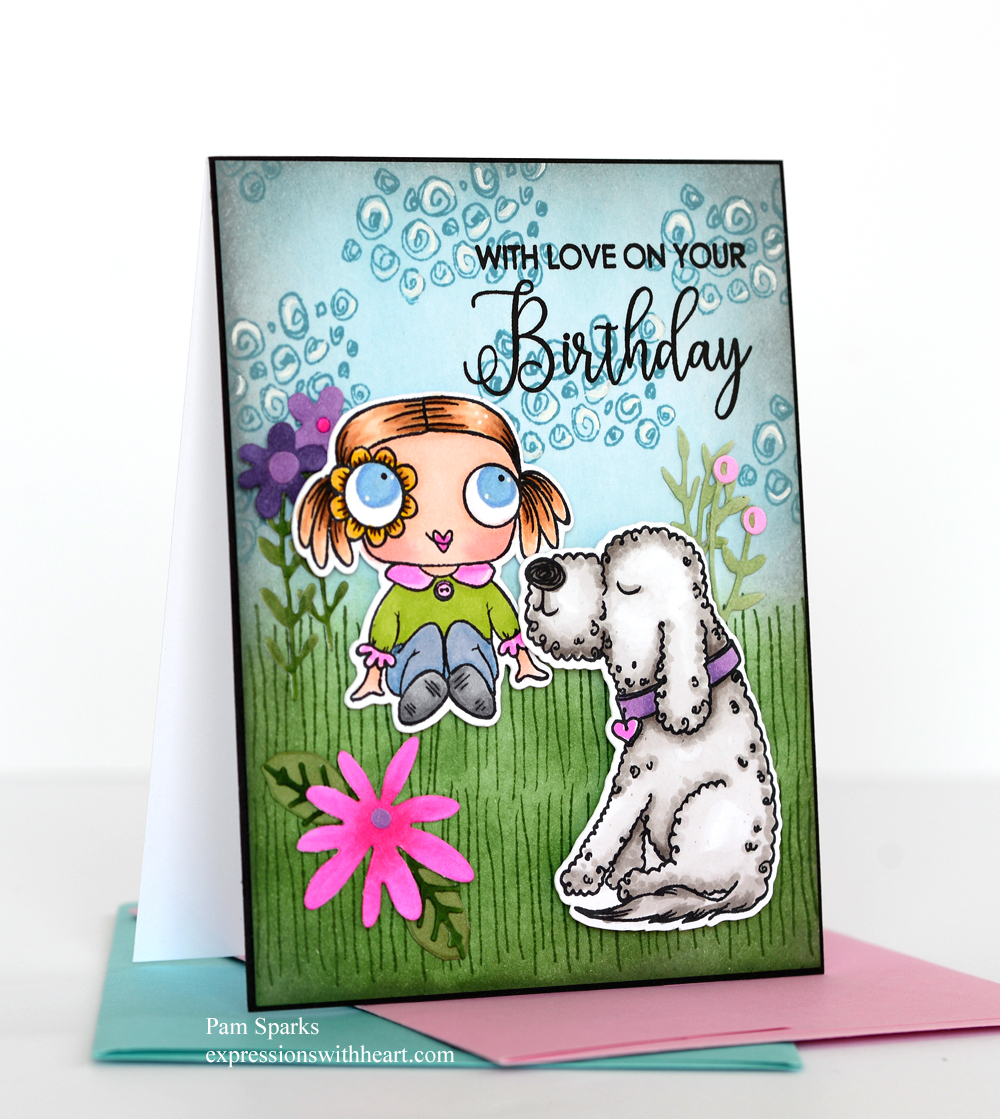
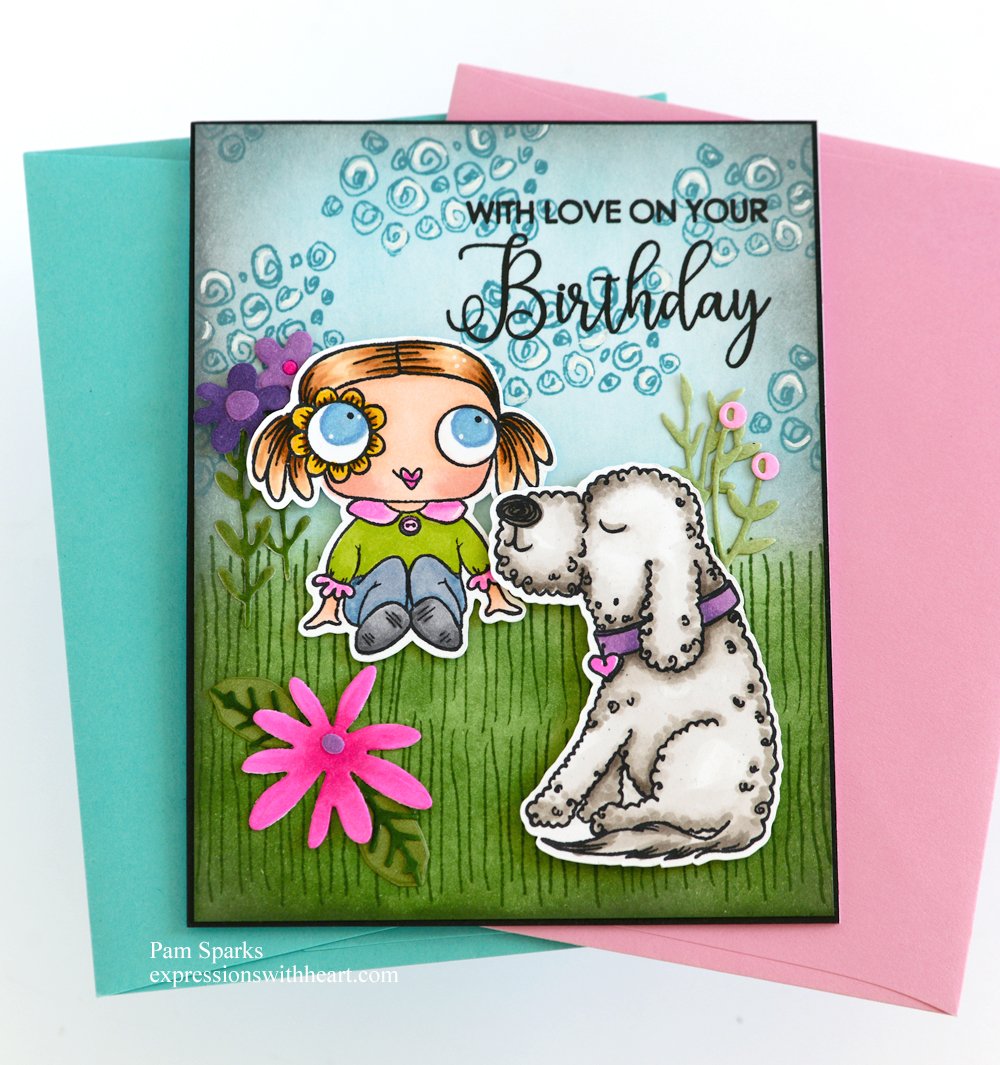
All Occasion · Birthday · cards · copics · Die Piecing · Distress Ink coloring · Flowers · Get Well · Memory Box · Mini Slim Card · Oxide Inks · Poppystamps · Spring · Thank You · Thinking of You

Memory Box Magnolia Leaf Brand, Magnolia Bud Trio and Backyard Wren Mini Slimline Card…

This card says hello for me!  I had fun looking through the new paper pads and playing ‘matchy’! hahahaha  Almost felt like I was quilting again!

This release is stretching me!  I rarely use purple but not this time!  Purple it is!

This is such a sweet bird die… NEW….Backyard Wren.  So sweet and Memory Box just put a post up on Instagram showing it in all different colors!  So I decided I could use purple!  Why not!

I took pictures with a white background too but they look so washed out, I’m not posting them!  Crazy what a difference!

Cards always look better IRL even with all the awesome technology we have these days!

I die cut the Magnolia Leaf Branch, Magnolia Bud Trio and Backyard Wren in white Hammermill cardstock. I colored the branch and buds with Copic Sketch Markers and the wren with my distress oxide ink blending brushes.  I didn’t ink them just used the ink that was in them already.

I like coloring dies and cutting from colored cardstock.  I was thinking of the branch this time and knew I’d want the branch brown and leaves green.  It’d be really easy to do colored cardstock also…next time!

I used a new poppystamps die for the sentiment, Hello Moonlight Script.  What a fun name! What a beautiful font!  The white cardstock is Hammermill and the black is Memory Box Glossy Black. I love that cardstock so much.  I’m on my last sheet from the ten pack!

The pattern paper is the NEW 6×6 pads from Memory Box!   I’ll link them below with everything else.

Linking to some challenges!

Papercraft Challenges – Spring

Word Art Wednesday Challenge – anything goes

Thanks so much for stopping by!  I hope you enjoyed this sweet wren card!

To see the products  I used and shop, click/tap the abbreviations below the item…

Memory Box – 94723 Backyard Wren…
[ STR | SSS ]
Memory Box – 94721 Magnolia Leaf…
[ STR | SSS ]
Memory Box – 94718 Magnolia Bud Trio…
[ STR | SSS ]
Poppystamps – 2509 Hello Moonlight…
[ STR | SSS ]
Memory Box – PP1021 Magnolia Plaid…
[ STR | SSS ]
Memory Box – PP1022 Magnolia Grove…
[ STR | SSS ]
Memory Box BLACK GLOSSY 8.5×11 Paper…
[ SSS | STR ]
Hammermill WHITE 100 LB SMOOTH…
[ SSS ]
Copic
[ SSS | BLIC ]
Scrapbook Adhesives Crafty Foam Tape…
[ STR ]
Kuretake ZIG Memory System Squeeze…
[ SBC | STR | SSS ]
Sizzix – White and Gray – Big Shot…
[ SBC ]

All Occasion · Birthday · cards · copics · Die Piecing · Flowers · Shopping · Spellbinders dies · Spring · Thinking of You

Spellbinders April Stamp and Die of the Month Club and Small Die of the Month Club Cards…

Hi everyone!  Getting my floral on with the NEW Spellbinders clubs this week!

Two cards to show you using the NEW club kits coming real soon!

For the first card I used the Stamp and Die Club of the month and for the background I used the Small Die of the month set. So pretty!

My second card I used two floral sections of the Stamp from the stamp and die club to create a wreath!  So fun!

Here’s a couple pictures that hopefully will help you see…

then the dies for the stamp set…

Fun to make so many different looks with this set and a great variety of sentiments with dies for them too!

If you look real close you can see I die cut the top right double flower and the bottom left flower and pieced them back in for this card. Those are also the pieces I used to make the wreath… five of each.

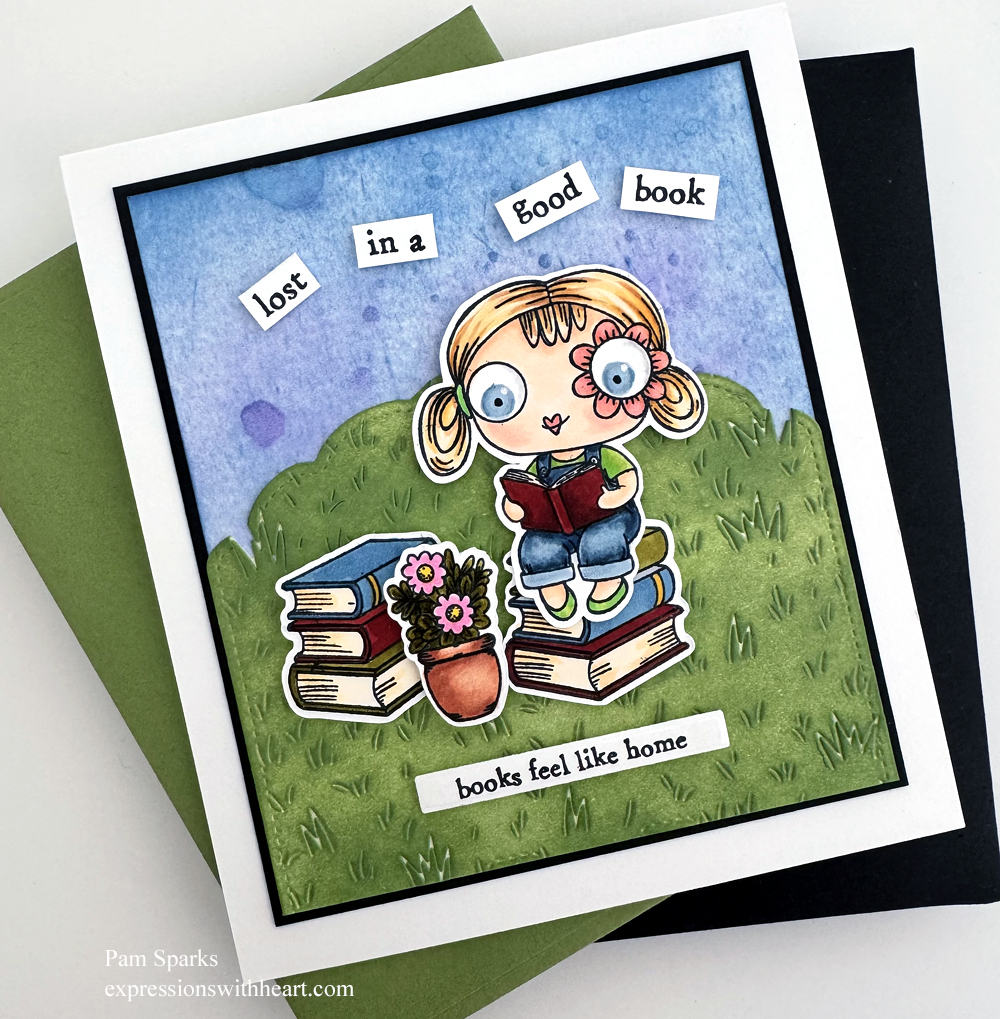
I stamped with Memento Tuxedo Black ink and colored with Copic Sketch Markers.

This card is A2 size…

My wreath card is 5 ¼ in. square card…

I stamped with Memento Tuxedo black and colored with Copic Sketch again for this one.  I stamp and die cut before I color.

I really like that it’s easy to get the margin the same around the whole image when you die cut with these dies.

Lots of pictures today! Crazy how some days are better for taking pictures.  Here we are at a season change again which means adjustments!

Here’s where you can find out about the monthly kits from Spellbinders Paper Arts…so many great stamps and dies! The kits go ‘live’ on the 6th!  (that’s the day you can start signing up for them)

A BOGO SALE going on also!!!  Check it out HERE!  All kinds of wonderful included!

Have fun looking around and holler if you have any questions.  Thanks so much for stopping by!

Here’s what I used to make these two cards…

Clear Stamp & Die of the Month Club –…
[ SPL ]
Small Die of the Month Membership –…
[ SPL ]
Cheerful Occasions Paper Pad |…
[ SPL ]
Black Cardstock 8 1/2″ x 11 – 25 pack…
[ SPL ]
White Cardstock 8 1/2″ x 11 – 25 pack…
[ SPL ]
White Foam Squares Mix 1MM Adhesive |…
[ SPL ]

All Occasion · cards · copics · Die Piecing · Distress Ink coloring · Flowers · Memory Box · Oxide Inks · Poppystamps · Spring · Thank You

Memory Box Floral Bud and Stems Thanks Card…

Hi everyone!  It feels like Spring here!  A beautiful sunshiny day in Iowa!

My card today is using NEW dies from Memory Box and NEW Stencil set and die from poppystamps.

I started by inking the stencil set with three colors of Distress Oxide ink.  Shabby Shutters for the largest square hole stencil,  Peeled Paint for the next size and Forest Moss for the smallest. (it’s greener in real life)

Then I die cut the NEW Pointy Lattice Plate from poppystamps in white cardstock to glue over the top of the stenciled panel.

I die cut the NEW Memory Box Floral Bud and Stems die three times and colored with Copics.  I remember the greens I used were YG61, 63, 67.

I die cut the NEW Memory Box Woodgrain Fence Pickets from watercolor paper and smooshed them a couple times in Gathered Twigs Distress ink refill and a couple spritzes of water. Then I decided to make them look more weathered and rubbed a white pigment ink pad over them.  I still wasn’t that thrilled so I added some brown color pencil!  How crazy!  Next time I think I’ll die cut them in brown cardstock! hahahahahaha They do look weathered though!

I was following the sketch from the Freshly Made Sketches Challenge blog for my card but I’m too late getting it posted to link up.  There was another panel in the sketch so I die cut the NEW Curved Cap Pinpoint Layers die in vellum.  I think you can see it behind the flowers and pickets.

I used a piece of wide scor-tape to hold the front pickets together… that worked really slick.  Then I wrapped twine/jute cord around the front panel layers before I adhered it to the cardbase.

I die cut the NEW Memory Box Tilted Thanks die from Memory Box Black Glossy Cardstock and two other layers of regular black cardstock and glued them together and glued them to the front of the card.

I don’t have very many pictures because it’s so bright today I ended up taking pictures three times!  Picky camera or is it picky me! ha

I have a question for you though, if you don’t mind replying… When I write a blog post, it’s preset that the font is this gray color.  If I want it black I have to remember to go in and change it.   Do you have a preference?  gray or black?

Thank you for stopping by! I hope to be back with a couple more flower cards!

Here’s what I used to make this card…

Memory Box – 94647 Floral Bud and…
[ STR | SSS ]
Memory Box – 94470 Tilted Thanks…
[ STR | SSS ]
Memory Box – 94646 Curved Cap…
[ STR | SSS ]
Memory Box – 94703 Woodgrain Fence…
[ STR | SSS ]
Poppystamps – 2558 Pointy Lattice…
[ STR | SSS ]
Poppystamps – T104 Deco Diamond…
[ STR | SSS ]
Linen Thread – 40 yds – by the spool
[ STR | TE ]
Hammermill WHITE 100 LB SMOOTH…
[ SSS ]
Memory Box – WP101 Watercolor Paper
[ STR ]
Scor-Tape; Scor Tape
[ STR | SSS ]
double-sided tape holder – holds…
[ STR ]

cards · copics · Shopping · Simon Says Stamp · Spring

Simon Says Stamp NEW Just For You Release!

Hi everyone!  A fun Copic colored card to share with you today.  Simon Says Stamp sent me this adorable stamp set, Magical Spring, for me to create with!  You can tell I had fun with it and using bright colors!

A delightful release with lots of Spring and Easter offerings!

I started out by stamping the cute images with Memento Tuxedo Black ink on Hammermill Color Copy Cardstock.  

I cut them out and colored them using Copic sketch markers and a Sakura white gel pen for accenting.

I cut an A7 cardbase from the same cardstock, masked off the edges and ink blended on a Distress Oxide background in Tumbled Glass, Twisted Citron and Mowed Lawn.  I spattered on some white ink and regular distress ink color.

I stamped two sentiments from the set in the MISTI directly on the front of the card using Ranger Archival Black ink.

I adhered the images using foam tape and liquid glue.

Thank you for stopping by!  Be sure to check out the new release HERE

I’m not part of the hop but I didn’t want you to miss this code if you click from here to shop… 

Simon Says Stamp has a big event coming up… here’s the info about it!


All Occasion · Birthday · cards · copics · Die Piecing · Interactive · Lawn Fawn · Pop up card · Snowman · Winter

Lawn Fawn Snowball Fight Platform Pop-Up Interactive Card…

Hi everyone! I have an end of Winter card to share today!  Maybe an end to Winter… haha!

I made this for our youngest grandson’s 8th birthday…he loves the outdoors!

Linking to Lawn Fawnatics Challenge 144 – All Things Birthday

I started by making the platform pop-up. I LOVE Lawn Fawn’s interactive die sets!  They are so meticulously made AND made in the USA!  I have used this set so many times since I purchased it…best purchase ever!  It’s even easy to walk the kids through making it!

It always takes me a little time deciding what to use.  I made a set using Doodlebug Design stickers after seeing one of their design team members cards… So so cute!

Kelly from Lawn Fawn always makes excellent videos for walking you through construction too!  I was totally inspired by the LF team in creating this card.  The how to put the Platform Pop-up together video is HERE.

I stamped with Tuxedo Black Memento ink and colored with sketch copic markers.  White gel pen for accenting here and there.

For the snow hills I used the curved borders from the LF Shadow Box Card and Shadow Box Card Theather Add-on.  Trimming them to fit the front and inside.

The sign on the front is from the Berry Special stamp set and die set.

The pattern paper I used is from LF also… I don’t see it in the store anymore though.

I know I’ve shown this before in my other posts but I love how easy it collapses and fits in an A6 or A7 envelope!

You can collapse it either up or down!

The kids love it!  I love it! ❤

I hope you’re inspired to try it!  Thank you so much for stopping by twice this week!  I appreciate it!

Shopping links to the products I used to make this card… click on the abbreviations below the item to take you to a store!  Thank you! No extra cost to you! (I see some are out of stock but I left them in for when they come back in stock)

Platform Pop-Up Lawn Cut – Lawn Fawn
[ ACH | SBC | SSS ]
Platform Pop-Up Add-On Lawn Cuts -…
[ ACH | SBC | SSS ]
Lawn Fawn – Clear Photopolymer Stamps…
[ SBC | SSS | ACH ]
Lawn Fawn – Lawn Cuts – Dies -…
[ SBC | SSS | ACH ]
Lawn Fawn – Lawn Cuts – Dies -…
[ SBC | SSS ]
Copic Sketch Markers and Sets
[ BLIC | SSS | TE ]
Memento TUXEDO BLACK INK PAD Full…
[ SSS | ACH | STR ]
Hammermill WHITE 100 LB SMOOTH…
[ SSS ]
double-sided tape holder – holds…
[ STR ]
Scor-Tape; Scor Tape
[ STR | SSS | ACH ]
Honey Bee Stamps – Birthday Bliss…
[ SBC | SSS ]
Scrapbook Adhesives Crafty Foam Tape…
[ STR ]

Birthday · cards · copics · Die Piecing · Poppystamps · Step card

poppystamps Whittle Panda Pickup Kit Step Card…

Hi everyone! How do birthdays look at your house?  Pretty much Panda-monium around here! lol  Look at this adorable shiny black pickup and friends though! So cute! I think I’m going to have to save this for my husband’s next birthday. 

I started with a 5 ½ in x 11 in piece of cardstock.  Then it’s just a simple cut and some score lines to create the fold.  Email me if you want me to post a how to… I used to make these a lot!

Here it is flat… send in a square envelope or the catalog size envelope that is rectangle.

A close up of the panda on the right step.

I die cut the pandas in white cardstock and colored them with a black copic marker. The details die cut into the images and you can stick a piece of scrap paper to help protect the white areas.  slick!

A Fineliner pen for their eyes. 

Panda on the left will hold something so I put in a heart and he’s holding a balloon. 

I had to cut the pickup out of Memory Box Glossy Black cardstock and silver mirror cardstock for the wheels and bumpers. 

A piece of acetate I hand cut to place behind the window.  

I used the poppystamps Whittle Cloud Border for the clouds.

I used the poppystamps Word Balloons for the sentiment that comes with the Whittle Panda Pickup kit. 

This is all I’ve gotten made this week.  Sometimes I can be so slow!  Well, I was just playing and having fun! lol

I also pieced the pandas from white and black cardstock and that worked great too.  If you do that, use a fine sanding block or the Tombow sander that looks like an eraser to smooth your scissor cut areas.  It works great!

ok – I’ll stop talking now and get busy on my next card!  I was inspired by a flower card in the new Birch Press Design look book!

Have a great rest of the week and see you here again soon!  Thank you so much for stopping by!

Here’s the products I used to make this card…

Poppy Stamps Whittle Panda Pickup Kit…
[ SSS | STR ]
Poppystamps – 2380 Word Balloons…
[ STR | SSS ]
Poppystamps – 2318 Whittle Cloud…
[ STR ]
Memory Box – SH44004 Black Glossy…
[ STR | SSS ]
Hammermill WHITE 100 LB SMOOTH…
[ SSS ]
TE Premium Cardstock
[ TE ]
Bazzill Foil Cardstock – Silver 12×12
[ STR ]
Scrapbook Adhesives Crafty Foam Tape…
[ STR ]
Fiskars Non-Stick Titanium Softgrip…
[ STR ]
Scor-Tape; Scor Tape
[ STR ]
double-sided tape holder – holds…
[ STR ]
Gutermann Extra-Strong Thread – 110…
[ STR ]