cards · Christmas · Class · Classes · Embedded Die Cuts · Memory Box · Perfect Layers Tools · Poppystamps · rubber stamps · Techniques · Winter

Snowy Tree and Class Photos…

PamSparksSnowyTree700


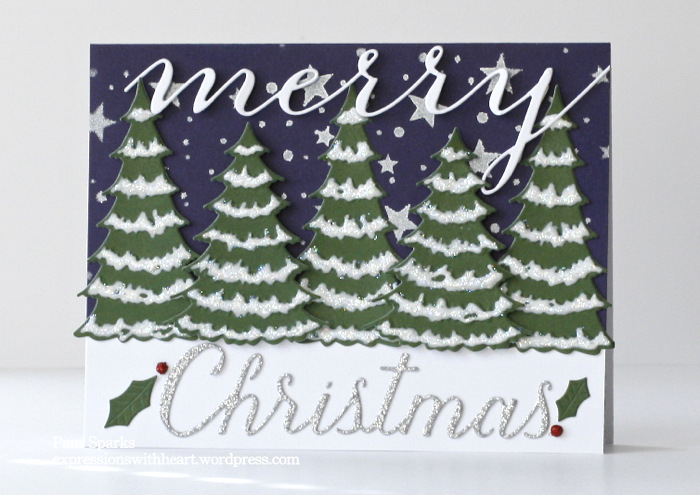
Today I’m sharing a card I made with the technique I introduced in my last video, Embedded Die Cuts, HERE and the beautiful new Snowy Tree dieLove it!

I also used the Beloved Snowflakes die and placed it at the bottom of the card. When you die cut it, there are extra snowflakes!  I used the extras, dots from the waste and a piece that I cut off to create the snowy background.

The swag like snowflakes toward the top of the tree are cut from the inside of the Sparkling Tree Tile die and glued on. So instead of strings of lights… you have a few strings of snowflakes!

It was fun to put unusual colors together.  I used Memory Box White, Sage and Sky A-2 Notecards.

I used the 1/16th inch Perfect Layers Ruler to cut the white mat for the Sage layer… love these rulers!  Link in the sidebar… be sure to use the coupon code if you order!


PamSparksSnowyTreeClose


I’m linking my Snowy Tree card to some challenges…

ABC Christmas Challenge – uncolored image

Merry Monday Christmas Challenge – non-traditional colors

Addicted To Stamps Challenge – Holiday

Simon Says Stamp Monday Challenge – Anything Goes


Over on the Memory Box blog there is a Blog Blitz that started yesterday, Monday the 20th and will go through Friday. You have until 11:00 p.m. EST on Sunday, October 26th, to leave comments on all the posts. The winners will be randomly drawn and announced on Monday, October 27th. Good Luck!  

I also wanted to share some photos from two classes I taught on Sunday at Scrapmania in Cedar Rapids, Iowa.

The morning class – Winter Wonderland…with 15 ladies creating the cards in the photo below.

PamSparksWinterWonderlandClass


10730914_386023374879938_1389526919788698531_n


The afternoon class – The Night Before Christmas…with 10 ladies creating the cards in the photo below.

PamSparksNight Before Christmas

(I do have two of the afternoon class kits to sell… $25 plus $5 flat rate shipping in the USA.  International we’d have to figure out)

Here’s Jo Ann working on her Fireplace card…

MB3


We had a great time!  Stacy has an awesome store and awesome customers!  Thank you so much for having me!  I’m still smiling!

I’ll be teaching two classes at The Scrapbooking Studio in Moline, IL Nov. 8th.  For class info, scroll down on the class page HERE. We’d love to have you come!

Thanks for stopping by! Good to be back!

ttul,

Blog Hop · cards · Christmas · copics · Lawn Fawn · Memory Box · Perfect Layers Tools · Snowman · Winter

Perfect Paper Crafting and Lawn Fawn Blog Hop…

PamSparksLFSnowmanPostcard700


Welcome everyone!  It’s a blog hop Monday for Perfect Paper Crafting and Lawn Fawn!


get-attachment.aspx

If you hopped to my blog from Tracy’s Blog, you’re in the right place!  

Today you’re hopping and commenting for a chance to win your choice between two prizes from Perfect Paper Crafting and from Lawn Fawn the prize is a stamp set and a 6×6 pattern paper pad! Good luck!

You’ll want to check out the Perfect Paper Crafting and Lawn Fawn blogs everyday this week for more inspiration and chances to win. 

For my card today – I used Lawn Fawn’s darling Making Frosty Friends clear stamp set, You’ve Got Mail clear stamp set and the holly is from the NEW Joy To the Woods clear stamp set.  I used the coordinating die sets too… all linked below. Don’t you love all the clear stamps and matching die sets?!

The snowflake pattern paper (beanie) is from the adorable Snow Day Collection that just came out.

  • I stamped the postcard, cancellation and wavy lines stamps on white card-stock with Memento Tuxedo Black ink
  • I die cut the stamped postcard with the new Lawn Fawn Stitched Rectangles die (love them!)
  • I stamped the sentiment from You’ve Got Mail stamp set in red ink
  • I stamped the snowflakes from Making Frosty Friends stamp set with Versamark ink and embossed them with clear embossing powder
  • I masked off the edges with Eclipse Masking strips
  • I inked the postcard area with Tumbled Glass and Broken China Distress ink and the ink blending tools, the clear embossed snowflakes resist the ink
  • I die cut red pattern paper with the new Stitched Rectangles die,  then I used my Perfect Layers mini rulers and mat to achieve the 1/16th inch black frame.  I LOVE the 1/16th inch ruler!  Links to the tools below and in the sidebar…be sure to use the code Sparks5% to save 5% off your order!
  • I die cut another Stitched Rectangles die from white card-stock and adhered it to a white A2 card base.
  • The snowman is stamped in Memento Tuxedo Black ink, die cut with the coordinating dies and colored with Copic Sketch markers. Hat T3 – 7, Red R24 – 29 and 59, Scarf and holly YG93 – 97
  • I die cut a Memory Box snowflake to embellish the upper left hand corner

You next stop on the hop is Roxie’s blog

Have a great week and I’ll see you next time!  ‘preciate you stopping by!  Remember to comment for a chance to win prizes!

P.S. Here’s another fun Lawn Fawn card and it’s a winner! : )  I woke up Sat. a.m. to a  wonderful surprise!  Queen of the Green at the Lawnscaping Challenge.  A very fun challenge to enter!  Thank You Lawnscaping team!

5-off-600

Stamps, Dies and Supplies I used to create my card for today…

cards · Christmas · Fall · Memory Box · Stencils · Winter

Frosted Pine trees and Maple Leaves…

A couple cards I posted on the Memory Box blog today…


PamSparksMerryTrees700

No, I’m not ready for the sparkly, fluffy stuff but I sure like it on cards! lol

For the starry background, I applied Imagine Crafts Delicata Silver ink through the Stardust Stencil with Imagine Crafts large round ink Dauber onto a Memory Box A-2 Sapphire Notecard.

I die cut and embossed the Frosted Pine die five times in Memory Box Dill card-stock.  I went over the embossed snow areas with Dries White glue, shook on and tapped off the glitter and let it dry.

Merry is die cut from a Memory Box White notecard.

The word Christmas is left over from the Grand Merry Christmas Script die card I made and posted last week HERE.

I used two of the holly leaves from the HO HO Holly Leaves die and a couple red glitter domes finish it off.
Now for some Fall colors!


PamSparksHappyFall700

Very simple but maybe a nice, easy to mail, ‘flat’ card! Gotta love that once in awhile! lol

The card base is a Memory Box Lagoon A-2 Notecard with a 5 1/4 inch x 4 inch panel from a Memory Box Parchment Notecard layered on top. I used Gathered Twigs Distress ink to edge the panel and all the leaves, letters and the Woodland Branch die.

I used the new Marvelous Maple Leaves die and cut the small leaf in 3 Memory Box card-stock colors, Meadow, Sweetcorn and Jack O Lantern. The large leaf is cut once out of Jack O Lantern.

Upper and lower case Classic Alphabet dies for happy FALL.


PamSparksHappyFallClose

Our daughters call their baby diaper inserts ‘flats’, so I can call my flat cards ‘flats’!  lol  Children are a blessing even when they create a lot of laundry!  I guess we big people make a lot of laundry too!  Now how did I get off on that! lol

I’ll link up to some challenges and call it a post!  ttul!  TFL!

(my merry Christmas card at the top)

Merry Monday Christmas Challenge – the words have it

Simon Says Stamp – Make your own background 

Divas By Design – Anything Goes 

Sister Act Card Challenge – Anything Goes 

Paper Creators Crafts – Early Christmas

(my happy FALL card)

2 Cute Ink Challenges – Fall 


Dies and Supplies I used on these cards…


cards · Christmas · Impression Obsession · Memory Box · MFT

Festive Friday Challenge…

PamSparksIOPineBranchWreathFF700


Here I am sneaking into the Festive Friday Challenge with only a couple hours to spare!  eek!   It’s a photo inspiration challenge and I love the photo so I just had to play!

fd93ada97c89a38f501ce3a4a8f1afe8

I used the Impression Obsession Pine Branch to make my wreath…following the tutorial on Klaudia’s blog, HERE.  She made a beautiful ornament…I want to do that too! : )

Some wood veneer stars that I colored with a Krylon 18 K Gold paint pen…My Favorite Things Pierced Fishtail Flag die (I tried to edge it with the gold pen after I already stuck it on the card…oops, kinda messy but hey… it’s a rustic looking sign in the photo) and Memory Box Merry Christmas die.  Links below.

This ended up being a 6×6 inch card!

Thanks for stopping by! Have a good rest of the week… it’s stamp club Friday here… fun! ttul!

Dies and supplies…

cards · CAS · Christmas · Die Piecing · Distress Ink coloring · Fall · Memory Box · rubber stamps · Watercolor

Memory Box Fall cards and one Christmas card…

 *** Some new Fall stamps added to my ‘for sale’ page… click on tab under the blog header ***

PamSparksAlessandriaTreeLeaf700

It’s looking like Autumn here today!  Love the cooler temps!  The fabulous colors of Fall are showing up everywhere!

I started with a MB Crimson Notecard and stamped the Autumn Leaf Collage stamp on a MB Parchment piece of notecard.

The Alessandria Tree Background die and Marvelous Maple Leaves die were cut from watercolor paper and watercolored with distress inks. I added the leaf veins with the smallest stylus from the McGill Stylus set.

Then the Alessandria Tree on top.


PamSparksCasertaBloomFall700

I started this card with a MB Parchment Notecard, stamped the Journey Collage stamp on it but covered up the word journy with the new Give Thanks Combo stamp.

Die cut the Caseta Bloom die from three colors of MB card-stocks. Add a couple sequins to the flower centers and some 1/16th inch brads.

Die cut the Grapevine Wreath die from MB kraft card-stock and ink.

Linking my card up to…
Simon Says Stamp Wednesday Challenge blog – ‘stamp it’


PamSparksSilverMerryChristmasSnowflake700


Here’s a festive CAS Christmas card using techniques we love and easy to create multiples of!

1. I stenciled the Memory Box Flurry Frame Stencil with Tsukeniko’s Delicata Silver ink and one of their large ink daubers on the top portion of a Memory Box White A2 notecard.

2. I die cut the Grand Merry Christmas Script die from Silver Glitter card-stock and Memory Box Cranberry card-stock. Be sure to keep the cranberry dot for the i and the silver inside piece for the tail of the y.

TIP: You could use any color for the word Christmas! A way to use up scraps. Try Black, Teal and Royal purple! (wish I’d thought of that while I was making it! lol)

3. I trimmed the silver cut to fit the white notecard.

4. Adhere the Grand Merry Christmas to the notecard.

5. Keep the word Christmas from the cranberry cut, insert into the silver cut.

TIP: If you use double sided tape to adhere your silver Merry Christmas to the card, there will be adhesive where the cranberry Christmas fits, if you go ahead and place tape over the cut out area too.

6. Die cut the Bristol Snowflake die in white and silver glitter card-stocks.

7. Adhere the silver center to the white snowflake and adhere the snowflake to the card.  I just glue the center.

8. Add some pretty silver cord at the top, tying with a square knot.

9. I used the clear Wink of Stella brush marker on the word Christmas.

That’s it for today!

Holler if you have any questions!  Always love reading your comments!  Happy Fall Y’all!  TFL!

Products I used on these cards…