cards · Christmas · Foiling · Memory Box · Minc · Winter

Memory Box, Foiling and the Minc…


Pam Sparks Elliana Ornament with Poinsettia Corner


Happy Thanksgiving week! I know, I should be posting something with pilgrims on it!  I did love studying about Pilgrims and all they endured to come to American!  Amazing! I don’t know that I could’ve been that strong a person.  Thankful they were!

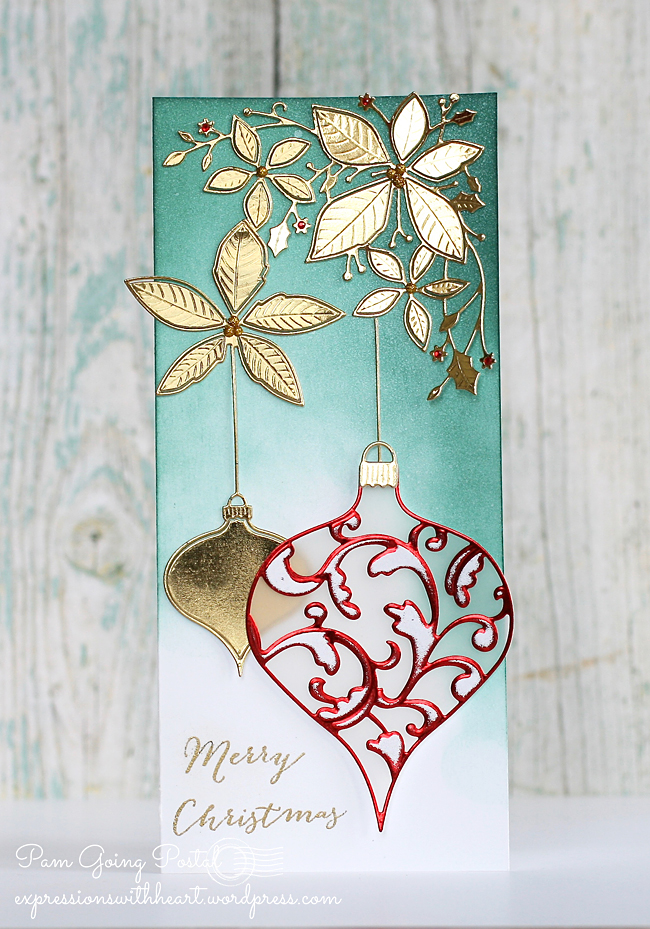
Here’s a fun, festive card using dies again… I did something different with them though.  I foiled everything!  A couple months ago, I needed a new printer so I went ahead and got an HP laser jet, so I could foil of course too! I ‘leaped’ into the beauty of foiling with the mini 6×6 Minc after a friend demoed her’s at stamp club.

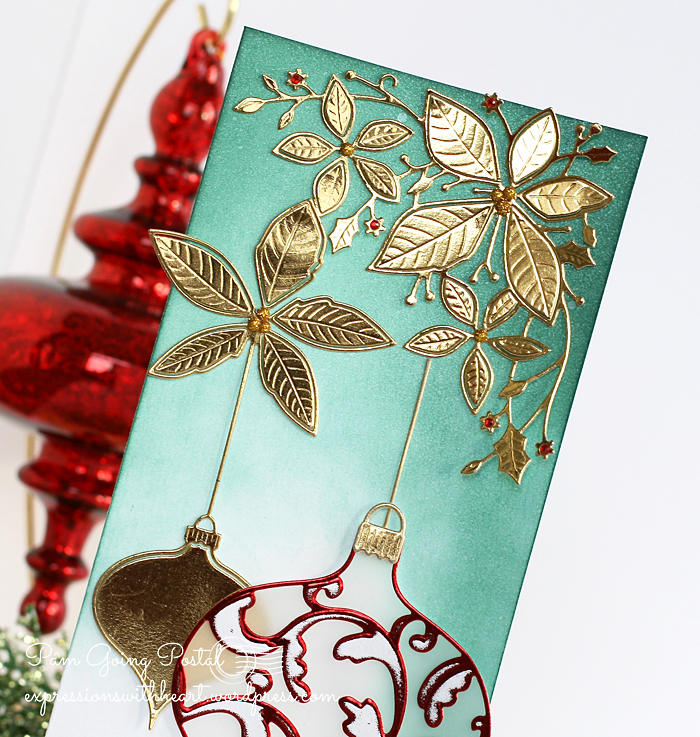
Here’s the scoop. If you photocopy the back side of your dies with a laser printer, then run them through the Minc foiling machine, then die cut them, you get this neat edge like you see on this Elliana Ornament.  You’ll see it on the next card below too.  One trick I figured out though, you have to photocopy your die twice.  So when it spits out, just copy again, to get it black enough because the dies are silver… if you can’t figure out which way to put it back in, put a mark on your paper, you won’t use that part anyway.  I also found that smoother cardstock works the best.  I used Hammermill Color Copy Cover cardstock.  I use it a lot for coloring with Copics too.

I really love the look of foil and it really is easy!  😀  I used Heidi Swapp Red Foil on the Ornament… I die cut a piece of vellum with the Drop Ornaments die to put behind the Elliana Ornament die.


Pam Sparks Elliana Ornament and Poinsettia Close 2


and Heidi Swapp Gold on the Poinsettia Ornament and Plush Poinsettia Corner dies. Pine Needle Distress ink sponged on with the ink blending tool.  What a gorgeous color.  I need to use it more!


Pam Sparks Elliana Ornament and Poinsettia Close 1


Here’s a card I made with the Elliana Ornament last year and some posts with the Plush Poinsettia here.


Linking up to some challenges…
Simon Says Stamp – Anything Goes

SSS is also having a one day sale on their brand!  YAY! 

thanksgiving


The Challenge #52 – Create a Christmas Card

Christmas Card Challenges – Anything Goes


Then how about a silver foiled snowflake! This is the Limoges Snowflake die and Lindeman Snowflake dieI photocopied both for foiling.


Pam Sparks Limoges Foiled


Can you see how the silver is just on the edges of the cut?  That’s because there are holes in the die, so the holes leaves white when you photocopy it.  cool.  My photos don’t do it justice.  Here’s a couple pictures of the parts, photo taken under the ott lite.


IMG_4870


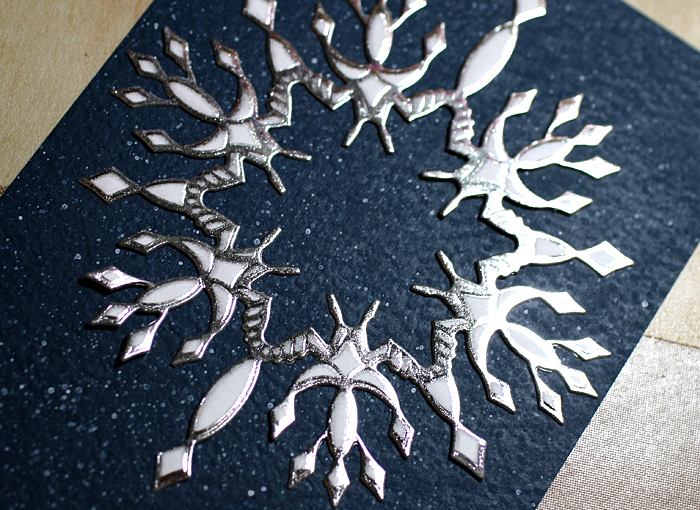
I did run these back through the Big Shot to get the embossing too.


IMG_4871


I layered the Modern Tile Backgound die cut from white cardstock to a piece of navy cardstock that I’d spattered with white ink and the Ink splatter tool and then to a white top folded A2 card base.  The snowflake was mounted with thin mounting squares cut to fit and the center flake mounted with regular thickness mounting squares.  The Lindeman snowflake is stuck on with a dot of glue in the center.

Crazy but fun seeing what you come up with!  : )


I used the Limoges Snowflake die on a couple cards last year too… here and here. Three different looks between the three cards.


Thank you for stopping by today! I appreciate it! Happy Thanksgiving Day!


Dies and Supplies I used to make these cards… be sure to check out my links for the Big Shot and the Minc machine…great prices @ scrapbook.com. Thank You!

cards · CAS · Christmas · copics · Memory Box · PTI · rubber stamps · Winter

Merry Monday, Memory Box, Make It Monday – Motif, Papertrey Ink…


Pam Sparks Deer Snowglobe 1


Almost a last minute loo-loo here…. whew! I couldn’t just not play in the Merry Monday Challenge – use a reindeer!

So here’s my cutie little Memory Box ‘reindeer’ called Happy FawnI colored him with Copics and then built a scene for him to live in.

I die cut the Circle Forest die in white cardstock, recut it with a pinpoint circle layer die to make it the right size,  mounted a couple extra trees in the snow… die cut the frame first with the Pinpoint Circle Layers die, then recut it with the Shaker Circle Frames die That way I still had the little dots, although I think I would’ve liked it just as well with just the frame cut! : )

I used one of the Snowglobe Bases  dies, cut in woodgrain cardstock.  Adhered everything to a top folded A2 card base and stamped the sentiment from Into The Words clear stamp set. The holly leaves and berries are from the Mini Holly Leaves die set.

I’ll tell you how I made the sky sometime this week in another post.


Pam Sparks Deer Snowglobe Close 1


Then I watched the Papertrey Ink Video Monday on motif building…well…I’ve been thinking about it most of the week! ugh!  I just don’t have enough of their stamps for the center motif, so being me, I used dies so I’m linking up!  I hope it counts! lol  CAS!


Pam Sparks PTI Sled Motif


Yes, we’ve got snow!  All of the dies I used are from Papertrey Ink.  I cut the word snow away from one of the dies that says Let It Snow.

In the Meadow
I think the snowflake center and flakes are from the Tinsel and Tags set, can’t remember for sure.
Christmas Cheer 


Here’s another shot…


Pam Sparks PTI Sled Motif Close


Thanks for stopping by!  Here’s some snow from Iowa for all my friends that went south or live in warm states! : ) I took this when I got up yesterday a.m. The city had already been out making all kinds of racket. grrr  They can’t just leave it pretty, they have to plow it a million times and make it look dirty.  boo.   This is one of the churches across from us…we live on a corner.  Sympathy for ppl that live on the corner please?! lol


IMG_4947 (2)


ttul!  TFL!


cards · Christmas · Penny Black · rubber stamps · Watercolor · Winter

Penny Black Brush Pines…


Pam Sparks PB Brush Pines


Penny Black stamps and dies put me in a festive mood! I had fun inking up this brush art style stamp…I used the MISTI for stamping…some watercolor markers and stamp pads.  Next time I need to try the Zig Clean Color Paint markers!  I didn’t think of that ’til now!

The sentiment is embossed in gold detail powder and is from the Believe Transparent stamp set.

In this next pictures you can really see the Tim Holtz Jingle Bell brad!  I LOVE these! I did poke holes in the watercolor paper first for the prongs.  I used Canson Montval 140# this time.


Pam Sparks PB Brush Pines Bell Close


The snow is Stampendous Frantage Chunky Embossing Enamel.  Another reason why the heavy watercolor paper was better this time.  You lightly sprinkle on the chunks and heat from the underside.  Years ago we used to heat up an old electric frying pan and lay the card in it to heat UTEE.  That would be easier to keep the chunks in place for sure!  Be careful you don’t get too much… you can see I kinda did on the left pinecone.


Pam Sparks PB Brush Pines Close


A pretty stamped card…the bell brad might be a little too much for Uncle Sam’s mail machines though. ugh.

Oh the twine is one of Lawn Fawn’s, sparkle green.  love it!

I inked the edges with Broken China Distress ink and the ink blending tool.


Sharing my card on the following challenge blogs…
Penny Black and More – Anything Christmas
Craft Stamper Magazine – Take a Stamp/Anything Goes
Stamp Ink Paper Challenge – CAS Christmas
Addicted To Stamps – Clean and Simple
Stamping Sensations – Festive Flowers and Foliage


THANKS for stopping by again!  I am so excited to ‘make’ Christmas! I’m hoping to post a lot cuz I love to share and  I miss hearing from you if I don’t post! lol Enjoy the pretty weekend!


Shopping links to what I used on this card…

cards · Christmas · Memory Box · Poppystamps · Winter

Memory Box Christmas Look Book…


I can finally share with you what I spent so much time on this Summer!  YAY!!!!  Click on the photo below to go to the book.


lookbook holiday (1)


I hope it inspires your Christmas card making and I love it when you email me with the cards you’re making!  If you see something you need… lol… here’s the link to Starlitstudio.  Cindy has the best customer service and the fastest  shipping around!  😀

Thanks for looking!!!!

cards · CAS · Christmas · Die Piecing · rubber stamps · Taylored Expressions · Winners · Winter

Taylored Expressions November Release Day and Book Winner!


PamSparksHappyNewYear1Thurs


Hi everyone! Looking at this card makes me want to celebrate! EEK!  We’re so close to a new year…hard to believe…can I just live in denial?!

Today I’m featuring this fabulous Happy New Year die from Taylored Expressions. All the NEW for November release is in the store today! I die cut the Happy New Year die in metallic silver cardstock. I used four other dies for this card too. The Celebration Confetti die is new also and cut in gold metallic cardstock. Perfect for shaker party cards!  Then I used the Starry Night Cutting Plate cut in teal-ish glitter cardstock for the background, the Frame in a Frame Cutting Plate cut in metallic silver cardstock and one of the banners from Skinny Mini Party Borders cut in metallic gold cardstock. Sparkle and Shine!


PamSparksHappyNewYearCloseThurs


Next up…a sweet gift idea…keep them by the computer for all the recipe sharing that happens online!


PamSparksMixerThursday


Look at this cute NEW Little Bits Mixer die!  Darling!  The Recipe Card Pack is NEW also…the TE designers have been showing what they’ve made with the new kitchen stamps and dies all week. So cute!

I used the Tag Stacklets 2 dies, Tag Reinforcement dies, Special Delivery stamp set and tied the pack up with twine.


PamSparksMixerCloseThursday


Next up…a super cute NEW set of Holiday Charms! I used the snowflake charm on this card.


PamSparksHolidayCharmSnowflake


I cut the three flakes in silver glitter foam and then added silver stickles glitter too!  Sometimes you just need more you know! lol

The vellum banner is cut with the NEW Stitched Banner Stacklets die set and I embossed a sentiment from last months new In and Out Christmas stamp set.

I hung the flakes on twine hidden behind the Peek A Boo Circle die panel.

The background is embossed with the Winter Flurry Embossing Folder.


PamSparksHolidayCharmSnowflakeClose


Next up…two cards using the NEW Basketweave Cutting Plate die.


PamSparksBasketweaveThurs


Here I used it in a traditional way… just like you would think a basket should look!  The NEW Stitched Banner Stacklets again stamped with the Simply Stamped Pinecones stamp set and the Simply Stamped Pinecones Dies.

A little Frosted Lace Stickles on the pinecones and tied up with twine.


PamSparksBasketweaveCloseThurs


Here is a CAS use for the Basketweave Cutting Plate.  I die cut it in Red and Green cardstock.  Placed it on the diagonal and trimmed off the excess after I taped it to the back of the card.


PamSparksSantaHatParty


There’s another one of the NEW Holiday Charms.  A cute little Santa Hat cut in white and red cardstock. Trim the white and glue to the red and Frosted Lace Stickles just makes it more festive!


PamSparksSantaHatParty copy


I hope you’ve enjoyed the Taylored Expressions November release posts this week and can get over to the TE Blog for a complete list of the participating designers. Take a look around for more inspiration and NEW product info! All the stuff we love! 


*** AND the WINNER of the Creative Cardmaking book is…..  #34!  Carmen Willis you have the lucky number my hubby picked!   Congratulations!  I will email you for your address…be watching for it!!!  Thank you everyone for commenting.  Always makes me happy!

Thanks for stopping by today… links for what I used on these cards in the Taylored Expressions store below. Holler if you have any questions!