cards · Distress Ink coloring · Magnolia · rubber stamps · Spellbinders dies · Spring · Tilda's Town

Magnolia, Tilda’s Town, Spring!


PamSparksSkateboardTilda700

Time for Tilda’s Town Challenges!  Spring is the challenge this week… a fun change in colors and well…almost anything goes for Spring!

Click over to Tilda’s Town ChallengesHERE and enjoy the inspiration from the Design Team and enter the weekly challenge!  We’d love to have you!

Each week there is a random winner, chosen by Inlinkz, for a $10 gift certificate to Tilda’s Town.com!

logo1

Tilda’s Town is a most magical shop specializing in Magnolia Stamps. Over 1,100 stamps in stock at all times. Tilda’s Town offers FREE worldwide shipping on every order, every day. You can also save up to an additional 20% on your purchase by using one of the famous coupon codes. Shop at Tilda’s Town.com and live the magic.

PamSparksSkateboardTildaClose700

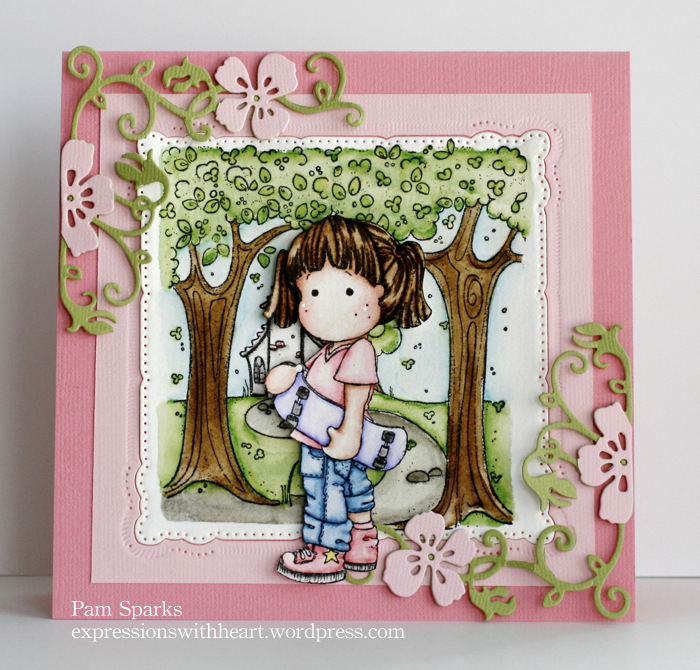
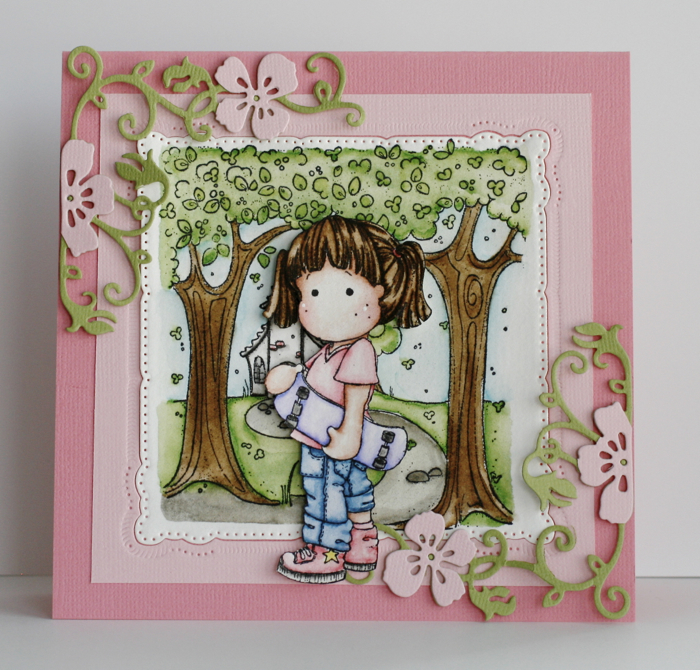
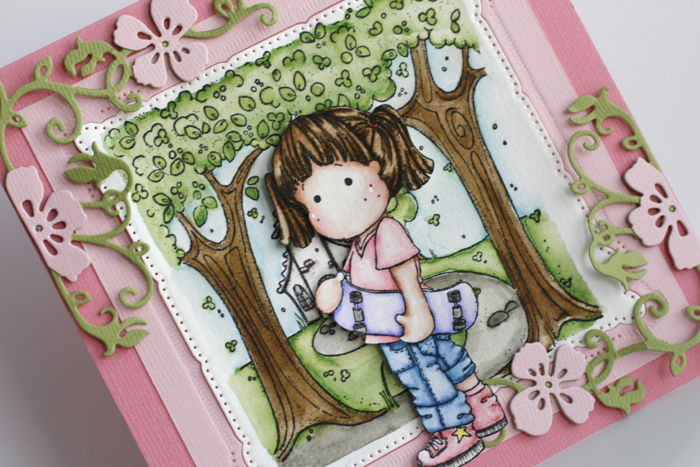
I used this super cute Skateboard Tilda… she’s been playing hard… she must’ve skinned her knee and forgot to pull her jeans back down! lol  Behind her is the Vintage Swedish Background stamp.

I colored with Distress Markers…her hair got a little dark, oops, I used Vintage Photo first but didn’t like it so I went back and used Gathered Twigs over it.  Next time I’m just going to use Gathered Twigs and see what that looks like.

Her face is a light wash of Vintage Photo and then Tattered Rose,  like I did in a video…under the header photo you’ll find the video tab…pull down.

Shirt  and tennis shoes are Spun Sugar and Worn Lipstick.  Faded Jeans on the jeans.  Tree trunks are Gathered Twigs.  Grass is Mowed Lawn.  Sidewalk is Pumice Stone.  Skateboard is Shaded Lilac. Sky is Tumbled Glass.

Stamped with Ranger Archival Black ink on Canson Motval 90# watercolor paper.

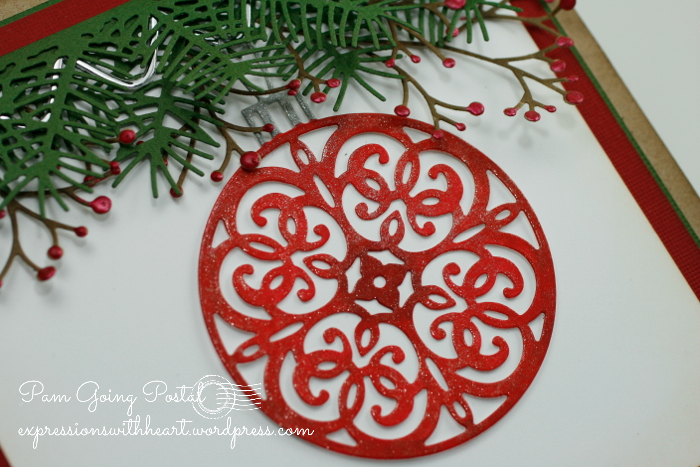
I cut the scene with some new (to me) Square Spellbinder dies and then floral corners are from Magnolia.  Flower Swirl Corner DooHickeys die.

The finished card is 5 ½ in. square.

*** Linking up to…
Lovely hÄnglar and Sweet Magnolia – Flower Power
Time For Magnolia Challenge – Spring is in the Air
Dutch Magnolia Lovers – Spring is in the Air
CASology – Blush

It was fun to color again.  : )  Happy weekend everyone!  Some grocery shopping to do, nothing real exciting.

Well,  not sure I’ve told you, but, our youngest daughter is expecting and it won’t be long until grandchild number 16 is here!!!  woohoo!  We’re excited.  She’s knitting up a storm… she makes the sweetest things.  I’ll have to post something on my FB page.  I have shared a couple photos of what our middle daughter is up to.  She purchased a loom and is weaving… oh my… so amazing!   Our oldest daughter sews and creates adorable things too!  Like my FB page and I’ll share once in awhile what they’re up to.  Link is over on the right.

Thanks for stopping by!  I love sharing and chatting with you! ttul!

 Supplies I used on my card…

Birthday · cards · CAS · Die Piecing · Impression Obsession · Memory Box · Perfect Layers Tools · rubber stamps · Techniques · Tutorials · Winter

NEW Memory Box Darling Poppies die and Impression Obsession dies…

PamSparksDarlingPoppies

Another NEW die from the  Spring and Summer release, called Darling Poppies I love this sweet image and thought it’d make a great CAS just thinking of you today card.

PamSparksDarlingPoppiesClose

Here’s what I did…

Die cut the Darling Poppies die in the front of an A-2 size white notecard. You will need to keep a few of the white pieces to put back in.

Then die cut the Darling Poppies die two more times from Memory Box Meadow Green and Cranberry card-stock… by the way, die piecing is a great way to use up scraps!  YAY!

Turn the white card with the die cut hole over so the back side is facing up.

Place the green outline cut in the hole right side facing down.

Then put in the larger white piece that is between the stems, right side down.

Then using scotch tape or packing tape, tape over the back so there will be sticky on the front.

Turn the white card front, right side up.

Finish filling in the spaces with the flower petals and the three white teeny pieces.

End result…a lovely notecard to ‘snail’ mail!

*** Linking to…
The Paper Players Challenge – Clean and Simple Spring
Cards in Envy – Anything Goes with an A2 size card

❤ ❤ ❤ ❤ ❤

I’ve had these two Winter cards waiting for me to just glitter the trees and finish!!! ugh.  I don’t know why I procrastinate getting the glitter out!  I got all these trees glittered without making a terrible mess!  YAY!

Anyway,  I needed a Winter scene swap card for stamp club last Friday…our January swap theme was a Winter Scene card but we had to cancel our January meeting because of the below zero cold.  Then we had to cancel our February meeting because of snow!  March is our catch up month… so finally… the two dreaded glitter cards are done and it wasn’t so bad after-all!

What a bummer though… can you see the glitter in the photos even?????  grrrrr… lol

PamSparksSleddingIOTreesGlitterScene

Love this sweet sledding die and snow laden tree dies … from Impression Obsession…links below in the supplies links.  Background stamp is from Hero Arts and the sentiment from Papertrey Ink.  Layers cut with my Perfect Layers Tools and Mat… links below or in the sidebar.  Videos about them under the header.

*** Linking to…
The Card Concept – Clean and Layering, Create a birthday card

❤ ❤ ❤ ❤ ❤

PamSparksIOWinterSceneFront

Same trees and stamps again and added the Impression Obsession bunnies.  Ranger Black enamel for the eyes.

PamSparksIOWinterSceneClose

The glitter I used is Winter White from the Art Institute Glittering System.  I put sheets of double sided adhesive on my card-stock before I die cut the trees.  After they were die cut, I peeled off the protective sheet, poured glitter on them, layed a scrap paper over the glitter and rubbed it in.  Shook off the extra glitter and put it back in the jar.  It’s a really fine, pretty glitter.

Oh, the hill die cuts are from Papertrey Ink.

*** Linking to…
Simon Says Wednesday Challenge – Glitter it!

Whew… back to flowers and Easter now! Thanks for stopping by and I’ll talk to you later!

Supplies I used on these cards…

Impression Obsession trees, sled and bunny dies are also in stock HERE at Dies R Us

Birthday · cards · CAS · Die Piecing · Masculine · Memory Box · rubber stamps · Spring · Techniques

NEW Memory Box!!!

PamSparksBeautifulBalloonHello2

Here’s the NEW Beautiful Balloon die pieced and inlaid with the Puffy Clouds dies… I just love this look and I had so much fun creating it!  After everything was pieced in, I stamped parts of the happy hello combo stamp with the Stamp a ma jig.  Love the embossing detail in the balloon!

Hello is die cut out of the card front also and another white hello die cut inserted.  Imagine the ‘hello’ as part of the cloud formation.  : )

Ribbon is from May Arts in stock at Starlitstudio.net
Memory Box Holly Berry Red & White A-2 Notecards

This truly is a one layer card.

PamSparksBeautifulBalloonHello2Close

And another card…

PamSparksWildflowerCornerAstiSwirlFront

*For this card I cut the Wildflower Corner two times.
*Glued one complete cut in the bottom left corner. (I use Tombow mono multi glue, little dots here and there)
*Glued the other corner in pieces to the top right corner, right side and top left corner.
*Die cut the thanks Cloud but just used the word.  I cut my thin mounting squares into narrow strips.

PamSparksWildflowerCornerAstiSwirlClose

*die cut the Asti Butterfly wings directly in the card front…it doesn’t cut completely…it stays connected at the body.
*die cut the Swirl Butterfly, glue on top of the Asti butterfly
*Memory Box White and Lagoon A-2 Notecards

A pretty CAS card that could be used for several occasions!

Here’s another take with the Wildflower Corner die cut in the front panel of the card twice… then cut again twice from white card-stock and inlaid into the holes  you cut in the front of the card.

Version 1…that I gave away…

PamSparksWildflowerCornerBirthday1

Version 2… I made it again this a.m. so I’d have one but I didn’t look at my photo first!  The corners are in different corners!  pout.

PamSparksWildflowerCornerBirthday2copy

I don’t think I’ll make it again today anyway but I like the corner placement on the first card the best. The second one I did a better job of keeping track of all the little center dots! lol

I have a few tips that make this go easier… thinking video… let me know if you get this die and need help… so hard to explain with words.

In the post before this one… I list the steps I used to inlaying die cuts.

Well back to the die cutting table and stamping desk!  Have a great week stamping friends and I’ll be back with something sometime! : )  Thanks for all your comments and encouraging words!  They always help me keep motivated! ttul!

Links to the Supplies I used…

cards · CAS · Die Piecing · Lawn Fawn · Memory Box · Perfect Layers Tools · Serendipity Stamps · Winter

New Memory Box meets Lawn Fawn…Serendipity Winter Scene…

NEW Memory Box and poppystamps dies…Spring 2014 release in stock @ Starlitstudio.net

PamSparksLawnFawnBalloon:MBDreamCloud

Isn’t this going to be a fun congrats card or graduation card?!  I love it!  It’s so fun when what you imagined works out!  YAY for stamping and die cutting  FUN!  *grin*

a little bit of a side view…

PamSparksLawnFawnBalloonMBDreamCloudSide

You are looking at the NEW Dream Cloud die from Memory Box!  There’s a new happy cloud, birthday cloud and thanks cloud too!  I LOVE using the words by themselves too!  Cindy at Starlitstudio.net has them in stock!

The balloon stamp and die, sentiment and star stamps are from Lawn Fawn… link below in the supplies.

Linking up to CAS on Sunday – one layer wonder (yes this truly is one layer!)
Addicted To CAS – luck
Clean and Simple Stamping – sketch (upside down)
Sarah Hurley 365 – Speech Bubbles
Stempelgarten Challenge – one layer card
Sister Act Card Challenge – Anything Goes
Word Art Wednesday – Anything Goes
Addicted To Stamps – Anything Goes
7 Kids College Fund Challenge –  Anything Goes with a twist, Die cute

So here’s what I did…

1. cut an 8.5 x 11 pc. of card-stock in half,  score one half at 4.25.  Use the teflon bone folder to crease… LOVE the teflon bone folder (link below)…no glossy look where I rub after creasing!!!

2. cut the balloon out of the front of your card

3. cut the balloon out of red card-stock

4. cut the bottom of the balloon out of kraft card-stock

5. stamp the red and kraft pcs with the balloon stamp, then cut and piece them together

6. I used packing tape to cover behind the balloon cut out portion of the card front.  You want sticky in the opening to adhere your red and kraft balloon parts to it.   Go ahead and stick them in

7. Then position your dream cloud die face down to the right side of the card front over the stamped red balloon.

8. Tape the dream die in place with reposition-able tape, stick the tape to your clothes a couple times to make sure most of the sticky is removed.

9. Run it through the die cut machine.

10.  Keep the word dream because you will use that part

11.  Cut the dream cloud die from white card-stock, keeping the white centers of the letters.

12. Piece the die cuts into the card front and cover the back with packing tape to hold it in place or you can put the packing tape over the hole first and then piece in the cloud parts.

13. isn’t this fun?! : )

14. Stamp the little star from the balloon set multiple times with Tumbled Glass distress ink.

15. Stamp the sentiment from the set.

16. Back to the other half of the 8.5 x 11 piece of card-stock.  Cut it in half…well, a little less than half… 4 ⅛ in. x 5 ⅜ in.

17. Adhere that piece behind the card front to cover up the piecing and taping you did.

That’s it for this card!

Now for the Winter scene I told you I was working on… colored it last Monday morning and finished it Friday morning!  Where does the time go!  It goes by me way too fast!

The stamps I used for this card are from Serendipity Stamps…wonderful images to color and create cards with.

PamSparksSerendipityWinterPeaceScene

I stamped with Ranger Archival Black ink on Canson watercolor paper and watercolored with Ranger Distress markers.  Stardust Stickles to give the snowy, Winter sparkle.

PamSparksSerendipityWinterPeaceSceneClose

I used the new Mini Perfect Layers Tools and the new Cutting mat… oh,  I do love them a lot!  Yes, I’m glad I have both sizes.

Stamps I used….Winter Farm HERE, Sled Here and Peace on Earth HERE.

How I paint with Distress Markers…post and Video HERE.

So happy to finally use these stamps I’ve had in my collection for years!  Some times just owning makes me happy!  I need to find a use your stash challenge to link to! lol

Linking my Winter Scene card to…
Christmas Stampin’ All Year Long – Sparkle and Shine
Virginia’s View Challenge – Watercoloring
Hiding in my Craft Room – Color It!
Completely Christmas – Anything Goes
QKR Stampede – Anything Goes
Stampin’ For the Weekend – Anything Goes
Word Art Wednesday – Anything Goes
Fusion Card Challenge – Sketch

I have two more Winter cards but I better save them for another day!  : )   Tomorrow I’ll be back with more NEW from Memory Box!

Thanks for stopping by!  We’ve got snow again… you know you’re in IOWA when you experience all four seasons in one week! lol  ttut!

Supplies I used for these two cards…

Blog Hop · cards · CAS · Christmas · copics · Impression Obsession · Memory Box · Perfect Layers Tools · Poppystamps · rubber stamps · Serendipity Stamps

Blog Hop – Perfect Paper Crafting and Serendipity Stamps…

SerendipityHop

Good morning and WELCOME to the first day of the week long Perfect Paper Crafting with Serendipity Stamps Blog Hop!  So excited to be blogging with this wonderful group of stampers!

If you’ve come from Marybeth’s Blog, you are in the right place.

You will want to hop and comment on all the blogs… AWESOME PRIZES… I mean AWESOME!
Perfect Paper Crafting and Serendipity Stamps are both giving away a $50 Gift Certificate
Two winners will be chosen randomly from the people that have commented on all the blogs!
Winners will be announced on the PPC and Serendipity blogs on March 17th.

PamSparksSerendipityOrnamentIOPine

My first card for the hop is a window card…cut a circle from an A-2 top folding card, die cut the Serendipity Ornament die…lovin’ this die! Poked a couple holes for the twine bow, die cut some pine branches, glued them on and there you have it!  It was hard for me to leave it without a sentiment, but I’ll figure something out! lol

PamSparksSerendipityOrnamentIOPineClose

Up close…that is dark brown card-stock in the background…helped it show up for the photos.

❤ ❤ ❤ ❤ ❤

PamSparksSerendipityOrnaments3

On this card I used the Ornament Stamp and Die set from Serendipity Stamps.  I heat embossed the ornament stamp, twice on the background, then die cut the ornament die, heat embossed it and using mounting squares, adhered it to the card front.  I used black pigment ink to ink up the ornament stamp all three times and Judikins Egyptian Gold embossing powder.  I used the Stamp a ma jig for positioning.

The ornament stamps beautifully and the ornament die cuts perfectly!

Here’s a close up…

PamSparksSerendipityOrnaments3Close

I used my Perfect Layers Rulers to mat the image panel and the base of the card.  I love how perfect and elegant the 1/16th inch ruler cuts the mats.  I’m lovin’ the new shorter rulers and the cutting mat… both are AWESOME and I’m telling you true!  : )

❤ ❤ ❤ ❤ ❤

I was in the mood to color, so I cut the ornament die from white card-stock so I could color it with Copics!  I wanted to use my Wink of Stella Red and Silver Brush pens too!  It’s Christmas…bring on the sparkle!

PamSparksSerendipityOrnamentPineClose

Then I needed some greenery to hang the ornament!  poppystamps Pine Needle Border, Berry Sprig and Memory Box Ribbon Candy Border all combined to make a festive arrangement for it to hang from. Ranger Cranberry Liquid Pearls on the berries.

PamSparksSerendipityOrnamentPineSide

A festive sentiment from Serendipity Stamps, Tis the Season… stamped beautifully with Versafine Onyx Black ink.

❤ ❤ ❤ ❤ ❤

*** Serendipity has a SPECIAL going on right now… Everything in their Easter Category is 20% off until Wednesday March 12, 2014. ***

The HOP will go through Sunday, March 16, Midnight Pacific time. Enjoy, be inspired and comment for a chance at the prizes!

❤ ❤ ❤ ❤ ❤

Your next stop on the HOP is Julie

❤ ❤ ❤ ❤ ❤

Thanks so much for stopping by and see you next time!  Working on a scene card with Serendipity Stamps and Perfect Layers tools..

Supplies I used on my cards…