cards · CAS · Christmas · Die Piecing · Distress Ink coloring · Fall · Memory Box · rubber stamps · Watercolor

Memory Box Fall cards and one Christmas card…

 *** Some new Fall stamps added to my ‘for sale’ page… click on tab under the blog header ***

PamSparksAlessandriaTreeLeaf700

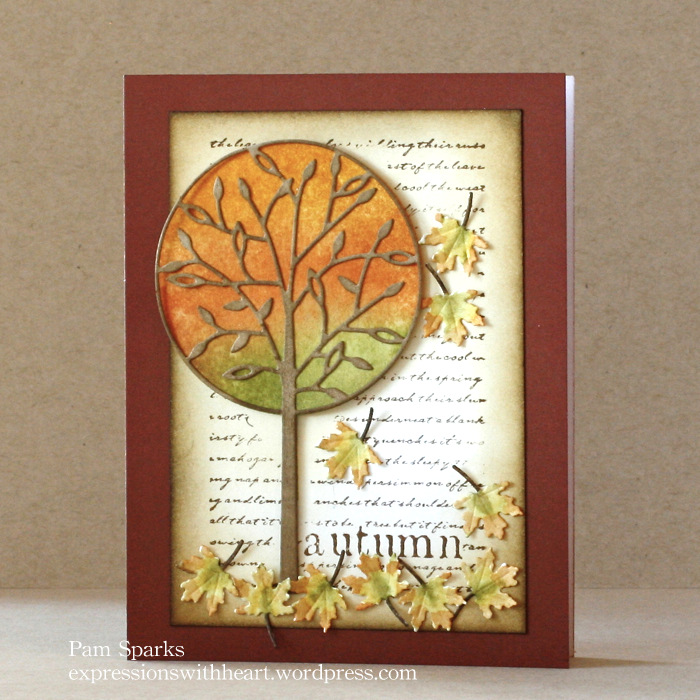
It’s looking like Autumn here today!  Love the cooler temps!  The fabulous colors of Fall are showing up everywhere!

I started with a MB Crimson Notecard and stamped the Autumn Leaf Collage stamp on a MB Parchment piece of notecard.

The Alessandria Tree Background die and Marvelous Maple Leaves die were cut from watercolor paper and watercolored with distress inks. I added the leaf veins with the smallest stylus from the McGill Stylus set.

Then the Alessandria Tree on top.


PamSparksCasertaBloomFall700

I started this card with a MB Parchment Notecard, stamped the Journey Collage stamp on it but covered up the word journy with the new Give Thanks Combo stamp.

Die cut the Caseta Bloom die from three colors of MB card-stocks. Add a couple sequins to the flower centers and some 1/16th inch brads.

Die cut the Grapevine Wreath die from MB kraft card-stock and ink.

Linking my card up to…
Simon Says Stamp Wednesday Challenge blog – ‘stamp it’


PamSparksSilverMerryChristmasSnowflake700


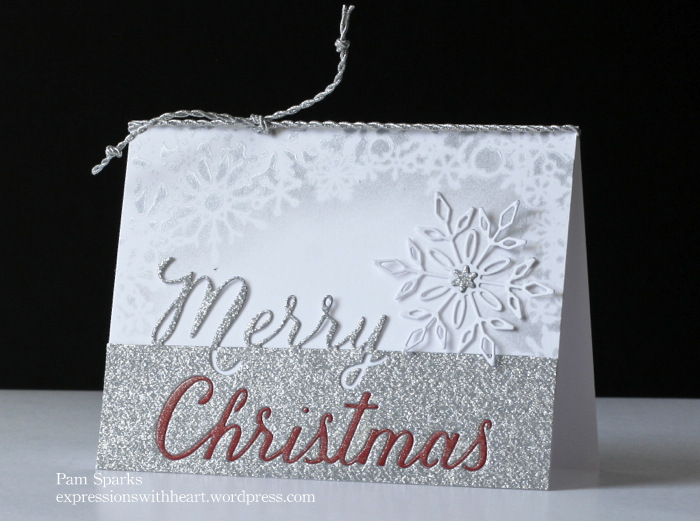
Here’s a festive CAS Christmas card using techniques we love and easy to create multiples of!

1. I stenciled the Memory Box Flurry Frame Stencil with Tsukeniko’s Delicata Silver ink and one of their large ink daubers on the top portion of a Memory Box White A2 notecard.

2. I die cut the Grand Merry Christmas Script die from Silver Glitter card-stock and Memory Box Cranberry card-stock. Be sure to keep the cranberry dot for the i and the silver inside piece for the tail of the y.

TIP: You could use any color for the word Christmas! A way to use up scraps. Try Black, Teal and Royal purple! (wish I’d thought of that while I was making it! lol)

3. I trimmed the silver cut to fit the white notecard.

4. Adhere the Grand Merry Christmas to the notecard.

5. Keep the word Christmas from the cranberry cut, insert into the silver cut.

TIP: If you use double sided tape to adhere your silver Merry Christmas to the card, there will be adhesive where the cranberry Christmas fits, if you go ahead and place tape over the cut out area too.

6. Die cut the Bristol Snowflake die in white and silver glitter card-stocks.

7. Adhere the silver center to the white snowflake and adhere the snowflake to the card.  I just glue the center.

8. Add some pretty silver cord at the top, tying with a square knot.

9. I used the clear Wink of Stella brush marker on the word Christmas.

That’s it for today!

Holler if you have any questions!  Always love reading your comments!  Happy Fall Y’all!  TFL!

Products I used on these cards…

Birthday · cards · CAS · copics · Distress Ink coloring · Fall · Magnolia · Memory Box · Paper Smooches · Perfect Layers Tools · Poppystamps · punches · rubber stamps · Summer

Memory Box 2014 Holiday Stamps Blog Blitz starts today and a Paper Smooches/poppystamps Rainbow…

PamSparksBrambleSurprise700-001

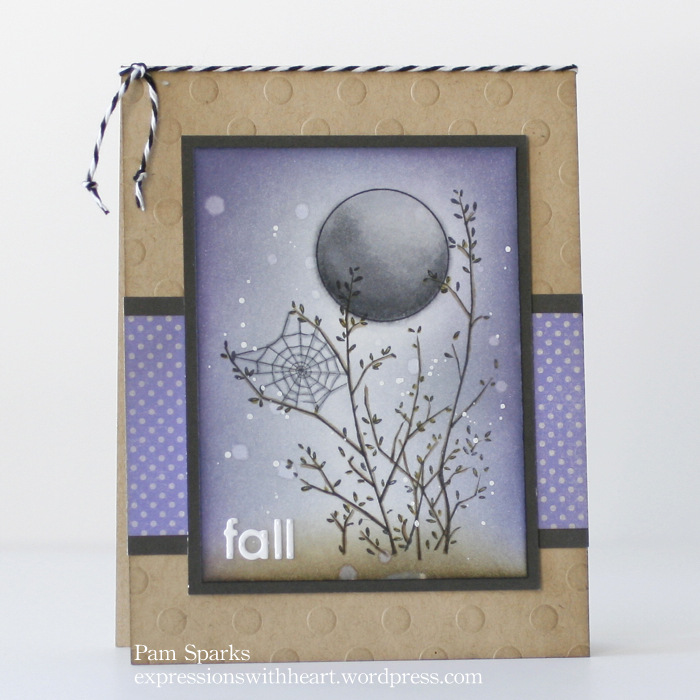
Today I’m starting the week off with the NEW Memory Box Bramble Surprise rubber stamp. As soon as I saw it, I knew I wanted it!!  I love the whimsical feel of it!  I decided on some Copic colorbook therapy with some Distress ink blending for the background.

I matted the image and the Distress Dot paper with the Mini Perfect Layers Tools and cutting mat… love them!  Links on the right and below…


PamSparksBrambleSurprise700Close

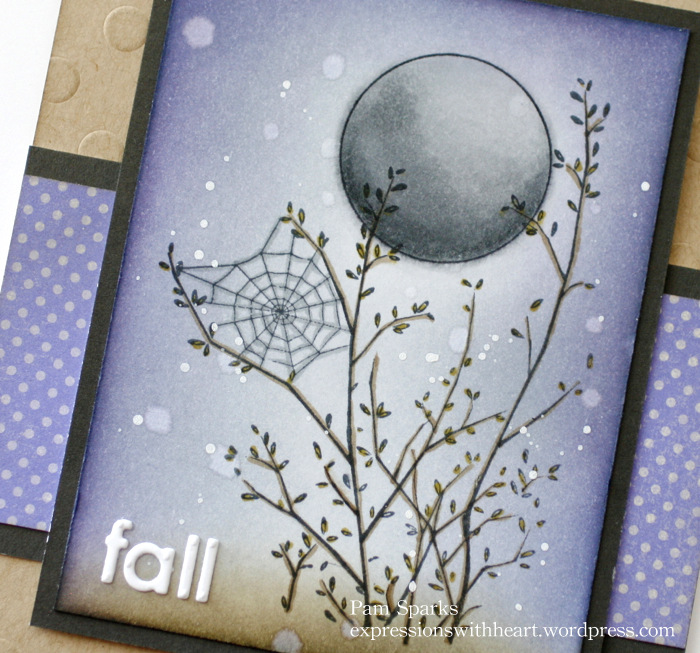
After I colored the image, I went around the perimeter of the card with Weathered Wood Distress ink first, then I added in Chipped Sapphire,  then Dusty Concord and on the very edge a bit of Black Soot. Walnut Stain on the bottom.

Then I sprayed water into the palm of my hand and dropped it onto the inked part, staying away from the moon.

I shook up a bottle of White Linen Dylusions Ink Spray real good, opened it and spattered the white dots on by tapping the cap and letting the ink flick off the end of the tube.

I die cut the letters for the word ‘fall’ from the Alphabet Soup die. I put scor tape on the back of Memory Box White card-stock before I cut.  The letters are really easy to adhere to the card when the tape is already on there. The drawback is, the thicknesss causes the holes in the die, (for poking out the waste) to emboss.

I layered Memory Box Violet Distress Dots Card-stock to a top fold A-2 Memory Box Kraft card base that I embossed with the Memory Box Dots Stencil.

Click over to the Memory Box Blog, HERE to comment for a chance to win this stamp!

Linking to the Artistic Expressions Challenge Blog – Anything Goes


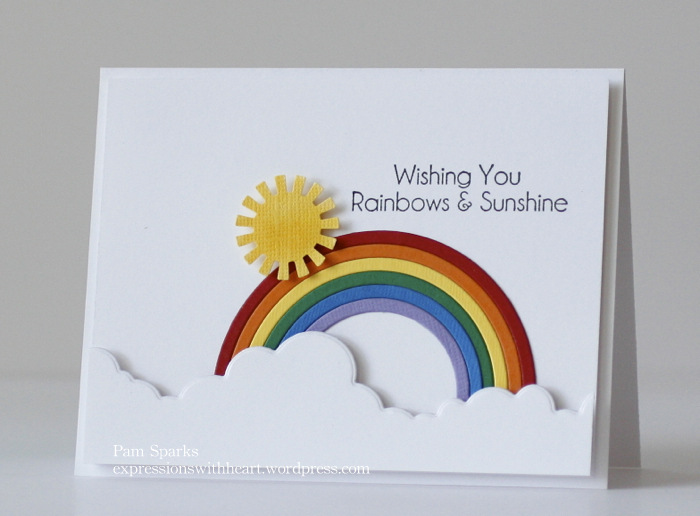
I’m behind getting my cards posted on my blog but I will catch up soon!  I wanted to share this CAS Summer card that I made for our area stamp club monthly swap.  July’s theme was a Summer scene.


PamSparksRainbowPS700


The sentiment is from Magnolia, rainbow is Paper Smooches, cloud border is poppystamps and the sun is an old EK Success medium size punch.

Linking up to Addicted to CAS – Sky
the Cutting Edge Challenge #3 – card inspiration

TCEC_3_thumb[2]

Thanks for stopping by!  Catch up with you later!

Links to supplies I used…

cards · Distress Ink coloring · Distress Stains · Memory Box · Perfect Layers Tools · Poppystamps · rubber stamps · Spring · Stencils · Techniques

Memory Box Stencils and Dies…

Hi everyone!  There is a Stencil Blog Blitz going on over on the Memory Box Blog, HERE.  Every day there is a chance to win a stencil,  just by leaving a comment on the blog post each day.

ca615aa4-37f5-4221-8c4f-5bc3e18724b5


In today’s post, Laura is showing the Pop Dots Stencil.  I have a card made with it and the poppystamps Mod Flower Background die matches up with it perfectly!  I embossed the stencil by running a piece of card-stock through the big shot,  then laying the stencil back over the embossed piece as a mask,  I used several colors of Distress Stains to color the circles…Spun Sugar, Peeled Paint, Barn Door and Broken China.

PamSparksModFlowerDistressStains
Then I added a banner cut with poppystamps Classic Ribbons die,  I stamped on it with a Memory Box Washi Chevron stamp and  Wishing You a Happy Day stamps

PamSparksModFlowerClose
Some Doodlebug Sequins to embellish and then glued together with Tombow Mono Multi glue.

I posted a stencil card on the Memory Box Blog  for the Blog Blitz on Saturday, using the Texture, Line Up stencil, Delphinium and Stems mini stencils from the Garden collection.

PamSparksStencilFleur
I inked through the stencils with Distress Inks and the new Round Ink Blending Tools. (they are awesome by the way!)

Then I cut the Rhone Butterfly Wings die in the panel and layered Lagoon card-stock under it.

The Blooming Branch die is glued on behind the Classic Ribbons Banner and the word FLEUR is cut with the new Urban Uppercase Alphabet die set.

PamSparksStencilFleurClose2

And I have found that I LOVE to spatter!  Two colors of spray mist spattered on the panel.  Shake the mists side to side to mix, unscrew the cap and tap with your finger to spatter the ink off the tube.  Works great!

I used my Perfect Layers mini Rulers  and Cutting mat to cut the mat for the floral scene.  Link over on the right… love these rulers!

I have more cards to post and photos and cards from the Great Yosemite Stamp Escape too!  I’ll be back soon!

Thanks for stopping by, it’s good to be back. I have missed you ALL!

p.s. I still haven’t been able to get Google to recover my You Tube Channel.  It’s so discouraging. This is for sure one time when technology is not my friend.  boo.

There is one video on my blog Facebook page though.  I wish I’d loaded them all to FB!  Who’d a thunk!

Supplies I used on these cards…


cards · Distress Ink coloring · Magnolia · rubber stamps · Spellbinders dies · Spring · Tilda's Town

Magnolia, Tilda’s Town, Spring!


PamSparksSkateboardTilda700

Time for Tilda’s Town Challenges!  Spring is the challenge this week… a fun change in colors and well…almost anything goes for Spring!

Click over to Tilda’s Town ChallengesHERE and enjoy the inspiration from the Design Team and enter the weekly challenge!  We’d love to have you!

Each week there is a random winner, chosen by Inlinkz, for a $10 gift certificate to Tilda’s Town.com!

logo1

Tilda’s Town is a most magical shop specializing in Magnolia Stamps. Over 1,100 stamps in stock at all times. Tilda’s Town offers FREE worldwide shipping on every order, every day. You can also save up to an additional 20% on your purchase by using one of the famous coupon codes. Shop at Tilda’s Town.com and live the magic.

PamSparksSkateboardTildaClose700

I used this super cute Skateboard Tilda… she’s been playing hard… she must’ve skinned her knee and forgot to pull her jeans back down! lol  Behind her is the Vintage Swedish Background stamp.

I colored with Distress Markers…her hair got a little dark, oops, I used Vintage Photo first but didn’t like it so I went back and used Gathered Twigs over it.  Next time I’m just going to use Gathered Twigs and see what that looks like.

Her face is a light wash of Vintage Photo and then Tattered Rose,  like I did in a video…under the header photo you’ll find the video tab…pull down.

Shirt  and tennis shoes are Spun Sugar and Worn Lipstick.  Faded Jeans on the jeans.  Tree trunks are Gathered Twigs.  Grass is Mowed Lawn.  Sidewalk is Pumice Stone.  Skateboard is Shaded Lilac. Sky is Tumbled Glass.

Stamped with Ranger Archival Black ink on Canson Motval 90# watercolor paper.

I cut the scene with some new (to me) Square Spellbinder dies and then floral corners are from Magnolia.  Flower Swirl Corner DooHickeys die.

The finished card is 5 ½ in. square.

*** Linking up to…
Lovely hÄnglar and Sweet Magnolia – Flower Power
Time For Magnolia Challenge – Spring is in the Air
Dutch Magnolia Lovers – Spring is in the Air
CASology – Blush

It was fun to color again.  : )  Happy weekend everyone!  Some grocery shopping to do, nothing real exciting.

Well,  not sure I’ve told you, but, our youngest daughter is expecting and it won’t be long until grandchild number 16 is here!!!  woohoo!  We’re excited.  She’s knitting up a storm… she makes the sweetest things.  I’ll have to post something on my FB page.  I have shared a couple photos of what our middle daughter is up to.  She purchased a loom and is weaving… oh my… so amazing!   Our oldest daughter sews and creates adorable things too!  Like my FB page and I’ll share once in awhile what they’re up to.  Link is over on the right.

Thanks for stopping by!  I love sharing and chatting with you! ttul!

 Supplies I used on my card…

Birthday · cards · copics · Distress Ink coloring · Printworks · rubber stamps

Printworks Birthday cards…

PamSparksPWdog

Back to class… haha… chalkboard!  Now wouldn’t this be a FUN class?!!!  I just need some place to teach it! haha   On the inside of this puppy card I stamped,  Celebrate Today!  I stamped the pup on watercolor paper and watercolored him a bit with a Black Soot Distress Ink Marker.

Linking up the puppy card to some challenges…
Sweet Sketch Sunday Challenge 208 – I followed the sketch.
Come and Get it Challeges – Sweet Domestic Animals
Fan-tastic Tuesday Challenges – Anything Goes
CASology – Paint
CAS on Sunday – Masculine

PamSparksPWBirthdayCollectionCards

I posted the balloon card several days ago… so scroll on down for it…

PamSparksPWTriFoldFront

This is a Tri-fold card… 4 1/4 in. wide by 11 in. long… scored and folded into thirds.

PamSparksPWTriFoldInside

I love how it turned out… so fun!  Printworks stamps complement each other perfectly!  Zillions of cute combinations!

PamSparksPWTriFoldMiddle

Linking my Tri-Fold Birthday card to some challenges…
Tuesday Throwdown – Anything Goes
Party Time Tuesday – Anything Goes
Sister Act Card Challenge – Anything Goes
Scribbles Design – Frame It

There’s a cupcake sentiment too!  Click over HERE to shop the store… Printworks Collection.com.  Click on NEW release to see these new stamps… they come wood mounted or cling mounted.  The Cling mounted are indexed!  Top quality rubber stamps!   REMEMBER to use the code PAM2014 to save 5% on your order!!!

PamSparksPWwish

Linking my Make a Wish card up to some challenges…
Challenges 4 Everybody – Anything Goes
Crafty Girls Challenge – Anything Goes
Just B Creative – Linky Party, Anything Goes
Crafty Creations Challenges – Keep it Simple

The Printworks gal’s would love to have you ‘like’ their Facebook page too… HERE… a great way to keep up with all the specials and NEW releases.

PamSparksPWCelebrate

Seems like I need Birthday cards more than any other kind… is that how it is with you?  Enjoy the whimsical style of this release!  I love how there are so many sentiments that coordinate!

Thanks for stopping by! ttul!