Avery Elle · Blog Hop · cards · CAS · Christmas · copics · Perfect Layers Tools · Summer

Perfect Paper Crafting and Avery Elle Blog Hop!

get-attachment.aspx

❤ ❤ ❤ ❤ ❤

Hi everyone!  Welcome!  Good to be back sharing cards with you today!
Perfect Paper Crafting and Avery Elle have teamed up this week for a blog hop! The Design Teams are creating with Avery Elle stamps and dies and Perfect Paper Crafting tools. Both companies are giving away a $50 gift certificate to two lucky winners!!! How do you win? Just leave comments on the designer’s blogs as you hop through the list!  Remember to use my Sparks5% code when you shop PPC. Thank you!

The hop started Monday, July 28th and will go through August 1st at 12:00 midnight.  The winners will be announced on August 2nd.  You still have time to comment!
Just in case you missed any of the amazing projects created by the Avery Elle design team and the Perfect Paper Crafting design team, here are the links to all of the designers blogs…scroll down to get to my cards!
Avery Elle – every day
Perfect Paper Crafting – every day
Caryn Davies – Monday
Yainea – Monday
Jenny Peterson – Monday
Kasia Curry – Tuesday
Chunyuan Wu – Tuesday
Roxie Glaza – Tuesday
Maska Vanacker  – Wednesday
Jenny Gropp – Wednesday
Heather Campbell – Thursday
JJ Bolton – Thursday
Tracy Valure – Thursday
Avery Elle – Friday (Jamie Gracz)
Pam Sparks – Friday

❤ ❤ ❤ ❤ ❤

Only one Christmas card today! : )

PamSparksAELaurels700

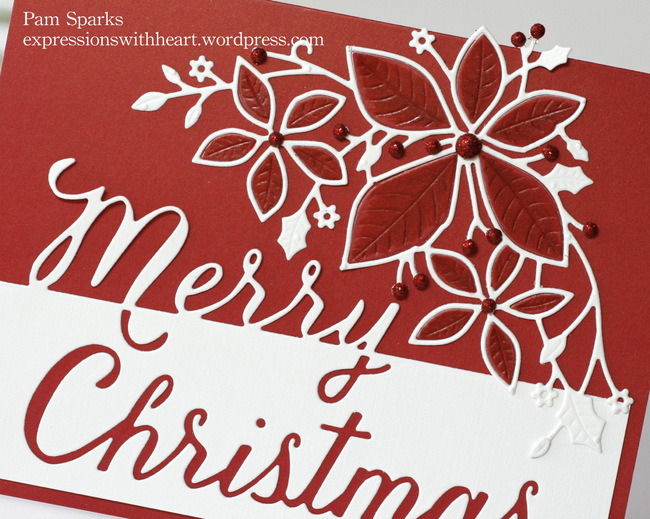
Here I used the Mini Perfect Layers Tools and cutting mat to border the angle (cut with one of the dies from the Custom Panel Elle-ments set) of the kraft card-stock with red.   I do love Christmas and I love these colors together!

PamSparksAveryEllePeek7:31

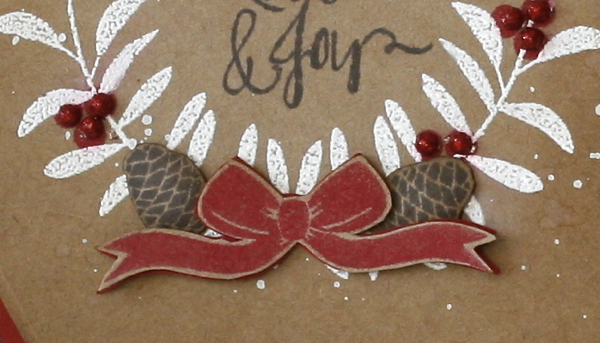
I used the Avery Elle Winter Wreath Clear Stamp Set and Custom Panels Elle-ments for this card. I heat embossed the wreath with white embossing powder. Inked the kraft card with Gathered Twigs Distress ink and spattered it with a little water. Stamped the pinecones and bow on kraft and cut them out by hand. Stamped the sentiments with Espresso Truffle Memento ink, spattered with Dylusions White Linen spray and added red glitter domes for berries.

Linking up to the Simon Says Stamp Anything Goes Challenge
Addicted To Stamps Anything Goes Challenge
Crafting For all Seasons – Christmas in July
Southern Girls Challenge – Christmas is a-coming
Creative Card Crew – Christmas
Avery Elle Challenge – Die Cuts

❤ ❤ ❤ ❤ ❤

PamSparksAELaurelsPink700

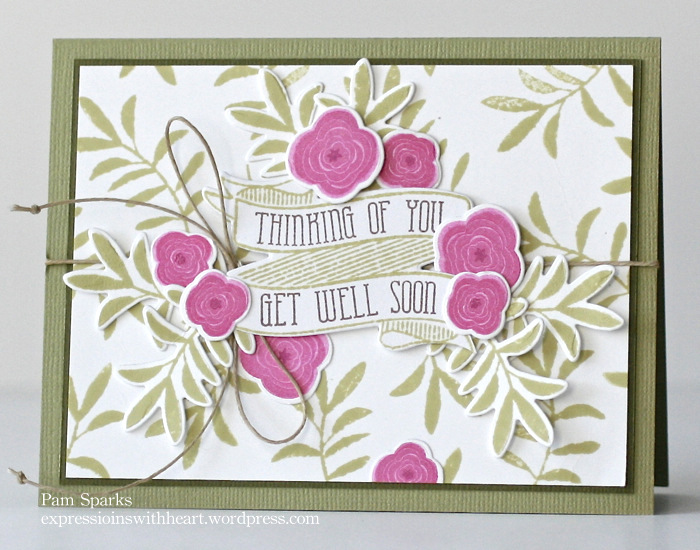
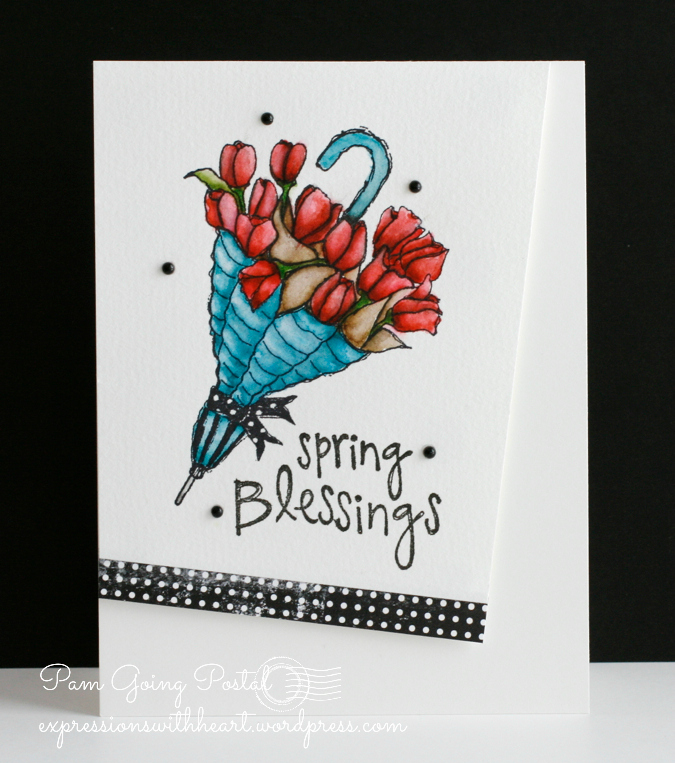
Here I used the Mini Perfect Layers Tools and cutting mat to mat my stamped white panel with 1/16th inch green.  I love being able to cut a perfect 1/16th inch mat every time!!!

I used the Avery Elle Laurels Clear Stamp set, Laurels Elle-ments, Build a Banner Clear Stamp set, Build a Banner Elle-ments and Petals and Stems Clear Stamp set for this card.

I stamped with Shabby Shutters Distress Ink for the green and Versacolor Pigment inks for the pink flowers.

It’s so fun to be able to die cut the images!  Love how the Elle-ments dies work!

Linking up to 7 Kids College Challenge – Anything Goes, Get Wordy
Avery Elle Challenge – Die cuts

❤ ❤ ❤ ❤ ❤

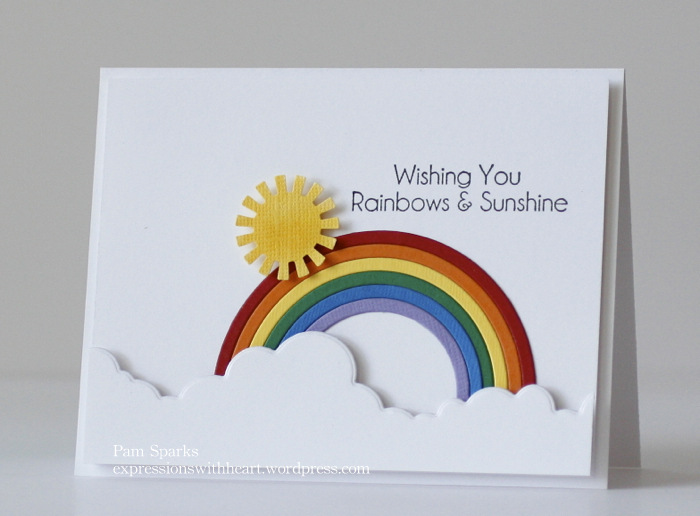
My last card for today. I was inspired by a card I saved from the Avery Elle blog some time ago.  Sorry, I didn’t save the link and there isn’t a name on the photo.  : (   I just had to make it though! It’s perfect for one of our grandson’s.   Our July family birthday party is tonight… so more birthday cards coming soon!

s

I used the Mini Perfect Layers Tools and cutting mat to mat the white panel with an 1/8th inch border.

I used the Avery Elle Happy Camper Clear Stamp set for the images and the happy birthday is from the Red and Goldie Clear Stamp set. 

I hand cut the images out and colored the mountains and canoe with Copics and stamped with Versacolor Pigment ink. Happy Birthday is embossed with white embossing powder on black card-stock.

Linking to the Simon Says Stamp Work it Wednesday Challenge – use the color blue
Color Q Challenge 

❤ ❤ ❤ ❤ ❤

Thanks for visiting my blog today! It was so good to use some of the ‘collection’ today!  wink, wink… I know you know what I mean! lol

Have a great weekend and I hope you win! : )

Supplies I used… 

❤ ❤ ❤ ❤ ❤
CopicSummerSale
❤ ❤ ❤ ❤ ❤

Birthday · cards · CAS · copics · Distress Ink coloring · Fall · Magnolia · Memory Box · Paper Smooches · Perfect Layers Tools · Poppystamps · punches · rubber stamps · Summer

Memory Box 2014 Holiday Stamps Blog Blitz starts today and a Paper Smooches/poppystamps Rainbow…

PamSparksBrambleSurprise700-001

Today I’m starting the week off with the NEW Memory Box Bramble Surprise rubber stamp. As soon as I saw it, I knew I wanted it!!  I love the whimsical feel of it!  I decided on some Copic colorbook therapy with some Distress ink blending for the background.

I matted the image and the Distress Dot paper with the Mini Perfect Layers Tools and cutting mat… love them!  Links on the right and below…


PamSparksBrambleSurprise700Close

After I colored the image, I went around the perimeter of the card with Weathered Wood Distress ink first, then I added in Chipped Sapphire,  then Dusty Concord and on the very edge a bit of Black Soot. Walnut Stain on the bottom.

Then I sprayed water into the palm of my hand and dropped it onto the inked part, staying away from the moon.

I shook up a bottle of White Linen Dylusions Ink Spray real good, opened it and spattered the white dots on by tapping the cap and letting the ink flick off the end of the tube.

I die cut the letters for the word ‘fall’ from the Alphabet Soup die. I put scor tape on the back of Memory Box White card-stock before I cut.  The letters are really easy to adhere to the card when the tape is already on there. The drawback is, the thicknesss causes the holes in the die, (for poking out the waste) to emboss.

I layered Memory Box Violet Distress Dots Card-stock to a top fold A-2 Memory Box Kraft card base that I embossed with the Memory Box Dots Stencil.

Click over to the Memory Box Blog, HERE to comment for a chance to win this stamp!

Linking to the Artistic Expressions Challenge Blog – Anything Goes


I’m behind getting my cards posted on my blog but I will catch up soon!  I wanted to share this CAS Summer card that I made for our area stamp club monthly swap.  July’s theme was a Summer scene.


PamSparksRainbowPS700


The sentiment is from Magnolia, rainbow is Paper Smooches, cloud border is poppystamps and the sun is an old EK Success medium size punch.

Linking up to Addicted to CAS – Sky
the Cutting Edge Challenge #3 – card inspiration

TCEC_3_thumb[2]

Thanks for stopping by!  Catch up with you later!

Links to supplies I used…

cards · CAS · Christmas · copics · Die Piecing · Memory Box · Perfect Layers Tools · rubber stamps

More Christmas in July…

PamSparksCandleLight-001


Three white CAS cards in a row!  At least I got the white part of the holiday weekend in!  I think everyone else is getting ready for the 4th of July and here I am making Christmas cards like crazy!

I’m thinking you want to see the NEW stuff made up though so I’ll just keep making.  Although I think tomorrow is going to be clean out the garage day. ugh.  I’d rather make cards!!! lol

I cut the NEW Tall Taper Candle die out of gold metallic card-stock then again for just the berries out of a scrap of silver metallic card-stock.

I glued this with Tombow Mono Multi glue, green caps, directly to a top folding A-2 size card base. Teeny dots where the lines meet and there is a tad bit bigger area to leave a teeny dot of glue.

*Tip*  Always keep the tip of your glue clean and it won’t clog up on you.

*Tip* and the most important one… always keep your glue laying down. If you keep your glue upside down, it will come out uncontrollable!  eep!

(I did try die cutting this with double sided tape on the back. It didn’t work well for me…too sticky and didn’t hold it’s shape)

Isn’t this Taper Candle die gorgeous?!  Can you just see it made up to look like stained glass?!  awesome!  Can’t wait to do that next!

The holly and berries are from the NEW Cabrini Ornament die.  Three little snips with the scissors and you have the perfect embellishment for the candle!  : )

Did you notice the sentiment?  NEW rubber stamps!!!!  YAY!  This is the NEW Let Your Heart combo rubber stamp.


PamSparksScriptMerryPoinsettiaCorner-001

WOW is right!  LOVE the NEW Grand Merry Christmas Script die!  It’s a beauty!  I paired it with the NEW Plush Poinsettia Corner die. Another beauty!

PamSparksScriptMerryPoinsettiaClose-001

The Grand Merry Christmas is cut from white card-stock and the Plush Poinsettia Corner is cut from white and cranberry card-stock.  The cranberry petals I colored with Copic markers after I glued them in place.  A gal can only go so long without a little colorbook therapy! : )

Several red glitter domes on the berries and this A-2 size card was done.

My last card for today is colorful and picks up the chalkboard trend that has been so popular.

PamSparksHollyJolly-002

Isn’t it fun?!  I love it!  This is the NEW Have a Jolly Christmas die!  FABULOUS!  First I die cut it in white and it was great…but I just had to try some retro-ish colors.  I know…even though I’ve been on a white kick!

So here you have Lagoon, Sage, Cranberry, Licorice and White Memory Box card-stock or notecard colors.

I used my Perfect Layers Mini Tools and Cutting Mat to layer.  The ⅛ th inch ruler for the white mat and the ½ inch ruler on three sides of the card base.  Click HERE. Be sure to use the code Sparks5% at checkout.  The rulers are so awesome!  They save me so much time!  You will love them too!


PamSparksHollyJollyClose-001

See that poinsettia at the bottom?  That is a NEW die too! It’s the smallest flower from the NEW Poinsettia Bloom Trio die.  YAY!  More of everything I love!

Well, this is a lot today…holler if you have any questions!

I’m linking up to some challenges…

Virginia’s View Challenge # 5 – Die Cut

Wonderful Words Challenge – Word Dies

Keep it Simple – lots of turquoise

Thanks for looking, enjoy the holiday weekend and keep coming back to see more NEW * NEW * NEW!!!

Blog Hop · cards · copics · Die Piecing · Memory Box · Perfect Layers Tools · Poppystamps

Perfect Paper Crafting and Simple Stories Blog Hop…

get-attachment-2.aspx


WELCOME to Day One of our Perfect Paper Crafting Blog Hop with Simple Stories.  I’m starting the week long hop here on my blog.  The other PPC and SS gals will have a post on another day of the week.  Check in on the Perfect Paper Crafting Blog each day, April 7 – 12,  for what two blogs to visit!

Prizes!!! * A set of Perfect Paper Crafting Rulers and a Simple Stories Paper Collection! Comment on the blog posts all week for a chance to win!

My first card today, I colored the cut from the Joyful Bouquet die by Memory Box with Copic Sketch markers. Then I colored the flower centers and some of the stems with the Wink of Stella Clear Glitter Brush marker.  (forgot to take a close up to see the sparkle)  I kept the negative/waste part and pieced it back in like I did on this card, in this post HERE

I trimmed it down, matted it with black card-stock and the Perfect Layers Mini Rulers ⅛ inch ruler and layered it on SS Lookin’ Good card-stock trimmed down to an A6 size card. I also used one of the label stickers and the circle heart chipboard sticker from the DIY Boutique Collection.

Challenges…
Stampin’ for the Weekend 
wants to see Spring Colors


Weekly-Favorite


PamSparksJoyfulBouquetSS


Enjoy! it’s a beautiful day!  On this card I used the Perfect Layers Mini Rulers ⅛ inch ruler to mat SS Newspaper card-stock to white card-stock and then to an A2 size kraft card base.   I colored the SS enjoy sticker with Copic Sketch markers to get a closer match to the card-stock I used for the leaves in the die cuts. The sentiment is cut from the SS Who’s To Say card-stock and layered to one of the pieces from the SS Card Foundations pack.   I used the Memory Box Sophia Bloom dies to cut and layer up the flower border.

PamSparksSophiaBloomSS


“Let’s Do This”… what a cute sticker.  We like to ride bikes and take pictures… so it was fun to make a card with the SS bike, flower and butterfly chipboard stickers and poppystamps Cinema Film Strip die.  I added the SS heart talk bubble sticker and a couple more behind the film strip.  I used the Perfect Layers Mini Rulers ⅛ inch ruler to mat SS Chevron card-stock (the back side) to white card-stock, then to SS Polka card-stock and then to a 5 ½ inch square white card base.

PamSparksCinemaFilmStripBike


“You Are My Anchor”, I cut the sentiment from the SS Who’s To Say card-stock.  SS Anchor chipboard, some twine, a SS circle heart chipboard sticker and Memory Box Big Splash Border die at the bottom. This card uses the back side of the SS Outside the Box card-stock sheet and a narrow strip from the SS Herringbone sheet.

PamSparksBigSplashAnchor


A cute “just a note” SS typewriter chipboard, some super sweet heart chipboard circles, a card foundation (I added the white stitching lines), a frame from the Freeze Frame sheet matted with the 1/16th in Perfect Mini Layers Rulera couple sticker labels and this and that word stickers.  A2 size card.

PamSparksSStypewriter


The last one!  hehe  A 4 ½ in. square card with the cute little SS Chipboard telephone sticker and word stickers.  The frame is from the SS Freeze Frame sheet, I used the 1/16th in. Perfect Mini Layers Ruler to mat it and layer it on a SS Polka square of card-stock.  I used one of the blooms from the Memory Box Sophia Bloom set in the corner.

PamSparksSStelephone

No stamps!!! eek!  can you believe it!  I missed them while creating these though.  Paper is fun but I love my stamps!  At least I worked in some dies.  Simple Stories pattern paper, stickers and chipboard make cute and fun cards though and it was challenging for me to use pattern paper again!  I love a challenge! : )

So happy to promote Perfect Paper Crafting!  I LOVE my Perfect Layers Rulers and Mini Rulers.  The mat is awesome too!  Smooth and easy cutting every time! Be sure to use my code, Sparks5%, when you shop the PPC store.

Hop over to Simple Stories blog to see their FABULOUS work!  Comment here and there for a chance to win one of the prizes being given away at the end of the hop! Enjoy the week of inspiration!  Thanks for visiting my blog and happy creating!

Supplies I used to create these cards…


Blog Hop · cards · copics · Easter · Perfect Layers Tools · Printworks · rubber stamps · Spring · Watercolor

Perfect Paper Crafting Blog Hop and Printworks…

get-attachment.aspx

Welcome to the week long, Perfect Paper Crafting, Brand Ambassador blog hop.

  • the hop starts today, March 31st and goes through Friday, April 4th at Midnight PST
  • visit all of the participating blogs and leave a comment on every single one for a chance to win one of the prizes!
  • prizes…one $50 Gift Certificate to Perfect Paper Crafting and one $25 Gift Certificate to Sugar Pea Designs
  • the winner will be announced  Sunday, April 6th on the Perfect Paper Crafting blog

We’re posting today to show you what we created using the NEW Perfect Paper Crafting Mini Tools and the NEW Perfect Cutting Mat!  (use Sparks5% at checkout for 5% off your order)


MinisPkg__02217.1388869767.451.416MatPckg__92234.1388872844.451.416

I have a bunch of cards to show you so I better get started!  You know me… I LOVE, LOVE, LOVE my Perfect Layers Tools and NOW we have NEW Mini tools and an AWESOME NEW Cutting Mat!  I love this mat… it is different than other mats!  It has just the right amount of softness to it… so different than all the hard, hard, mats we’ve been using. I love how the craft knife works on it and you can hardly see any cut marks!  It’s the perfect size for card-making and so are the new mini rulers.

Fabulous products to save card makers time!  That is a BIG plus for me!  No more trimming, measuring, trimming, measuring, trimming, measuring, to get the right mat size! YAY!

On my first card, I used the ⅛ inch and ¼ inch ruler and Printworks NEW Spring Release rubber stamps.  They come in CLING HERE and mounted on WOOD HERE(use the code “PAM2014” for 5% off your order total)


PamSparksPWCrossesRisen2


I was so excited at how this card turned out. I stamped in Archival Coffee stamp ink on Canson watercolor paper.  I painted in the grass and the little bit of yellow with Distress Markers, using them like watercolor.

I edged the piece with Tumbled Glass distress ink and the ink blending tool and then flicked water on it.

Here’s a close up…


PamSparksPWCrossesRisenClose


Here’s the NEW sentiment I stamped with Versafine Onyx Black on the inside.  The flower is colored in with a white gel pen.


PamSparksPWCrossesRisenInside


Here’s a pretty Spring card with the NEW Tulip Umbrella stamp and Spring Blessings sentiment stamp…


PamSparksPWTulipUmbrella


For this card, I used the ⅜ inch ruler to add the polka dot mat.  So easy with the new mini size ruler.  They make me happy!
Then on the inside I used another new sentiment from Printworks…stamped with Versafine Onyx Black ink.


PamSparksPWUmbrellaInside


I have a tip for you… did you notice the top layer of my card matches up to the card base layer in the top left corner?  This slant type card is really popular right now, so I thought, why not!  Then it was like, oh, well, I want the layers to fit together perfectly, what can I do?!   Did you guess?  I use my stamp a ma jig ALL the time!  YES!  It works perfect!  Another awesome tool!  I took a picture so you could see what I mean.  Lay the card base in the angle of the stamp a ma jig, then lay the top piece right in on top and it’s perfect.  I did use mounting squares on the image piece.


PamSparksPWTulipUmbrellaTip


One more thing to make me very happy!  YAY!

The Tulip Umbrella is stamped with Ranger Archival Black ink on Canson 90# watercolor paper.  I wanted a similar white for the card base, so I used Strathmore Bristol card from a pad for it. I watercolored the image with Distress Markers.

***Linking up to the Simon Says Stamp Monday Challenge – Anything Goes

CAS-Favorite

Do I dare post another card?!  So many cute new stamps from Printworks!  Here’s a cute bunny card! I used the 1/16th inch and 3/8th inch ruler to mat the image.  Then I positioned it on the card and used the 3/8th inch ruler again for the sides.


PamSparksPWBunnyCarrotNameTag


I stamped the NEW Carrot Name Tag stamp and NEW thanks with Memento Tuxedo Black ink and colored with Copic Sketch Markers.  The background is Tumbled Glass Distress ink applied with the ink blending tool.

Darling image and wouldn’t it be so cute for place cards at your big Easter Dinner! Just put the name where the ‘thanks’ is.  Cute!

Copics – green YG00, 13, 17;  orange YR00, 02, 04, 07, 09; bunny E40, 41,42 and R81,83,85

I have another card but I think I better save it for another day! : )  You’ve been so patient to make it clear to here in this post! eek!

Here’s the blog  hop list…

Perfect Paper Crafting & Laura Lynn 
Wendy Ramlakhan 
Pam Sparks  – you are here
Roxie Glaza 
Jenny Gropp 
Susie Moore 

Kim O’Connell
Jeanie Witmer 
Heather Hudson 
Lori Brown 
Kat Ancheta 
Dana Joy 
Kristie Maynard 
Kim Bush 
Diane Bove 
Patti Gilliam 
Cathie Rigby 
Linda McClain 
Leigh Brunton 
Nancy Baier 
Jenn Cocran 
Lezlye Lauterbach 
Faith Abigail Prado 

Thanks so much for stopping by today!  I always love sharing what I’ve been up to! Have a great week hopping and commenting for a chance to win! ttul!


Supplies I used on my cards today…