birch press design · cards · CAS · Christmas · Die Piecing · Fall · Memory Box · Poppystamps · Winter · Wreath Building

Memory Box NEW Fanciful Gilded Frame Two Ways…

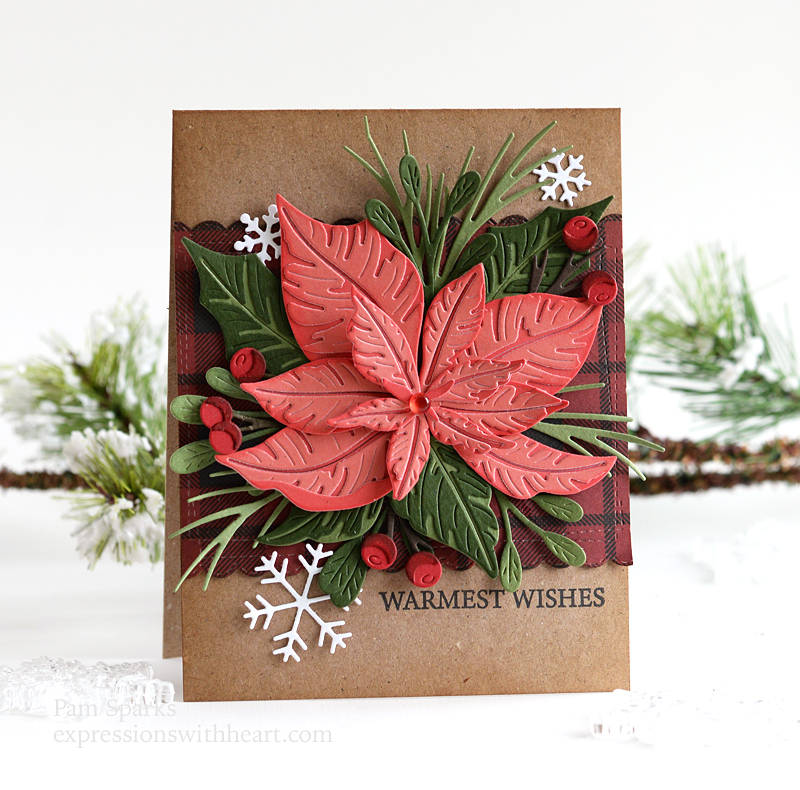
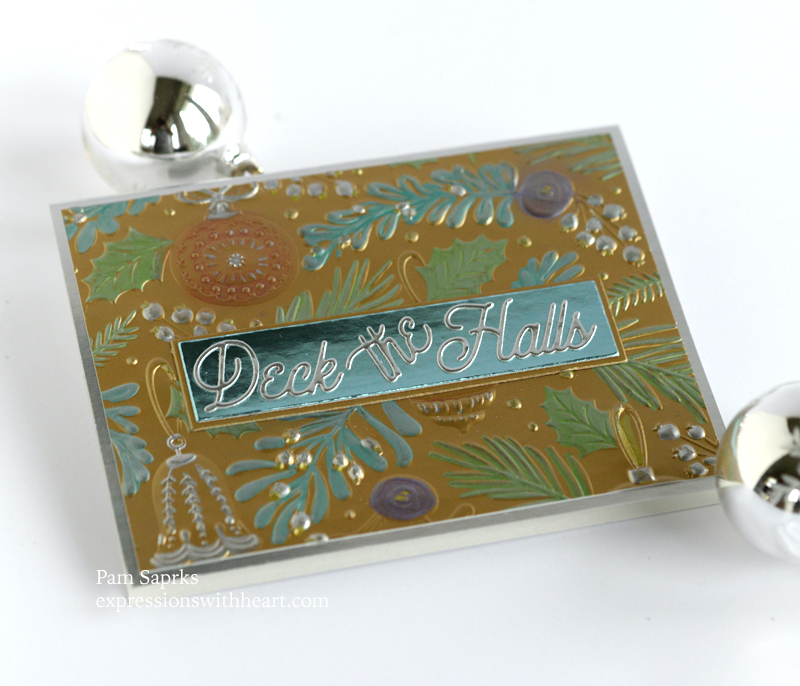
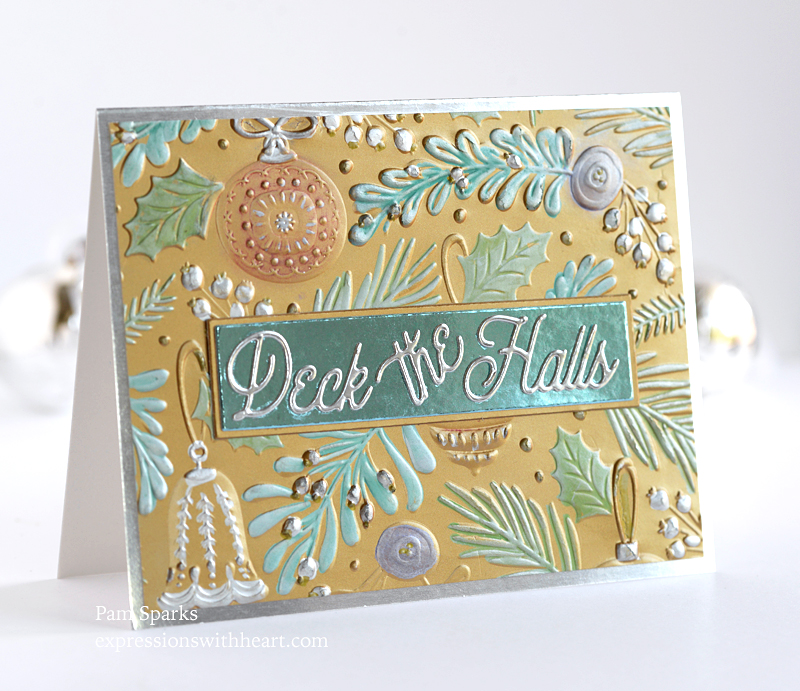
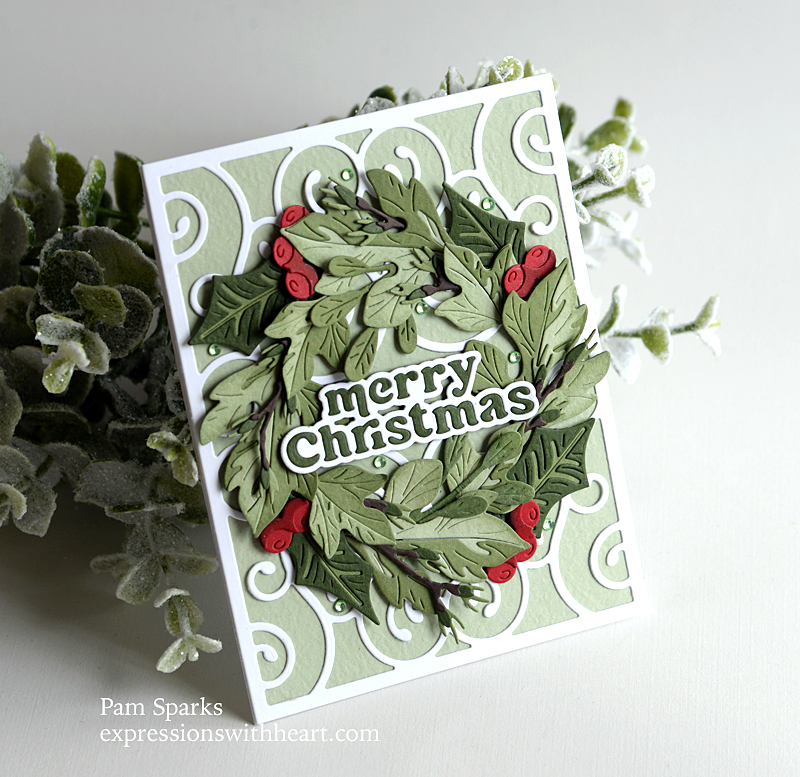
Hi everyone!  Second card with the parts I glued up with the NEW Birch Press Design dies.  This time I used a NEW Memory Box die for the background.  Fanciful Gilded Frame.

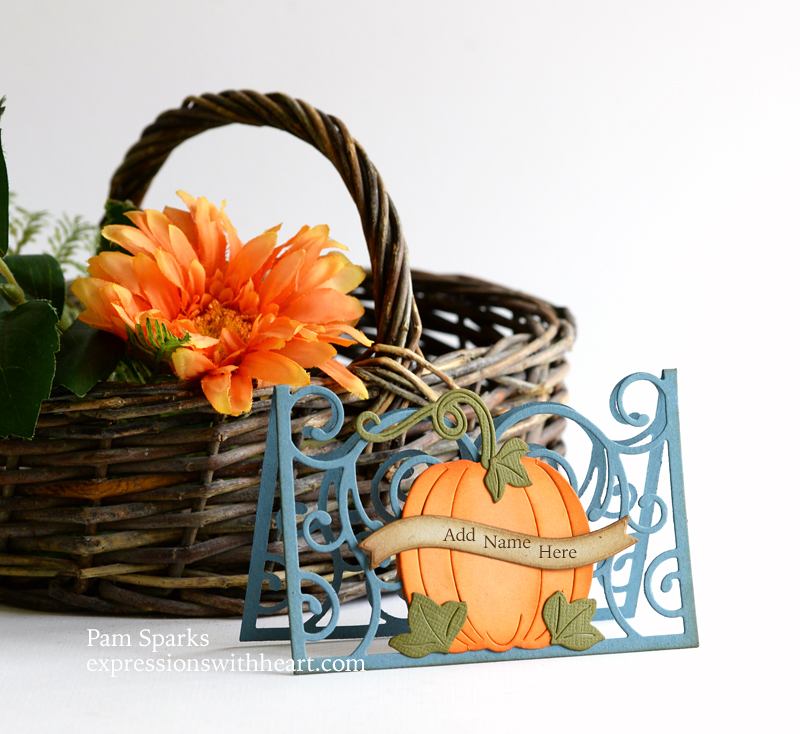
The first thing I made with the frame though was this place card!  I looked at the die and thought, this could be folded in half and used for table decorations!

I made this in 15 minutes!  That’s a record make for me time wise!

Back to the top card…

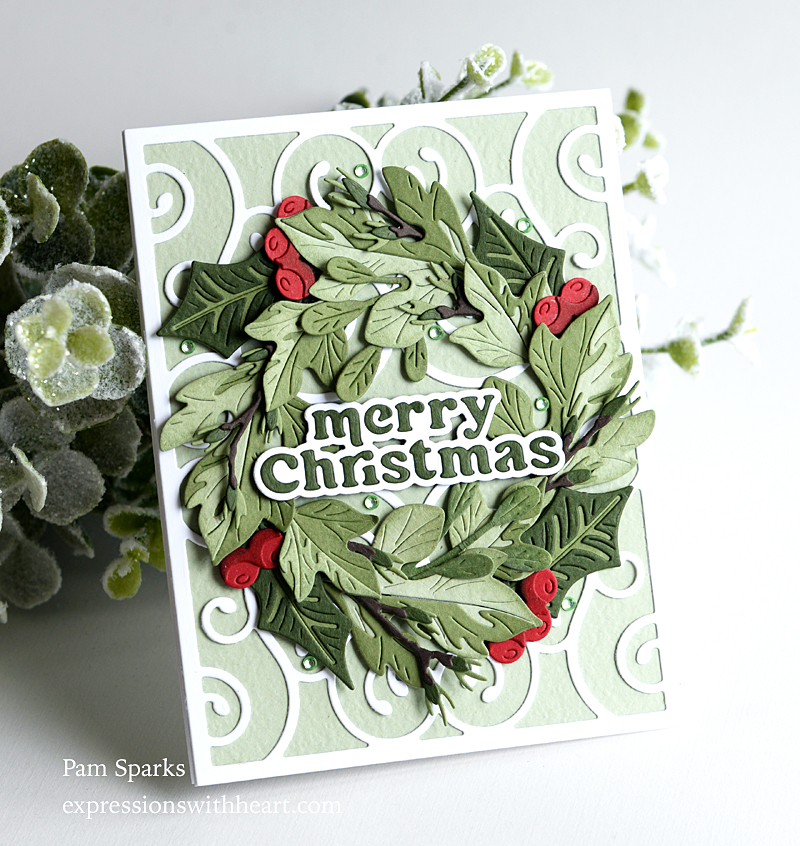
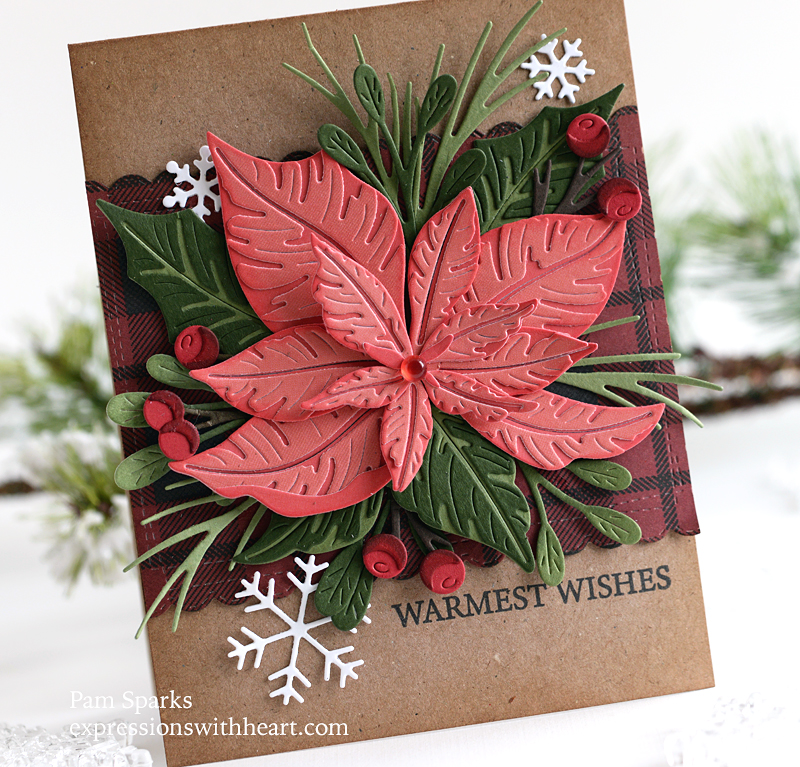
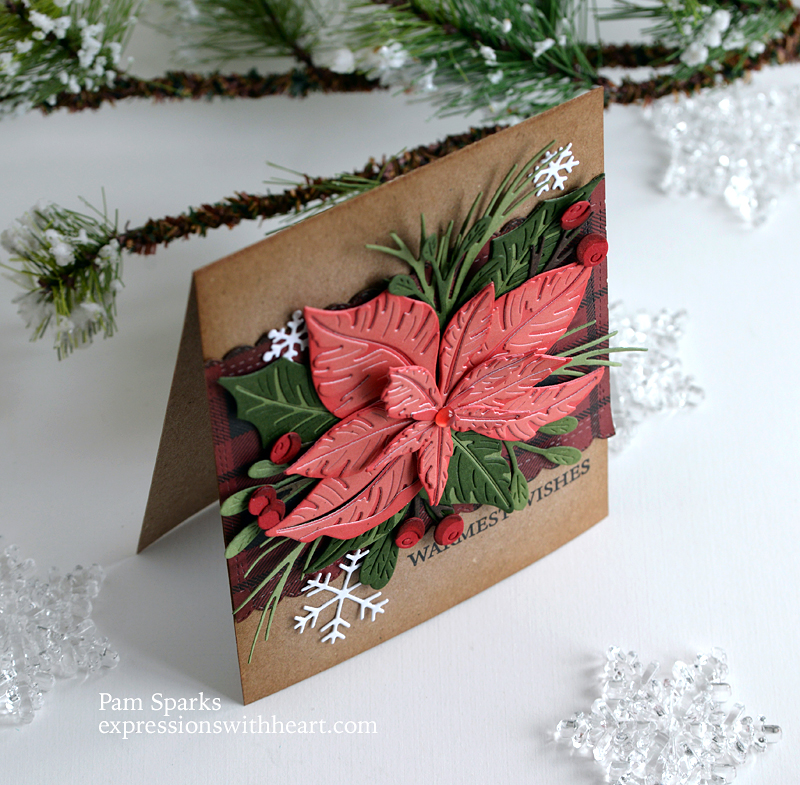
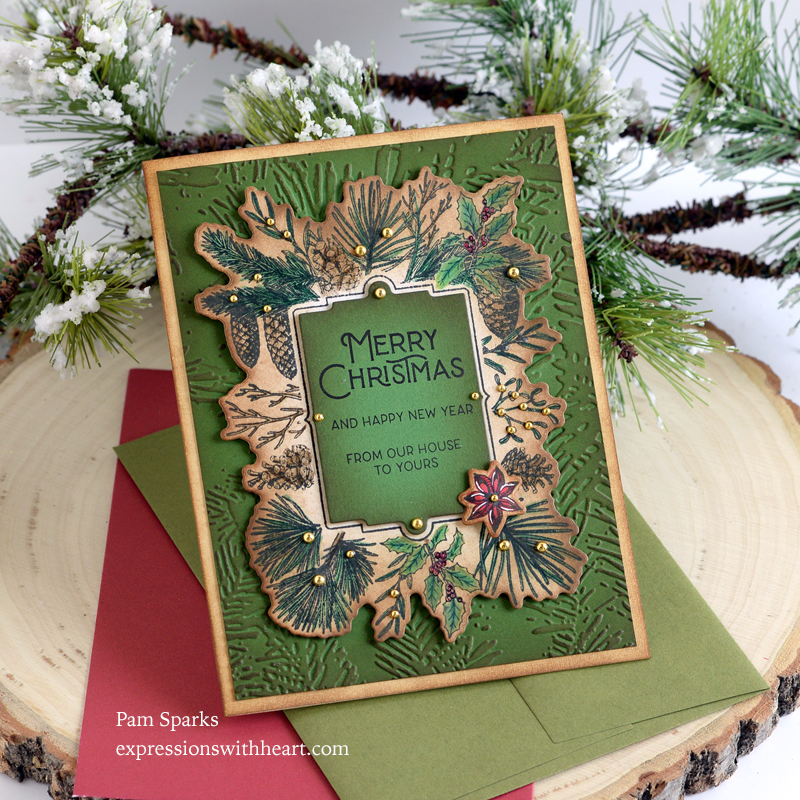
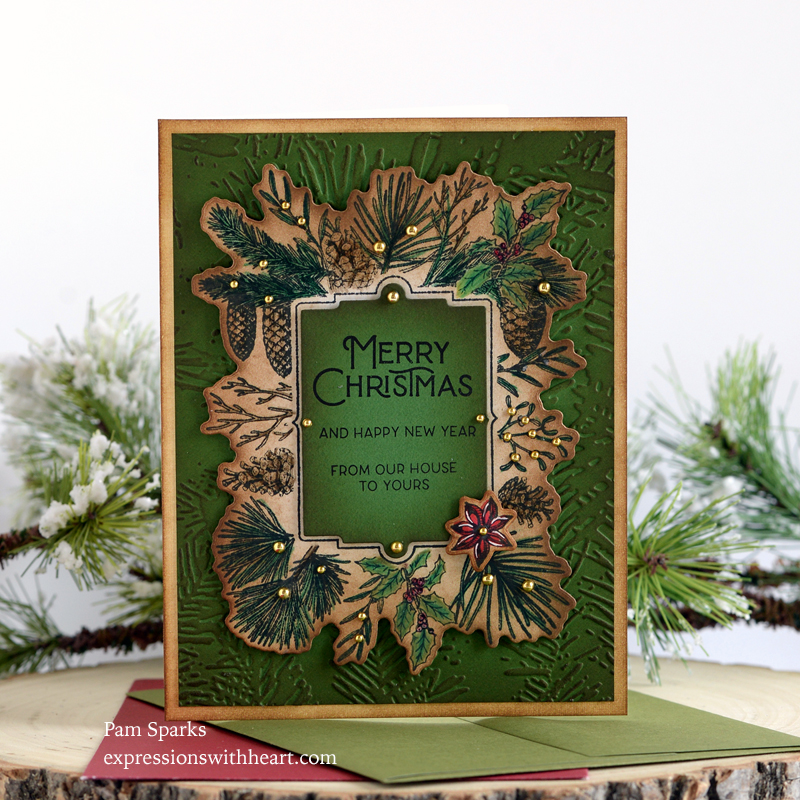
I started the wreath by laying out the four large leaves I’d made from the Forest Leaf and Berries Contour Layers dies, top, bottom and both sides.

Then I added four of the Jolly Holly Contour Layers dies.

Then I went back to the Forest set and put in the four small dies, pretty much beside the holly.

Then I added the berries from the Jolly Holly dies.

I only had two of the small branches from the Oval Leaf Brances Contour Layer so I added them on the inside of the wreath top and bottom.

I cut up the Budding Twigs Contour Layers dies and inserted them here and there.

It looks complicated to me but laying it out like this, it went together fast! YAY!

It really turned out pretty if I do say so myself! lol  I never know! lol

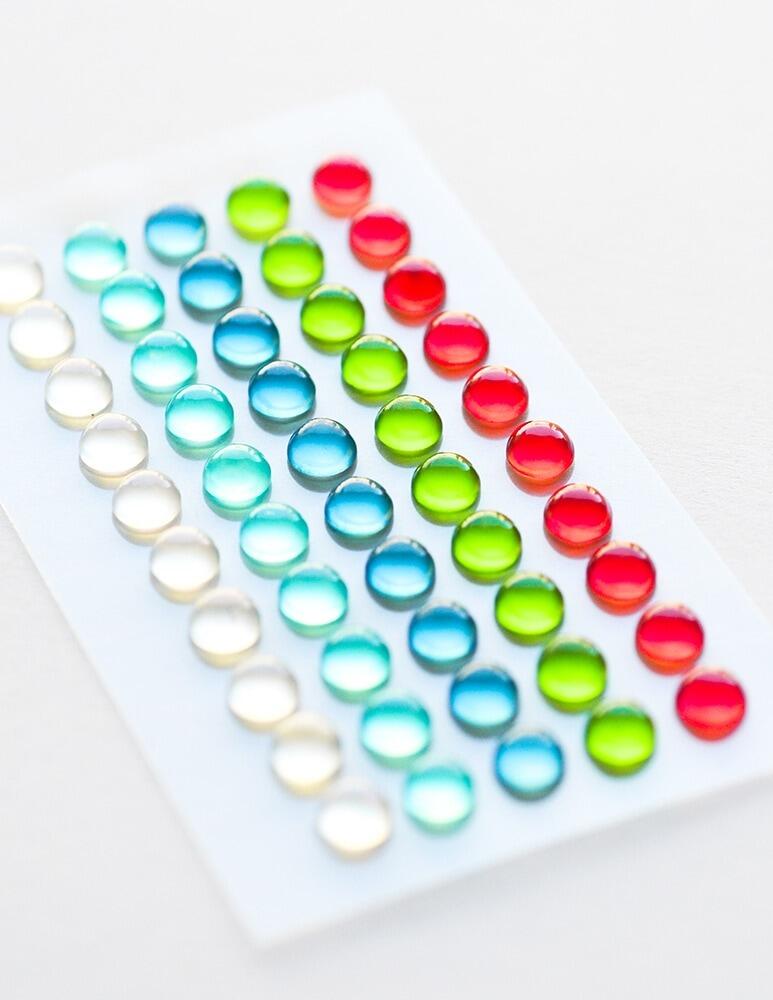
I added some Memory Box Pastel Fairy Jewels in the light green color….matchy! lol

It’s an A2 size card and will go through the mail fine with one stamp! YAY!

Back to the pumpkin…

Do you do name cards?  We don’t because…big family!  I took pictures of this design without the banner too because I would more than likely use it more for a decorative piece here and there or maybe to put in front of a dish to tell what it is!

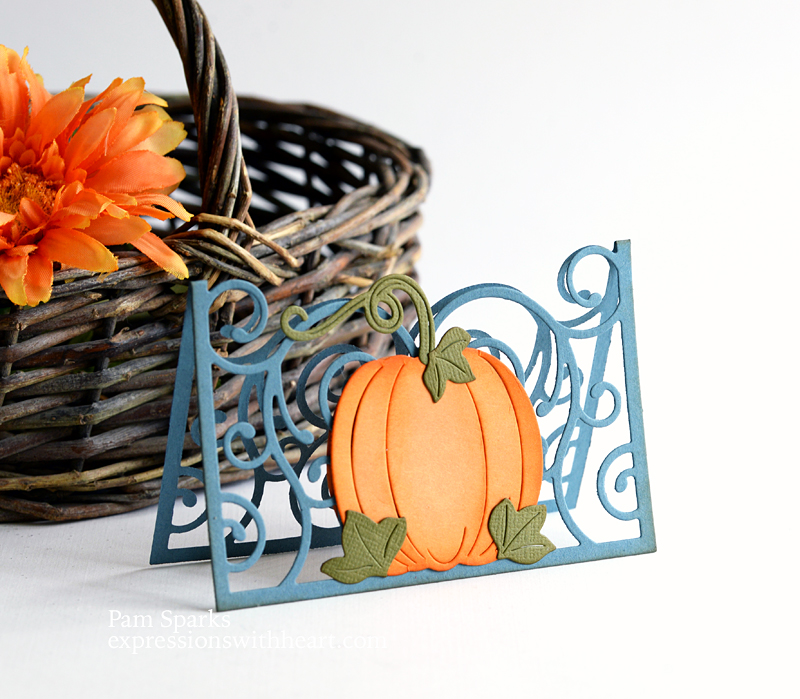
I love this pretty NEW Autumn Pumpkin from Memory Box.  The details are ‘built in’… die cut and it’s ready to go!  I did add a little Spiced Marmalade Distress ink with an ink blending brush but you wouldn’t have to!

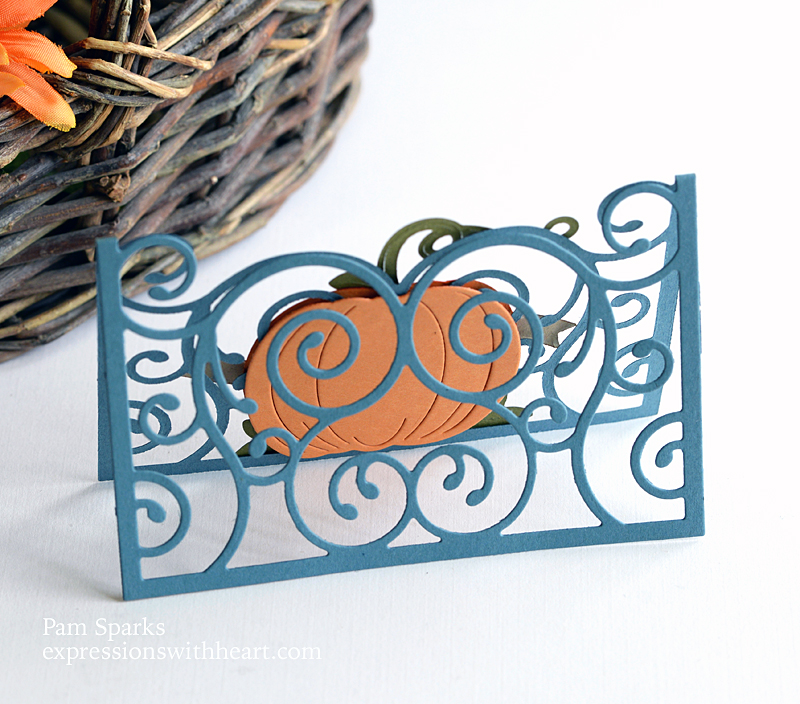
I quick cut an extra pumpkin to back the pumpkin. View from the back….

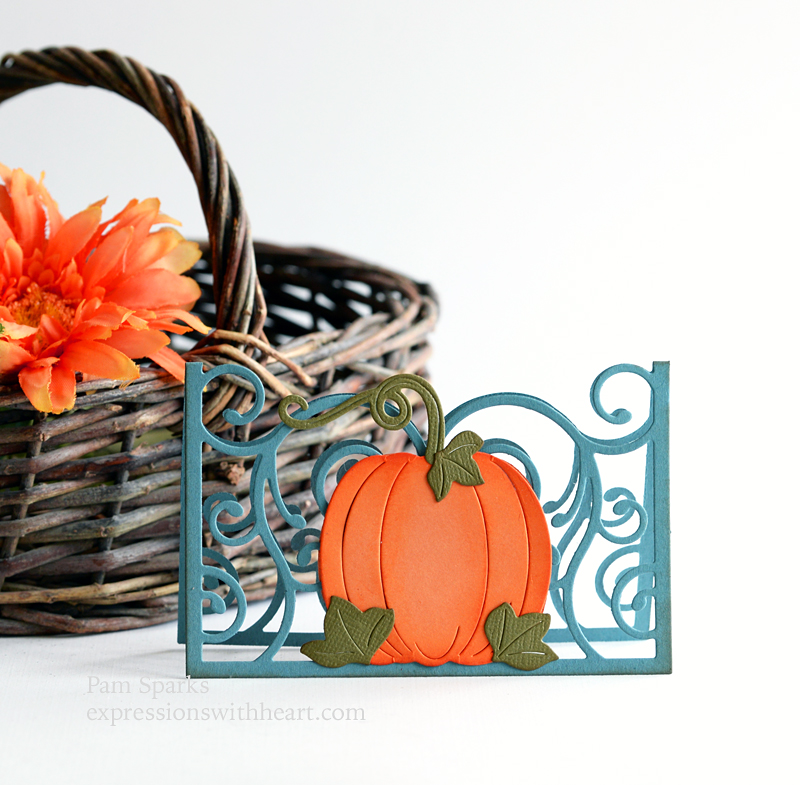
I had this denim looking cardstock still out on the desk so I used it but you could use any Autumn color you like!

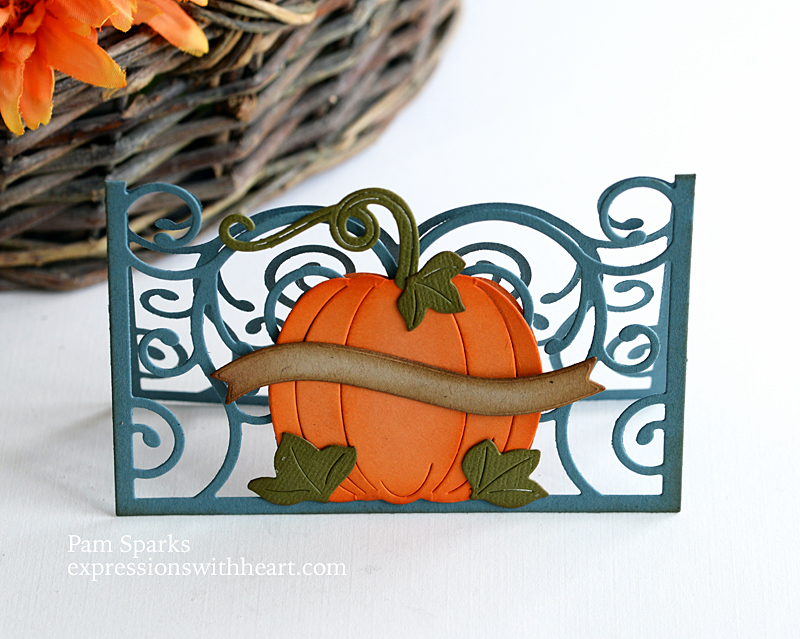
Here it is with the banner again.  I used the banner die from a poppystamps foil and cut die set, Modest Banner Greetings.

Both designs are festive and fun!  YAY for holidays!

One more thing….I made some kits for stamp club this month and I have three left.  Everything is die cut/included to make one card!   $15 includes the postage to you in the USA.  This is the card for the kit.   OH, I did use a white glaze pen on the icing, eyes and buttons and some blush on the ginger’s cheeks. That is not included in the kit.

Email or comment if you want one!

Thank you for visiting my blog today!  It’s so hot here this week, we had a couple really nice weeks, now it’s back to real Summer!  I hope to get a lot done in my stamp room where it’s nice and cool!

Here’s what I used for these projects…holler if you have any questions!

Memory Box – 94660 Fanciful Gilded…
[ STR | SSS ]
Birch Press Design – 57514 Forest…
[ STR | SSS ]
Birch Press Design – 57512 Jolly…
[ STR | SSS ]
Birch Press Design – 57538 Merry…
[ STR | SSS ]
Memory Box – 94690 Autumn Pumpkin…
[ STR | SSS ]
Memory Box Fairy Drops • Jewels •…
[ STR | SSS ]
Birch Press Design – 57525 Oval Leaf…
[ STR | SSS ]
Birch Press Design – 57529 Budding…
[ STR | SSS ]
Poppystamps – PSF806 Modest Banner…
[ STR | SSS ]
Hammermill WHITE 100 LB SMOOTH…
[ SSS ]
Scrapbook Adhesives Crafty Foam Tape…
[ STR ]
Tombow Mono Multi Liquid Glue
[ STR | SBC | SSS ]
Tim Holtz Distress Ink Pad SPICED…
[ SSS ]
Waffle Flower Crafts – Blending Brushes
[ SBC | SSS ]
Sizzix – White and Gray – Big Shot…
[ SBC ]
Bazzill Card Shoppe
[ STR ]
TE Premium Cardstock – Cherry Pop -…
[ TE ]
TE Premium Cardstock – Candy Corn -…
[ TE ]

birch press design · cards · Christmas · Die Piecing · Flowers · Memory Box · Winter

Birch Press Design Splendid Poinsettia Card…

Hi everyone!  I’ve been gluing and gluing so I’ll have a series of cards coming with the NEW Birch Press Design Dies for this release!  Yay for Christmas!

I have a lot of pictures of this one.  I even remembered the inside!  So this card is completely finished and ready for card sending season!

This NEW BPD stamp set is gorgeous!  It’s called Glad Tidings and the font is so so pretty!  My links to everything are below!

The front of this card highlights the NEW Splendid Poinsettia Contour Layers die set.

The layers go together so easily and so dramatic and detailed!  I love it!

Then I used some of the other NEW dies also, Jolly Holly Contour Layers, Forest Leaf and Berries Contour Layers, Oval Leaf Branches Contour Layers and Hillside Branch and Bramble Contour Layers.

I didn’t use all the pieces I made though so more cards coming in the future!  We’ll see how many cards I can make with the pieces I glued up.  There’s a video on Instagram showing them HERE.  It should come up even if you don’t have an account.

I die cut a piece of 6×6 plaid from the Memory Box Jolly Christmas paper pad with one of the Wrapped Scalloped Rectangles dies.  I used it horizontal and trimmed off the scallops on the sides.

I made a top folding A2 size cardbase.  Layered on the plaid rectangle and then the poinsettia with small pieces of the super thin mounting tape I love. I wanted to be able to add the pieces of greenery and leaves easily.

I love how it turned out.  The poinsettia is die cut with paper from the Memory Box Berry Red 6×6 cardstock pad. Then I inked the edges just a little bit with Distress Worn Lipstick ink and a mini ink blending tool.

There’s some dimension but I will mail it probably with an extra ounce stamp because of the Christmas Dewdrop in the center.  If you left that off, you could mail it normal because it’s under ¼ in. thick.

The warmest wishes sentiment is from the NEW Glad Tidings set also… I just love this set!

Then for that pop of white I used BPD Felicity Snowflakes on the front and on the inside.

Entering my card is some challenges…

Triple B August Challenge – use 1, 2 or 3 of the B’s … Birds, Butterflies, Blooms

Peace on Earth #45 – anything goes Christmas

The Holly and the Ivy #145 – anything goes Christmas

Addicted to Stamps and More #452 – anything goes Christmas

The weather kinda took a turn for us and cooled down today.  A little rain off and on…you can tell I’m from Iowa…they say we always talk about the weather! lol  I hope it’s enjoyable where ever you are!

Thank you so much for stopping by my blog today!  I appreciate it!

Some shopping links for you…click on the store abbreviations below the product to go to a store!  Thank you for tapping or clicking through my links!  No added cost to you!

Birch Press Design – 57517 Splendid…
[ STR | SSS ]
Birch Press Design – 57512 Jolly…
[ STR | SSS ]
Birch Press Design – 57514 Forest…
[ STR | SSS ]
Birch Press Design – 57524 Hillside…
[ STR | SSS ]
Birch Press Design – 57525 Oval Leaf…
[ STR | SSS ]
Birch Press Design – CL8164 Glad…
[ STR | SSS ]
Birch Press Design – 57453 Felicity…
[ STR | SSS ]
Memory Box – PP1019 Jolly Christmas…
[ STR | SSS ]
Memory Box Fairy Drops • Jewels •…
[ STR | SSS ]
Scrapbook Adhesives Crafty Foam Tape…
[ STR ]
Tombow Mono Multi Liquid Glue
[ STR | SBC | SSS ]
Ranger Ink Jet Black Archival Ink Pad
[ SBC | SSS ]
MISTI Stamping Tool – The Most…
[ SBC | SSS | SBC | SSS | SSS ]
Ranger Ink – Tim Holtz Distress Ink…
[ SBC | SSS ]
Ranger Ink – Tim Holtz – Mini Ink…
[ SBC ]

Blog Hop · cards · Christmas · Die Piecing · Flowers · Hot Foiling · Spellbinders dies · Winter

Blog Hop for Spellbinders July2023 Clubs!

Welcome cardmakers and friends! Today I’m participating in Spellbinders Christmas in July blog hop!  We’re sharing the July monthly clubs release.

Find out how the clubs work HERE.  I’m using the Small Die of the Month in this post.  You’ll find it HERE.

I made an A2 size top fold card.

Spellbinders die sets are beautifully designed and easy to assemble.  I die cut in three colors and gold foil cardstock.

I used a hot foil plate from the Christmas Magic Glimmer Set for the sentiment and die cut it with the smallest die from the Precision Layering Mini Slimline B die set.

I kept my card clean and simple but there’s so many embossing folders or hot foil plates for backgrounds if you want to add more to your card!  That’s part of why the sets of the month are so fun.  You can use already purchased products with them also!

Links to my other cards I created for the July Clubs of the Month…

Large Die of the Month Club – HERE

Stamp and Die of the Month Club – HERE

3D Embossing Folder of the Month Club – HERE

Now for the GIVEAWAY!  Can’t have a blog hop without a giveaway and this is an awesome one!

To celebrate this release, Spellbinders is giving away three $25 gift certificates to 3 lucky blog readers – selected from the comments on our blog. Giveaway closes on Sunday, July 23rd, 11:59 pm MST. The winner will be announced in this blog hop post the following Wednesday. The winner is responsible for shipping costs, duties, and taxes.

The next blog on the hop is Carrie Rhoades

Thank you so much for hopping by!  I appreciate it and below are the links to the products I used for my card!

Small Die of the Month Membership –…
[ SPL ]
Christmas Magic Glimmer Hot Foil…
[ SPL ]
Precision Layering Mini Slimline B…
[ SPL ]
Precision Layering Mini Slimline Die…
[ SPL ]
Glimmer Hot Foil Roll – Gold -…
[ SPL ]
Glimmer Hot Foil 4 Rolls – Essential…
[ SPL ]
Portobello Color Essentials Cardstock…
[ SPL ]
Blue Spruce Color Essentials…
[ SPL ]
Pomegranate Color Essentials…
[ SPL ]
Mirror Gold Cardstock 8 1/2″ x 11 -…
[ SPL ]
Fashion Gold Embellishments -…
[ SPL ]
New & Improved Platinum SIX Machine…
[ SPL ]
Glimmer Hot Foil System Platinum |…
[ SPL ]
Tombow Mono Multi Liquid Glue
[ STR | SSS | SBC ]
Scrapbook Adhesives Crafty Foam Tape…
[ STR ]

cards · Die Piecing · Embossing Folders · Karin Markers · Spellbinders dies · Winter

Spellbinders 3D Embossing Folder Club of the Month – Christmas in July Card…

Hi everyone!  I’ve always loved the sentiment Deck the Halls but I don’t think I use it every year!

This NEW 3D embossing folder is called ‘Adorning the Trees’!  So the sentiment sure fits!  This embossing folder is a big one.  It will emboss a 8 ½ in. x 5 ½ in. piece of cardstock. I used the top half.

I used a piece of matte, gold metallic cardstock and I had quite a bit of cracking and I hated to pitch it!   I had to think and try a couple things before I landed on the Karin Deco Metallic markers!  Wow!  They worked so good!  Metallic is so hard to capture to show the true beauty of it.

Painting in the design was really easy too.  I really didn’t try for perfection but to my eyes, it turned out great! haha

This picture shows the metallic cardstock under the sentiment better.

I used two rectangles from the Precision Layering Mini Slimline sets A and B.  I am so glad to have so many rectangle sets.  I can pretty much always find one that fits whatever sentiment I need to cut out. lol   Makes me happy because I don’t always use the small sizes of sets.  Do you?

The die cut sentiment is from Mix and Match Holiday Greetings set… I’ll link below.  I die cut it in a matte Silver metallic cardstock, same as the cardbase.

This is an A2 size card.

You’ll find all of the info on Spellbinders Club of the Month deals HERE and the link for just the 3D Embossing Folder Club is HERE.

Holler if you have any questions and thank you for stopping by!  I appreciate your visit so much!

Check out what I used to make this card at the links below…

3D Embossing Folder of the Month…
[ SPL ]
Spellbinders – Universal Plate System…
[ SBC | SPL | SSS ]
New & Improved Platinum SIX Machine…
[ SPL | SBC | SSS ]
Spellbinders – Celebrate The Season…
[ SBC | SSS | SPL ]
Precision Layering Mini Slimline A…
[ SPL | SSS ]
Precision Layering Mini Slimline B…
[ SPL ]
Karin DECOBRUSH METALLIC Markers 28z1
[ SSS | BLIC ]
Zig Glue
[ STR ]
Tombow Mono Multi Liquid Glue
[ STR | SBC | SSS ]

cards · Christmas · Color Pencil · Die Piecing · Distress Ink coloring · Embossing Folders · Flowers · Masculine · Spellbinders dies · Winter

Christmas in July Spellbinders Stamp and Die Set Club Card…

Hi everyone! I had fun with this!  If you’ve known me for all the years I’ve been stamping, you know I LOVE brown! haha  I stamped and die cut this twice in Hammermill White cardstock thinking I would color it with Copics.  I sat down and started coloring one with color pencils! lol  I still have the other white one to color with Copics.

I have a deep love for brown…when Ranger came out with Van Dyke Brown all those years ago I bought a few reinkers thinking I’d use it forever!  But then Distress Inks and then Gathered Twigs!  Gathered Twigs regular Distress is my go to!  Do not take my Gathered Twigs away!

I die cut the floral shape, put the waste/frame in the MISTI, lined up the stamp in the hole, put in the die cut, inked up the stamp and stamped with Memento Tuxedo Black ink.

I used Caran d’Ache Pablo Color Pencils to color but any will work.  After coloring I went around the edges with Gathered Twigs and the mini ink blending tool.  I just keep this color and this tool handy on my desk all the time!

I embossed the Forevergreen Embossing Folder in TE Cilantro cardstock and inked it with Gathered Twigs Distress ink and the mini ink blending tool.   I trimmed it down this time so my card would end up A2 size.

I ink blended a natural linen cardbase with Gathered twigs also. Just around the perimeter.

The panel in the center is a die that comes with the set too!  Dies for everything in the stamp set!  Such an amazing deal!

I lined up the sentiments in the MISTI and inked up the decorative panel…inked it up with GT also!

Glue on the little gold pearls…adhere everything to the cardbase and it’s ready to mail almost!  I need to bring back my last year’s resolution to finish the insides…. ugh. haha

Here’s where you need to go to get the info on joining the Spellbinders monthly club option or options!

Here’s the link to the Clear Stamp and Die Kit of the Month.  You can also choose just to get the Stamp Set.

CHRISTMAS in July SALE going on right now HERE!

Thank you for stopping by my blog today…hope you’re inspired and making something fun!

Links to the products I used to make this card…

Clear Stamp & Die of the Month Club –…
[ SPL ]
Spellbinders – Tis The Season…
[ SBC | SSS | SPL ]
Hammermill WHITE 100 LB SMOOTH…
[ SSS ]
Ranger Ink – Tim Holtz – Distress Ink…
[ SBC | SSS ]
Ranger Ink – Tim Holtz – Mini Ink…
[ SBC | SSS ]
Caran d’Ache Pablo Colored Pencils…
[ BLIC ]
TE Premium Cardstock – Cilantro -…
[ TE ]
Scrapbook Adhesives Crafty Foam Tape…
[ STR ]
Tombow Mono Multi Liquid Glue
[ STR | SSS | SBC ]
Tiny Pearl Embellishments – flat…
[ STR ]
New & Improved Platinum SIX Machine…
[ SPL | SSS ]
Spellbinders – Universal Plate System…
[ SBC | SPL ]