cards · Die Piecing · Masculine · Patriotic · rubber stamps · Taylored Expressions

Taylored Expressions May Release Day…

Pam Sparks Lakeside Thurs

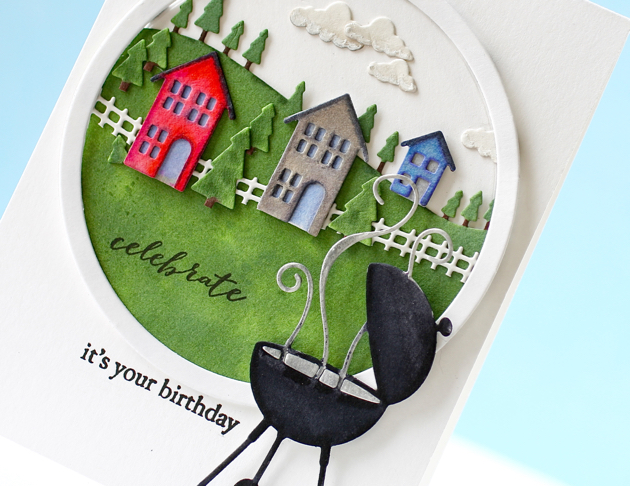
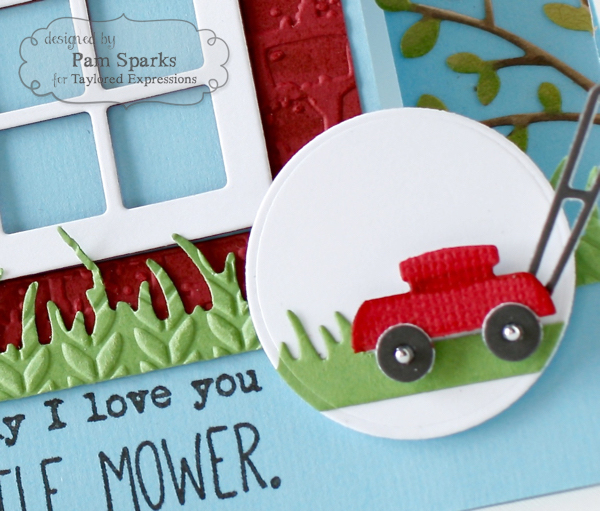
Hi everyone! Welcome to my blog post for Taylored Expressions May stamp and die release. My first card today features the NEW Build a Scene Lakeside die set and the NEW Paddle Out stamp set. I stamped the sentiment with the MISTI and Versafine Onyx Black ink. Lots of potential for man cards here!  YAY!

I inlaid some clouds and popped some up from the Little Bits Sun and Clouds die set. I used the Build a Scene Rolling Hills for the grass, die cut from Granny Smith card-stock.

Pam Sparks Thursday (1)

I die cut the scene with the Stitched Rectangle Stacklets and mounted it to a piece of Toffee card-stock. I edged most of the scene pieces with Distress inks and the ink blending tool.

Linking to the Happy Little Stampers challenges – Inlaid Die Cutting

See these products in the TE online store…

Pam Sparks RedWhiteBlue Marching On

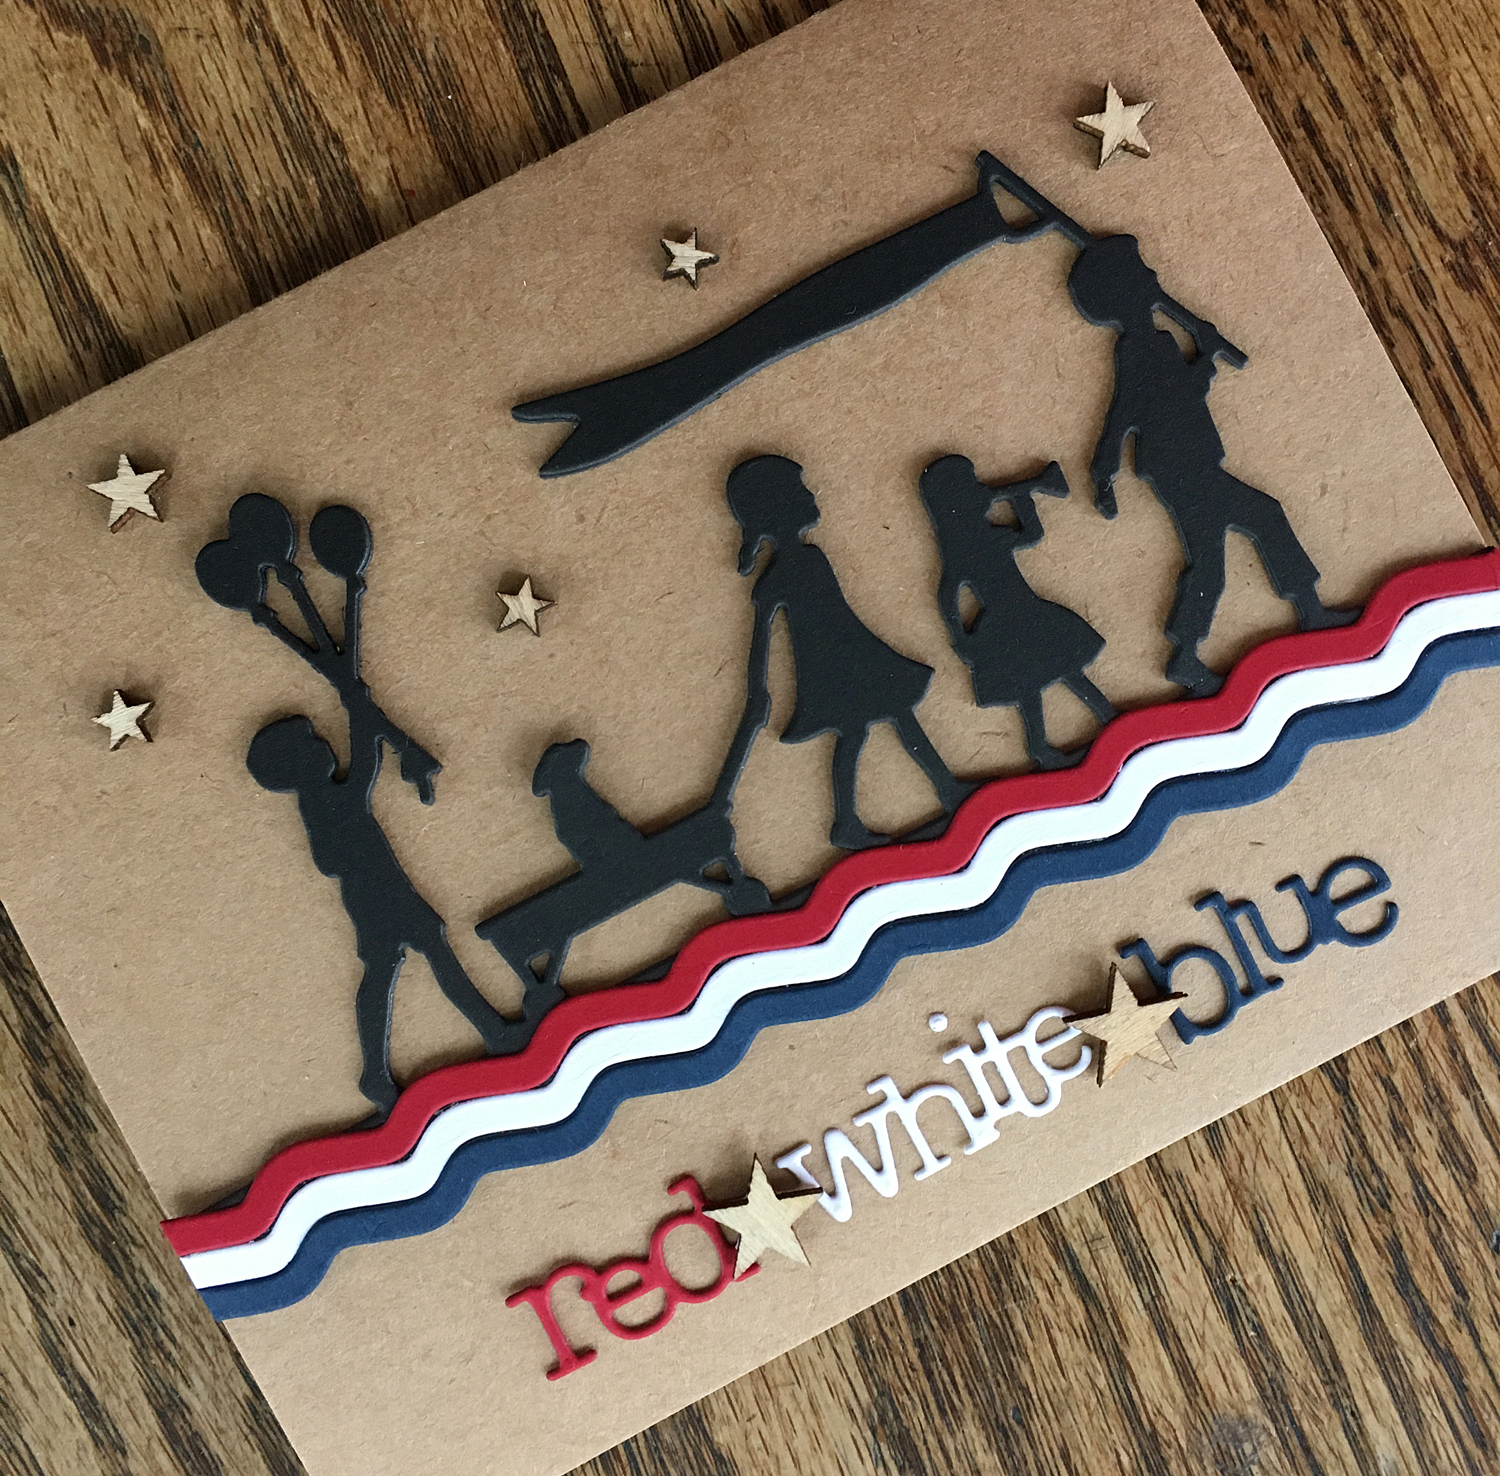
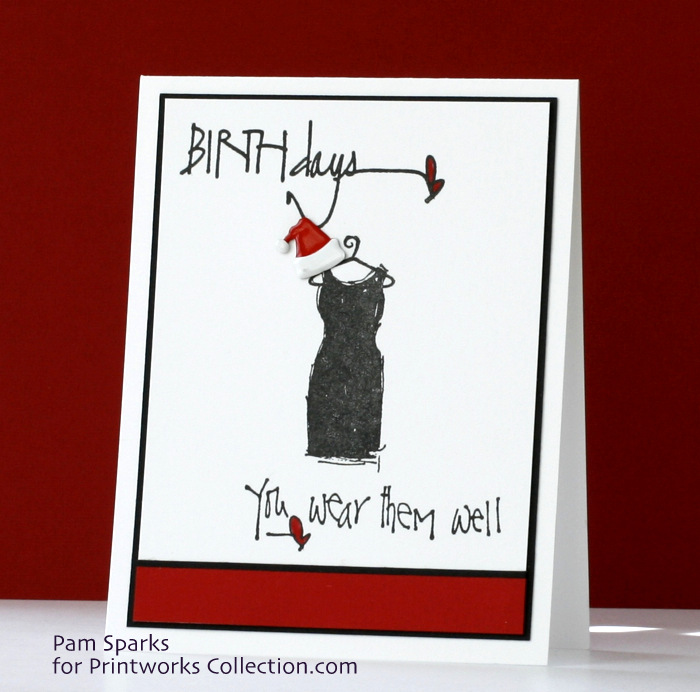
When I saw this NEW Marching On die, I knew I HAD to have it!  I’ve always loved the silhouette kids stamps and now dies… swoon. hehe

I die cut it three times in black card-stock, glued them together and then glued them to a Toffee card-base. I die cut the NEW Lakeside Border die and the NEW Americana Script die in Red Pepper, Blue Corn and Sugar Cube card-stock. Glued or taped them together and adhered them to the card.

I embellished the card with some wood veneer stars cuz it’s a celebration!

Pam Sparks Red White Blue Silhouette

See these products in the TE online store…

Thanks for stopping by my blog today! It’s another fabulous release from Taylored Expressions! Click over to the TE blog to see Taylor’s posts and scroll down for links to the other designers posts. You won’t want to miss their inspiration!

Birthday · cards · Masculine · Memory Box · Watercolor

Memory Box Circle Forest Scene BBQ…


PamSparksCircleForestSceneBBQ700


You can plan a BBQ even if it’s not your birthday though!  Celebrate Summer with a fun scene card!

I cut a white piece of card-stock 4.25 in. x 11 in., scored and folded it for a top fold card base.  Top fold cards are the easiest to photograph and another photo tip, if you’re using natural light, be sure to pull up the blinds!  Open blinds let in light but you’ll be amazed how much better it is when you pull them all the way up and out of the way! Your camera will thank you! lol

oops!  Got off track there for a minute, back to the card!

I die cut the Circle Forest Scene parts from cold press watercolor paper.  Then I watercolored them, the grass/trees with Peerless and the grill, houses and clouds with Zig Clean Color Brush Pens.

The little curvy fence is from the Wide Open Spaces Open Studio die set. I just trimmed off the bottom…perfect fit!


PamSparksCircleForestSceneBBQClose


I wish I’d  used the Celebrate from this set because it’s just enough larger. I didn’t see it until I’d already stamped this one from poppystamps Into the Words set.  ‘It’s your birthday’ is from the same set.

I die cut a circle frame to place over the top from the Shaker Circle Frames die set.

Well, I see I goofed.  The Grill has been discontinued!!!  I wouldn’t have thought… so think bicycle or golf cart or even the new tractor die!  Sorry about that!

All that’s left to do is layer everything up!  I use ATG, Tombow mono multi glue, thin and regular 3L/Scrapbook Adhesives mounting squares.

Happy Summer day to you! Hope the weather is treating you right! haha  Thanks for stopping by! TTUL!

Birthday · cards · copics · Masculine · rubber stamps · Taylored Expressions

Taylored Expressions May Release Day…


PamSparksUnderTheToadstoolThurs


Hi everyone!  It’s Release Day at Taylored Expressions today!  My first card is a new stamp and die combo called Under the Toadstool. Super cute and whimsical with the little glittery fairy and her magical kingdom.


PamSparksUnderTheToadstoolThursClose


I inked up an acrylic block with Distress ink pads, spritzed with water and smooshed a piece of watercolor paper onto it for the background.  The images are stamped with Memento Tuxedo Black ink and colored with Copic Sketch markers.  Then die cut with the coordinating dies.  The dies are very easy to use because you can see where to position them!  YAY! A coat of Wink of Stella Clear Brush Marker finished her off.


To complement the scene I used the TE Wispy grass and Arbor Accessories dies. I colored the stems and flowers with Copic Sketch markers, shaped with a mat and stylus then glued them to the corners.


This month’s release has us looking ahead to Father’s Day!


PamSparksPunnyManThurs


I made an A2 size Center Panel Step Card.  Don’t you love that cute Little Bits lawn mower die?!  The window, well, it’s really a new die called Gridlocked!  Love the new Brick Embossing Folder too!


Version 2


I die cut the Shades of Thanks tree in white card-stock and colored with Copic Sketch markers.

The Wispy Grass die I cut from green card-stock and embossed it with the Cable Knit Embossing Folder.

The cute sentiments on the front and inside are from the new Punny Man stamp set… so fun!

and here’s the inside…


PamSparksPunnyManMowerInsideThurs


So glad you stopped by today! If you’d like to see more projects and new product information, please head over to the TE Blog for a complete blog roll of the participating designers!


Hope you’re inspired to create some cards with TE stamps and dies!  😀

See ‘ya!


All of the new products are available for purchase at the TE web store today!

Birthday · cards · Christmas · copics · Masculine · One Layer Card · Perfect Layers Tools · Printworks · rubber stamps · Winter

Printworks Collection Birthday and Christmas…


HI Everyone!  Three A2 size cards to show you today…I really have six but I’ll hold off on the other three for another post!

Do you have any Christmas birthdays coming up?  I’ve had these santa hat brads and I just had to use one!

I matted the main panel with black card-stock cut with the Perfect Layers Rulers.  Can hardly make a layered card without them!

If you’re shopping, be sure to use my coupon codes over in the sidebar for Printworks and for Perfect Paper Crafting!


PamSparksPWBLKdress700


and on the inside…

PamSparksPWC-masB-dayDressInside


A masculine card with a nature twist…I used a gold Krylon pen for the gold dots… dispensed some out on the craft sheet and dotted the ink onto the card with the end of a paintbrush.  Edged the sentiment with Distress ink and then the Krylon pen.  Stamped with Printworks Ivy and Oak Brown ink pads.  I did shadow the stag with a little copic coloring.

PamSparksPWStag700


on the inside…Printworks has the best scripture sentiments…stamped with Printworks Ivy Ink pad.

PamSparksPWStaginside


I love this one… the gold embossing and pretty Christmasy colors.  I stamped and embossed several stamps and then colored with watercolor markers – Tombow and Memento.  Tied on some twine.

PamSparksPWteacups700


then on the inside…stamped in black versafine ink.

PamSparksPWDearFriendInside


Entering my Dear Friend card into the following challenges…

Addicted to Stamps – Make your mark

Catered Crop – Anything Goes

Penny Black and More – Anything Goes


Here’s the stamps I used on these cards…available @ Printworks Collection.com – links to cling stamps but wood available also.  If the stamp isn’t on the website, add it to your order in the comments section.


So glad to have you stop by!  Can you believe this???  I didn’t use any dies!!!  Whoa! haha! Happy stamping weekend to you!

Stamps and supplies I used on these cards…


Birthday · cards · CAS · Die Piecing · Masculine · Memory Box · rubber stamps · Spring · Techniques

NEW Memory Box!!!

PamSparksBeautifulBalloonHello2

Here’s the NEW Beautiful Balloon die pieced and inlaid with the Puffy Clouds dies… I just love this look and I had so much fun creating it!  After everything was pieced in, I stamped parts of the happy hello combo stamp with the Stamp a ma jig.  Love the embossing detail in the balloon!

Hello is die cut out of the card front also and another white hello die cut inserted.  Imagine the ‘hello’ as part of the cloud formation.  : )

Ribbon is from May Arts in stock at Starlitstudio.net
Memory Box Holly Berry Red & White A-2 Notecards

This truly is a one layer card.

PamSparksBeautifulBalloonHello2Close

And another card…

PamSparksWildflowerCornerAstiSwirlFront

*For this card I cut the Wildflower Corner two times.
*Glued one complete cut in the bottom left corner. (I use Tombow mono multi glue, little dots here and there)
*Glued the other corner in pieces to the top right corner, right side and top left corner.
*Die cut the thanks Cloud but just used the word.  I cut my thin mounting squares into narrow strips.

PamSparksWildflowerCornerAstiSwirlClose

*die cut the Asti Butterfly wings directly in the card front…it doesn’t cut completely…it stays connected at the body.
*die cut the Swirl Butterfly, glue on top of the Asti butterfly
*Memory Box White and Lagoon A-2 Notecards

A pretty CAS card that could be used for several occasions!

Here’s another take with the Wildflower Corner die cut in the front panel of the card twice… then cut again twice from white card-stock and inlaid into the holes  you cut in the front of the card.

Version 1…that I gave away…

PamSparksWildflowerCornerBirthday1

Version 2… I made it again this a.m. so I’d have one but I didn’t look at my photo first!  The corners are in different corners!  pout.

PamSparksWildflowerCornerBirthday2copy

I don’t think I’ll make it again today anyway but I like the corner placement on the first card the best. The second one I did a better job of keeping track of all the little center dots! lol

I have a few tips that make this go easier… thinking video… let me know if you get this die and need help… so hard to explain with words.

In the post before this one… I list the steps I used to inlaying die cuts.

Well back to the die cutting table and stamping desk!  Have a great week stamping friends and I’ll be back with something sometime! : )  Thanks for all your comments and encouraging words!  They always help me keep motivated! ttul!

Links to the Supplies I used…