cards · CAS · Christmas · Die Piecing · Distress Ink coloring · Fall · Memory Box · rubber stamps · Watercolor

Memory Box Fall cards and one Christmas card…

 *** Some new Fall stamps added to my ‘for sale’ page… click on tab under the blog header ***

PamSparksAlessandriaTreeLeaf700

It’s looking like Autumn here today!  Love the cooler temps!  The fabulous colors of Fall are showing up everywhere!

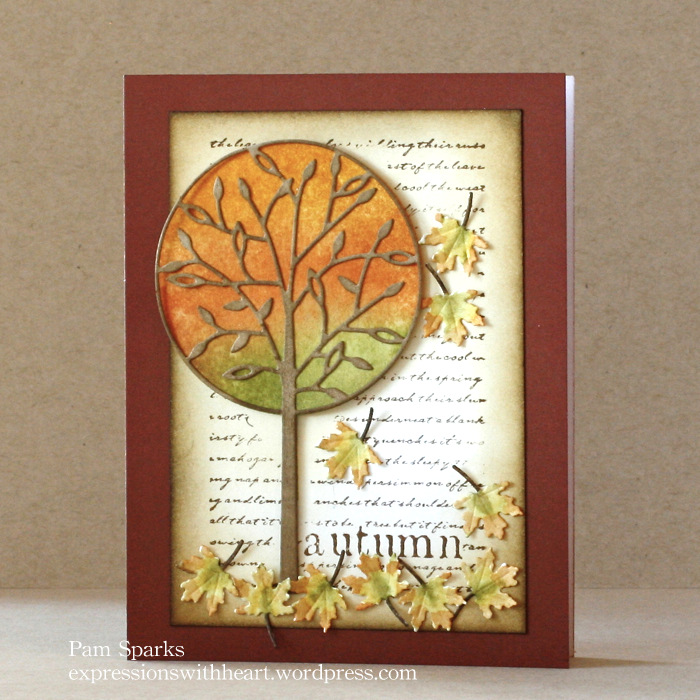
I started with a MB Crimson Notecard and stamped the Autumn Leaf Collage stamp on a MB Parchment piece of notecard.

The Alessandria Tree Background die and Marvelous Maple Leaves die were cut from watercolor paper and watercolored with distress inks. I added the leaf veins with the smallest stylus from the McGill Stylus set.

Then the Alessandria Tree on top.


PamSparksCasertaBloomFall700

I started this card with a MB Parchment Notecard, stamped the Journey Collage stamp on it but covered up the word journy with the new Give Thanks Combo stamp.

Die cut the Caseta Bloom die from three colors of MB card-stocks. Add a couple sequins to the flower centers and some 1/16th inch brads.

Die cut the Grapevine Wreath die from MB kraft card-stock and ink.

Linking my card up to…
Simon Says Stamp Wednesday Challenge blog – ‘stamp it’


PamSparksSilverMerryChristmasSnowflake700


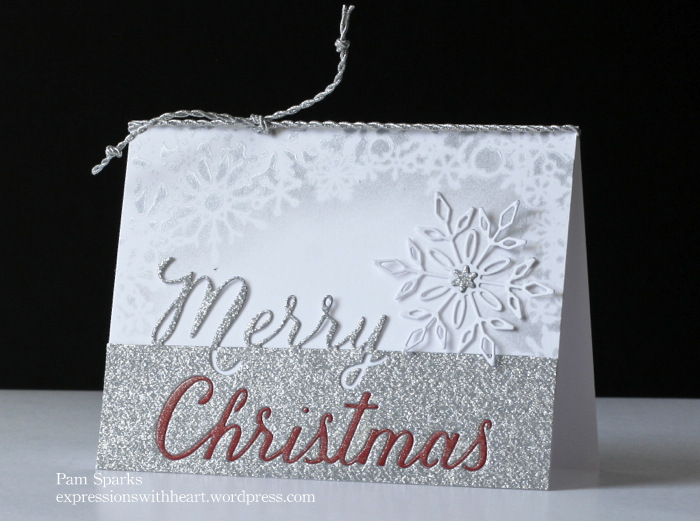
Here’s a festive CAS Christmas card using techniques we love and easy to create multiples of!

1. I stenciled the Memory Box Flurry Frame Stencil with Tsukeniko’s Delicata Silver ink and one of their large ink daubers on the top portion of a Memory Box White A2 notecard.

2. I die cut the Grand Merry Christmas Script die from Silver Glitter card-stock and Memory Box Cranberry card-stock. Be sure to keep the cranberry dot for the i and the silver inside piece for the tail of the y.

TIP: You could use any color for the word Christmas! A way to use up scraps. Try Black, Teal and Royal purple! (wish I’d thought of that while I was making it! lol)

3. I trimmed the silver cut to fit the white notecard.

4. Adhere the Grand Merry Christmas to the notecard.

5. Keep the word Christmas from the cranberry cut, insert into the silver cut.

TIP: If you use double sided tape to adhere your silver Merry Christmas to the card, there will be adhesive where the cranberry Christmas fits, if you go ahead and place tape over the cut out area too.

6. Die cut the Bristol Snowflake die in white and silver glitter card-stocks.

7. Adhere the silver center to the white snowflake and adhere the snowflake to the card.  I just glue the center.

8. Add some pretty silver cord at the top, tying with a square knot.

9. I used the clear Wink of Stella brush marker on the word Christmas.

That’s it for today!

Holler if you have any questions!  Always love reading your comments!  Happy Fall Y’all!  TFL!

Products I used on these cards…

cards · Christmas · Die Piecing · Embedded Die Cuts · Memory Box · Perfect Layers Tools · Poppystamps · rubber stamps · Techniques · Tutorials · Video

Adhering Intricate Dies Video…


Embedded Diecuts


I did take this in high definition so after you click play,  you can click the gear for a better picture and click the frame to see it large!

Here’s my technique for making your die cuts into stickers for perfect placement.  I’m really pleased with how it works… so many of the fine line dies from Memory Box are easy to pull out of shape.  After trying several things, this is what I came up with! I hope you’ll try it too!

One thing I didn’t show in the video is changing the color of the petals.  It’s really easy though… just cut the die in the color card-stock you want the petals and adhere them over the top after the process I show in the video.

On my candle card, I added the black pieces over the white after using the technique I show in the video.

  1. glue the musicality background die cut to the card base (little dots of  Tombow Mono Multi behind the notes)
  2. die cut the tall taper die just like I did the plush poinsettia in the video
  3. while still in the die, (after removing the waste) lay it right over the top of the musicality background piece, run it through the Big Shot just like I did in the video
  4. remove the die
  5. die cut the contrasting tall taper parts that you want a different color and glue on (or make them a sticker too)


PamSparksFFblackKraftWhiteCandleMusic700
The holly is from the Cabrini Ornament die. Die cut and then trim the holly away from the ornament with scissors.

Thanks for stopping by today!  ttul!

Dies and supplies I used…

cards · CAS · Christmas · Die Piecing · Memory Box · Perfect Layers Tools · Poppystamps · rubber stamps · Techniques · Winter

Memory Box and poppystamps for challenges…

PamsparksFFblackKraftWhiteTree700

My cards that I’m linking up today were totally inspired by the inspiration photo from Festive Friday Challenge blog.  Oh what fun!  I always enjoy FF designer Ardyth’s CAS/graphic cards and I love following her because my mom’s name was Ardyth!  Funny story for you…I remember so well coming home from school and saying to my mom, “what is your name again?”  lol  I could never remember her name and the beginning of every year we had to fill out a form with our parents names on it! lol  My dad always called her mom, so it was rare that I heard her name as a grade schooler.  Evidently they couldn’t remember her name either cuz I was the 7th of 8 kids to come through that grade school!  You’d think by #7, they would’ve know all about us Bryants!  lol

And it is a WINNER!  Thank you Festive Friday Challenge Blog ladies! You made my day!


Winner Badge


PamsparksFFblackKraftWhiteTreeClose

This is a 5 ½ inch square card… kraft card base…poppystamps Merry Christmas Background die cut in black card-stock…Memory Box Snowy Tree Border die cut in white card-stock.

Very straight forward CAS card!  YAY!  love it!

First pass through the Big Shot to cut the Snowy Tree…then back through with the tan mat and shims to emboss the snow detail…leave the cut in the die…turn it over… dauber on Tsukineko’s glue pad through the holes in the die…burnish on the Art Glittering System’s Winter White glitter.

Strips of white card-stock glued behind a couple of the words…

Also linking this card up to some other challenges…

Addicted to Stamps Challenge – CAS

Friday Mashup Challenge – die cuts

ABC Christmas Challenge – Q for quick and easy  – my card was in the top 3!  Thank you ladies!

Top 3

Simon Says Stamp Monday Challenge – kraft

Winter Wonderland Challenge – anything goes


My next card was the second card I made but it kinda backfired on me…. ugh…every time I try to put white, ink, paint or even gesso over black card-stock, it turns blue!!!!  grrrrr  *sigh*   Oh well,  I’m posting this anyway.  : )


PamSparksFFblackKraftWhiteFrozenC-mas700


Pretty much the same as the card above except the card is 6 inches square and I used the poppystamps Frozen Flakes Border die.
My last card was the first I started with the Festive Friday inspiration photo colors in mind…


PamSparksFFblackKraftWhiteCandleMusic700


I did some experimenting here too, so it’s not perfect! hehe  I’ll do a video soon on gluing and tell about it then.

Memory Box Musicality die, Tall Taper Candle and Joyful combo rubber stamp.  The background paper is from an older Basic Grey Kraft 6×6 paper pad.

I used my mini Perfect Layers Tools and mat with black and then to cut the three sides of the card.  Link in the sidebar and below in the links too.  Be sure to use my code to get 5% off when you shop!

Linking this card to…

Catered Crop Challenge – musical expression

Festive Friday Challenge – photo inspiration

The Friday Mashup – die cuts

Simon Says Stamp Monday Challenge – kraft


That’s it for today!  Thanks for all the wonderful comments about my last two cards!  You are all awesome!

Take care and TFL!

Supplies and dies I used on these cards…

cards · Christmas · Die Piecing · Memory Box · Poppystamps · rubber stamps · Winter

Memory Box Christmas cards…

PamSparksPineNeedleBorderBlkGoldSilver675

I like challenges!  I created this card for the Cutting Edge Challenge – Kay Miller’s card for inspiration (I turned it) and for the Merry Monday Christmas Challenge – use black, gold and silver!  Yay! Such fun!

I’m also linking both my cards in this post to the Cutting Edge Blog Hop.

cuttingedge


and to Freshly Made Sketches Challenge – Sketch 150  (I flipped the sketch)

FMS Final 150-001

This is an A2, white, side fold card…the black layer is glossy card-stock cut to 3 3/4 in. x 5 in.

I die cut the Pine Needle border die in Metallic Silver card-stock, taped it to the black layer and then rounded all four corners with the EK Sucess Medium size corner rounder punch.


PamSparksPineNeedleBorderBlkGoldSilverClose

Look at all the awesome detail!  YES!  That’s Memory Box for you! : )

I heat embossed the sentiment stamp, Wonderful Time Combo with detail Gold embossing powder.

I die cut the Plush Poinsettia die in Metallic Gold and Silver card-stocks.  Glued them together, then layered it on with mounting squares.

Love it!  Wish you could see it IRL!  It makes me smile!  Always love it when cards work out how you want them to! Doesn’t take much to make me happy! lol

Well, you know me!  I couldn’t just stop there… this card evolved from other things I was trying! lol


PamSparksJoyeuxNoelPoinsettiaCorner675

I die cut two of the Plush Poinsettia die and adhered them to the top and bottom corners of my A-2 size card panel.

Then I die cut the Grand Joyeus Noël die in that panel.  I had to trim the left side with a scissors.

I love how the design shows in the letters!  more FUN!


PamSparksJoyeuxNoelPoinsettiaCornerClose

Then I used the Poinsettia Bloom die over the bottom corner and added some twine.


PamSparksJoyeuxNoelPoinsettiaCornerCloseTop

I’m linking my Joyeux Noël card to the Papercrafts Connection Link Party – Holiday Cards  and to the Winter Wonderland Christmas Challenge – anything goes

That’s it from me today!  I had fun and I hope you’re having fun with this new collection from Memory Box too!  Holler if you have any questions and thanks for commenting!  Nothing like encouraging a gal to keep die cutting and inking!

‘preciate it so much! Take care!

ttul,

Supplies and dies I used to make these two cards…

FYI for Starlitstudio… We are currently closed (family vacation). Orders placed after 9am EST Saturday, August 23rd will ship Monday, September 1st. Please be aware of this delay should you place your order today. Thank you!

cards · CAS · Christmas · Memory Box · Poppystamps · rubber stamps · Savvy · Sizzix · Tim Holtz dies · Winter

Savvy Stamps, Memory Box and Merry Monday Challenge…

Two cards to share with you today… I wanted to play in the Merry Monday Challenge  – use Pinecones, greens and plaid on your card.  Just right up my alley!  So Christmas again from me today!  Two cards to link up if they’ll let me.  : )

The first one is all Memory Box, so it’s over on the Memory Box blog too…

PamSparksPineCornerNewCastle675

Awhile back my husband was looking for new shoe strings for his work boots.  He ran into this video and ended up learning how to tie his boots a different way so they’d stay tied and no need for new strings!  He sent the videos to me and of course I had to try it out too!  I LOVE it for tying bows on presents and it works great on cards too!  I’ll just link you up to the videos and if you want to go to the man’s site,  he gives the link in the videos.  HERE and HERE.  It’s so fast and wonderful for kids with tie shoes….no need to keep retying time and time again every day!

PamSparksPineCornerNewCastleClose

Here’s a close up…see the bow?  It stays balanced and straight across!  LOVE that!   I do knot it first on a card before I do the bow.

I cut the Pinecone Corner die from Dill and Vanilla Bean Memory Box card-stock.

Cut the brown pinecones away from the greenery, shape them with a stylus on a molding mat or mouse pad, ink them with Walnut Stain Distress Ink and the ink blending tool and then mount them over the green pinecones die cut with mounting foam squares.

Die cut the NEW New Castle Snowflake die from white card-stock, adhere it with Tombow mono multi liquid glue.

Emboss the Merry Christmas sentiment with Tsukineko Imagine white embossing powder, tie on a festive little ribbon and embellish with some White Glitter Domes.

Card #2 for today…

PamSparksSavvyPine&Peace700

Here I used Savvy’s Peace and woodland branch dies and their coordinating woodland branch stamp. Poppystamps Frozen Flakes border cut in white card-stock, Memory Box Corner Bow die,  Tim Holtz Wreath and Bow die for the red bow and an old PSX Pinecone stamp G1956.

Embellished with plaid ribbon and red glitter domes.

PamSparksSavvyPine&PeaceSide700

I’m also linking both my cards to…

Craftyhazelnut’s Christmas Challenge – my favorite things

Crafting at the Weekend – anything goes

Sweet Stampin’ Challenge – Christmas in August

Sparkles Christmas Challenge – Snowflakes

Winter Wonderland Challenge – anything goes for Christmas

My Peace card won an honorable mention on the Merry Monday Challenge blog… Thank you so much ladies!

Honorable Mention


That’s all from me today!  : )  Grocery shopping to do! ick… I’d rather be making cards! lol  Have a great weekend and I’ll talk to you on Monday!  TFL!

Here’s the links to what I used to make these two cards…