Birthday · cards · CAS · Christmas · Die Piecing · Embedded Die Cuts · Memory Box · One Layer Card · Perfect Layers Tools · Poppystamps · Video · Winter

NEW poppystamps dies, Video and Horse Country exclusive die…

PamSparksBirthdayStackRed:kraft700


Hi everyone!  Isn’t this a neat die?  love it and the fancy thanks too!  I have several things to share with you today.  I don’t mean to have long posts but it seems like it always turns out that way!

Here’s a video of the NEW poppystamps ‘poppy’ dies and Starlitstudio’s exclusive die!

Click on the gear to see in high definition… or the frame to see larger.  Sorry about the blurry ‘fancy Merry Christmas’ die.  I have not idea why! ugh.

I used the Perfect Layers Tools to cut the ⅛ inch border on each side of the main panel.

Linking my first card to the Festive Friday Challenge – inspiration photo

Simon Says Stamp Wednesday Challenge – Anything Goes

Here’s the Birthday Stack die again…


PamSparksBirthdayStackPool700

I used the Embedded Die Cut technique I show in a video… pull down the video tab under the blog header.

Here’s the tags I show in the video…


PamSparkspoppystampsGiftTags700

and the NEW Vintage Merry Christmas and Celestial Star Border.


PamSparksCelestialStars700
Lots of NEW to play with!

The NEW exclusive die for Starlitstudio.net is gorgeous!  Horse Country and you can make it up for all four seasons!

memory-box-die-horse-country-new-exclusive-die-for-starlitstudio-3.gif
Holler if you have any questions… ‘preciate you stopping by. Have a creative weekend!

Supplies I used to make these cards and tags…

cards · CAS · Christmas · copics · Lawn Fawn · One Layer Card · Simon Says Stamp · Winter

Simon Says Stamp Cold Hands Warm Hearts release…


PamSparksWarmWishesCocoa700


Hi everyone! Are you enjoying the beautiful days we’ve been having?  love it!  Soon enough we’ll be thinking about staying warm, here in Iowa anyway!

I made a few cards using some of the new Simon Says Stamps October Release Cold Hands Warm Heart.


1_121


Oh what fun!  Awesome stamp sets, die sets, stencils and supplies! The mug, heart and sentiment are from the Winter Warmth stamp set.  The oval the mug is sitting on is from the Dash Line Shapes stamp set.

I took a CAS approach for my three cards today and some color book therapy!  Oh, the little holly and berries with the mug is from Lawn Fawn though.


PamSparksWarmWishesBrrrr700


On this Brrr card… I used one of the dies from the Stitched Slopes and Hills die set to make the clothes line. I stamped the images from the Winter Warmth stamp set to appear like they are hanging. What an awesome die set!  Can’t wait to use it for landscape type scenes!


PamSparksWarmWishesBrrrrClose


This card was ‘spotted’ on the SSS Flickr page!  yay!  Thank you SSS!


image00


Images stamped with Memento Tuxedo Black ink

Copics I used…
green – (brr card) YG41, 45 (mug YG61,63, 67)
red – R27, 59
teal – (brr card) BG45, 49 (mug) B00, BG53, 57

Snowflakes stamped with Memento Teal ink pad

Sentiment stamped with Versafine Black

I’m linking up to some challenges…

Virginia’s View Challenges – CAS  First card is in the wrap up, HERE. YAY!  THX Virginia! AND in the Honorable Mentions!  woohoo!  Thank you so much Virginia and family!

Panama-322 - Copy - Copy - Copy

Addicted to Stamps Challenge – Anything Goes First card is an honorable addict!  YAY!  THX ladies!

honourable addict

Papertake Weekly – Anything Goes


Here’s another new die I got to play with…it’s called the Triangle Pattern Wafer die.


PamSparksWarmWishesTree700


I die cut it twice, in white and green, then filled in the white with green to give it a tree like look.  A neat die and it cut beautifully!

The Merry Christmas sentiment is from a poppystamps Merry Christmas background die.  I cut it but left the letters in the cut.

Click over to Simon Says Stamp.com to see the rest of this awesome release!  Copics, stamp pads and supplies, everything you need to stamp out cold hands and warm hearts…  : )

Thank you for stopping by!  I’ll be teaching Memory Box/poppystamps classes soon… two on Oct. 19th at Scrapmania in Cedar Rapids and two on Nov. 8th in Moline, IL at The Scrapbooking Studio.  If you’re anywhere close… come! I’d love to meet you!  : )

cards · CAS · Christmas · Die Piecing · Distress Ink coloring · Fall · Memory Box · rubber stamps · Watercolor

Memory Box Fall cards and one Christmas card…

 *** Some new Fall stamps added to my ‘for sale’ page… click on tab under the blog header ***

PamSparksAlessandriaTreeLeaf700

It’s looking like Autumn here today!  Love the cooler temps!  The fabulous colors of Fall are showing up everywhere!

I started with a MB Crimson Notecard and stamped the Autumn Leaf Collage stamp on a MB Parchment piece of notecard.

The Alessandria Tree Background die and Marvelous Maple Leaves die were cut from watercolor paper and watercolored with distress inks. I added the leaf veins with the smallest stylus from the McGill Stylus set.

Then the Alessandria Tree on top.


PamSparksCasertaBloomFall700

I started this card with a MB Parchment Notecard, stamped the Journey Collage stamp on it but covered up the word journy with the new Give Thanks Combo stamp.

Die cut the Caseta Bloom die from three colors of MB card-stocks. Add a couple sequins to the flower centers and some 1/16th inch brads.

Die cut the Grapevine Wreath die from MB kraft card-stock and ink.

Linking my card up to…
Simon Says Stamp Wednesday Challenge blog – ‘stamp it’


PamSparksSilverMerryChristmasSnowflake700


Here’s a festive CAS Christmas card using techniques we love and easy to create multiples of!

1. I stenciled the Memory Box Flurry Frame Stencil with Tsukeniko’s Delicata Silver ink and one of their large ink daubers on the top portion of a Memory Box White A2 notecard.

2. I die cut the Grand Merry Christmas Script die from Silver Glitter card-stock and Memory Box Cranberry card-stock. Be sure to keep the cranberry dot for the i and the silver inside piece for the tail of the y.

TIP: You could use any color for the word Christmas! A way to use up scraps. Try Black, Teal and Royal purple! (wish I’d thought of that while I was making it! lol)

3. I trimmed the silver cut to fit the white notecard.

4. Adhere the Grand Merry Christmas to the notecard.

5. Keep the word Christmas from the cranberry cut, insert into the silver cut.

TIP: If you use double sided tape to adhere your silver Merry Christmas to the card, there will be adhesive where the cranberry Christmas fits, if you go ahead and place tape over the cut out area too.

6. Die cut the Bristol Snowflake die in white and silver glitter card-stocks.

7. Adhere the silver center to the white snowflake and adhere the snowflake to the card.  I just glue the center.

8. Add some pretty silver cord at the top, tying with a square knot.

9. I used the clear Wink of Stella brush marker on the word Christmas.

That’s it for today!

Holler if you have any questions!  Always love reading your comments!  Happy Fall Y’all!  TFL!

Products I used on these cards…

cards · CAS · Christmas · Die Piecing · Memory Box · Perfect Layers Tools · Poppystamps · rubber stamps · Techniques · Winter

Memory Box and poppystamps for challenges…

PamsparksFFblackKraftWhiteTree700

My cards that I’m linking up today were totally inspired by the inspiration photo from Festive Friday Challenge blog.  Oh what fun!  I always enjoy FF designer Ardyth’s CAS/graphic cards and I love following her because my mom’s name was Ardyth!  Funny story for you…I remember so well coming home from school and saying to my mom, “what is your name again?”  lol  I could never remember her name and the beginning of every year we had to fill out a form with our parents names on it! lol  My dad always called her mom, so it was rare that I heard her name as a grade schooler.  Evidently they couldn’t remember her name either cuz I was the 7th of 8 kids to come through that grade school!  You’d think by #7, they would’ve know all about us Bryants!  lol

And it is a WINNER!  Thank you Festive Friday Challenge Blog ladies! You made my day!


Winner Badge


PamsparksFFblackKraftWhiteTreeClose

This is a 5 ½ inch square card… kraft card base…poppystamps Merry Christmas Background die cut in black card-stock…Memory Box Snowy Tree Border die cut in white card-stock.

Very straight forward CAS card!  YAY!  love it!

First pass through the Big Shot to cut the Snowy Tree…then back through with the tan mat and shims to emboss the snow detail…leave the cut in the die…turn it over… dauber on Tsukineko’s glue pad through the holes in the die…burnish on the Art Glittering System’s Winter White glitter.

Strips of white card-stock glued behind a couple of the words…

Also linking this card up to some other challenges…

Addicted to Stamps Challenge – CAS

Friday Mashup Challenge – die cuts

ABC Christmas Challenge – Q for quick and easy  – my card was in the top 3!  Thank you ladies!

Top 3

Simon Says Stamp Monday Challenge – kraft

Winter Wonderland Challenge – anything goes


My next card was the second card I made but it kinda backfired on me…. ugh…every time I try to put white, ink, paint or even gesso over black card-stock, it turns blue!!!!  grrrrr  *sigh*   Oh well,  I’m posting this anyway.  : )


PamSparksFFblackKraftWhiteFrozenC-mas700


Pretty much the same as the card above except the card is 6 inches square and I used the poppystamps Frozen Flakes Border die.
My last card was the first I started with the Festive Friday inspiration photo colors in mind…


PamSparksFFblackKraftWhiteCandleMusic700


I did some experimenting here too, so it’s not perfect! hehe  I’ll do a video soon on gluing and tell about it then.

Memory Box Musicality die, Tall Taper Candle and Joyful combo rubber stamp.  The background paper is from an older Basic Grey Kraft 6×6 paper pad.

I used my mini Perfect Layers Tools and mat with black and then to cut the three sides of the card.  Link in the sidebar and below in the links too.  Be sure to use my code to get 5% off when you shop!

Linking this card to…

Catered Crop Challenge – musical expression

Festive Friday Challenge – photo inspiration

The Friday Mashup – die cuts

Simon Says Stamp Monday Challenge – kraft


That’s it for today!  Thanks for all the wonderful comments about my last two cards!  You are all awesome!

Take care and TFL!

Supplies and dies I used on these cards…

Birthday · Blog Hop · cards · CAS · Lawn Fawn · Memory Box · MFT · Paper Smooches · Perfect Layers Tools · Printworks · rubber stamps · Techniques · Wedding

Perfect Paper Crafting and Xyron Blog Hop…

XyronHop

WELCOME!

So excited to share some cards with you, that I made using Perfect Paper Crafting and Xyron’s awesome products!

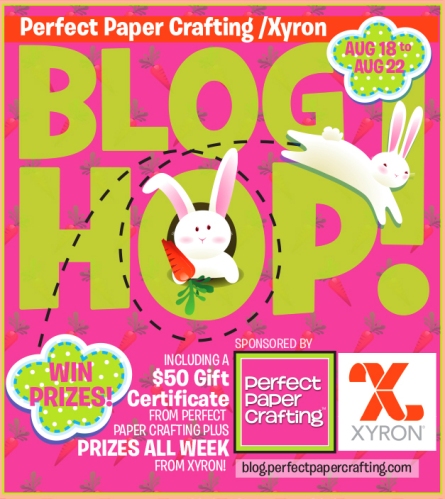
The Perfect Paper Crafting team is posting today but you can take all week to hop around and comment for a chance to win a fabulous prize!  $50 gift certificate! (winner to be announced the 25th on the PPC blog)

The Xyron team will be posting each day on the Xyron blog and giving away prizes every day!

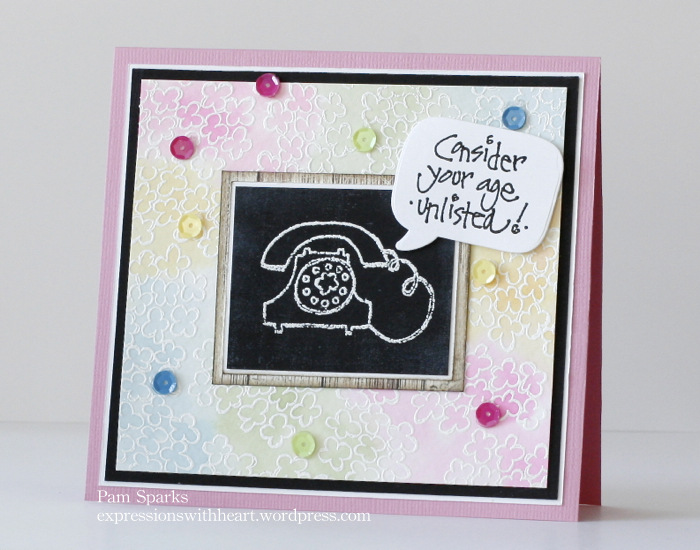
My first card for today will make you laugh…brrring brrring
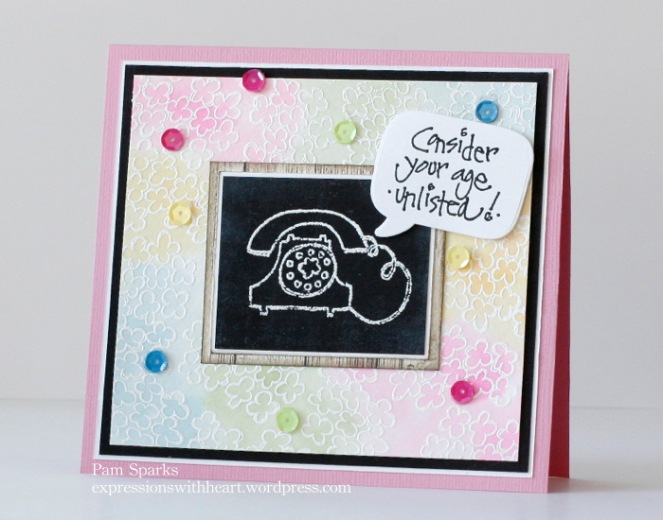

PamSparksPWTelephone700


I do! lol

I love this sentiment from Printworks and use it anytime I use a telephone!  This adorable telephone image and the floral background stamp are NEW and also from Printworks.  I embossed the telephone and the flowers (multiple times) with white pigment ink and Tsukineko’s Imagine White Embossing Powder.  The sentiment is stamped with black pigment ink and embossed with Tsukineko’s Imagine Black Embossing Powder.  I die cut the sentiment with a die from Lawn Fawn.

I used Printworks stamp pads for watercoloring the white embossed flowers (watercolor paper).  Go back in time…the first CHA type show I went to was in 1995.  Printworks was there teaching Annette’s (the owner and artist) watercolor techniques.  She introduced using stamp pads for watercolor way back then! It’s stood the test of time for sure!

What can I say that I haven’t said a million times about the Perfect Paper Crafting Layering Tools!  They are the BEST!  I Love these tools!  I didn’t think there would be any room for improvement but I love the mini tools and mat more!  I’m glad I have both sets though because today I needed to use the one inch ruler that just comes in the long ruler size.

It’s so nice to get the professional look of even borders along with the charm of a handmade card.  Use Sparks 5% off at checkout to get 5% off your PPC order!  Thank you for clicking through my links.

MinisPkg__02217.1405333517.451.416   MatPckg__92234.1405333593.1280.1280layers__15229.1405333517.1280.1280


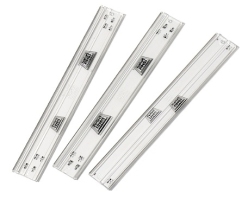
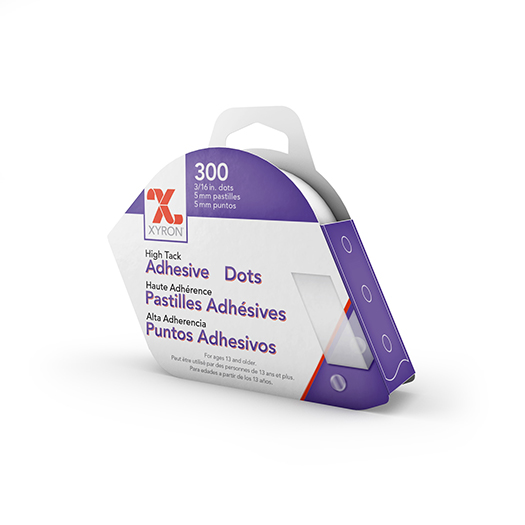
What did I use from Xyron?  Well, they have this awesome Mega Tape Runner… looks like this…

1_82605_FS

wow!  It’s great!  It dispenses permanent adhesive dots and is refillable.  So easy to operate too… not too big and not small either!  It just works!  YAY!  I used this to put most of my layers together.

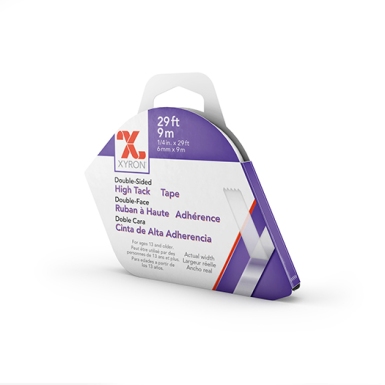
I adhered the telephone panel to the white embossed panel with Xyron ¼ in. High Tack Double Sided Tape…

SBC_xy-100068.gif

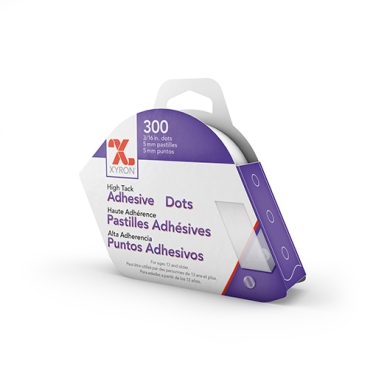
and the sequins with Xyron High Tack Adhesive Dots…perfect!

SBC_xy-100070.gif

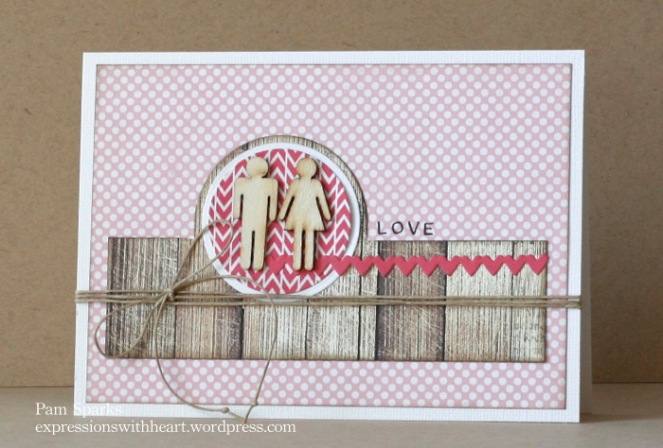
My next two cards are wedding cards…


PamSparksPottyPPLWedding700


Here I used the Perfect Layers Mini Tools and Mat to cut my card base.  I scored and folded a sheet of 8.5×11 card-stock, then adhered my main panel to the folded card base with the Xyron Mega Tape Runner, then used my mini tool to cut the border on the other three sides.

I used the Xyron Mega Tape Runner to adhere the Studio Calico wood veneer potty people to the circle too!  Yep, they stick great!  I was able to rub away any excess before I stuck them down, so easy because it’s dot adhesive. (looks like the wood veneer potty people have been discontinued)

My inspiration for this card came from Maile Belles’ card HERE.

I partial die cut a circle and then die cut two complete circles for the layers.


PamSparksTwoLivesPottyPPL700

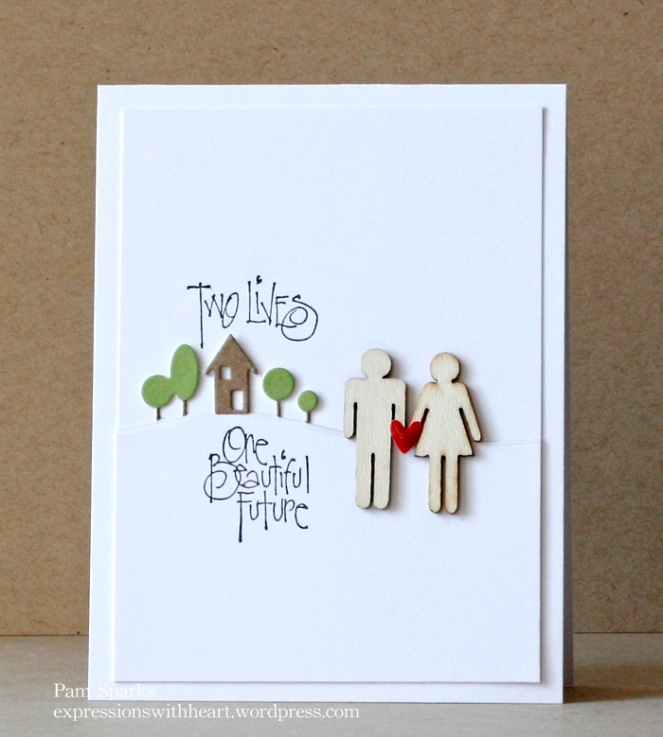
Another fun wedding card using a Memory Box border die, Printworks stamps, wood Potty People and a Doodlebug red heart embellishment.

Again I used my Perfect Layers tool to cut the three sides of my card base and the Xyron Mega Tape Runner to adhere the layers and the potty people.

Wonderful tools!  Wonderful adhesives!  Thank you PPC and Xyron!

Your next stop is Jenny’s blog! Enjoy the hop, be inspired and I hope you win!

Thanks for stopping by and hopping with us!  ttul!

I’m linking my first card up to the Seize the Birthday challenges – anything goes 

I’m linking my second card up to the Simon Says Monday Challenge – anything goes

I’m linking my third card up to the Clean & Simple Stamping  challenge 303 – sketch

Supplies I used on these cards…