cards · Christmas · Memory Box · rubber stamps · Techniques · Watercolor

New Memory Box Poinsettia Ribbon card…


PamSparksPoinsettia700


It’s time for the Memory Box Blog Blitz this week.  Click over and comment for chances to win dies from the new 2015 Holiday/Christmas release!

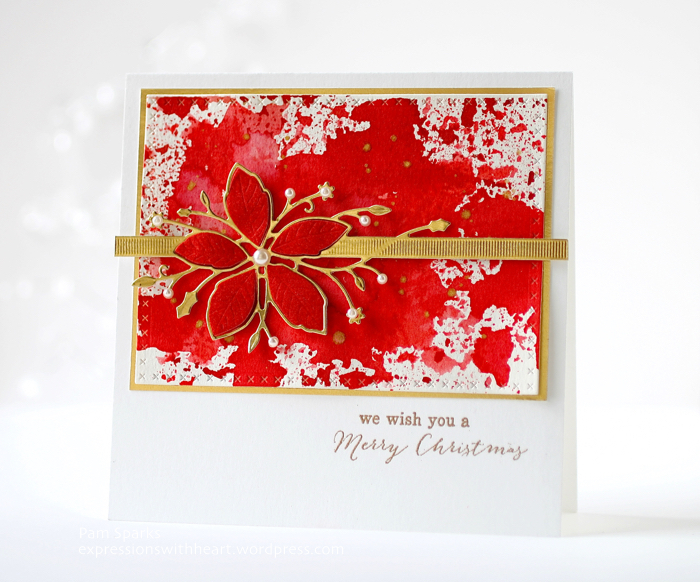
Today I’m using the NEW Poinsettia Ribbon die.  I die cut it in Metallic Gold and Red card-stock and mounted the gold ribbon piece with mounting squares behind the ribbon part and then mounting squares behind each of the red poinsettia petals. A gorgeous die!  I love it!


PamSparksPoinsettiaClose630


I did the ink smooshing watercolor technique for the background in three Distress ink colors, Abandoned Coral, Barn Red and Fired Brick.  A few spatters of gold ink and some pearls to glam it up a little.

I mounted the panel to gold card-stock and then to a 5.5 inch square white card base, that I stamped the Merry Christmas Combo stamp on, and embossed in gold embossing powder.

Challenges…
Deep Ocean Challenge – Christmas in July
Happy Little Stampers – Sketch Challenge


Some shopping news for you…Scrapbook.com is having a free standard shipping special on all orders over $60!!!  AWESOME deal.  Today through the 19th! They have thee best price on the new Big Shots!!!  I love them…so happy with them…while you’re there…the magnetic platform and spare cutting plates are a great deal too!  They carry my favorite mounting squares in regular and thin…in white and in black…by 3L Scrapbook Adhesives.

Top_Header_FREE_Shipping_watercolorfun

While you’re there… get the free tote!


Starlitstudio.net shopping… Cindy will be back packing and shipping orders this weekend!  YAY!


ok – I’m headed to Ankeny IA later this afternoon for a class at Taylored Expressions Studio! Here’s the fb page if you would like to keep up with the fun classes and activities happening there!  August release in a couple weeks!  oh eek!  August…no way!  The year is flying by way toooooo fast!

Happy stamping, die cutting Day to you! It’s ok to track little bits of paper all over the house! lol

Thanks for stopping by!  : )

cards · CAS · Christmas · Die Piecing · Memory Box · Winter

NEW Memory Box Winter Scenes…


PamSparksSnowglobeWhitte700


Brrrr…it’ll be a Winter Wonderland before we know it! haha!  I love creating Winter scenes!  I started this card with the NEW Stitched Snowflake Circle Frame die. I knew it would work with one of the NEW Open Studio Snowglobe Base dies that I die cut in kraft wood grain card-stock.

I used the NEW Open Studio Pinpoint Circle Layers die set for the blue card-stock circle background.


PamSparksSnowglobeWhiteCloseLeft


The poinsettia is from the NEW Poinsettia Border die cut in green and red card-stock.  I trimmed off the smallest flower and a couple of the flourishes/holly leaf and colored the little flowers with a white gel pen.


PamSparksSnowglobeWhiteCloseRight


Inside the snowglobe circle I die cut the NEW Deer in the Trees die in black card-stock, trimmed it to fit and added some Frosted Lace stickles to the branches.


After I made the snowglobe piece I started working on what to put it on.  I just kept adding because these dies are so cool and build on each other so well!  I ended up with a card under the snowglobe!  An all white card, so I took pictures of it before I put the globe on it!

PamSparksTreesDeerAllWhite675


I die cut everything from white card-stock and then glued the layers down in this order, with Tombow Mono Multi glue.

NEW Simple Evergreen Frame die first, then the NEW Deer in the Trees die and on the top, the NEW Cascade Evergreen Frame die.  They line up perfectly and Mono Multi glue gives you just a little bit of wiggle room to get things adjusted!  I appreciate that! lol


PamSparksTrees:Deer:AllWhiteClose2.600


That was my adventure in card making yesterday!  : )  I hope it sets your mind to racing about all the things you can create with these new dies!  LOVE.THEM.ALL!

After all this ‘snow’, I think I need to go for a bike ride! lol  Thanks again for stopping by! ttul!

Dies and Supplies I used…


cards · Christmas · Die Piecing · Embedded Die Cuts · Memory Box

NEW Memory Box dies!!!


Version 2


I know…Christmas already?!!!  YES!  You are going to love so much of this Memory Box and poppystamps release!  : )

Here’s the NEW Corby Ornament die…I die cut it in green and red card-stocks, trimmed the green branches and leaves from the green cut and glued them on the red cut with Tombow Mono Multi glue.  The red cut stayed intact. It was easy to do because most of the green is connected.

With a gold gel pen, I colored the little flowers and circle buds.

I die cut the NEW Drop Ornament Layers die in metallic gold card-stock and glued the Corby Ornament on top of it.


PamSparksCorbyBlissfulClose.2


The NEW Blissful Bundle die I cut in green card-stock.  For the red berries, I just placed a small piece of red card-stock over the die where the berries were and ran it though my Big Shot. I used a little piece of scotch tape on the back side of the green cut to hold the red berries in place.

I glued the two extra pine branch cuts behind the berries and used a mounting square to adhere the Blissful Bundle to the top of the Corby ornament.

I mounted the ornament to a top folding, A2 size, red card base with mounting squares and added the gold May Arts 1/4 in. wired gold ribbon.

Next I want to die cut these in watercolor paper and watercolor them!

The Corby Ornament is so pretty, it’ll be awesome cut from everything!  Glittery, sparkly, glitzy goodness!


Next up…


PamSparksWeWishYouWhite2.700


I die cut the NEW We Wish You die two times, once in red and once in black cardstock.  I glued the black cut over the red but left the poinsettia petals showing in red. I die cut the medium bow from the  NEW Stitched Bows die in red card-stock and glued it together.  I used thin mounting squares behind the petals, leaves and bow to adhere it to the vellum panel.  Then I put thin mounting squares on the vellum, behind the petals, to adhere it to the white, A2, top folding, card base.

I love Poinsettias so I’m always excited to use these dies! Under the vellum overlay, I embedded the NEW Poinsettia Border die two times.  HERE is the video on how to do this technique….I love it!


PamSparksWeWishYouInside


I added two black enamel dots and then tried to capture it on camera! lol  I think it takes me longer to take pictures than it takes to make a card! lol


PamSparksWeWishYouAngle630


Cindy at Starlitstudio.net will have these in stock tomorrow!  Click over and read her info about  ordering and shipping this time.  She also has the Tombow Mono Multi glue, Score Tape, card-stock, Doodlebug Enamel Dots and lots more!

Thanks for stopping by today!  Thank you for all the wonderful comments… I didn’t get replies made after the last post.  Things kinda went haywire here… I’ll spare you the details! ugh.  I read them all, smile so big and am encouraged to make more cards!  Thank you for being a kindred stamper friend… I appreciate it!  More cards coming soon!

p.s. I saw that Simon Says Stamp has their brand stamps and dies 25% off HERE. Use code ‘simon25’ Ends tonight!  Shopping!!! lol

SIMON-FLASH-SALE-SIMON-25-600X600-

Birthday · cards · Masculine · Memory Box · Watercolor

Memory Box Circle Forest Scene BBQ…


PamSparksCircleForestSceneBBQ700


You can plan a BBQ even if it’s not your birthday though!  Celebrate Summer with a fun scene card!

I cut a white piece of card-stock 4.25 in. x 11 in., scored and folded it for a top fold card base.  Top fold cards are the easiest to photograph and another photo tip, if you’re using natural light, be sure to pull up the blinds!  Open blinds let in light but you’ll be amazed how much better it is when you pull them all the way up and out of the way! Your camera will thank you! lol

oops!  Got off track there for a minute, back to the card!

I die cut the Circle Forest Scene parts from cold press watercolor paper.  Then I watercolored them, the grass/trees with Peerless and the grill, houses and clouds with Zig Clean Color Brush Pens.

The little curvy fence is from the Wide Open Spaces Open Studio die set. I just trimmed off the bottom…perfect fit!


PamSparksCircleForestSceneBBQClose


I wish I’d  used the Celebrate from this set because it’s just enough larger. I didn’t see it until I’d already stamped this one from poppystamps Into the Words set.  ‘It’s your birthday’ is from the same set.

I die cut a circle frame to place over the top from the Shaker Circle Frames die set.

Well, I see I goofed.  The Grill has been discontinued!!!  I wouldn’t have thought… so think bicycle or golf cart or even the new tractor die!  Sorry about that!

All that’s left to do is layer everything up!  I use ATG, Tombow mono multi glue, thin and regular 3L/Scrapbook Adhesives mounting squares.

Happy Summer day to you! Hope the weather is treating you right! haha  Thanks for stopping by! TTUL!

cards · Memory Box · Poppystamps · rubber stamps · Scrapbook.com · Washi Tape · Watercolor

Memory Box Blooming Sketch Border Thank You…


PamSparksBloomingSketchBDR700


Thank you for being such super blog friends!!!  I have a Memory Box card to share today and one tomorrow too!

For this card, I started by stamping the beautiful Blooming Sketch Border stamp with Ranger Archival Black ink  on watercolor paper and coloring with Zig Clean Color Brush Pens.

After it was dry, I die cut the panel with the largest rectangle die from the Cross Stitched Frame Borders die set and layered it to an A2 card base.  I did put a little piece of washi tape on it… it was just laying there on the table, from Little B.


PamSparksBloomingSketchBDR650


I embossed the poppystamps Thank You sentiment with super fine white embossing powder on a black banner from the poppy Classic Ribbons die set and stamped the friend sentiment directly on the watercolor paper with the MISTI stamp tool. Both are from the Hope and Thanks set.

I die cut the Pennington Rose Border die in white card-stock but just used the right end and one other rose from the cut to embellish above the banner. I added a few enamel dots in green.  I love the fun touch the dots add to the mix.

Thanks for stopping by today!  8 )   I’ll be back tomorrow with a birthday card or two!

p.s. if you’re in the market for a new die cutting machine I have to share this with you… I was and when I saw it was white… I was delighted! lol  Silly things make me happy!  Anyway, over at Scrapbook.com they have a terrific sale going on and the new Big Shot is $79.99!  A terrific price and a great online store!  All their Sizzix products are on sale!  If you’d like a larger platform, the Big Shot Plus is awesome!  I love it too. Room for an A2 card sideways, easy to crank and it stays put!  Holler if you have any questions!