cards · CAS · Die Piecing · Lawn Fawn · Memory Box · Perfect Layers Tools · Serendipity Stamps · Winter

New Memory Box meets Lawn Fawn…Serendipity Winter Scene…

NEW Memory Box and poppystamps dies…Spring 2014 release in stock @ Starlitstudio.net

PamSparksLawnFawnBalloon:MBDreamCloud

Isn’t this going to be a fun congrats card or graduation card?!  I love it!  It’s so fun when what you imagined works out!  YAY for stamping and die cutting  FUN!  *grin*

a little bit of a side view…

PamSparksLawnFawnBalloonMBDreamCloudSide

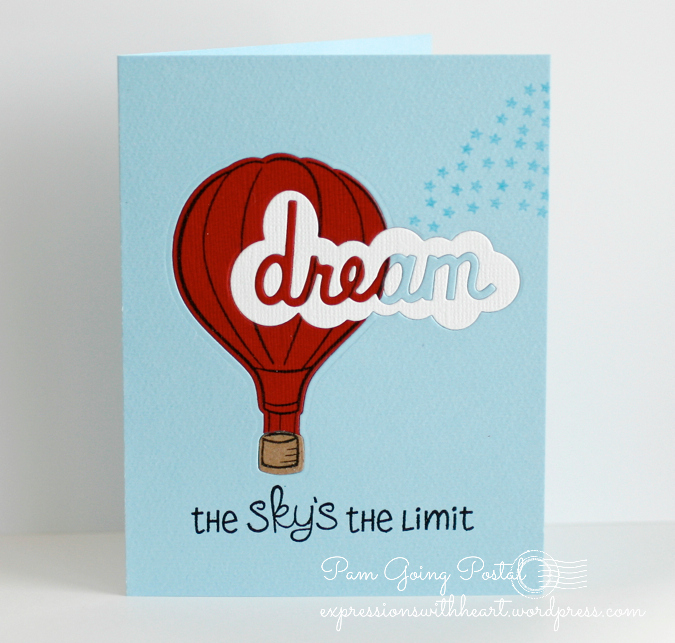
You are looking at the NEW Dream Cloud die from Memory Box!  There’s a new happy cloud, birthday cloud and thanks cloud too!  I LOVE using the words by themselves too!  Cindy at Starlitstudio.net has them in stock!

The balloon stamp and die, sentiment and star stamps are from Lawn Fawn… link below in the supplies.

Linking up to CAS on Sunday – one layer wonder (yes this truly is one layer!)
Addicted To CAS – luck
Clean and Simple Stamping – sketch (upside down)
Sarah Hurley 365 – Speech Bubbles
Stempelgarten Challenge – one layer card
Sister Act Card Challenge – Anything Goes
Word Art Wednesday – Anything Goes
Addicted To Stamps – Anything Goes
7 Kids College Fund Challenge –  Anything Goes with a twist, Die cute

So here’s what I did…

1. cut an 8.5 x 11 pc. of card-stock in half,  score one half at 4.25.  Use the teflon bone folder to crease… LOVE the teflon bone folder (link below)…no glossy look where I rub after creasing!!!

2. cut the balloon out of the front of your card

3. cut the balloon out of red card-stock

4. cut the bottom of the balloon out of kraft card-stock

5. stamp the red and kraft pcs with the balloon stamp, then cut and piece them together

6. I used packing tape to cover behind the balloon cut out portion of the card front.  You want sticky in the opening to adhere your red and kraft balloon parts to it.   Go ahead and stick them in

7. Then position your dream cloud die face down to the right side of the card front over the stamped red balloon.

8. Tape the dream die in place with reposition-able tape, stick the tape to your clothes a couple times to make sure most of the sticky is removed.

9. Run it through the die cut machine.

10.  Keep the word dream because you will use that part

11.  Cut the dream cloud die from white card-stock, keeping the white centers of the letters.

12. Piece the die cuts into the card front and cover the back with packing tape to hold it in place or you can put the packing tape over the hole first and then piece in the cloud parts.

13. isn’t this fun?! : )

14. Stamp the little star from the balloon set multiple times with Tumbled Glass distress ink.

15. Stamp the sentiment from the set.

16. Back to the other half of the 8.5 x 11 piece of card-stock.  Cut it in half…well, a little less than half… 4 ⅛ in. x 5 ⅜ in.

17. Adhere that piece behind the card front to cover up the piecing and taping you did.

That’s it for this card!

Now for the Winter scene I told you I was working on… colored it last Monday morning and finished it Friday morning!  Where does the time go!  It goes by me way too fast!

The stamps I used for this card are from Serendipity Stamps…wonderful images to color and create cards with.

PamSparksSerendipityWinterPeaceScene

I stamped with Ranger Archival Black ink on Canson watercolor paper and watercolored with Ranger Distress markers.  Stardust Stickles to give the snowy, Winter sparkle.

PamSparksSerendipityWinterPeaceSceneClose

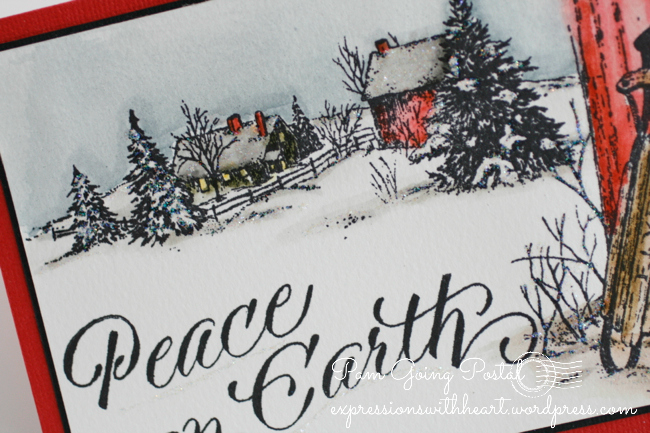
I used the new Mini Perfect Layers Tools and the new Cutting mat… oh,  I do love them a lot!  Yes, I’m glad I have both sizes.

Stamps I used….Winter Farm HERE, Sled Here and Peace on Earth HERE.

How I paint with Distress Markers…post and Video HERE.

So happy to finally use these stamps I’ve had in my collection for years!  Some times just owning makes me happy!  I need to find a use your stash challenge to link to! lol

Linking my Winter Scene card to…
Christmas Stampin’ All Year Long – Sparkle and Shine
Virginia’s View Challenge – Watercoloring
Hiding in my Craft Room – Color It!
Completely Christmas – Anything Goes
QKR Stampede – Anything Goes
Stampin’ For the Weekend – Anything Goes
Word Art Wednesday – Anything Goes
Fusion Card Challenge – Sketch

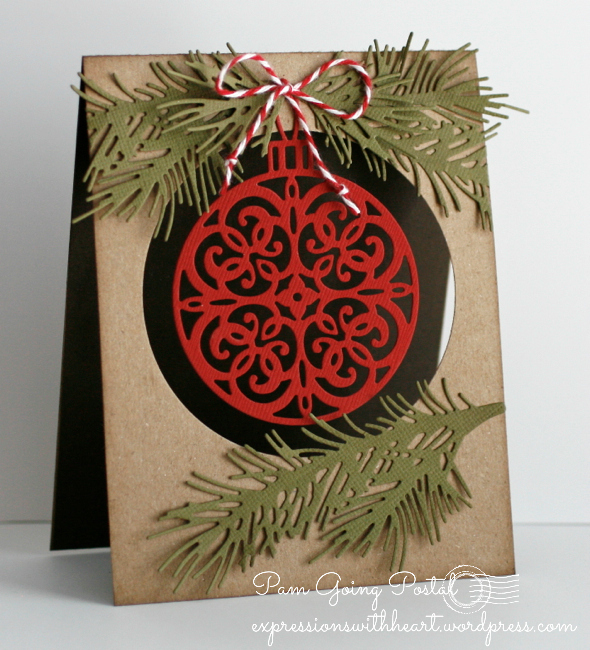
I have two more Winter cards but I better save them for another day!  : )   Tomorrow I’ll be back with more NEW from Memory Box!

Thanks for stopping by!  We’ve got snow again… you know you’re in IOWA when you experience all four seasons in one week! lol  ttut!

Supplies I used for these two cards…

Blog Hop · cards · CAS · Christmas · copics · Impression Obsession · Memory Box · Perfect Layers Tools · Poppystamps · rubber stamps · Serendipity Stamps

Blog Hop – Perfect Paper Crafting and Serendipity Stamps…

SerendipityHop

Good morning and WELCOME to the first day of the week long Perfect Paper Crafting with Serendipity Stamps Blog Hop!  So excited to be blogging with this wonderful group of stampers!

If you’ve come from Marybeth’s Blog, you are in the right place.

You will want to hop and comment on all the blogs… AWESOME PRIZES… I mean AWESOME!
Perfect Paper Crafting and Serendipity Stamps are both giving away a $50 Gift Certificate
Two winners will be chosen randomly from the people that have commented on all the blogs!
Winners will be announced on the PPC and Serendipity blogs on March 17th.

PamSparksSerendipityOrnamentIOPine

My first card for the hop is a window card…cut a circle from an A-2 top folding card, die cut the Serendipity Ornament die…lovin’ this die! Poked a couple holes for the twine bow, die cut some pine branches, glued them on and there you have it!  It was hard for me to leave it without a sentiment, but I’ll figure something out! lol

PamSparksSerendipityOrnamentIOPineClose

Up close…that is dark brown card-stock in the background…helped it show up for the photos.

❤ ❤ ❤ ❤ ❤

PamSparksSerendipityOrnaments3

On this card I used the Ornament Stamp and Die set from Serendipity Stamps.  I heat embossed the ornament stamp, twice on the background, then die cut the ornament die, heat embossed it and using mounting squares, adhered it to the card front.  I used black pigment ink to ink up the ornament stamp all three times and Judikins Egyptian Gold embossing powder.  I used the Stamp a ma jig for positioning.

The ornament stamps beautifully and the ornament die cuts perfectly!

Here’s a close up…

PamSparksSerendipityOrnaments3Close

I used my Perfect Layers Rulers to mat the image panel and the base of the card.  I love how perfect and elegant the 1/16th inch ruler cuts the mats.  I’m lovin’ the new shorter rulers and the cutting mat… both are AWESOME and I’m telling you true!  : )

❤ ❤ ❤ ❤ ❤

I was in the mood to color, so I cut the ornament die from white card-stock so I could color it with Copics!  I wanted to use my Wink of Stella Red and Silver Brush pens too!  It’s Christmas…bring on the sparkle!

PamSparksSerendipityOrnamentPineClose

Then I needed some greenery to hang the ornament!  poppystamps Pine Needle Border, Berry Sprig and Memory Box Ribbon Candy Border all combined to make a festive arrangement for it to hang from. Ranger Cranberry Liquid Pearls on the berries.

PamSparksSerendipityOrnamentPineSide

A festive sentiment from Serendipity Stamps, Tis the Season… stamped beautifully with Versafine Onyx Black ink.

❤ ❤ ❤ ❤ ❤

*** Serendipity has a SPECIAL going on right now… Everything in their Easter Category is 20% off until Wednesday March 12, 2014. ***

The HOP will go through Sunday, March 16, Midnight Pacific time. Enjoy, be inspired and comment for a chance at the prizes!

❤ ❤ ❤ ❤ ❤

Your next stop on the HOP is Julie

❤ ❤ ❤ ❤ ❤

Thanks so much for stopping by and see you next time!  Working on a scene card with Serendipity Stamps and Perfect Layers tools..

Supplies I used on my cards…

Blog Hop · cards · copics · Fall · Impression Obsession · Memory Box · Perfect Layers Tools · rubber stamps · Serendipity Stamps

Perfect Paper Crafting and My Minds Eye Blog Hop…

PamSparksFallPumpkinChairMME700

The colors of Fall…My Minds Eye Happy Haunting paper pack and Perfect Paper Crafting tools… a great combination!  Welcome to the Hop! Comment until Nov. 1st, 12 a.m. PST for a chance to win one of these awesome prizes!!!

*** $50 Gift Certificate from Perfect Paper Crafting

*** My Mind’s Eye’s Happy Haunting Paper collection

MMEhop

I used the Perfect Layers Tools to mat my stamped and colored image… 1/16 in,  1/8 in and 1/2 in rulers.  Crisp and clean mats every time!  I ‘heart’ them!

PamSparksFallPumpkinChairMMEClose

I had fun incorporating dies and other elements into the design of the card.  Lovin’ the leaves die from Impression Obsession…the thanks die from Memory Box…burlap from Starlitstudio…stamp from Serendipity (colored with Copics) and the yarn is from the stash of old threads we used to use to embellish tags…can’t think of what we called it!  Most came wrapped on cards…several different ones. The First Class and cancellation lines are old stamps from Hero Arts.

PamSparksFallPumpkinChairSide700


The card is 6×6 and mounted on a 6×6 card base… I know… kraft again! hehe

Six blogs to visit for this hop…enjoy and comment to win!

Pam  (me)

Thanks so much for looking! So glad you stopped by! Have a great week and talk to you again soon!

Linking to the following Challenges…
Magazine Monday – Fall photo

My card mentioned in the winner’s post…

Papercrafting Inspiration: Magazine Mondays-Week Twenty-Eight Inspiration Piece (image)

Papercrafting Inspiration: Magazine Mondays-Week Twenty-Eight Inspiration Piece


Supplies I used…