Birthday · cards · copics · Die Piecing · Doodlebug Designs · Shape Cards · Snowman · Winter

Doodlebug Winter Wonderland Snowglobe Mini Shape Card…

Hi friends and cardmakers!  A little more snow here today so a good day to post a cute little snowglobe card I made for one of our grands birthday.

These super cute images are from the Doodlebug Winter Wonderland stamp set and coordinating die set.

The card looks big in my photos but it’s really only 3 x 3 inches!  ❤  The images are small but so cute and easy to color.  I used Copic sketch markers. The largest snowman is 1 ½ inches tall.

I stamped the snowglobe, colored the base, then die cut another snowglobe for the card back.  Scored the back at the top so it would open…glued it above the score line to the card front.

I love how it turned out… charming! It would be a cute tag too.

Hope it made you smile!  I’m going to link it to the #SnowmenOfJanuary event on social media right now.

Thank you for stopping by!

Here’s what I used to make this card…

Doodlebug Doodle Stamps – Winter…
[ STR | SBC | SSS | ACH ]
Doodlebug Design – Let It Snow…
[ SBC | SSS | ACH ]
Ranger Ink – Tim Holtz – Distress…
[ SBC | SSS | ACH | BLIC ]
Waffle Flower Crafts – Blending Brushes
[ SBC | SSS | ACH | TE ]
Shop – Ink, Paint & Markers – Copic…
[ TE | SSS | BLIC ]
Simon Says Stamp BLENDING BRUSH and…
[ SSS ]


cards · Christmas · copics · Memory Box · Simon Says Stamp · Sizzix · Winter

It’s That Time of Year… Diecember at Simon Says Stamp!

I have a card to share with the die Simon Says Stamp sent to me to make with.  Fine Textured Leaf die, designed by Memory Box. 

You can see the two dies that come in the set off to the sides in the pictures.  I used the smaller one to make the wreath on my card.

I die cut it 11 times in watercolor paper and then painted it with Distress Ink Reinkers.  They look really dark in the pictures, not sure why, but they aren’t this dark IRL. 

I used one of the plaids from Memory Box new 6×6 paper pad called Woodsy Plaids.  

I die cut the Memory Box new Merry Christmas Posh Script in white and colored them with the E 80’s copics.

I die cut the bow with a die from the Sizzix Festive Greens set #662425, a Tim Holtz set. I used watercolor paper again and colored it with a copic B93.

Very non traditional colors… I attempted to add some red.  Couldn’t do it. lol

This wreath would’ve been striking on white if I’d realized how it was going to photograph! and red!

Lots of potential for a million cards with this die set!  Very fun making wreaths! and that big leafy die! 

This card ended up 5 ½ x 5 ½ inches square.

Thank you for stopping by today! I’ll get back to my house… I’ve made a mess getting all the decorations out.  This nine foot tree takes  a lot of stuff! haha

Enjoy this new release!  Lots of beautiful dies!  Here’s to shopping!  Links below.

[ SHR ]
Simon Says Stamp FINE TEXTURED LEAF…
[ SSS ]
Memory Box MERRY CHRISTMAS POSH…
[ SSS ]
Memory Box WOODSY PLAID 6×6 Paper…
[ SSS ]
Lawn Fawn OUTSIDE IN STITCHED SQUARE…
[ SSS ]
Tombow MONO MULTI Liquid Glue Two…
[ SSS ]

cards · CAS · Christmas · copics · Die Piecing · Memory Box · Poppystamps · Snowman · Winter

poppystamps Whittle Friendly Snowman and Double Joy Card…

Hi everyone!  I’m so happy with this card!  I probably could’ve added more and tried to bling it up but this time I just left him to say JOY to the world! ❤

This is a new poppystamps snowman die… so whimsical and fun!  Oh you know a little holly might’ve been nice… I always think of things after! lol

I put him on a bed of snow from the new poppystamps Layered House Globe die set.

He just melts your heart, doesn’t he?! ❤  Oh…a heart on his belly to represent the O for joy would’ve been super fun too!

I used a plaid paper from last Winter’s 6×6 plaid paper pad called Christmas Plaid!  I’m not finding it to link to anymore but I’ll link to this year’s pad that would work too! ugh.  Sorry about that.  I don’t know why I grabbed this one instead of the new one.

I die cut him from heavy white cardstock and colored his parts with Copic Sketch Markers.  I backed the circles with a smaller punch circle so I would have something to glue his eyes and carrot too.  Then I used mounting tape behind his top part, mounting tape behind the snow hill and mounting tape behind the top parts of the letters J and Y.

I die cut the plaid with the largest Memory Box Stitched Square Layers die. Then I matted it with black cardstock and adhered them to a 5 ½ x 5 ½ piece of green from the Memory Box 6×6  Lush Green cardstock pad. It matches perfectly with this plaid! yay!

‘To The World’ sentiment is from the new Memory Box Festive Christmas Greetings again… this is such a good set!

I love this new poppystamps Double Joy die too… you get so many options with the two dies included in the set!

Mr. Frosty is 5 ½ in. x 5 ½ in. square. So cute!  I need to make some more of these and vary them a little as I go! hehe

Thank you so much for stopping by and your comments and for shopping through my links!  I appreciate it!

ttul,

Here’s what I used to make Frosty!

Poppystamps – 2471 Whittle Friendly…
[ STR | SSS ]
Poppystamps – 2476 Double Joy craft die
[ STR | SSS ]
Poppystamps – 2488 Layered House…
[ STR | SSS ]
Memory Box STITCHED SQUARE LAYERS…
[ SSS ]
Memory Box – PP1018 Woodsy Plaid 6×6…
[ STR | SSS ]
Memory Box – CL5273D Festive…
[ STR | SSS ]
Memory Box Clear Stamps FESTIVE…
[ SSS ]
Bazzill Card Shoppe – Marshmallow
[ STR | SSS ]
TE Premium Cardstock
[ TE | STR ]
Leader 6 x 6 WHITE Square Envelopes…
[ SSS ]
Lawn Fawn WHITE Embossing Powder LF1537
[ SSS ]
VersaMark Watermark Stamp Pad – full…
[ STR | SBC | SSS ]

cards · CAS · Christmas · copics · Die Piecing · Inlaid Diecutting · Memory Box · Winter

Memory Box Florentina Wreath and Merry Christmas Posh Script Card…

Hi everyone! Have you started on your Christmas card stash yet?  I’m working away dreaming of all the fun stuff there is out there to make!

Today’s card is a couple new dies and a sentiment from a new stamp set that I used on a previous card.

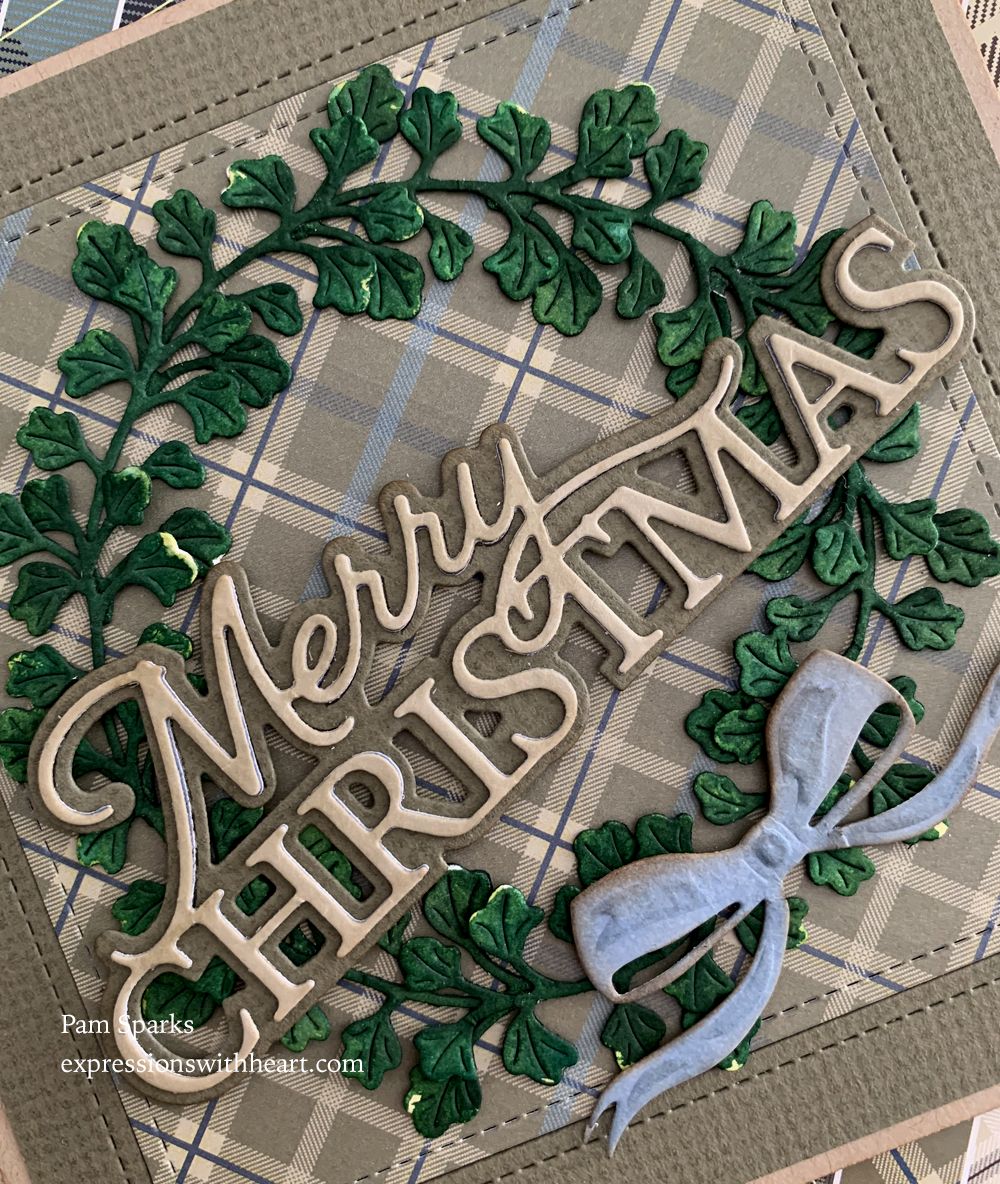
I die cut the new Florentina Wreath in heavyweight white cardstock and colored it with Copics.

Then I decided to inlay it back into the white panel that I die cut it from!  I love how it looks!  Hopefully you can see it in some of my pictures.

I wish I’d used a lighter brown for the branch so the red berries would’ve shown up better but the dot of white gel pen did help!

Very easy to inlay back in because there’s only the outside panel and the inside panel pieces to piece the wreath back into!  Super easy and classy looking!  That word gives me another idea… die cutting the wreath and then using embossing ink, gold embossing powder and heat embossing to make the wreath gold!

This is an A2 size card… the wreath panel is 4 x 5 ¼ in. then the black mat layer is just a teeny border and the cardbase is 5 ½ x 8 ½ in. folded and scored.

Very traditional again but festive and CAS too!

The sentiment is white embossing powder on TE oreo cardstock and from the new Festive Christmas Greetings stamp set.

Holler if you have any questions…I’m sure I forgot something. lol

OH!  The die cut Merry Christmas is a beautiful new die, Merry Christmas Posh Script!  I die cut it in TE Cherry Pop and white cardstock.

I cut narrow pieces of foam mounting tape for the back and adhered it over the inlaid wreath.

Thank you for stopping by!  Thinking….what to make next!

Here’s what I used to make this card…

Memory Box – 94592 Florentina Wreath…
[ STR | SSS ]
Memory Box – 94584 Merry Christmas…
[ STR | SSS ]
Memory Box – CL5273D Festive…
[ STR | SSS ]
Memory Box Clear Stamps FESTIVE…
[ SSS ]
TE Premium Cardstock
[ TE ]
Neenah Classic Crest 110 LB SMOOTH…
[ SSS ]
Uni-Ball Signo Broad White Gel Pen
[ STR ]
Lawn Fawn WHITE Embossing Powder LF1537
[ SSS ]
copic sketch markers at Simon Says…
[ SSS | TE | BLIC ]

All Occasion · cards · copics · Memory Box · No Outline Coloring · Shopping · Simon Says Stamp

Simon Says Stamp Memory Box Exclusive Stamp and Die Set…

Hi everyone!  It’s a busy, busy time with tons of new stuff this month at Simon Says Stamp!  I have a card to share today I made with the new Memory Box Exclusive clear stamp set , True Friend.

I stamped the main floral image from the set with Distress Anitque Linen ink and no line colored with Copic Sketch Markers.  Y11, 13, 15, 18 and YG11, 13, 17.  If you haven’t tried no line coloring yet, this would be a great set to start out with! 

Here’s a picture of it just colored and before I cut out the innards. lol

I die cut the brown card panel from the Memory Box Garland Stripes and Dots 6×6 paper pad with Memory Box Wrapped Stitch Rectangles.

I die cut the Simon Says Stamp Banner die with a yellow from the Memory Box Sunny Orange 6×6 cardstock pad.

I was surprised how easy it was to color!  It reminded me of coneflowers so that’s what I went with.

Here’s a picture of the set and the coordinating die…

I love it!  I’m going to have to order the die set! It looks like it cuts out the white between the flowers!  I love the sentiments too.

It’s Simon Says Stamp 12th Anniversary of STAMPtember!  There’s a big SSS release and collaborations with different companies all month!  So check in often and order quick because they do go fast!

Thank you so much for stopping by!  I love hearing from you!

Shopping links to what I used on my card today…

Memory Box TRUE FRIEND Stamptember…
[ SSS ]
Memory Box TRUE FRIEND Stamptember…
[ SSS ]
Simon Says Stamp BASIC BANNERS Wafer…
[ SSS ]
Memory Box WRAPPED STITCH RECTANGLES…
[ SSS ]
Tim Holtz Distress Ink Pad ANTIQUE…
[ SSS ]
copic sketch markers at Simon Says…
[ SSS ]
Lawn Fawn WHITE Embossing Powder LF1537
[ SSS ]
Tsukineko Versamark EMBOSS INK PAD…
[ SSS ]
MINI MISTI PRECISION STAMPER 6×7…
[ SSS ]
Memory Box SUNNY ORANGE 6×6 Paper…
[ SSS ]
Memory Box COTTAGE STRIPES AND DOTS…
[ SSS ]