Birthday · cards · copics · Die Piecing · Poppystamps · Step card

poppystamps Whittle Panda Pickup Kit Step Card…

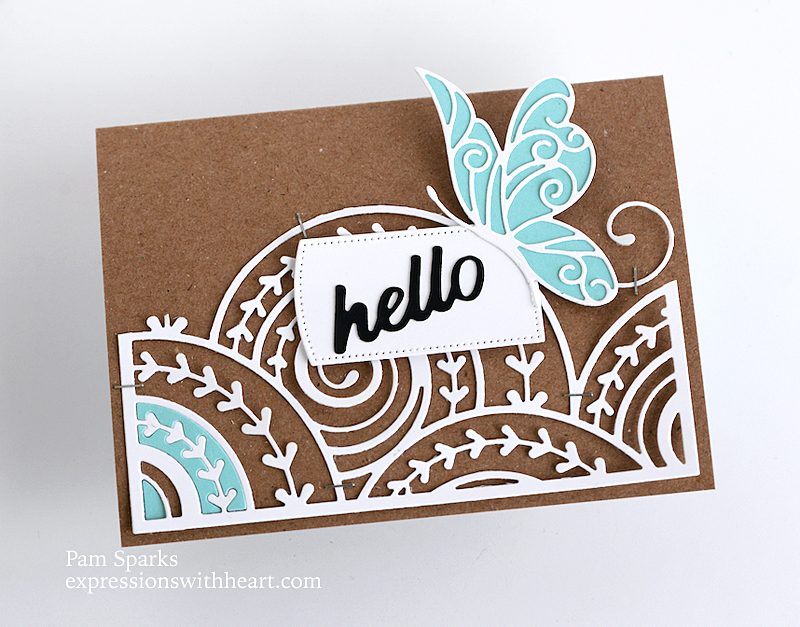
Hi everyone! How do birthdays look at your house?  Pretty much Panda-monium around here! lol  Look at this adorable shiny black pickup and friends though! So cute! I think I’m going to have to save this for my husband’s next birthday. 

I started with a 5 ½ in x 11 in piece of cardstock.  Then it’s just a simple cut and some score lines to create the fold.  Email me if you want me to post a how to… I used to make these a lot!

Here it is flat… send in a square envelope or the catalog size envelope that is rectangle.

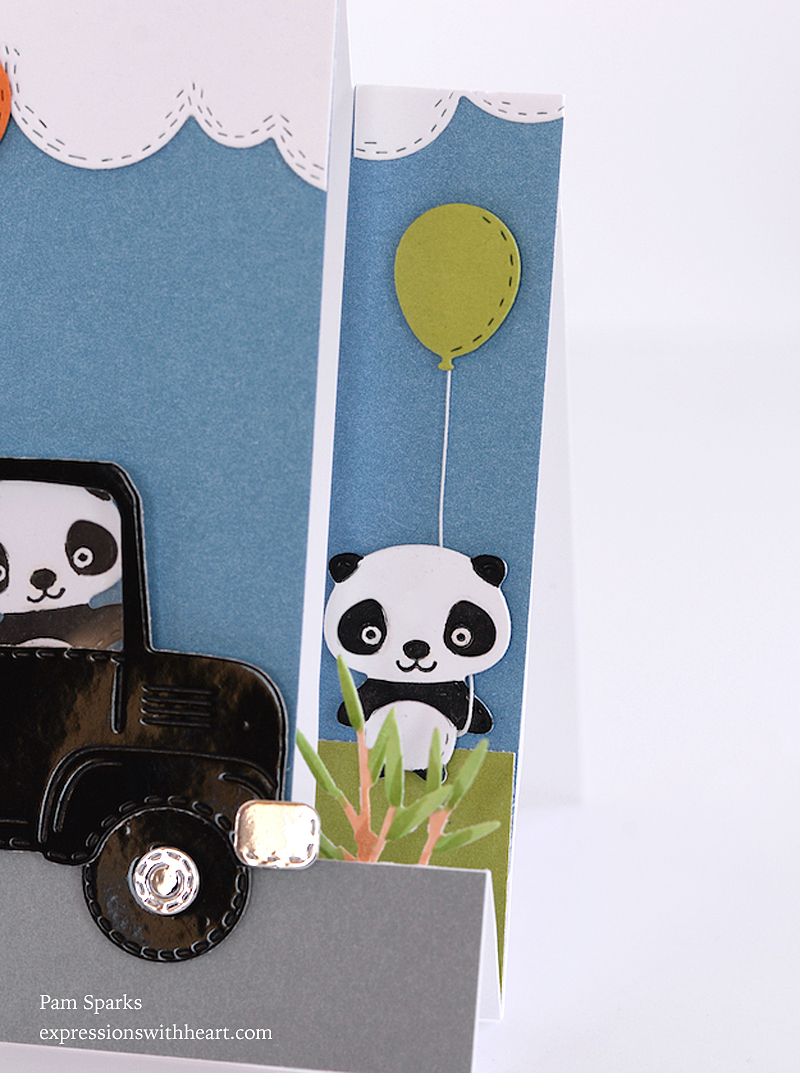
A close up of the panda on the right step.

I die cut the pandas in white cardstock and colored them with a black copic marker. The details die cut into the images and you can stick a piece of scrap paper to help protect the white areas.  slick!

A Fineliner pen for their eyes. 

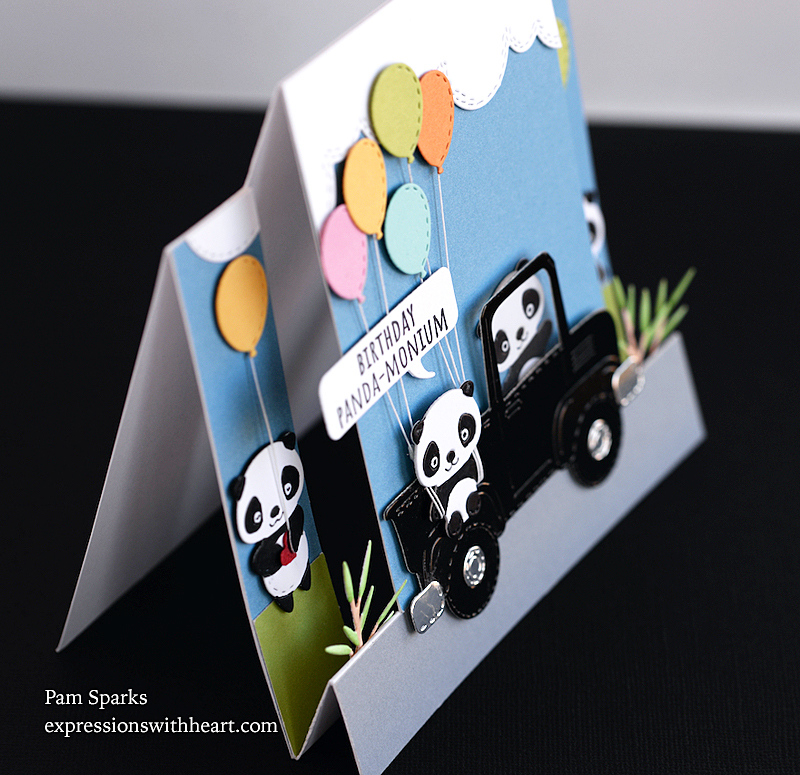
Panda on the left will hold something so I put in a heart and he’s holding a balloon. 

I had to cut the pickup out of Memory Box Glossy Black cardstock and silver mirror cardstock for the wheels and bumpers. 

A piece of acetate I hand cut to place behind the window.  

I used the poppystamps Whittle Cloud Border for the clouds.

I used the poppystamps Word Balloons for the sentiment that comes with the Whittle Panda Pickup kit. 

This is all I’ve gotten made this week.  Sometimes I can be so slow!  Well, I was just playing and having fun! lol

I also pieced the pandas from white and black cardstock and that worked great too.  If you do that, use a fine sanding block or the Tombow sander that looks like an eraser to smooth your scissor cut areas.  It works great!

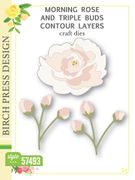
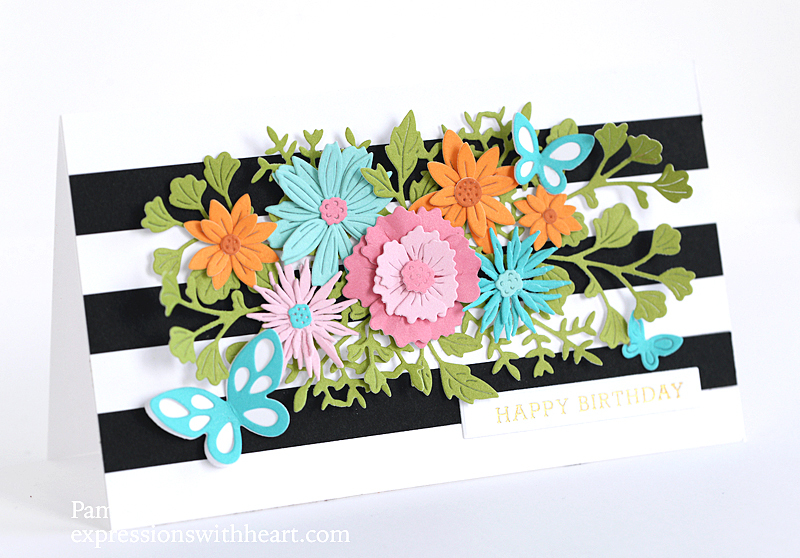
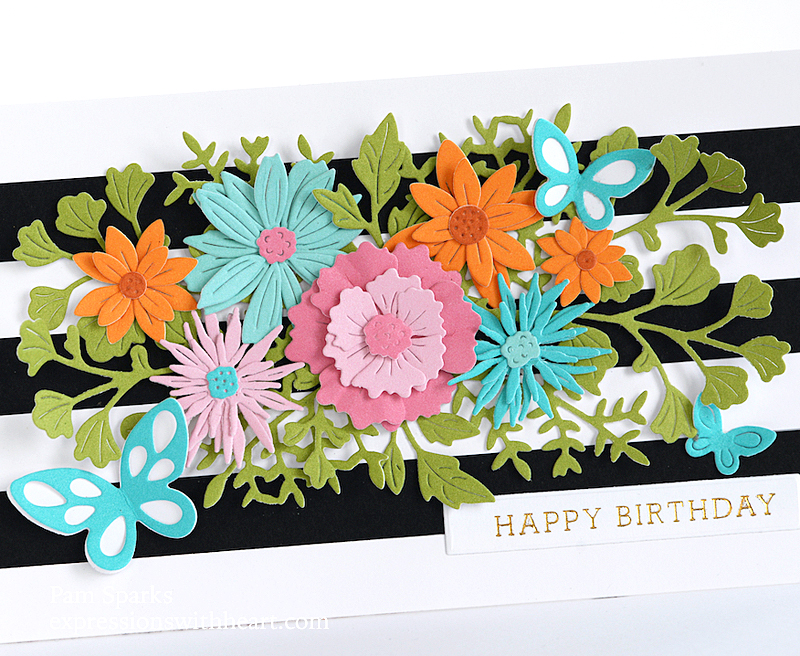
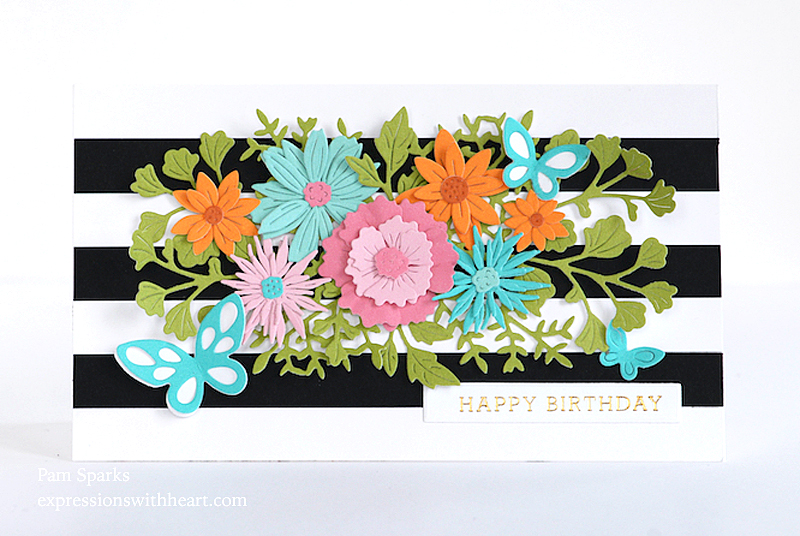
ok – I’ll stop talking now and get busy on my next card!  I was inspired by a flower card in the new Birch Press Design look book!

Have a great rest of the week and see you here again soon!  Thank you so much for stopping by!

Here’s the products I used to make this card…

Poppy Stamps Whittle Panda Pickup Kit…
[ SSS | STR ]
Poppystamps – 2380 Word Balloons…
[ STR | SSS ]
Poppystamps – 2318 Whittle Cloud…
[ STR ]
Memory Box – SH44004 Black Glossy…
[ STR | SSS ]
Hammermill WHITE 100 LB SMOOTH…
[ SSS ]
TE Premium Cardstock
[ TE ]
Bazzill Foil Cardstock – Silver 12×12
[ STR ]
Scrapbook Adhesives Crafty Foam Tape…
[ STR ]
Fiskars Non-Stick Titanium Softgrip…
[ STR ]
Scor-Tape; Scor Tape
[ STR ]
double-sided tape holder – holds…
[ STR ]
Gutermann Extra-Strong Thread – 110…
[ STR ]


All Occasion · birch press design · Birthday · cards · CAS · Die Piecing · Flowers · Memory Box · Mother's Day · Spring · Thinking of You

NEW Memory Box Gentle Rose Watercolor Floral, Plumed Gypsy Butterfly and Curlicue Plate Cards…

Hi everyone! It’s time for a new release from the Memory Box companies!  The usual beautiful products to work with!

I have two cards to share with you using the NEW Curlicue Plate!  I love it!  So whimsical and fun!  Keep going for my second card using it.


I wanted to use some other NEW dies too… so I made up the New Gentle Rose Watercolor Floral in a couple colors but went with pink from the Memory Box Berry Red 6×6 cardstock pad… it’s February, all things Red!

The NEW Wayfarer Leaves die cut in three colors of green from the Memory Box  Lush Green cardstock 6×6 pad.

The NEW Hugs Tender Script die cut in white and then in Memory Box Glossy Black cardstock.  I love this glossy black.  I’ve about used up my pack!  Not quite an emergency yet. lol  What a pretty font though!  Isn’t it gorgeous?!

I should’ve told my camera to focus on the hugs instead of the flower here.  I am an amateur… worse than an amateur! lol

I die cut the Curlicue Plate in white cardstock, the green panel underneath with the NEW A2 Rectangle Frames Die Set (same Lush Green cardstock pad)  and the oval from vellum using the Memory Box Studio Oval Layers die set.

The pretty rosebuds are from the Birch Press Design Morning Rose and Triple Buds Contour Layers dies released earlier this year.

My next card came about because I had an almost perfect Curlicue Plate die cut!  It’s so hard to throw those away!  So I thought about it and decided to try cutting away the parts that didn’t cut completely the first time.  This plate needs a shim… so I use a piece of copy paper folded in half on top of my cutting plate to run it through… blades up as I always say! (I never use that metal shim)

I thought this turned out fun!  You know me and kraft!  White, pool and whimsy! Oh and staples!

A beautiful NEW butterfly for all the butterfly lovers out there!  Plumed Gypsy Butterfly!

***notice how I used the curlicue from the part I cut off behind the butterfly!  clever… hehe

Hello Rush Script is a NEW sentiment die… love it in that glossy black again…

A new set of nesting dies!  Curved Cap Pinpoint Layers.  I can see this one working for banners too!

I think I remembered everything!  Send me an email or comment if you have any questions!  I don’t mind at all!

I used the Tim Holtz mini stapler to hold the Curlicue cut down but glued in the few pieces of pool color.

Linking to…

Just Us Girls Challenge – moodboard

CAS Colors and Sketches Challenge #505 Sketch

The Flower Challenge #77 Use your latest  stamps or dies, must be floral

Thank you so much for stopping by!  I hope you’re getting some creating time in.  Won’t be long til hearts turn to real flowers and grass grows!

Have a good rest of the week!

Here’s the products I used to make these cards…

94698 Curlicue Plate craft die
[ STR | SSS ]
Memory Box – 94713 Gentle Rose…
[ STR | SSS ]
Memory Box – 94712 Wayfarer Leaves…
[ STR | SSS ]
Memory Box – 94669 Hugs Tender Script…
[ STR | SSS ]
Memory Box – 94672 A2 Rectangle…
[ STR | SSS ]
Birch Press Design – 57493 Morning…
[ STR | SSS ]
Memory Box – SP1003 Lush Green 6×6 pack
[ STR | SSS ]
Memory Box – SP1001 Berry Red 6×6 pack
[ STR ]
Memory Box – 94708 Plumed Gypsy…
[ STR | SSS ]
Memory Box – 94468 Hello Rush Script…
[ STR | SSS ]
Memory Box – 94646 Curved Cap…
[ STR | SSS ]
Memory Box – SH44004 Black Glossy…
[ STR | SSS ]
Hammermill WHITE 100 LB SMOOTH…
[ SSS ]
Kraft Extra Heavy Weight Cardstock…
[ HBL ]
SCS-151 Spellbinders VELLUM SHEETS…
[ SSS ]
Tim Holtz Idea-ology TINY ATTACHER…
[ SSS | SBC ]
Tombow Mono Multi Liquid Glue
[ STR | SBC | SSS ]
Scrapbook Adhesives Crafty Foam Tape…
[ STR ]


All Occasion · cards · Distress Ink coloring · Embossing Folders · Flowers · Foiling · Hot Foiling · Oxide Inks · Spellbinders dies · Techniques

Spellbinders February Release Four Petal Floral 3D Embossing Folder Card…

Hi everyone!  Do you remember the poinsettia embossing folder card I made HERE?  I tried it again with the NEW Spellbinders Four Petal Floral 3D Embossing Folder. 

I did this one a little different.  I ran it through the Big Shot with the embossing folder setup after I inked it up with Antique Linen Distress Ink pad. (regular dye ink)  You ink it on the wrong side, the side that debosses, the design is recessed into the cardstock but you don’t want to go deep this time. Use a thinner sandwich.  I inked it up so it’d be easier to see where to brush on the ink.  The first time I did it I got too much green on the pink. 

I found that I could kinda ‘wash’ the ink off with a damp stiff-ish paint brush, after I deep embossed it and brushed back in the right color.  I missed a few spots though! hehe

Scroll down (last picture) and you’ll see how it looks after ink blending and before the last embossing like the folder is meant to be embossed. 

After inking with yellow, pink, green oxide inks and deep embossing, you ink blend again over the top of all of it with Vintage photo distress oxide ink. 

It’s a super fun, vintage-y, distressed look that the camera makes brighter and deeper color than it really is IRL.

I hot foiled the sentiment on a die cut panel using the Spellbinders Something Special Glimmer Hot Foil Plate and gold hot foil.

I spattered on some gold ink for sparkle and glued on some gold pearls to glam it up… oh and some thin gold cord before I glued it to an A7 size cardbase.

Here’s the not so pretty ink blended panel!  :O  I know… at this point you think, I should quit!  This is NOT working! lol

Never fear….keep going! lol

As to my Hallmark commentary last time… this one is Hallmark size anyway! lol

Linking to some challenges…

The Flower Challenge – Use your latest stamps and dies

Just Us Girls Challenge – Sparkle (I have gold sparkly spatters)

Can You Handle the Pressure – anything goes with an embossing folder

Sunshiny day here today, probably won’t be tomorrow when this posts and I haven’t even made it out!  I can’t believe it’s already Feb, 14th! Weather and time seem to be my go to conversation! ugh.  Sorry!

Hope this finds you creating valentines or something! I’ll talk to you again soon! 

HAPPY VALENTINES DAY!

Shopping links to the products I used… thank you so much for clicking through from here!  I appreciate it and no cost to you!  Valentines SALE!  Go HERE!  Feb. 14 – 20

Spellbinders – Four Petal Collection…
[ SBC | SPL | SSS ]
Spellbinders – Inspired Basics…
[ SBC | SPL ]
Spellbinders – Glimmer Hot Foil -…
[ SBC | SPL | SSS ]
Spellbinders – Glimmer Hot Foil…
[ SBC | SBC | SSS ]


Birthday · cards · Die Piecing · Flowers · Memory Box · Mini Slim Card · Poppystamps

poppystamps Birthday Floral Mini Slimline Card…

Hi everyone!  It’s warming up a little here in Iowa…paper flowers making us think of Spring for sure!  Although I’m not good at growing flowers and the three hydrangea bushes we planted a few years ago are finnicky about giving me blooms! 

For the card front panel, mini slimline size card, 3 ½ inches x 6 inches, I cut strips of ½ inch white and black and just layered them on using ATG adhesive.

I created the sentiment with Poppystamps Modest Greetings 1 Hot Foil and Cut Die set and gold hot foil.

For my card today I used a bunch of NEW poppystamps dies!  It was fun to create a kind of wildflower bouquet on a card!

I started with Little Posie Layered Flowers in pink…then Lucky Layered Flowers in the pool color, Little Layered Asters in blue and pink, Layered Pointy Petals in orange and Teardrop Butterflies in blue and white!

The greenery is from the NEW poppystamps Floral Vase Pop Up Easel Set.   I used the bouquet stems from the set and cut two in green, put them end to end (I had to trim off some of the long stems),  so easy because where to put the greenery was already decided for me by using the die from the set!

I die cut one other die from the set that cuts four extra stems and I just stuck them in…no rhyme nor reason.

I figured out where I wanted the flowers, took a picture of it with my phone, then glued them all on the card with Tombow Mono Multi glue while looking at my phone picture!

Another card using up scraps!  The fun thing about die cutting!  I guess I used to do the same with punches but it’s hard to use small pieces of cardstock with punches!

Linking to some card challenges…

Papercraft Challenges – anything goes

The Flower Challenge – use your latest stamps or dies


NBUS challenge – Never-Before-Used-Schtuff

Thank you for clicking over!  I appreciate your visit!  Celebrate if it’s your birthday! lol 

ttul,

Here’s the products I used to make this card…

Poppystamps – 2560 Little Posie…
[ STR | SSS ]
Poppystamps – 2556 Little Layered…
[ STR | SSS ]
Poppystamps – 2554 Lucky Layered…
[ STR | SSS ]
Poppystamps – 2559 Layered Pointy…
[ STR | SSS ]
Poppystamps – 2561 Teardrop…
[ STR | SSS ]
Poppystamps – 2552 Floral Vase Pop Up…
[ STR | SSS ]
Poppystamps – PSF802 Modest Greetings…
[ STR | SSS ]
Scrapbook Adhesives Crafty Foam Tape…
[ STR ]
Tombow Mono Multi Liquid Glue
[ STR | SBC | SSS ]
Spellbinders – Glimmer Hot Foil -…
[ SBC | SPL ]
Hammermill WHITE 100 LB SMOOTH…
[ SSS ]
Bazzill Card Shoppe – Licorice Twist
[ STR ]
Spellbinders – Glimmer Hot Foil System
[ SBC ]
Sizzix – White and Gray – Big Shot…
[ SBC ]
Sizzix White Tool Caddy Big Shot…
[ SBC ]

cards · CAS · Die Piecing · Foiling · Hot Foiling · LOVE · Memory Box · Poppystamps · Valentine

poppystamps Sending Love Poe Script and Criss Cross Heart Foil Plate and Stencil…

Hi everyone!  Still in Valentine mode here…when I finished this card I thought, ‘watch out Hallmark’! lol  Because irl, it looks like a Hallmark card!  I’ve arrived!  hahahahahahahahaha

I really tried hard not to have reflections in the gorgeous gold mirror/foil cardstock.  Almost imporssible!

So this is why all the pictures in weird positions! lol

tada!  99.9% on this last one! lol

Very basic card…. clean and simple even!  I foiled a piece of A2 cardstock with the new poppystamps beautiful Criss Cross Heart Foil Plate…

It’s hard to see in my photos but I used the new poppystamps Criss Cross Heart Stencil to up the red on the hearts but it’s really hard to see in my pictures.  It’s very subtle, but I love it!

I die cut the next largest Memory Box Double Stitch Loving Heart Cut Out die in gold mirror/foil cardstock.  I love this stuff from Starlitstudio.

For the sentiment I die cut the new poppystamps Sending Love Poe Script die in Memory Box Black Glossy cardstock!  I know, I keep saying it but it’s awesome stuff too!

I layered the foiled heart panel on black gloggy too… so narrow but so classy!   I wish you could see this in real life! hehe

Linking to some challenges…

Simon Says Stamp – Love is in the air

Papercraft Challenges – anything goes

TicTacToe Challenges – top row across dies, gold, stencil

I think that’s it for this card… holler if you have any questions.  I’m going to go make bread and then die cut some poppystamps floral dies for cards!  Have a creative cardmaking weekend if you can!  ❤

Here’s what I used to make this card…

Poppystamps – PSF801 Criss Cross…
[ STR | SSS ]
Spellbinders – Glimmer Hot Foil -…
[ SBC | SPL ]
Poppystamps – T103 Criss Cross Heart…
[ STR | SSS ]
Poppystamps – 2555 Sending Love Poe…
[ STR | SSS ]
Memory Box – SH44004 Black Glossy…
[ STR | SSS ]
Memory Box – 94359 Double Stitch…
[ STR ]
Bazzill Foil Cardstock – Gold 12×12
[ STR ]
Tombow Mono Multi Liquid Glue
[ STR | SBC | SSS ]
Scrapbook Adhesives Crafty Foam Tape…
[ STR ]
Spellbinders – Glimmer Hot Foil System
[ SBC | SSS | SPL ]
Spellbinders – Platinum 6 – Die…
[ SBC ]
Glimmer Hot Foil 4 Rolls – Satin…
[ SPL ]