cards · CAS · Christmas · copics · Die Piecing · Memory Box · Perfect Layers Tools · rubber stamps

More Christmas in July…

PamSparksCandleLight-001


Three white CAS cards in a row!  At least I got the white part of the holiday weekend in!  I think everyone else is getting ready for the 4th of July and here I am making Christmas cards like crazy!

I’m thinking you want to see the NEW stuff made up though so I’ll just keep making.  Although I think tomorrow is going to be clean out the garage day. ugh.  I’d rather make cards!!! lol

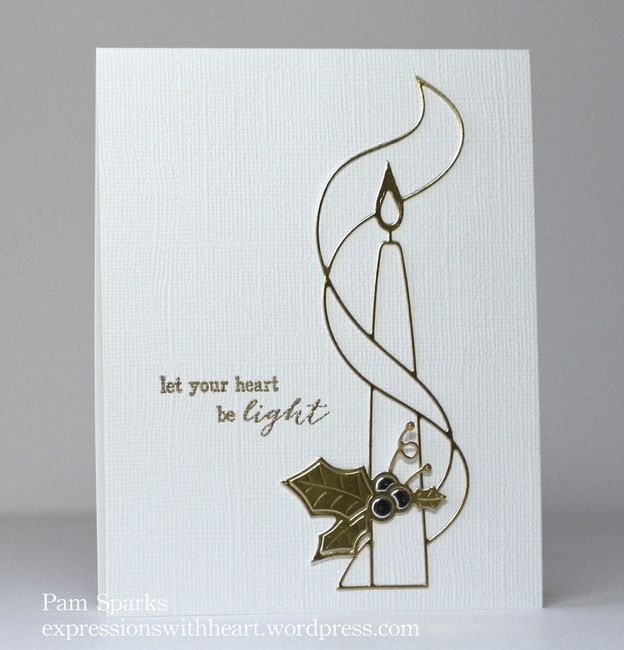
I cut the NEW Tall Taper Candle die out of gold metallic card-stock then again for just the berries out of a scrap of silver metallic card-stock.

I glued this with Tombow Mono Multi glue, green caps, directly to a top folding A-2 size card base. Teeny dots where the lines meet and there is a tad bit bigger area to leave a teeny dot of glue.

*Tip*  Always keep the tip of your glue clean and it won’t clog up on you.

*Tip* and the most important one… always keep your glue laying down. If you keep your glue upside down, it will come out uncontrollable!  eep!

(I did try die cutting this with double sided tape on the back. It didn’t work well for me…too sticky and didn’t hold it’s shape)

Isn’t this Taper Candle die gorgeous?!  Can you just see it made up to look like stained glass?!  awesome!  Can’t wait to do that next!

The holly and berries are from the NEW Cabrini Ornament die.  Three little snips with the scissors and you have the perfect embellishment for the candle!  : )

Did you notice the sentiment?  NEW rubber stamps!!!!  YAY!  This is the NEW Let Your Heart combo rubber stamp.


PamSparksScriptMerryPoinsettiaCorner-001

WOW is right!  LOVE the NEW Grand Merry Christmas Script die!  It’s a beauty!  I paired it with the NEW Plush Poinsettia Corner die. Another beauty!

PamSparksScriptMerryPoinsettiaClose-001

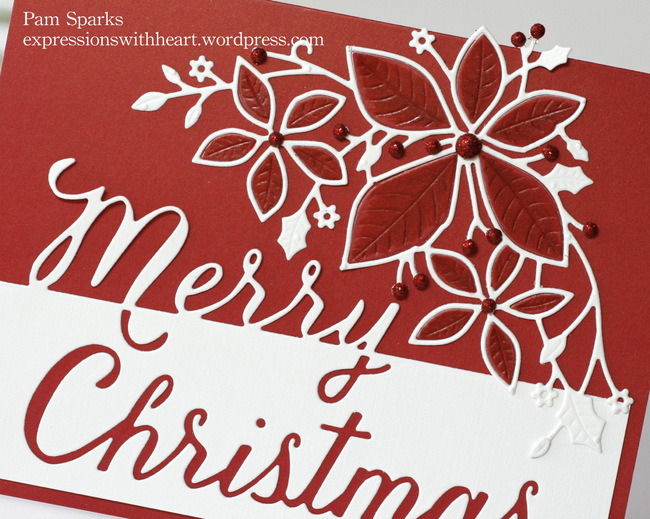
The Grand Merry Christmas is cut from white card-stock and the Plush Poinsettia Corner is cut from white and cranberry card-stock.  The cranberry petals I colored with Copic markers after I glued them in place.  A gal can only go so long without a little colorbook therapy! : )

Several red glitter domes on the berries and this A-2 size card was done.

My last card for today is colorful and picks up the chalkboard trend that has been so popular.

PamSparksHollyJolly-002

Isn’t it fun?!  I love it!  This is the NEW Have a Jolly Christmas die!  FABULOUS!  First I die cut it in white and it was great…but I just had to try some retro-ish colors.  I know…even though I’ve been on a white kick!

So here you have Lagoon, Sage, Cranberry, Licorice and White Memory Box card-stock or notecard colors.

I used my Perfect Layers Mini Tools and Cutting Mat to layer.  The ⅛ th inch ruler for the white mat and the ½ inch ruler on three sides of the card base.  Click HERE. Be sure to use the code Sparks5% at checkout.  The rulers are so awesome!  They save me so much time!  You will love them too!


PamSparksHollyJollyClose-001

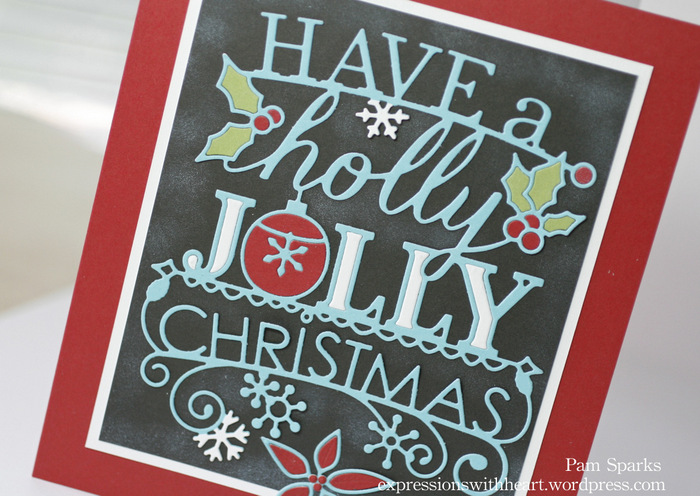
See that poinsettia at the bottom?  That is a NEW die too! It’s the smallest flower from the NEW Poinsettia Bloom Trio die.  YAY!  More of everything I love!

Well, this is a lot today…holler if you have any questions!

I’m linking up to some challenges…

Virginia’s View Challenge # 5 – Die Cut

Wonderful Words Challenge – Word Dies

Keep it Simple – lots of turquoise

Thanks for looking, enjoy the holiday weekend and keep coming back to see more NEW * NEW * NEW!!!

Birthday · cards · Memory Box · Perfect Layers Tools · Poppystamps · rubber stamps · Spring · Summer

Memory Box Birthday and Thinking of You…

PamSparksTremaineSquarePool

Just thinking of you today!  I am enjoying the Memory Box Summer Release… aren’t you?!

Here I used my Perfect Layers Tools to mat the MB Tremaine Square die a few times on a MB Pool A2 notecard.  Just thinking of you is stamped with Versafine Black ink.   I cut the Kensington Branch from MB kraft card-stock.

PamSparksTremaineSquarePoolClose

Some taupe-ish colored baby pearls, a couple birds from the Resting Birds die and it was done.  Love MB Pool Dot pattern paper!

The next card reminds me of a vintage greeting card.  I love vintage cards and papers.  If I wasn’t making cards all the time,  I bet I’d be out looking for old cards and papers! : )

PamSparksFabulousPhloxTremaineFront

Here I used the poppystamps Massa Leaf Frame die to build up from.  I used the Leaf tool from the Sizzix flower tool set to score the leaves!

There’s the MB Tremaine Square again…

PamSparksFabulousPhloxTremaine2

The MB Happy Birthday Garland die and Fabulous Phlox Flower dies…

PamSparksFabulousPhloxTremaineClose

So pretty… love the dainty greenery that comes with the Fabulous Phlox set.   Yikes…I don’t see it in any of the stores I link to… sorry about that!

PamSparksFabulousPhloxTremaine

A little carried away with photos today… sorry… hehe   Now that the trees are fully leafed out,  it’s trickier to get photos with natural light.  Takes me forever and I have a hard time deciding which ones to post!  It’s crazy how light changes the colors!   It’s nice to have shade though…much easier to air condition!

Linking up to the NBUS Challenge  HERE… my first times to use the Tremaine Square and Fabulous Phlox dies.

button aqua


and to Simon Says Stamp Challege – Anything Goes,  HERE

and to Simon Says Work it Wednesday, HERE

Thanks for stopping by today!  Hope Summer is treating you well!

Dies and Supplies I used…

Birthday · Blog Candy · cards · Class · Classes · Memory Box · Poppystamps · rubber stamps · Step card · Winners

The Give a way Winner and more cards…

AND… the winner is….

Lynn Gauthier!!!!

CLAP! CLAP! Congrats Lynn!!!  YAY for you!

I had Breanna pick a number between 1 and 63 and she picked 42!  Congrats Lynn!  Send me an email with your mailing information!

I tried to add names… for some reason you all didn’t put your names in for each thing, so I had to add a bunch.  Lesson learned…links must be too big a pain…stick with comments I guess!

THANK YOU Cindy from Starlitstudio!

I started posting the cards I designed and taught at the Great Yosemite Stamp Escape a week ago… eek… time gets away so fast!  HERE’S the post with the Sunflower cards and HERE’S the post from a couple weeks ago telling about the weekend and about the process of getting ready for the classes.

Today I’m posting the other three cards…

PamSparksGolfSceneForeYou

‘fore you’ – layering up dies to create a scene.  Love making scenes!  Memory Box dies and stamps and poppystamps dies.

I had the ladies cut out the golf cart in white cardstock and color the pieces with markers. Easy and so cute!


PamSparksPailiaBloom

more Memory Box and poppystamps dies…the Memory Box Chic Chevron makes an appearance on the panel.  Inked with Mowed Lawn Distress ink and the mini ink blending tool.  Some spatters and sequins add to the fun of the design!

Linking up this card to the Keep it Simple Challenge – Splatters

Weekly-Favorite

YAY!  My Pavilia Bloom card was in the favorites at SCS on Sunday!  Thank you ladies!


PamSparksPaviliaBloomClose

I had the ladies emboss the flower just like I did in this video HERE.  Then it was inked with Dusty Concord Distress ink and the mini ink blending tool.


PamSparksWaterCanStep

Another sweet Summer scene with Memory Box and poppystamps dies.  So fun to make!  I love step cards!

Linking my card to the Seize your Birthday Challenge – Summer Time

My card was a winner there too!  Thank you ladies!

STB Challenge Winner

Enjoy the Summer days!  We’re sure having some beautiful ones here in Iowa.  Love it when it’s not so hot and humid!   I hope to hop on my bike for a bit today!  : )

Thanks for visiting!  Love hearing from you and hope you enjoyed my cards today!

Dies, stamps and supplies I used to create these cards…

Birthday · cards · CAS · Class · Classes · Die Piecing · Memory Box · Poppystamps · rubber stamps

Memory Box and poppystamps Sunflower Card…

PamSparksPSsunflower

I really had a lot of fun creating this card!  I LOVE the poppystamps Bountiful Sunflower die!  I used it here with the Memory Box Toulouse Background die (trimmed off the flower head), the Memory Box Honey Comb Stencil, the Memory Box Happy Birthday Combo stamp and the poppystamps Bountiful Sunflower Background die.

I inked the front of a Memory Box Jack o Lantern A2 Notecard with the Honey Comb stencil, Wild Honey Distress ink and the mini Round Ink Blending tool.


PamSparksPSsunflowerClose

Remember this card and video?

I took the background piece and put it in the outline die, ran it through the Big Shot to emboss the detail into the background piece, that’s what I did here too… LOVE this look!

Then I inked the edges a little with Wild Honey Distress ink and the new mini Round Ink Blending Tool.

There is ONE big difference though… see it?

Instead of putting the background behind… I put it on top!

When I die cut the Bountiful Sunflower outline die in dark brown, I made sure to keep the seeds in the die and inked them with Walnut Stain Distress ink and the mini Round Ink Blending Tool.  TIP – to make sure the seeds stay in after you remove it from the die…tape them on the back side with scotch tape.

Then here is a card I made to show how you would normally think to cut this die and use it…

PamSparksBountifulSunflower

Only instead of lining up the background piece exactly, I decided to place it ‘off’!  I like it a lot this way!  YAY!

PamSparksBountifulSunflowerClose

I inked the edges of the Memory Box Kraft A2 Notecard with Walnut Stain Distress ink, stamped the Journey Collage stamp in black and ended up with a CAS card I’m really happy with too!

New Grandson and Mama are doing great!  Thanks for stopping by!

Still time to link up to the give a way… scroll down…

Supplies I used for these cards…

Birthday · cards · CAS · Die Piecing · Memory Box · Perfect Layers Tools · Poppystamps · rubber stamps · Spring

Memory Box Glorious Gerber Daisies and Kensington Border cards…

PamSparksGloriousGerbersKraftPurpleGreenCLOSE
Glorious Gerbers indeed!  I love these flower dies from Memory Box!  I will be posting later next week about the Great Yosemite Stamp Escape but in the meantime, here’s a couple cards I made up while working out what cards to teach.
 
PamSparksGloriousGerbersKraftPurpleGreen


I pieced in the Distress Dots Memory Box Signature pattern papers for the flower petals.  I like to leave the pieces in the die and use the Quikstik to place them them in the holes, easier to keep track of the pieces and faster too!

Memory Box Kraft A-2 notecard for the base, edged with Distress ink and the ink blending tool.

Just can’t get enough of the Kensington Border die!  Love it!

I inked up just the ‘happy birthday’ words from the Happy Birthday Special Combo stamp and stamped them on the poppystamps classic ribbon border die and layered it up.
Here’s a little bit different version…


PamSparksGerberKensingtonDistressDots

and since I couldn’t decide if I liked one photo better than the other…


PamSparksGerberKensingtonDistressDotsSide

Some little purple baby pearls on the border die cut, wish I’d remembered to do that on the first card before photos! lol  If you don’t have purple, you can always color white ones with your Copic markers!

Hemp on the first card and Lawn Fawn trimmings on the second.

THANKS for visiting today!

Supplies I used on these cards…