Blog Candy · cards · CAS · Memory Box · Perfect Layers Tools · rubber stamps

Memory Box and Starlitstudio Butterfly Dies Giveaway!!!

Some days I get carried away…are three cards in a post too many?  well…fortunately I didn’t take a picture of the first card I sent off to Printworks and one other card I didn’t like well enough to post… so whew… it was almost five! lol

When the Piano Border die came out… it was a MUST HAVE it!  I grew up playing the piano and still like to play once in awhile.  I taught piano lessons for years and once in awhile I work with the grandkids. Fun.

So I’ll start with the Grand Piano card!

PamSparksGrandPianoBorder700

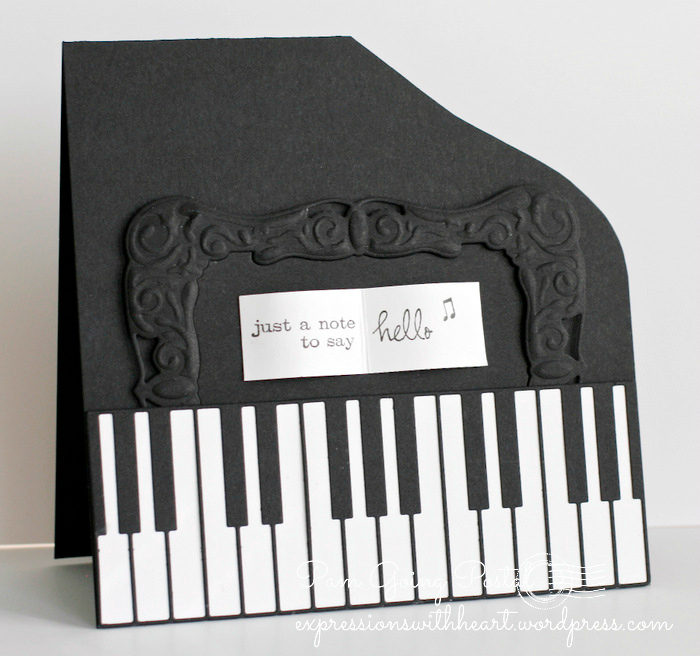
A 5 ½ inch square card, hand cut to resemble a Grand Piano. The Piano Border die, the Calozonia Frame die for the Music rack.  I cut and embossed the frame die in the Big Shot but extra embossed it with the stylus… a couple of my videos show how to do that.

PamSparksGrandPianoBorderClose

I really did stamp the sentiment with a good black ink pad… not sure why the light hit it and lightened it for the pictures.  I do have double mounting squares under the centers of each side of the pages, so they’d curve a bit.  grrrr  I’m not taking the photos over,  I’m not!  lol

My Grand Piano card was in the Weekly Favorites over at Splitcoast Stampers!  Thank you so much ladies!

Weekly-Favorite

❤ ❤ ❤ ❤ ❤

PamSparksVenitaLunetteButterfly

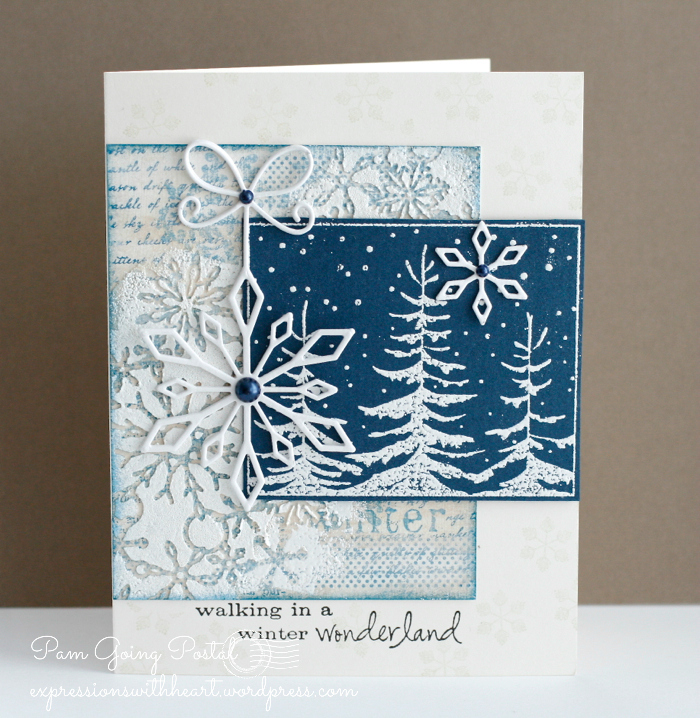
I spritzed the new Floral Mesh stencil with a bit of glimmer mist on watercolor paper for the background…layered up card-stock and pattern paper with my Perfect Layers Tools, cut the Venita Flourish and butterfly body from silver glitter card-stock, added some loops with May Arts purple cord, added the the Oriel and Lunette Butterflies on top and stamped part of the sentiment with the stamp a ma jig!  It’s an A-2 size card.

*** Linking my Butterfly card to the following…

Keep It Simple Challenge blog – Things With Wings

ETA – Moxie Fab World – Styling with Stencils Challenge

and my card was in the Weekly Favorites Thread at SplitCoast Stampers!  Thank you ladies!

Weekly-Favorite

❤ ❤ ❤ ❤ ❤

NOW For the Giveaway…

yhst-84277683982949_2271_4096328

❤ ❤ ❤ ❤ ❤

Cindy from Starlitstudio has given me a Lunette Butterfly die and an Oriel Butterfly die to give away!!! Hurrah!

❤ ❤ ❤ ❤ ❤

Link up at the blue frog  (USA mailing address only)  for a chance to win.

 email address in the first box…
you don’t have to have a blog…
Name in the third box…
that’s it!

❤ ❤ ❤ ❤ ❤

memory-box-die-lunette-butterflty-3.gif

Size of die cut: 3.3 x 1.8 (wings); .7 x 1.8 (body) – sizes in inches.

memory-box-die-oriel-butterfly-3.gif

Pretty awesome of  her!!!  THANK YOU CINDY!!!

❤ ❤ ❤ ❤ ❤

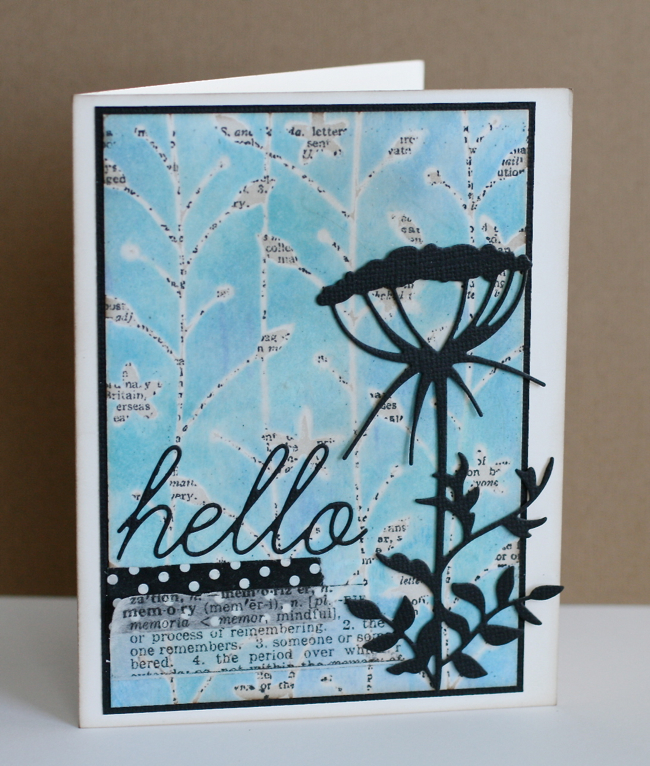
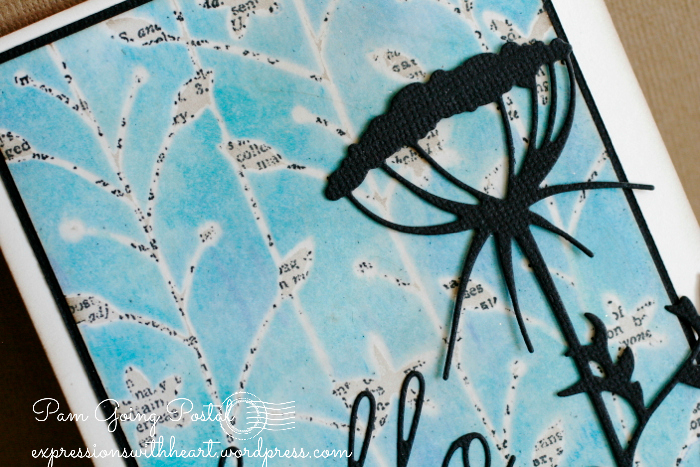
On to the last card.  The NEW Calm Countryside die… love it and love it CAS, clean and simple!

Happy Day!  This card was in the CAS Favorites for this week at Splitcoast Stampers!  Thank you so much ladies!

CAS-Favorite

PamSparksCalmCountrysideCAS

Dies and stamps I used will be linked below… holler if you have any questions!  So glad you stopped by to visit!  Always glad to share! Happy weekend!

* Supplies I used to make these cards *

cards · CAS · copics · LOVE · Memory Box · Perfect Layers Tools · rubber stamps · Valentine

Tulip Stems and Queen of Hearts…

PamSparksTulipStemsFront

Thank you So much – white heat embossed on vellum.  So fun that vellum is new again!  I die cut, embossed and colored the Tulip Stems die with Copic Sketch markers… V22, 25, 28 and YG21, 23, 25, 17.

Memory Box Distress Dot violet paper and Violet A-2 Notecard.

I’m entering this card in the CASE Study Challenge #176.

Here’s a close up…

PamSparksTulipStemsClose
I just had to use this Queen of Hearts die!  Of course you think of black and red with Queen things!  oh and Silver glitter paper is a must! haha

PamSparksQueenofHeartsFront
I dry embossed the NEW Flourish Stencil on the red heart and rubbed over it with a little Walnut Stain Distress ink and the ink blending tool.

Just a subtle look but I like that it’s delicate to go with the fine lines of the die!
PamSparksQueenofHeartsClose

This die cuts perfect and beautiful every time!
PamSparksQueenofHeartsSide
LOVE is cut with the UpperCase Classic Alphabet… love Memory Box Alphabets!

I’m linking up to Simon Says Stamp Work it Wednesday

Thanks for stopping by!  Hoping to do a snowman next!  It’s still Winter even though we’re working with all these new flower dies!

Supplies I used…

Birthday · cards · Distress Ink coloring · Magnolia · Perfect Layers Tools · rubber stamps · Tilda's Town

Distress Marker coloring video and card…

PamSparksLovelypopTildaFront700

My card for Tilda’s Town Challenges today is colored with Distress Markers in a watercolor way. I used Lovelypop Tilda for a birthday card because the theme is Celebrate!

Click over to Tilda’s Town ChallengesHERE and enjoy the inspiration from the Design Team and enter the weekly challenge!  We’d love to have you!

Each week there is a random winner, chosen by Inlinkz, for a $10 gift certificate to Tilda’s Town.com!

logo1

Tilda’s Town is a most magical shop specializing in Magnolia Stamps. Over 1,100 stamps in stock at all times. Tilda’s Town offers FREE worldwide shipping on every order, every day. You can also save up to an additional 20% on your purchase by using one of the famous coupon codes. Shop at Tilda’s Town.com and live the magic.

PamSparksLovelypopTildaSide700

Have you tried it?  Here’s a video of how I color with Distress Markers on Canson Cold Press watercolor paper.  It’s very basic but if you are curious how to begin, it might be an encouragement to you.

I did make this in HD, so you can click the gear and watch it that way if you want.

Here’s a close up but remember… I was coloring standing up so it’s kinda messier than usual! : )  I think coloring on Cold Press paper has a different look than Hot Press paper for sure and definitely different than Copic coloring.  I have to keep telling my self that it’s ok! lol

PamSparksLovelypopTildaClose
I’m linking my birthday card to Seize the Birthday Challenge – option this time is coloring
And just to make you laugh…how would you answer this question?  huh?  Did you or didn’t you?  Remember that white paste???   I do! lol

1536738_10152144116878680_1985588455_n
Thanks for stopping by!  If you color with Distress Markers, let me know so I can visit you!

Supplies I used…

cards · Memory Box · Perfect Layers Tools · rubber stamps · Stencils · Techniques · Tutorials · Washi Tape

Memory Box Garden Flora Stencil and Flower Dies…

PamSparksGardenFlora650

The NEW Garden Flora Stencil from Memory Box…

On this card, I laid the stencil on top of a piece of white cardstock and taped it down with removable tape.

Using the Colorbox pigment Queue called Surfs Up, I applied the ink, all the colors, randomly, all over.

I removed the stencil and heat embossed with clear embossing powder.

Using the rubber stamp Mail Definitions,  Ranger Archival Black ink and a Stamp a ma jig, I stamped   the panel, starting at the top and moving down, inking and stamping three times.

Heat up your craft iron. Lay the heat embossed and stamped panel face down onto scrap paper, I use a piece of newsprint folded in half, and iron off the embossing.  Be sure to protect your work surface from the heat.

PamSparksGardenFloralHelloClose

I used some Antique Linen Distress ink and the ink blending tool to add some color to the white areas.  The areas that were heat embossed, still pretty much resist the ink.

Mat the panel with black card-stock and the Perfect Layers Tools, add your die cuts, washi tape and mount to a Parchment notecard.  I used the Kylie Stem and hello script dies.

I’m linking up my hello card  to the CASology Challenge – Contrast

This next card I used the same Garden Flora Stencil and Mail Definitions stamp but the text is in the background instead of on the flowers and stems.

PamSparksGardenFloraStencilSide

I taped the stencil to the white piece of card-stock.

Inked it all with Tumbled Glass Distress ink and the ink blending tool.

Stamped it three times with Ranger Archival Black ink and the Stamp a ma jig.

Then removed the stencil.

I spritzed the panel with Glimmer Mist Dazzling Diamonds Spray.  I wish it showed up in the photos but it’s really pretty, shimmery IRL!

I die cut the NEW Zinnia Bouquet and Zinnia Bouquet Background dies from white cardstock.  I inked the three background pieces with Tumbled Glass Distress ink and the ink blending tool.

Glue the background pieces to the Outline piece.

PamSparksGardenFloraClose

Adhere the flower to the card with mounting squares.

Tie on Hemp cord.

Add the sentiment ‘FLOWERS’ from the April Showers Bring May Flowers stamp by mounting it to a piece of the Contempo Circle Border die.

Mat the panel with Black card-stock,  the Perfect Layers Tools and adhere it to a Kraft notecard.

There are so many techniques to try with the NEW Stencils and dies!  Can’t wait to see what you all come up with too!

Thanks for stopping by and enjoy stenciling!   I’m linking up to the Online Card Classes Stenciled that just started today.

STN_participant

Supplies I used for my cards…

cards · CAS · Memory Box · Perfect Layers Tools · rubber stamps · Stencils · Winter

Memory Box cards…

PamSparksWinterCollageFront

Here’s the new Delicate Snowflakes Stencil from Memory Box… I tried several different ways of using it but I’m just posting two!   This reminds me so much of what we’ve done for years with Brass Stencils!  I need to get those back out too!  For this card, I stamped a panel with Memory Box stamps, laid the stencil on the panel, applied stencil paste, then white embossing powder and heated it.

This card was a Weekly Favorite at Splitcoast Stampers!  Thank you ladies!

Weekly-Favorite

PamSparksWinterCollageClose

I used the Precious Snowflakes die and several stamps…
Snowy Evergreens
Walking Winter Wonderland
Winter Collage
Washi Tape Dots

PamSparksSmSnowflakesStencilFront

Here I used the Delicate Snowflakes stencil…laid it over a piece of watercolor paper and spritzed it with Frosty Night and Dazzling Diamonds Glimmer Mist.  My watercolor paper wasn’t the heaviest so it curled up some from the moisture causing the inks to go under the stencil a bit at here and there.

*tip* if you spritz the backside of your paper with water, it doesn’t curl up as much when you’re getting the front wet!

This card was a CAS Favorite at Splitcoast Stampers!  Thank you ladies!

CAS-Favorite

PamSparksSmSnowflakesStencilLeft

Frostyville Corner and Snowflake Corner cut from white glitter card-stock.  Looks like snow!

I had to make one die card to post too!  : )  It’s a CAS card that would be fun to make a pack of 6 or so for a gift… for a bunch of thank you cards…notecards…invitations too!  Easy to change it up, this is Version 2 for me! lol

PamSparksMonogramFront

I cut the S, from the Classic Upper Alphabet die set, in the center of a piece of Memory Box Pattern paper. Then I placed it on the NEW Venita Flourish die, centering the S and taping the card-stock in place to cut.  Exact placement!  Love it!

*tip* always cut the inside image first so you can position and center when you cut the surrounding shape.

Panel mat was cut with the Perfect Layers Tools…..

PamSparksMonogramClose
I’m linking up my Venita card to the NEW challenge at Addicted to CAS

Thanks for stopping by today!  ‘preciate it!  Hope I’ve inspired you a bit!  It’s so ‘wintery’ here but I must switch gears and make some Valentines!  Take care and ttul!

Stamps, Dies and Supplies I use…