Blog Hop · cards · Christmas · copics · Perfect Layers Tools · rubber stamps · Taylored Expressions

Perfect Paper Crafting Crazy Dayz with Taylored Expressions…


PamSparksTEWoodlandWinterSide700

❤ ❤ ❤ ❤ ❤

ETA…I’m linking my scene to the Foxy Foxes Challenge in the Moxie Fab World.  You’ll want to play along!

Hi everyone! Welcome!  Today I’m hopping with Regina Mangum from Taylored Expressions Design Team.  Perfect Paper Crafting and Taylored Expressions design teams have been posting random days throughout July and there will be one more day of hopping together, August 11th… so keep commenting on this post for a chance to win!

Today I used the ‘cool’  Perfect Tears, 3 Tool setI used the scallop edged ruler, both sides…the larger for the snow and the smaller for the ice skating rink.   The set comes with a water pen… very nice… the water pen is different than the one Julia shows in her video below.  Really works slick!  Love it!

❤ ❤ ❤ ❤ ❤

PPC’s Video showing how the Perfect Tears work…

❤ ❤ ❤ ❤ ❤

TEhop

❤ ❤ ❤ ❤ ❤

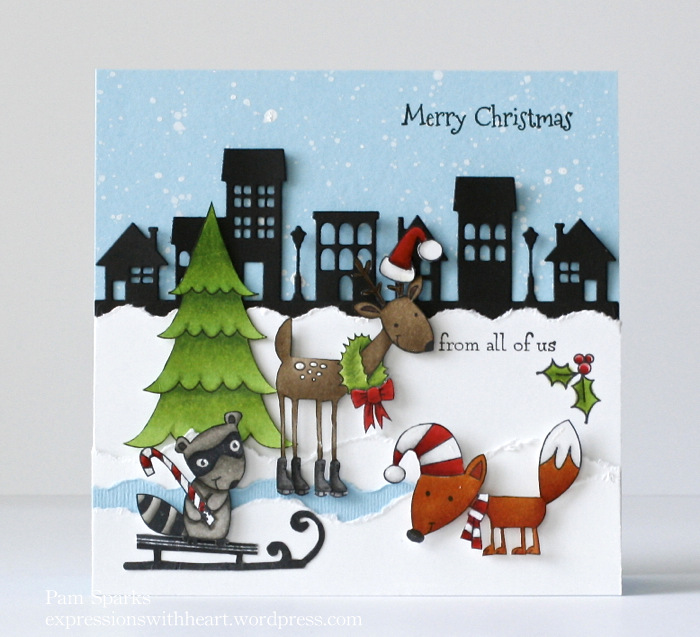
I created this 5 ½ inch square card with Taylored Expressions, Woodland Winter stamp set and Neighborhood Border die.   I’m in love with these cute, cute critters, sentiments and scenery!

❤ ❤ ❤ ❤ ❤

Here’s a close up of the scene…

PamSparksTEWoodlandWinterClose

❤ ❤ ❤ ❤ ❤

I stamped with Memento Tuxedo Black ink and colored with Copic Sketch Markers.  I hand cut out the critters and the tree and then colored them.  I like to do it that way so the white edges get saturated with color too.

Tree/wreath – YG23, 25, 67
Deer – E43, 44, 47
Red – R24, 27, 29, 59
Raccoon – W3, 4, 5, 7
Fox – YR27, E08

❤ ❤ ❤ ❤ ❤

PamSparksTEWoodlandWinterFront700

❤ ❤ ❤ ❤ ❤

So wintery and festive!  I spattered the blue background with Dylusions White Linen spray.  Shake it up really good…unscrew the cap and tap the ink from the tube onto your card-stock!  It’s a winter wonderland!

I’m linking to some challenges…

A Blog Named Hero – Die cut a little or a lot!

Simon Says Stamp Wednesday Challenge – Anything Goes

2 Cute Ink Challenges – Animals

Marker Pop Challenge #49 – Copic markers

Merry Monday Christmas Challenge – skis, skates or sleds (deer is ice skating, coon on the sled)

thank you ladies for choosing my card to be in your Honorable Mentions!

Honorable Mention

❤ ❤ ❤ ❤ ❤

Thanks for stopping by today!  Be sure to leave a comment here for a chance to win a $50 gift certificate from Perfect Paper Crafting!!!

❤ ❤ ❤ ❤ ❤

Supplies I used to make this card…

Avery Elle · Blog Hop · cards · CAS · Christmas · copics · Perfect Layers Tools · Summer

Perfect Paper Crafting and Avery Elle Blog Hop!

get-attachment.aspx

❤ ❤ ❤ ❤ ❤

Hi everyone!  Welcome!  Good to be back sharing cards with you today!
Perfect Paper Crafting and Avery Elle have teamed up this week for a blog hop! The Design Teams are creating with Avery Elle stamps and dies and Perfect Paper Crafting tools. Both companies are giving away a $50 gift certificate to two lucky winners!!! How do you win? Just leave comments on the designer’s blogs as you hop through the list!  Remember to use my Sparks5% code when you shop PPC. Thank you!

The hop started Monday, July 28th and will go through August 1st at 12:00 midnight.  The winners will be announced on August 2nd.  You still have time to comment!
Just in case you missed any of the amazing projects created by the Avery Elle design team and the Perfect Paper Crafting design team, here are the links to all of the designers blogs…scroll down to get to my cards!
Avery Elle – every day
Perfect Paper Crafting – every day
Caryn Davies – Monday
Yainea – Monday
Jenny Peterson – Monday
Kasia Curry – Tuesday
Chunyuan Wu – Tuesday
Roxie Glaza – Tuesday
Maska Vanacker  – Wednesday
Jenny Gropp – Wednesday
Heather Campbell – Thursday
JJ Bolton – Thursday
Tracy Valure – Thursday
Avery Elle – Friday (Jamie Gracz)
Pam Sparks – Friday

❤ ❤ ❤ ❤ ❤

Only one Christmas card today! : )

PamSparksAELaurels700

Here I used the Mini Perfect Layers Tools and cutting mat to border the angle (cut with one of the dies from the Custom Panel Elle-ments set) of the kraft card-stock with red.   I do love Christmas and I love these colors together!

PamSparksAveryEllePeek7:31

I used the Avery Elle Winter Wreath Clear Stamp Set and Custom Panels Elle-ments for this card. I heat embossed the wreath with white embossing powder. Inked the kraft card with Gathered Twigs Distress ink and spattered it with a little water. Stamped the pinecones and bow on kraft and cut them out by hand. Stamped the sentiments with Espresso Truffle Memento ink, spattered with Dylusions White Linen spray and added red glitter domes for berries.

Linking up to the Simon Says Stamp Anything Goes Challenge
Addicted To Stamps Anything Goes Challenge
Crafting For all Seasons – Christmas in July
Southern Girls Challenge – Christmas is a-coming
Creative Card Crew – Christmas
Avery Elle Challenge – Die Cuts

❤ ❤ ❤ ❤ ❤

PamSparksAELaurelsPink700

Here I used the Mini Perfect Layers Tools and cutting mat to mat my stamped white panel with 1/16th inch green.  I love being able to cut a perfect 1/16th inch mat every time!!!

I used the Avery Elle Laurels Clear Stamp set, Laurels Elle-ments, Build a Banner Clear Stamp set, Build a Banner Elle-ments and Petals and Stems Clear Stamp set for this card.

I stamped with Shabby Shutters Distress Ink for the green and Versacolor Pigment inks for the pink flowers.

It’s so fun to be able to die cut the images!  Love how the Elle-ments dies work!

Linking up to 7 Kids College Challenge – Anything Goes, Get Wordy
Avery Elle Challenge – Die cuts

❤ ❤ ❤ ❤ ❤

My last card for today. I was inspired by a card I saved from the Avery Elle blog some time ago.  Sorry, I didn’t save the link and there isn’t a name on the photo.  : (   I just had to make it though! It’s perfect for one of our grandson’s.   Our July family birthday party is tonight… so more birthday cards coming soon!

s

I used the Mini Perfect Layers Tools and cutting mat to mat the white panel with an 1/8th inch border.

I used the Avery Elle Happy Camper Clear Stamp set for the images and the happy birthday is from the Red and Goldie Clear Stamp set. 

I hand cut the images out and colored the mountains and canoe with Copics and stamped with Versacolor Pigment ink. Happy Birthday is embossed with white embossing powder on black card-stock.

Linking to the Simon Says Stamp Work it Wednesday Challenge – use the color blue
Color Q Challenge 

❤ ❤ ❤ ❤ ❤

Thanks for visiting my blog today! It was so good to use some of the ‘collection’ today!  wink, wink… I know you know what I mean! lol

Have a great weekend and I hope you win! : )

Supplies I used… 

❤ ❤ ❤ ❤ ❤
CopicSummerSale
❤ ❤ ❤ ❤ ❤

Birthday · cards · CAS · copics · Distress Ink coloring · Fall · Magnolia · Memory Box · Paper Smooches · Perfect Layers Tools · Poppystamps · punches · rubber stamps · Summer

Memory Box 2014 Holiday Stamps Blog Blitz starts today and a Paper Smooches/poppystamps Rainbow…

PamSparksBrambleSurprise700-001

Today I’m starting the week off with the NEW Memory Box Bramble Surprise rubber stamp. As soon as I saw it, I knew I wanted it!!  I love the whimsical feel of it!  I decided on some Copic colorbook therapy with some Distress ink blending for the background.

I matted the image and the Distress Dot paper with the Mini Perfect Layers Tools and cutting mat… love them!  Links on the right and below…


PamSparksBrambleSurprise700Close

After I colored the image, I went around the perimeter of the card with Weathered Wood Distress ink first, then I added in Chipped Sapphire,  then Dusty Concord and on the very edge a bit of Black Soot. Walnut Stain on the bottom.

Then I sprayed water into the palm of my hand and dropped it onto the inked part, staying away from the moon.

I shook up a bottle of White Linen Dylusions Ink Spray real good, opened it and spattered the white dots on by tapping the cap and letting the ink flick off the end of the tube.

I die cut the letters for the word ‘fall’ from the Alphabet Soup die. I put scor tape on the back of Memory Box White card-stock before I cut.  The letters are really easy to adhere to the card when the tape is already on there. The drawback is, the thicknesss causes the holes in the die, (for poking out the waste) to emboss.

I layered Memory Box Violet Distress Dots Card-stock to a top fold A-2 Memory Box Kraft card base that I embossed with the Memory Box Dots Stencil.

Click over to the Memory Box Blog, HERE to comment for a chance to win this stamp!

Linking to the Artistic Expressions Challenge Blog – Anything Goes


I’m behind getting my cards posted on my blog but I will catch up soon!  I wanted to share this CAS Summer card that I made for our area stamp club monthly swap.  July’s theme was a Summer scene.


PamSparksRainbowPS700


The sentiment is from Magnolia, rainbow is Paper Smooches, cloud border is poppystamps and the sun is an old EK Success medium size punch.

Linking up to Addicted to CAS – Sky
the Cutting Edge Challenge #3 – card inspiration

TCEC_3_thumb[2]

Thanks for stopping by!  Catch up with you later!

Links to supplies I used…

cards · CAS · Christmas · Memory Box · Perfect Layers Tools · rubber stamps

Memory Box Elliana dies…

PamSparksEllianaOrnamentTallWhite-007

There is just something so dramatic about a tall card!  I love how this turned out! Clean and beautiful!  Memory Box dies are so gorgeous!

Here I used the NEW Sturdy Stem die, Elliana Ornament die and Ornament Hooks and Caps die. All of these were die cut from Silver Glitter Card-stock.

PamSparksElliannaOrnamentClose

The Drop Ornament is cut from Memory Box Lagoon Card-stock.  I adhered Scor-tape to the color side before I die cut it.  After cutting, remove the release paper (the paper on the tape that keeps it from sticking to everything) and glitter with Clear Rock Candy Distress Glitter.

PamSparksEllianaOrnamentTallClose

And finish it off with the pretty NEW Merry Christmas rubber stamp. I stamped it in Versamagic Turquoise Gem Chalk ink and heat embossed it with Detail Clear Embossing Powder.

Almost makes a gal want to put up her Christmas tree!!!  HOHOHO!

Card Size… 3 3/4 in. x 9 in. fits a #10 business envelope


Have you seen the NEW Elliana Background die and Eliana Detail Plate?  Really, REALLY cool!


6a00d83454a17469e201a511df3496970c-800wi

On the left is the Detail plate and on the right is the cutting die…
Look right there in the middle where they overlap and the camera focused…you can see the detail…looks like corduroy!  Click to see it better.


6a00d83454a17469e201a3fd2f7d34970b-800wi

I die cut a Memory Box A2 Parchment Notecard with the Elliana Background die, then embossed the die cut with the Elliana Detail Plate and inked it with Gathered Twigs Distress Ink and the mini ink blending tool.  So pretty!  Going for a vintage look for this card…

PamSparksEllianaPoinsettiaRed700


The NEW Poinsettia Bloom Trio die cut from Memory Box Cranberry and Licorice Card-stock just makes me happy! Add the leaves from the NEW Sturdy Stem die, cut in Memory Box Licorice Card-stock and use the pieces separately this time!  Love that!

PamSparksEllianaPoinsettiaRedClose700


The NEW Merry Cursive die…cut three times from Memory Box Parchment Card-stock, glued together and edged with Gathered Twigs Distress ink.  The word Christmas is from the NEW Grand Merry Christmas Script and also cut three times, glued together and edged with Gathered Twigs Distress ink.

I used my Perfect Layers Tools to cut the mats and the card base… link over on the right.. Special Deal going on right now!!!

Would you like the chance to win the NEW Elliana Ornament die? Click over to the Memory Box Blog, Outside the Box and leave a comment!

Thanks for visiting today!  I hope to be back with a couple more cards but time will tell!  It’s always ticking and ticking faster and faster for me it seems! : )  Have a great and weekend creative friends!

P.S. Cindy aka Starlitstudio.net will be heading out on vacation tomorrow… orders shipping until 9 p.m. eastern time tonight!  Otherwise she will be back home July 20th and orders will ship Monday the 21st!

cards · CAS · Christmas · copics · Die Piecing · Memory Box · Perfect Layers Tools · rubber stamps

More Christmas in July…

PamSparksCandleLight-001


Three white CAS cards in a row!  At least I got the white part of the holiday weekend in!  I think everyone else is getting ready for the 4th of July and here I am making Christmas cards like crazy!

I’m thinking you want to see the NEW stuff made up though so I’ll just keep making.  Although I think tomorrow is going to be clean out the garage day. ugh.  I’d rather make cards!!! lol

I cut the NEW Tall Taper Candle die out of gold metallic card-stock then again for just the berries out of a scrap of silver metallic card-stock.

I glued this with Tombow Mono Multi glue, green caps, directly to a top folding A-2 size card base. Teeny dots where the lines meet and there is a tad bit bigger area to leave a teeny dot of glue.

*Tip*  Always keep the tip of your glue clean and it won’t clog up on you.

*Tip* and the most important one… always keep your glue laying down. If you keep your glue upside down, it will come out uncontrollable!  eep!

(I did try die cutting this with double sided tape on the back. It didn’t work well for me…too sticky and didn’t hold it’s shape)

Isn’t this Taper Candle die gorgeous?!  Can you just see it made up to look like stained glass?!  awesome!  Can’t wait to do that next!

The holly and berries are from the NEW Cabrini Ornament die.  Three little snips with the scissors and you have the perfect embellishment for the candle!  : )

Did you notice the sentiment?  NEW rubber stamps!!!!  YAY!  This is the NEW Let Your Heart combo rubber stamp.


PamSparksScriptMerryPoinsettiaCorner-001

WOW is right!  LOVE the NEW Grand Merry Christmas Script die!  It’s a beauty!  I paired it with the NEW Plush Poinsettia Corner die. Another beauty!

PamSparksScriptMerryPoinsettiaClose-001

The Grand Merry Christmas is cut from white card-stock and the Plush Poinsettia Corner is cut from white and cranberry card-stock.  The cranberry petals I colored with Copic markers after I glued them in place.  A gal can only go so long without a little colorbook therapy! : )

Several red glitter domes on the berries and this A-2 size card was done.

My last card for today is colorful and picks up the chalkboard trend that has been so popular.

PamSparksHollyJolly-002

Isn’t it fun?!  I love it!  This is the NEW Have a Jolly Christmas die!  FABULOUS!  First I die cut it in white and it was great…but I just had to try some retro-ish colors.  I know…even though I’ve been on a white kick!

So here you have Lagoon, Sage, Cranberry, Licorice and White Memory Box card-stock or notecard colors.

I used my Perfect Layers Mini Tools and Cutting Mat to layer.  The ⅛ th inch ruler for the white mat and the ½ inch ruler on three sides of the card base.  Click HERE. Be sure to use the code Sparks5% at checkout.  The rulers are so awesome!  They save me so much time!  You will love them too!


PamSparksHollyJollyClose-001

See that poinsettia at the bottom?  That is a NEW die too! It’s the smallest flower from the NEW Poinsettia Bloom Trio die.  YAY!  More of everything I love!

Well, this is a lot today…holler if you have any questions!

I’m linking up to some challenges…

Virginia’s View Challenge # 5 – Die Cut

Wonderful Words Challenge – Word Dies

Keep it Simple – lots of turquoise

Thanks for looking, enjoy the holiday weekend and keep coming back to see more NEW * NEW * NEW!!!