cards · Christmas · Die Piecing · Embedded Die Cuts · Memory Box

NEW Memory Box dies!!!


Version 2


I know…Christmas already?!!!  YES!  You are going to love so much of this Memory Box and poppystamps release!  : )

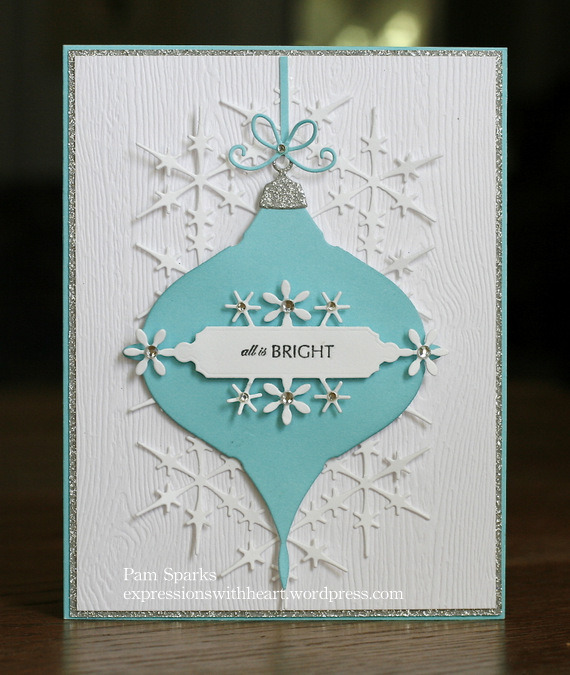
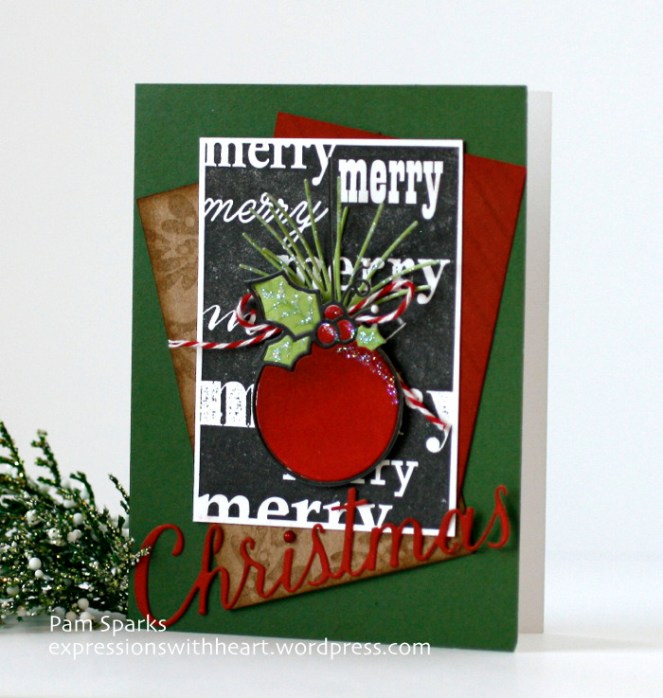
Here’s the NEW Corby Ornament die…I die cut it in green and red card-stocks, trimmed the green branches and leaves from the green cut and glued them on the red cut with Tombow Mono Multi glue.  The red cut stayed intact. It was easy to do because most of the green is connected.

With a gold gel pen, I colored the little flowers and circle buds.

I die cut the NEW Drop Ornament Layers die in metallic gold card-stock and glued the Corby Ornament on top of it.


PamSparksCorbyBlissfulClose.2


The NEW Blissful Bundle die I cut in green card-stock.  For the red berries, I just placed a small piece of red card-stock over the die where the berries were and ran it though my Big Shot. I used a little piece of scotch tape on the back side of the green cut to hold the red berries in place.

I glued the two extra pine branch cuts behind the berries and used a mounting square to adhere the Blissful Bundle to the top of the Corby ornament.

I mounted the ornament to a top folding, A2 size, red card base with mounting squares and added the gold May Arts 1/4 in. wired gold ribbon.

Next I want to die cut these in watercolor paper and watercolor them!

The Corby Ornament is so pretty, it’ll be awesome cut from everything!  Glittery, sparkly, glitzy goodness!


Next up…


PamSparksWeWishYouWhite2.700


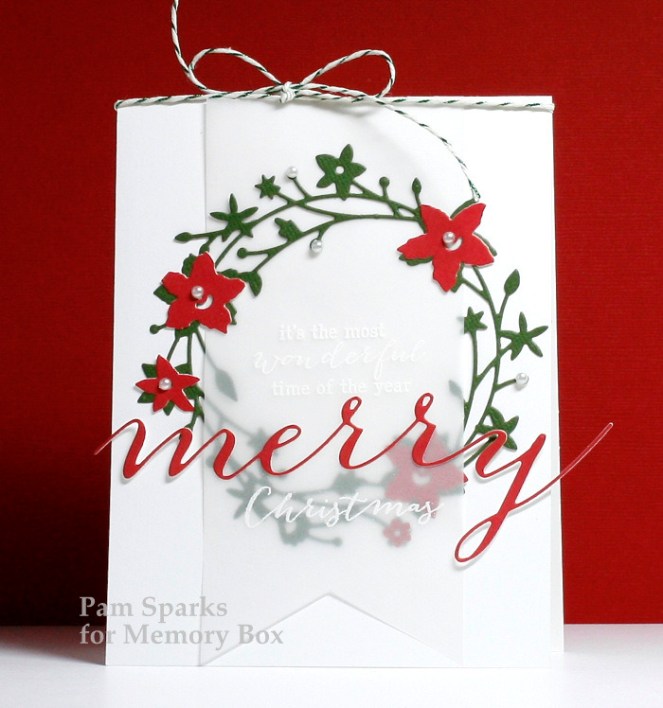
I die cut the NEW We Wish You die two times, once in red and once in black cardstock.  I glued the black cut over the red but left the poinsettia petals showing in red. I die cut the medium bow from the  NEW Stitched Bows die in red card-stock and glued it together.  I used thin mounting squares behind the petals, leaves and bow to adhere it to the vellum panel.  Then I put thin mounting squares on the vellum, behind the petals, to adhere it to the white, A2, top folding, card base.

I love Poinsettias so I’m always excited to use these dies! Under the vellum overlay, I embedded the NEW Poinsettia Border die two times.  HERE is the video on how to do this technique….I love it!


PamSparksWeWishYouInside


I added two black enamel dots and then tried to capture it on camera! lol  I think it takes me longer to take pictures than it takes to make a card! lol


PamSparksWeWishYouAngle630


Cindy at Starlitstudio.net will have these in stock tomorrow!  Click over and read her info about  ordering and shipping this time.  She also has the Tombow Mono Multi glue, Score Tape, card-stock, Doodlebug Enamel Dots and lots more!

Thanks for stopping by today!  Thank you for all the wonderful comments… I didn’t get replies made after the last post.  Things kinda went haywire here… I’ll spare you the details! ugh.  I read them all, smile so big and am encouraged to make more cards!  Thank you for being a kindred stamper friend… I appreciate it!  More cards coming soon!

p.s. I saw that Simon Says Stamp has their brand stamps and dies 25% off HERE. Use code ‘simon25’ Ends tonight!  Shopping!!! lol

SIMON-FLASH-SALE-SIMON-25-600X600-

Birthday · cards · Masculine · Memory Box · Watercolor

Memory Box Circle Forest Scene BBQ…


PamSparksCircleForestSceneBBQ700


You can plan a BBQ even if it’s not your birthday though!  Celebrate Summer with a fun scene card!

I cut a white piece of card-stock 4.25 in. x 11 in., scored and folded it for a top fold card base.  Top fold cards are the easiest to photograph and another photo tip, if you’re using natural light, be sure to pull up the blinds!  Open blinds let in light but you’ll be amazed how much better it is when you pull them all the way up and out of the way! Your camera will thank you! lol

oops!  Got off track there for a minute, back to the card!

I die cut the Circle Forest Scene parts from cold press watercolor paper.  Then I watercolored them, the grass/trees with Peerless and the grill, houses and clouds with Zig Clean Color Brush Pens.

The little curvy fence is from the Wide Open Spaces Open Studio die set. I just trimmed off the bottom…perfect fit!


PamSparksCircleForestSceneBBQClose


I wish I’d  used the Celebrate from this set because it’s just enough larger. I didn’t see it until I’d already stamped this one from poppystamps Into the Words set.  ‘It’s your birthday’ is from the same set.

I die cut a circle frame to place over the top from the Shaker Circle Frames die set.

Well, I see I goofed.  The Grill has been discontinued!!!  I wouldn’t have thought… so think bicycle or golf cart or even the new tractor die!  Sorry about that!

All that’s left to do is layer everything up!  I use ATG, Tombow mono multi glue, thin and regular 3L/Scrapbook Adhesives mounting squares.

Happy Summer day to you! Hope the weather is treating you right! haha  Thanks for stopping by! TTUL!

cards · Memory Box · Poppystamps · rubber stamps · Scrapbook.com · Washi Tape · Watercolor

Memory Box Blooming Sketch Border Thank You…


PamSparksBloomingSketchBDR700


Thank you for being such super blog friends!!!  I have a Memory Box card to share today and one tomorrow too!

For this card, I started by stamping the beautiful Blooming Sketch Border stamp with Ranger Archival Black ink  on watercolor paper and coloring with Zig Clean Color Brush Pens.

After it was dry, I die cut the panel with the largest rectangle die from the Cross Stitched Frame Borders die set and layered it to an A2 card base.  I did put a little piece of washi tape on it… it was just laying there on the table, from Little B.


PamSparksBloomingSketchBDR650


I embossed the poppystamps Thank You sentiment with super fine white embossing powder on a black banner from the poppy Classic Ribbons die set and stamped the friend sentiment directly on the watercolor paper with the MISTI stamp tool. Both are from the Hope and Thanks set.

I die cut the Pennington Rose Border die in white card-stock but just used the right end and one other rose from the cut to embellish above the banner. I added a few enamel dots in green.  I love the fun touch the dots add to the mix.

Thanks for stopping by today!  8 )   I’ll be back tomorrow with a birthday card or two!

p.s. if you’re in the market for a new die cutting machine I have to share this with you… I was and when I saw it was white… I was delighted! lol  Silly things make me happy!  Anyway, over at Scrapbook.com they have a terrific sale going on and the new Big Shot is $79.99!  A terrific price and a great online store!  All their Sizzix products are on sale!  If you’d like a larger platform, the Big Shot Plus is awesome!  I love it too. Room for an A2 card sideways, easy to crank and it stays put!  Holler if you have any questions!

cards · Christmas · Memory Box · Poppystamps · Shopping · Winter

Memory Box and poppystamps 50% Christmas/Holiday SALE…


Popping in quick to tell you about a great SALE at BlueMoon Scrapbooking!

  HERE… Memory Box and poppystamps Christmas/Holiday dies are 50% off


Christmas/Holiday stamps are 50% off too…mixed in HERE


I have tons of cards made up with these dies on my blog…not even sure where to start to post some!  I can’t believe it’s close to time to be thinking about making Christmas cards again!  Even though I love them…oh wait, I just finished 8 a week and a half ago! lol  My mind, it moves on way too fast! ugh

If BM doesn’t have the dies or stamps you want… you can always purchase from Cindy at Starlitstudio too!  Her everyday prices are so FABULOUS!

(clicking on the photos below should take you to the blog post about the card. TFL!)


6a00d83454a17469e201901e5d50ec970b-800wi


pamsparksmbmittenszigzag


pamsparksaddison6751


pamsparksmerrychristmasbellsfront


pamsparkspeacefulpineredbirdfront1


pamsparkscityglobetake2-700


pamsparksmerrychalkornament2-700


pamsparkssilvermerrychristmassnowflake700


pamsparkschristmasribbonornaments2


pamsparksellianapoinsettiared700


pamsparksmolinewreath700


pamsparksmolinetree700a-001


pamsparksffblackkraftwhitetree7001


pamsparkscandlelight-001


pamsparksscriptmerrypoinsettiacorner-001


pamsparksjoyeuxnoelpoinsettiacorner675


oh wow!  So many cool dies to create with!  I love Memory Box and poppystamps!  😀  You can tell, can’t you! lol

There is a search box in the side bar… you can type a die or stamp name and most of the time it works great!  There’s also the category option… just pull down until you come to what you’re looking for, or contact me if you have a question!

Thanks for stopping by and scrolling through this long review!  eek!  Hard to know where to start and where to stop! lol  I appreciate your support so much…your comments mean the world to me and shopping through my links too!  Thank you so much!  I just gave you an excuse to stay in the air conditioning a little longer! ; )

ttul!

cards · Die Piecing · Memory Box · Spring · Washi Tape

Steampunk Pipes Roses and Splendid Clarkia…


PamSparksSteampunkPipesRoses700


Hi everyone!  Something a little different…I love how the Steampunk Pipes grunged up!  Distressing with Distress Rusty Hinge and Black Soot inks and the ink blending tools.

Then it was what do I put with it! I decided to distress up the new English Rose Bouquet, Gearworks Border, Uppercase Alphabet Soup letters the same way and add them to the frame I made with the die cut pipes.


PamSparksSteampunkPipesRoseClose


I die cut everything from white card-stock, inked completely with Rusty Hinge and then Black Soot Distress inks.  The Rose Bouquet I die cut from white twice.  Inked the roses on one with Rusty Hinge and Black Soot and the other with Peeled Paint and Black Soot.

I pounced a Versamark pad on the pieces to hold the chunky embossing powder while it melted.

On the inside, I stamped a coordinating sentiment from the poppystamps Hope and Thanks clear stamp set. HOPING (on the front)… you have a terrific birthday (on the inside).

Very fun!  I think it’d make a cool man card too, without the Rose Bouquet… maybe just embossing the new clear stamps in the frame.


The next card I made back in February…another one that didn’t make it in the look book on time.  Link under the blog header…


PamSparksClarkiaSylvanCorner


A breathy, Spring-ish card for sure! A dash of this and a dash of that!  Love putting vellum behind butterflies!


PamSparksClarkiaClose


The washi tape I put on card-stock first and then taped it on the card.  Six dies on that one A2 size card! lol   It looks busy in the photo but IRL, it’s really dimensional and pretty.

And pearls… oh how did we ever make cards without pearls! lol

Thanks for stopping by!  I’ll be back Thursday with some Taylored Expressions Release Day cards!  TFL!


Supplies and Dies I used on these cards…