cards · Christmas · Die Piecing · Memory Box · Stencils · Winter

Memory Box Snowflake Joy and More Card…

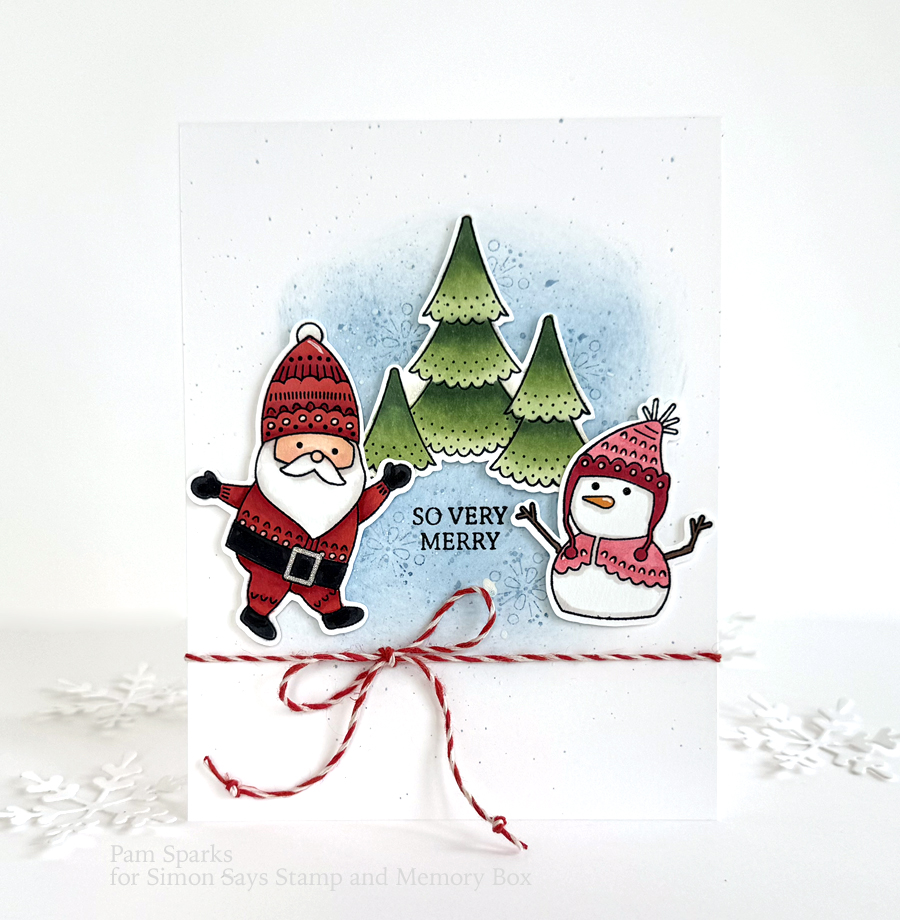
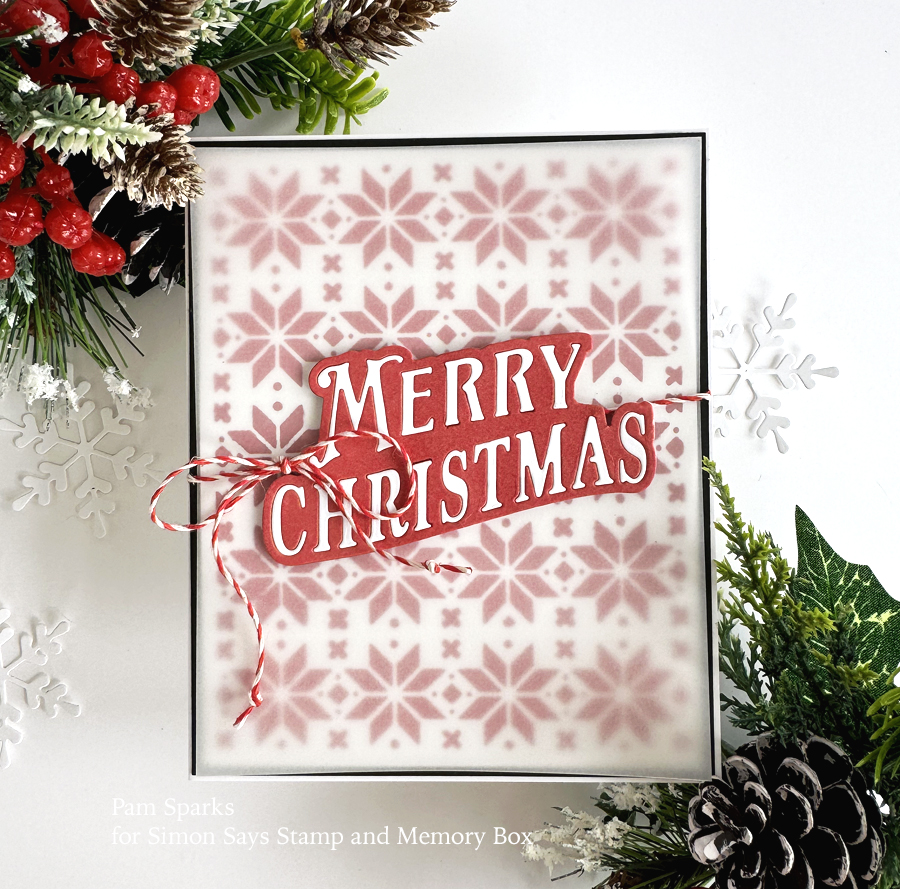
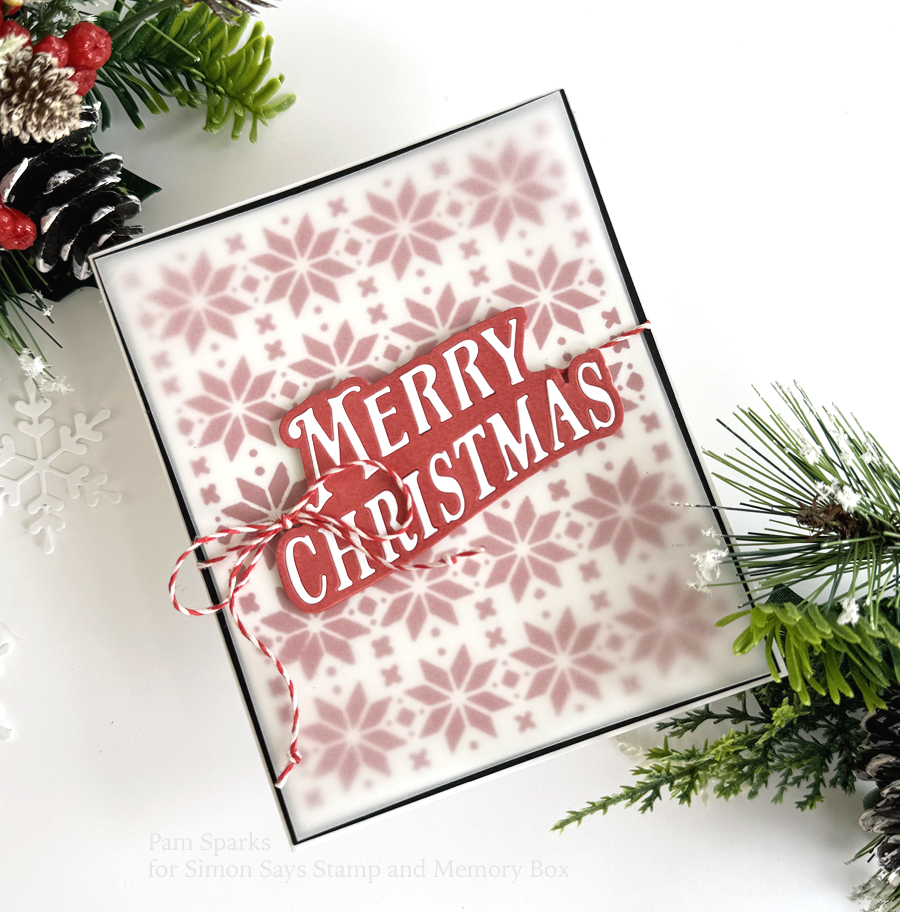
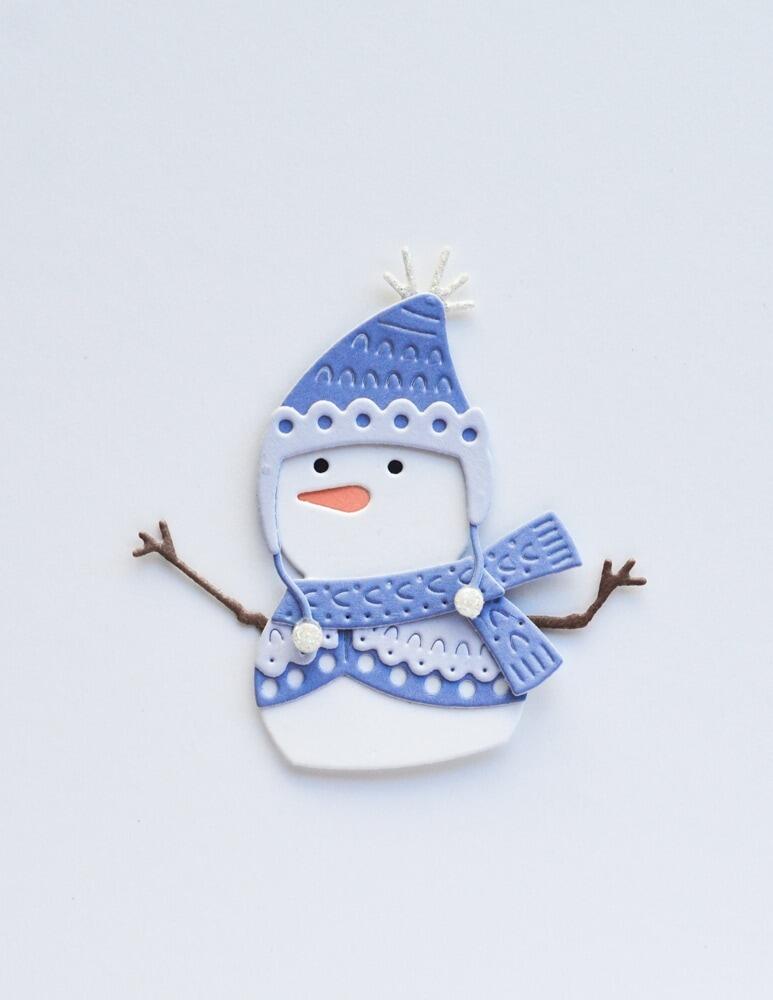
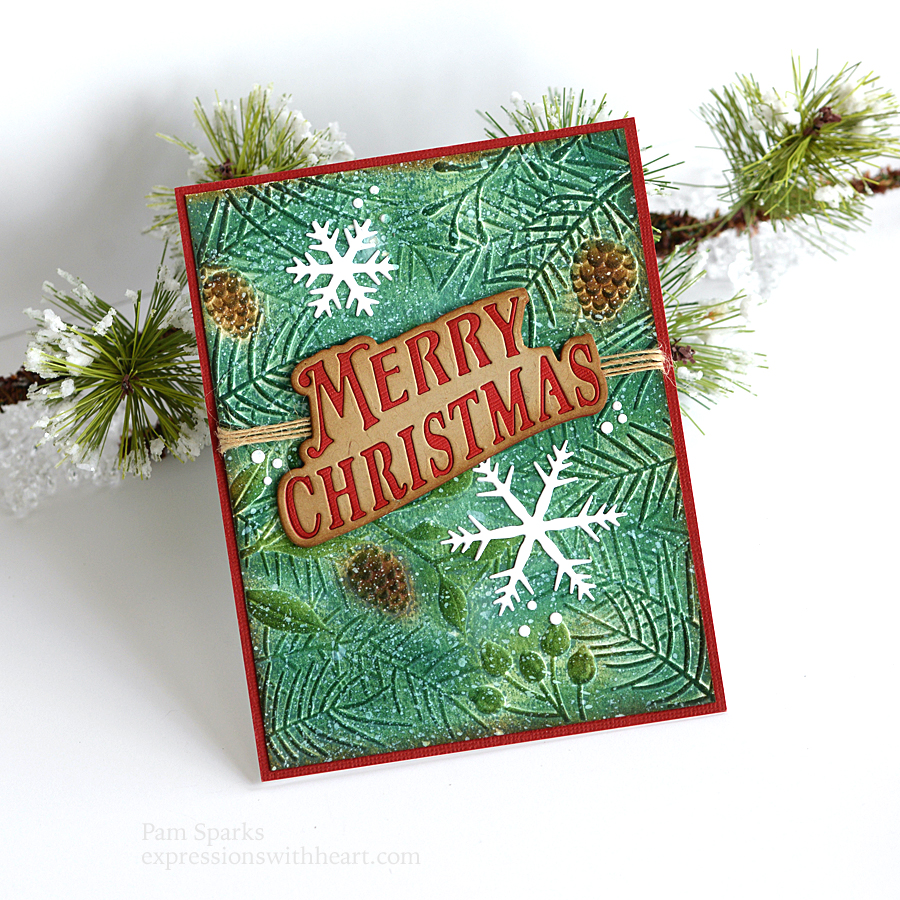
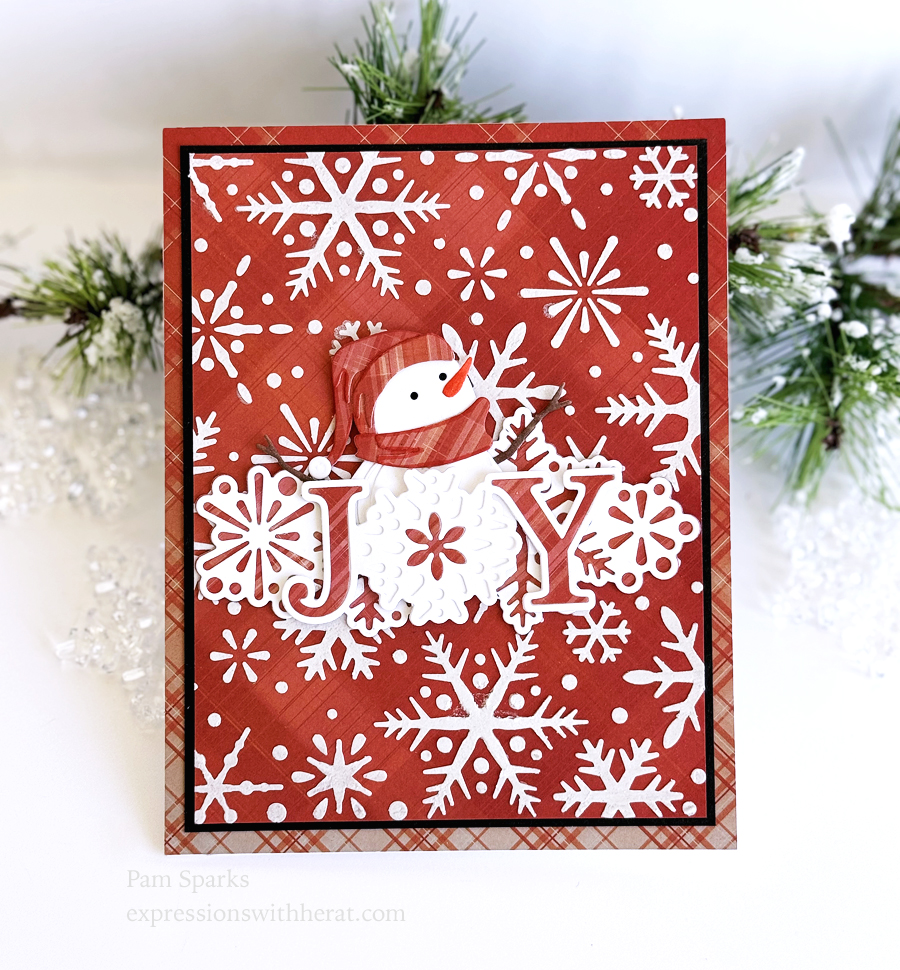
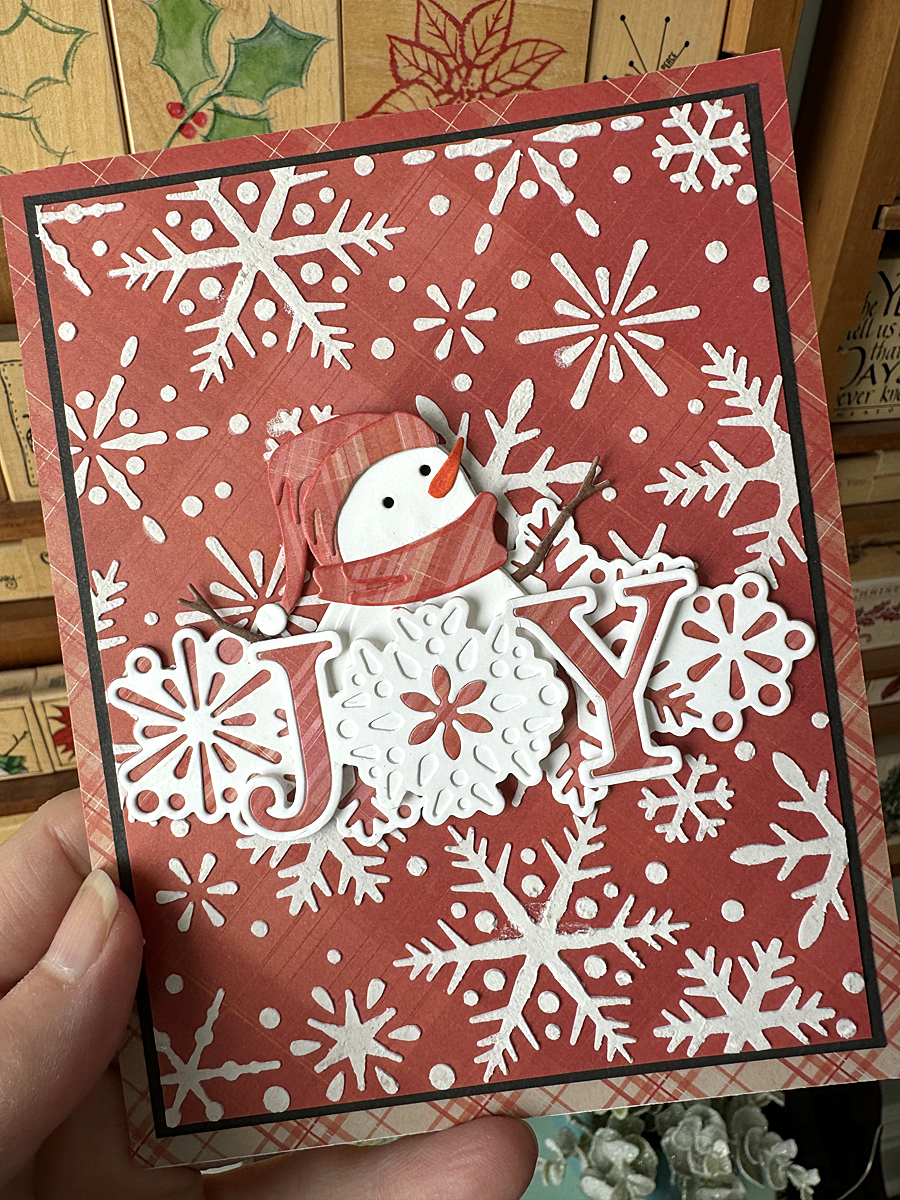
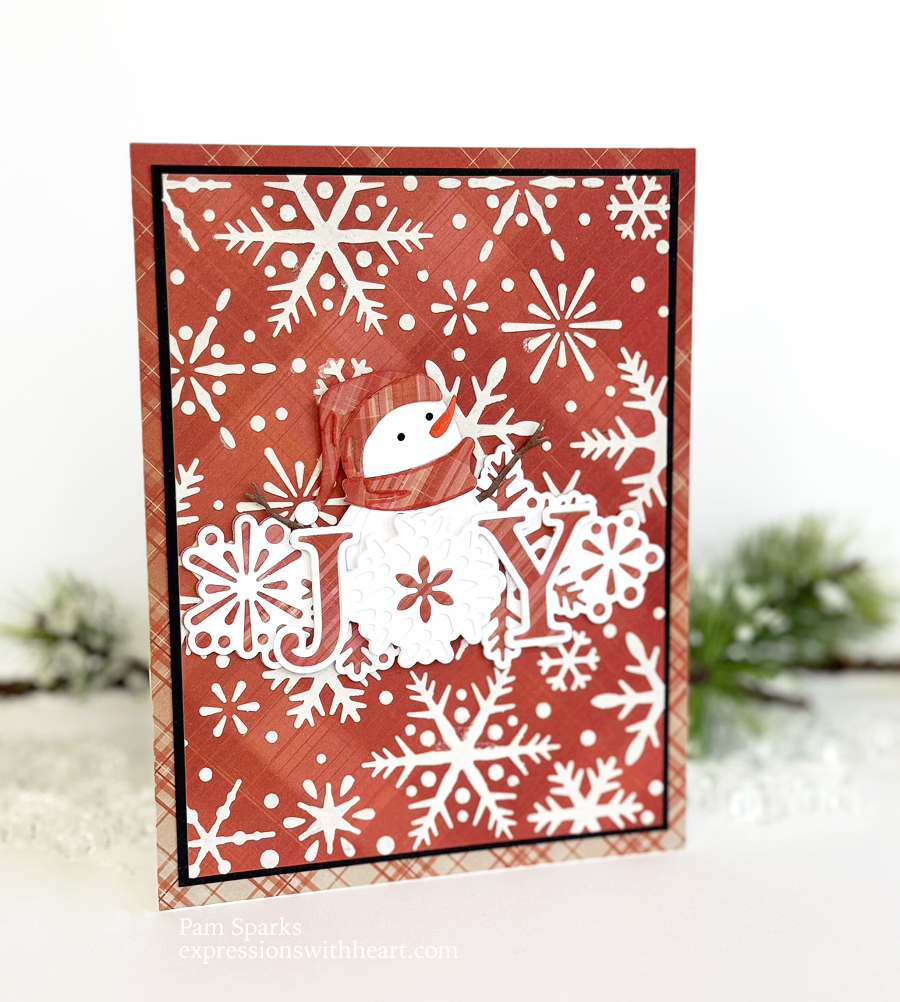
Hello everyone!  The name of this snowman is so cute!  Cordial Snowman….if you’re familiar with Anne of Green Gables… hehe  I don’t know why I remember that part of the movie. lol

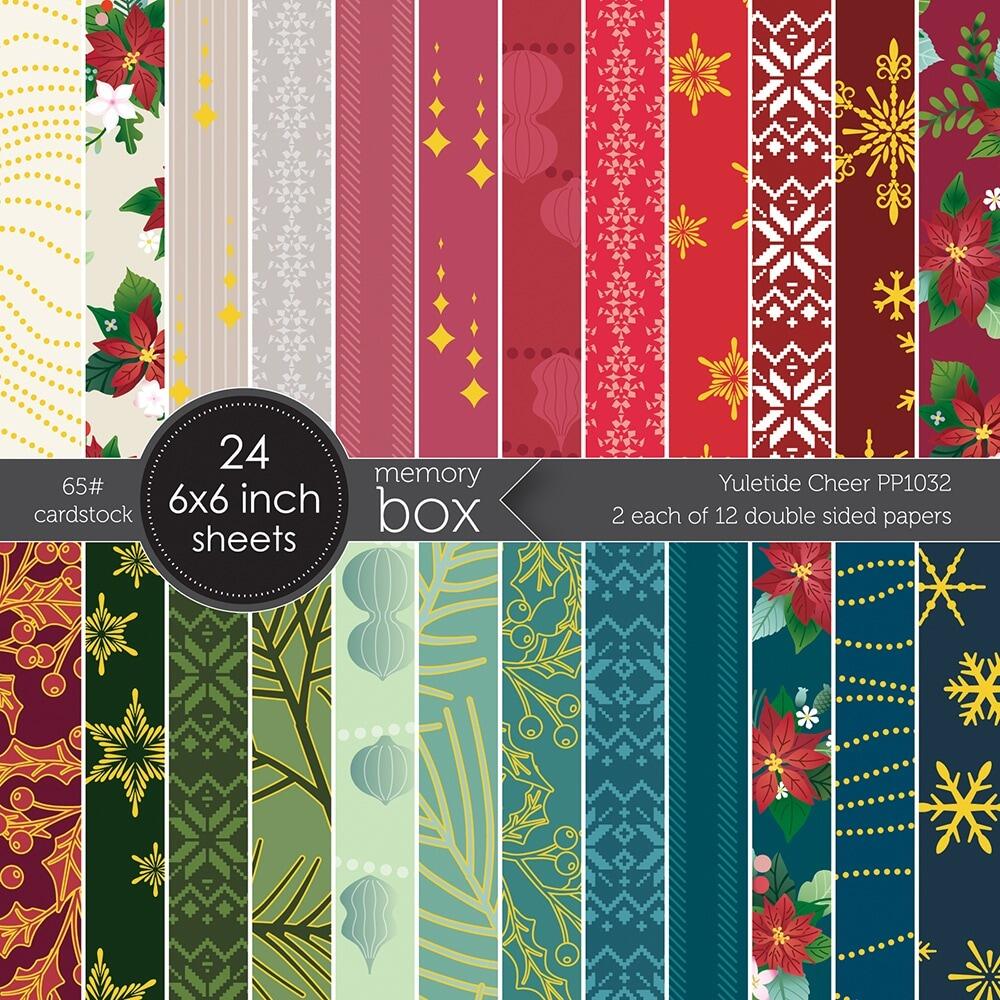
It’s a cutie anyway!  I used paper from the NEW Nutmeg Plaid 6 x 6 pad!  It dawned on me after I used it that it was probably supposed to be for Fall but it worked out fine!

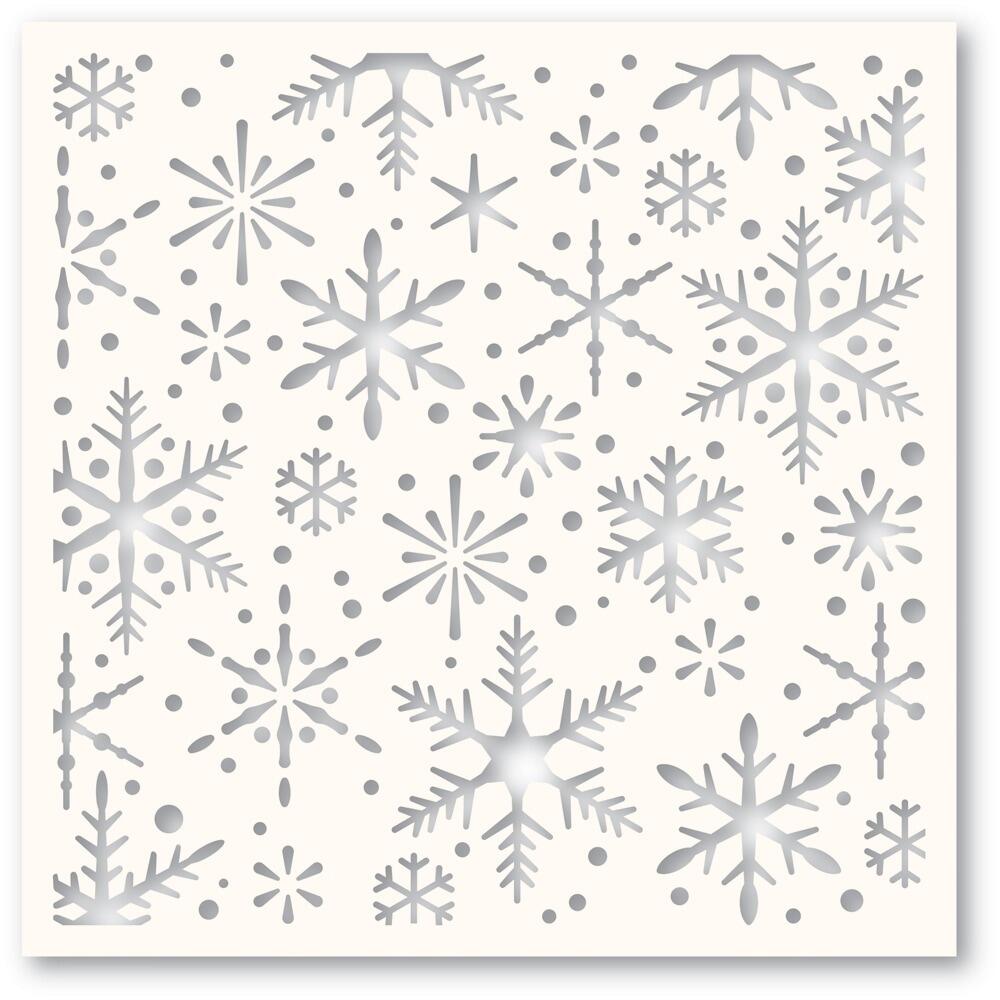
I used one plaid to Stencil on!  The New Falling Snowflakes stencil and Alene’s Glitter Snow paste worked great!

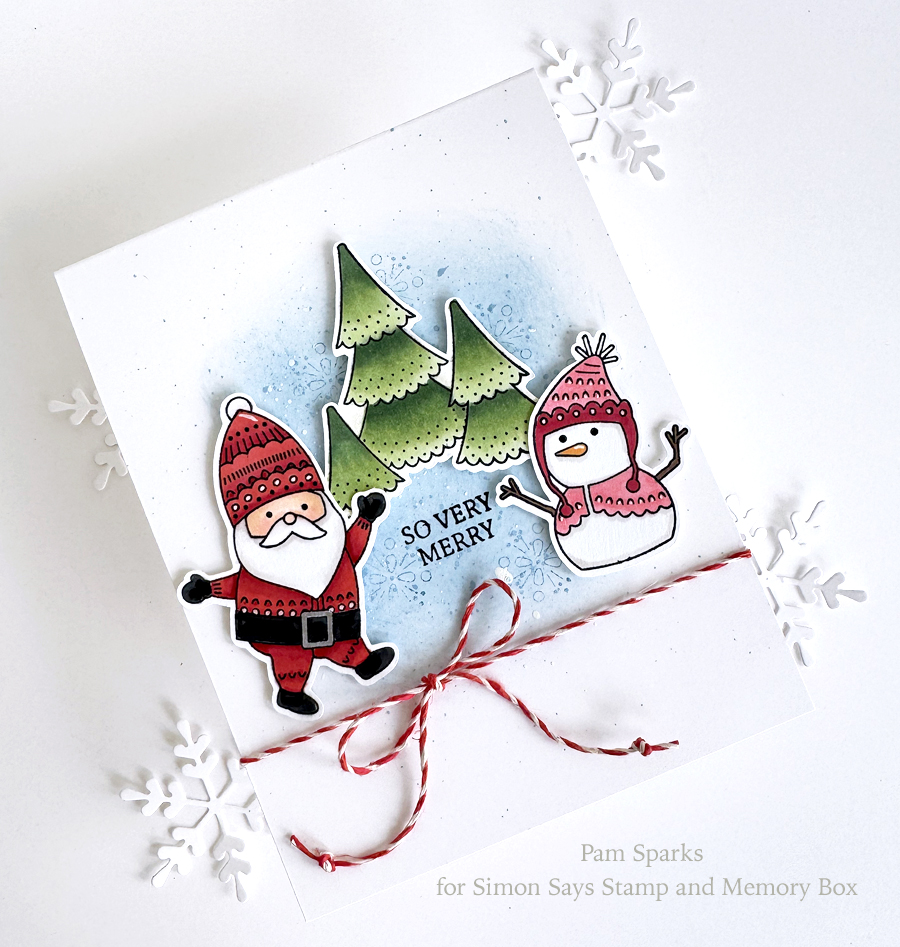
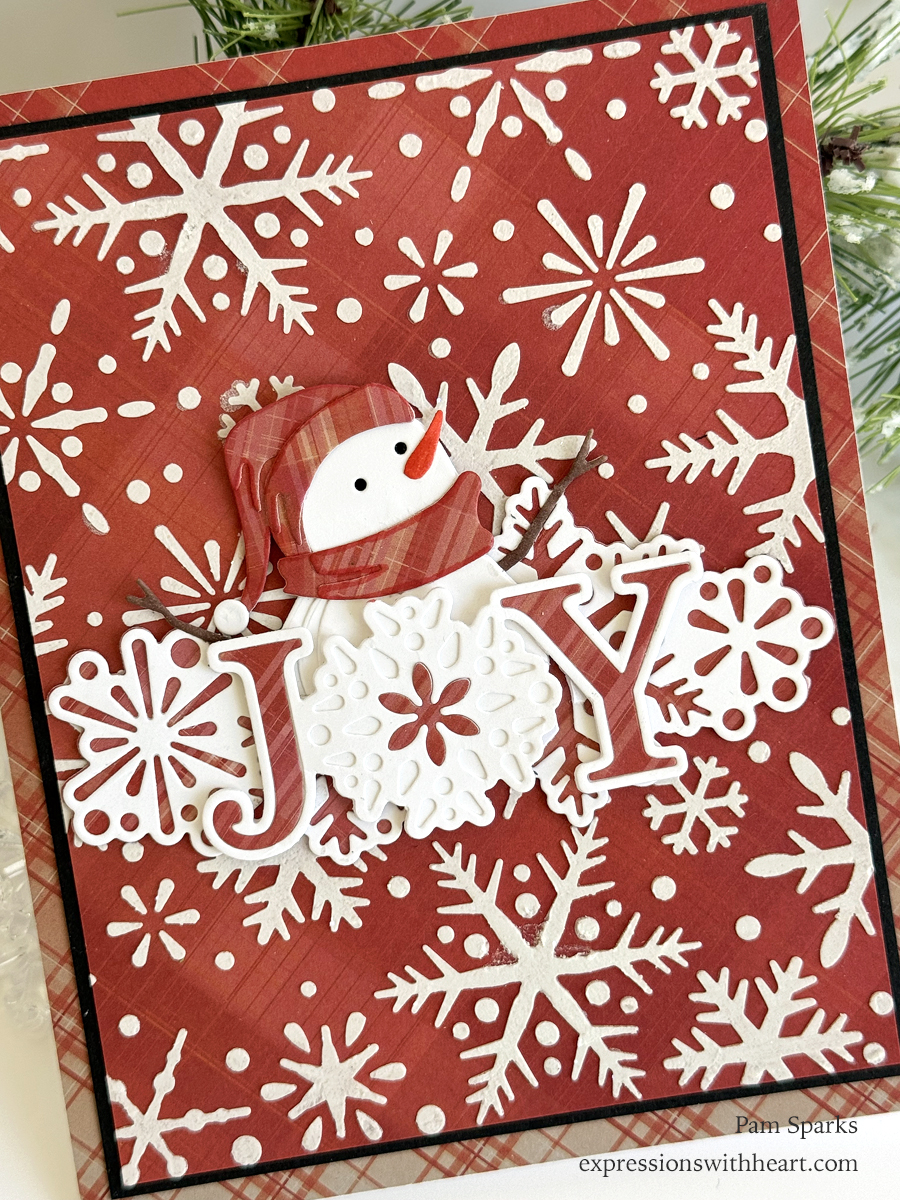
Maybe you can see some sparkle there… I did get a little messy but it’s handmade, right?!

Fortunately it was only a couple places. lol

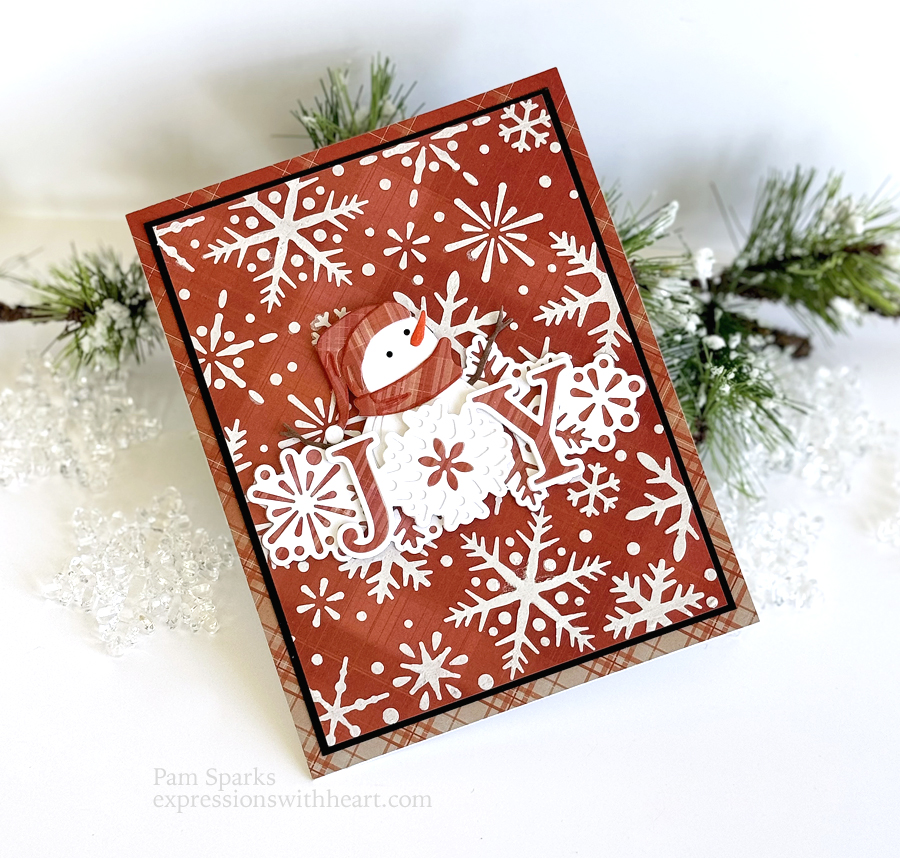
I trimmed it down to 4 ¼ in. x 5 ½ in. matted with black cardstock then mounted on another piece of plaid from the pad…notice it’s monochromatic… I liked that a lot!  So it’s larger than an A2 size but should fit in an A7 envelope easy enough.

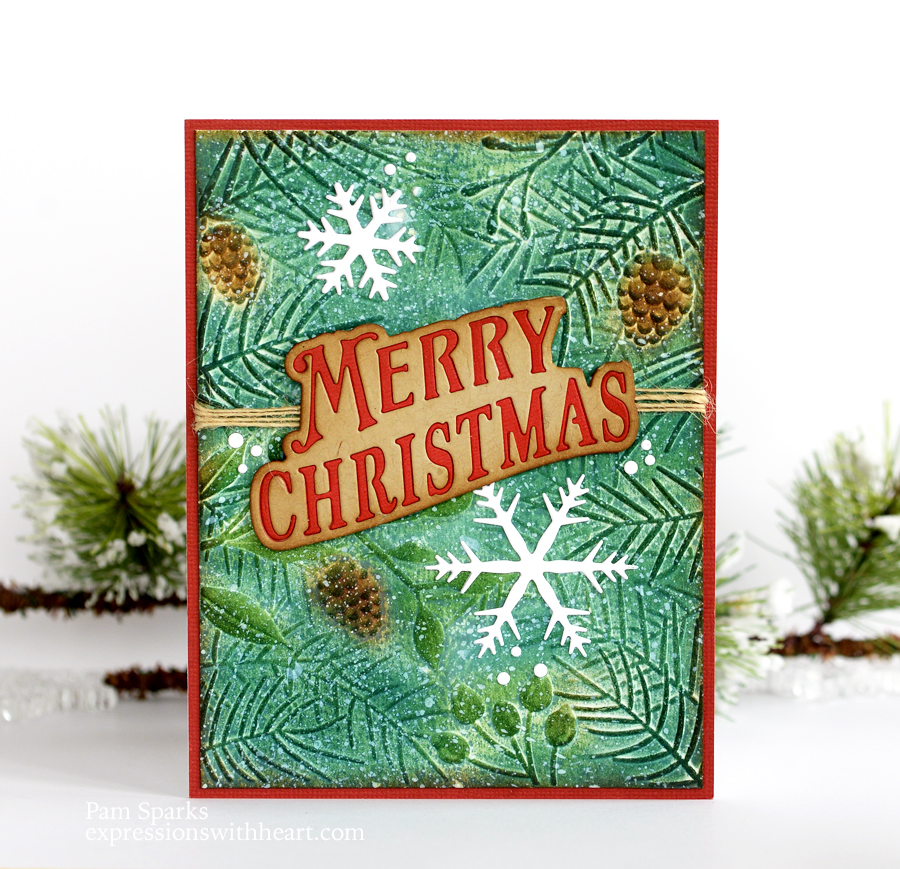
A little bit different angle. You can almost see a little sparkle.

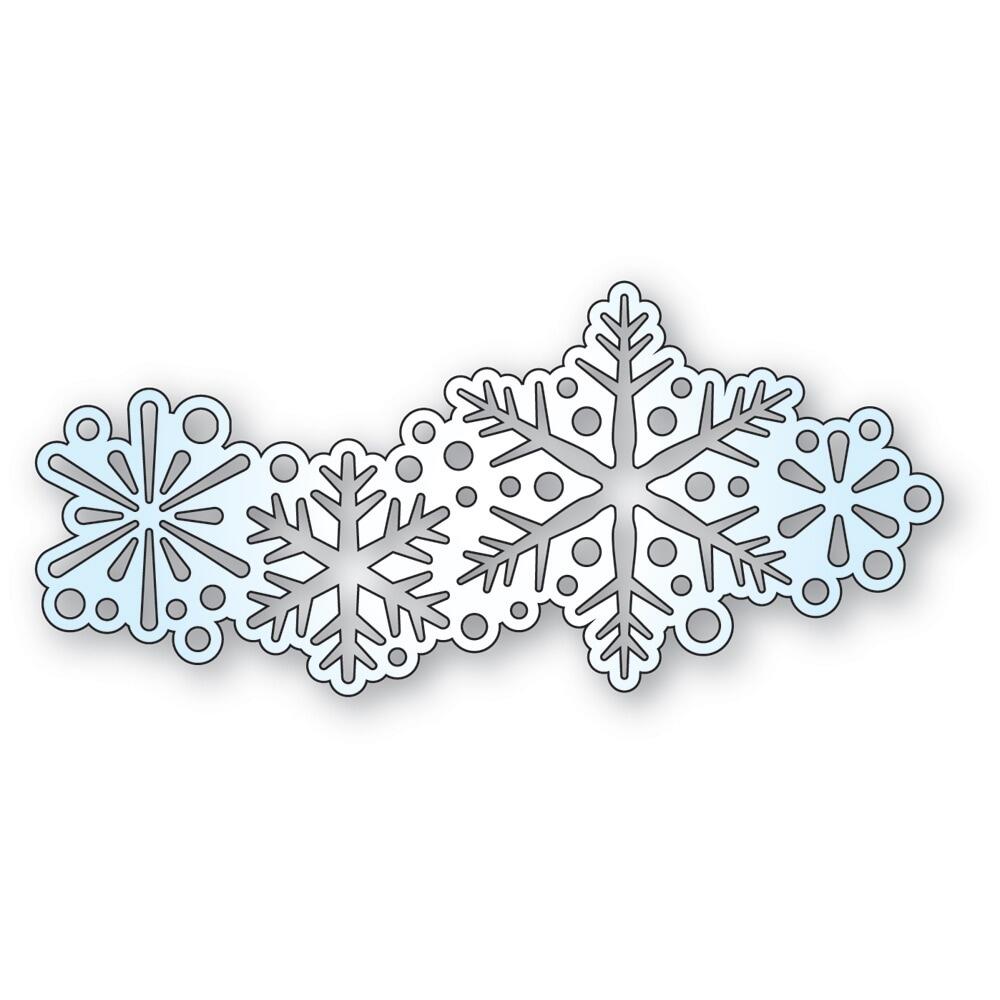
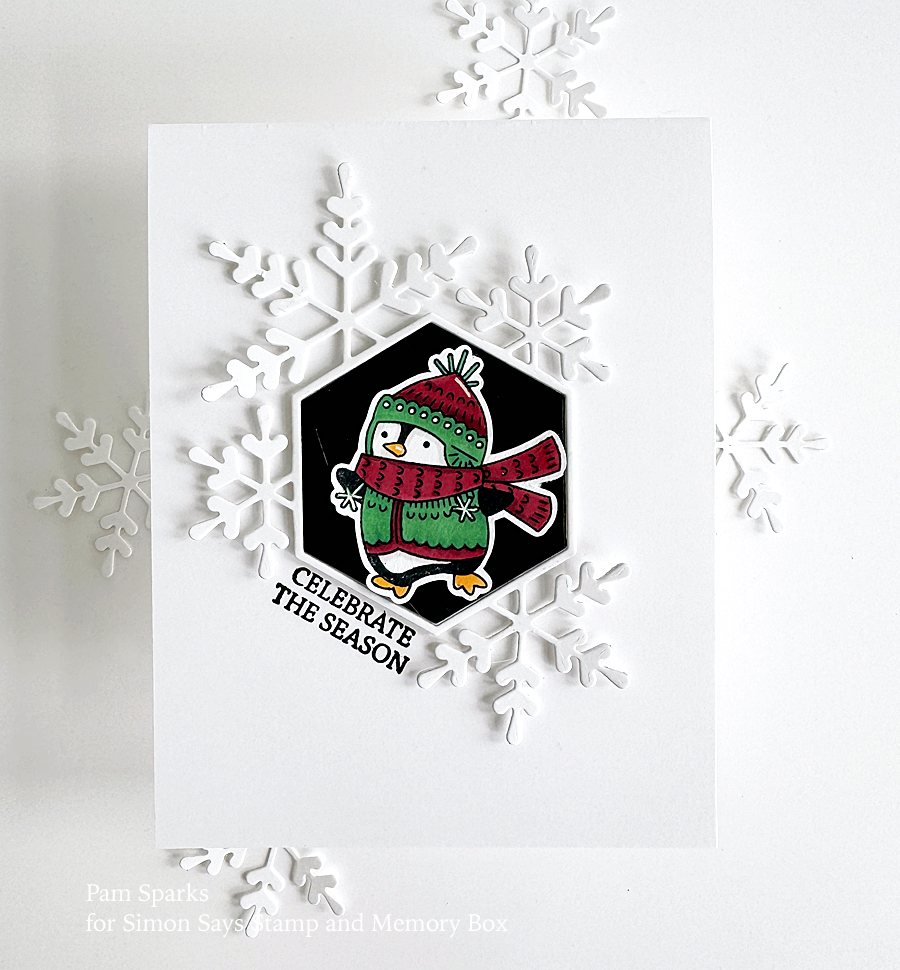
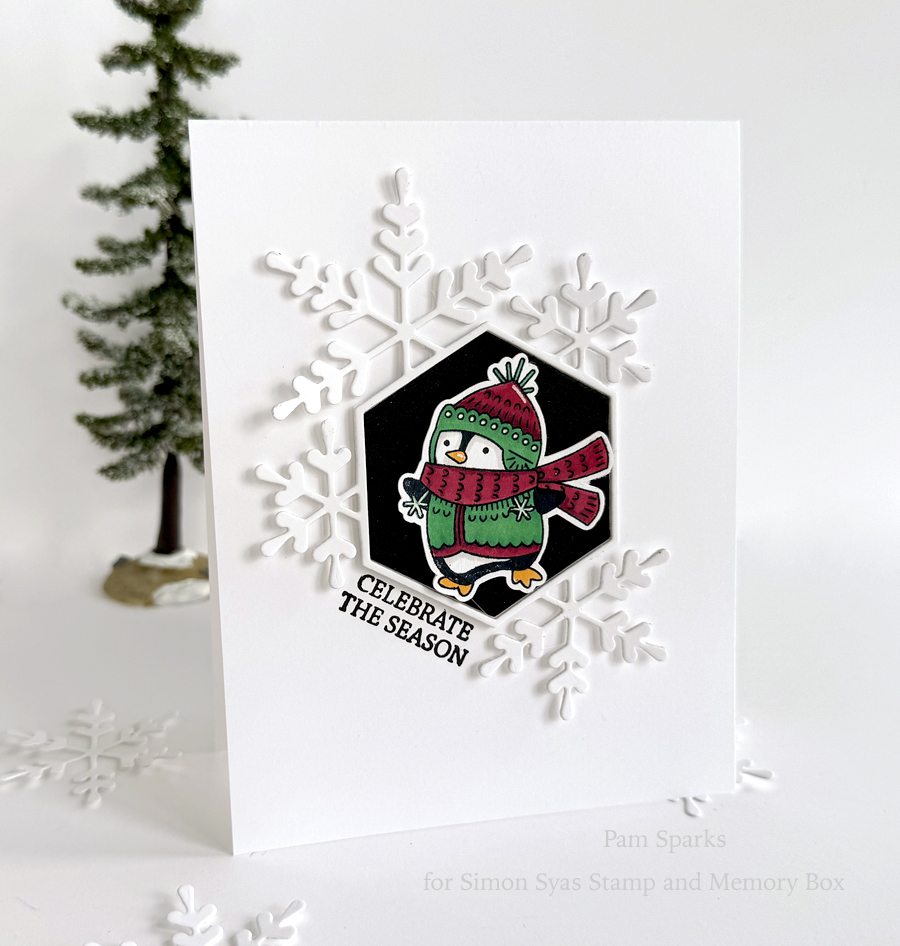
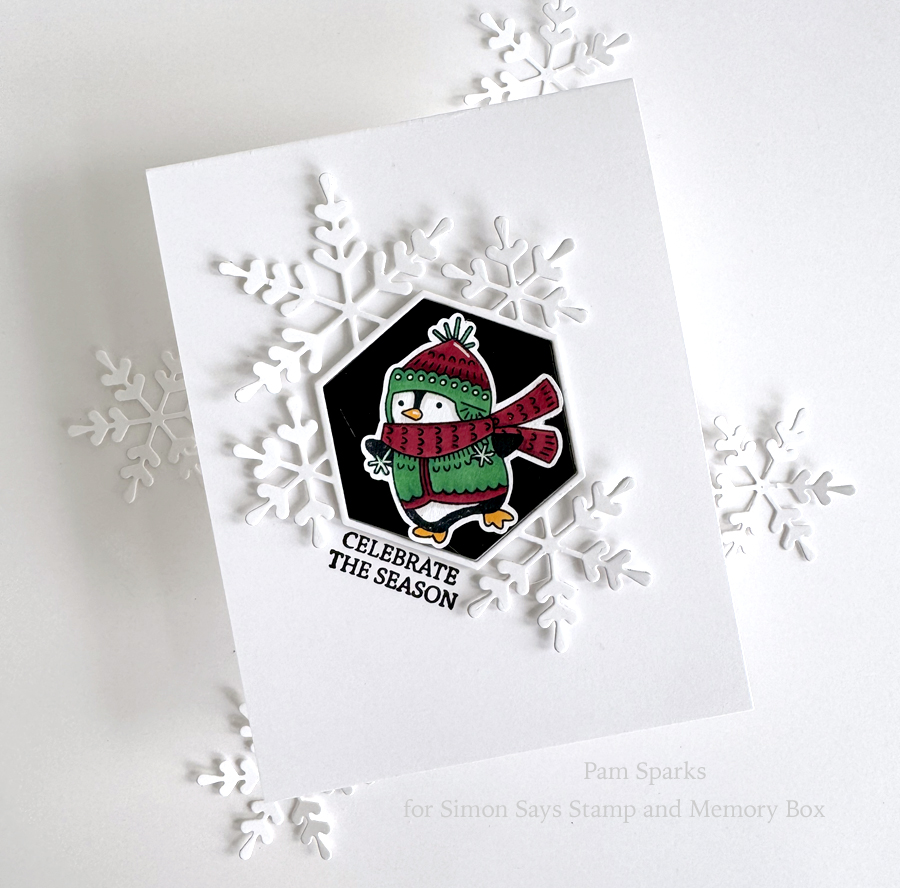
I used the NEW Drifting Snowflakes die behind cutie Cordial.

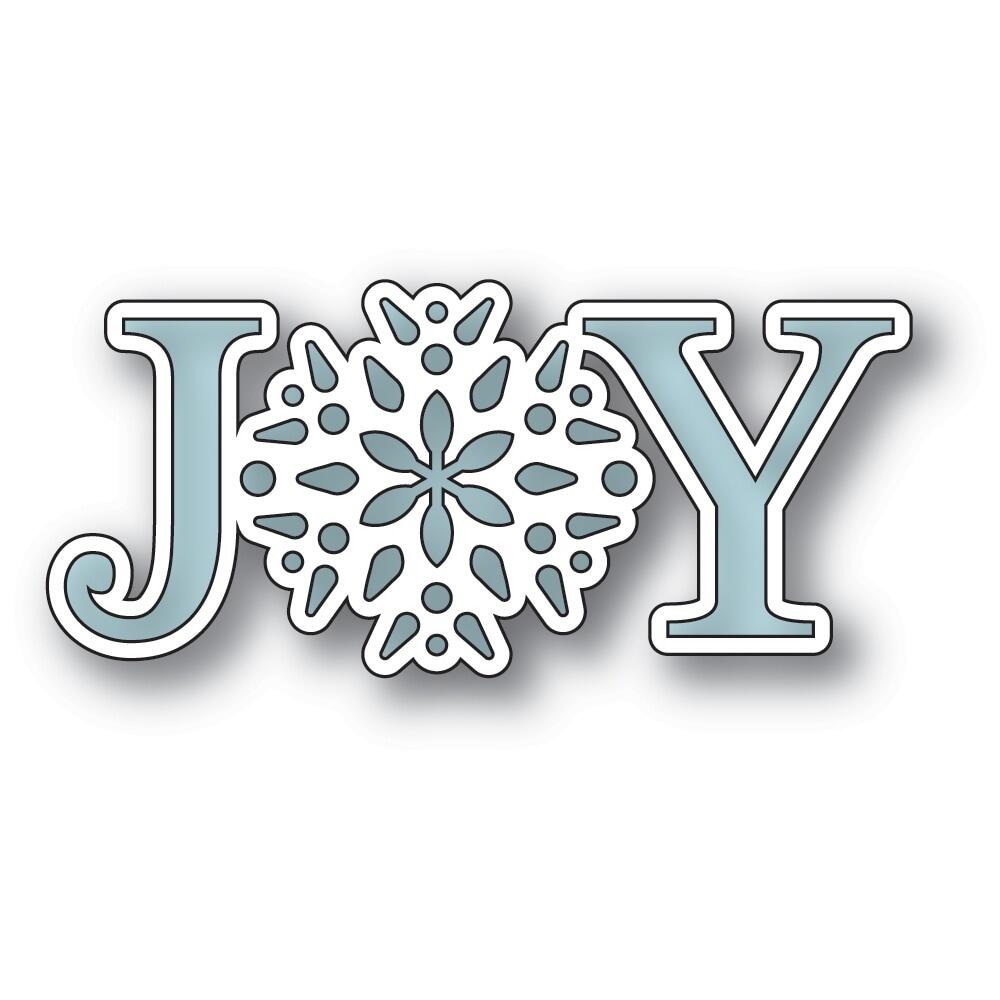
Then Snowflake Joy on top!  I used a little of the thin mounting tape I love on the top of Cordial.

Cordial was easy to glue up… yay!  So were the other dies too!  When I can make a card, take pictures AND write a blog post in one afternoon, I’m a super happy camper!  I with that was every time!

More than likely I forgot something so feel free to comment or email me any questions!  I love talking to cardmakers and friends!

I will shift gears and think about supper!  Thank you so much for stopping by!

Links below to the products I used to make this card…

STR = Starlitstudio.net,  SSS = Simon Says Stamp, SBC = Scrapbook .com,  SPL = Spellbinders

Memory Box – 94797 Snowflake Joy…
[ STR | SSS ]
Memory Box – 94813 Cordial Snowman…
[ STR | SSS ]
Memory Box – 94816 Drifting…
[ STR | SSS ]
Memory Box – 88627 Falling Snowflakes…
[ STR | SSS ]
Hammermill WHITE 100 LB SMOOTH…
[ SSS ]
Craft Tweezers – EK Tools – 5 inch…
[ STR ]
Scrapbook Adhesives Crafty Foam Tape…
[ STR ]
Fiskars Non-Stick Titanium Softgrip…
[ STR ]
Aleene’s Decorative Snow – Glitter…
[ BLIC ]
Stamperia – Trowel Spatula – Large
[ SBC | SSS | BLIC ]
Sakura BLACK GLAZE GEL PENS 2 Pack 38495
[ SSS ]
Tombow Mono Multi Liquid Glue
[ STR | SSS | SBC ]

cards · Die Piecing · Fall · Halloween · Memory Box · Oxide Inks · Poppystamps

poppystamps Ghostly Cats Happy Halloween Card…

Hello cardmaking friends!  A die cut card to share today….pretty quick and easy compared to some!

A2 cardbase ink blended with Wilted Violet Distress Oxide ink in the center-ish area and Hickory Smoke and Black Soot Distress Oxides around the perimeter.

Spatter with white and black ink, set it aside to dry.

What a cute idea if you have black cats that cooperate! lol

Look how real the spiders look!  eek!  They’re new from Memory Box, Eerie Spiders die.  Five spiders in the set!

I edged the orange die cuts with Rusty Hinge Distress ink.

The spider web is from poppystamps Halloween Assemblage.

Lavish Happy Halloween is NEW from poppystamps.

Intricate Mini Pumpkins are NEW from Memory Box.

I mounted the Happy Halloween and Ghostly Cats with the thin mounting tape I love so much!

Linking my card to some challenges…

The Paper Funday October 2024 Challenge – anything goes with twist of autumn colors

Classic Design Challenge – anything goes with twist of autumn colors

Double D Challenges – Halloween

The Four Seasons October 2024 Challenge – Anything Fall goes

Two Old Bats Halloween Challenge October 2024 – anything goes Halloween

Crafty Animals Challenge #88

I think that’s it!  Thank you so much for stopping by!

Here’s the dies and supplies I used… click/tap the Abbreviations below the image to go to the stores.  STR is Starlitstudio.net, SSS is Simon Says Stamp, SBC is Scrapbook .com.

Poppystamps – 2685 Ghostly Cats craft…
[ STR | SSS ]
Poppystamps – 2591 Lavish Happy…
[ STR | SSS ]
Memory Box – 94845 Intricate Mini…
[ STR | SSS ]
Memory Box – 94846 Eerie Spiders…
[ STR | SSS ]
Poppystamps – 2495 Halloween…
[ STR | SSS ]
Memory Box – Cardstock Paper – 8/1/2…
[ STR ]
Scrapbook Adhesives Crafty Foam Tape…
[ STR ]
Fiskars Non-Stick Titanium Softgrip…
[ STR ]
Tombow Mono Multi Liquid Glue
[ STR | SSS | SBC ]
Zig 2-Way Glue Pen – Squeeze & Roll…
[ STR | SSS | SBC ]
Hammermill WHITE 100 LB SMOOTH…
[ SSS ]
TE Premium Cardstock – Oreo
[ TE ]
Oreo Liquid Watercolor – Taylored…
[ TE ]
Spellbinders Splatter White Opaque…
[ SSS | SBC | SPL ]
Picket Fence Studios – Paper Splatter…
[ SBC | SSS ]
Tim Holtz Distress Oxide Ink Pad…
[ SSS ]
Tim Holtz Distress Oxide Ink Pad…
[ SSS | SBC ]
Tim Holtz Distress Oxide Ink Pad…
[ SSS ]
Ranger – Black Soot Distress Oxide…
[ SPL ]
Tim Holtz Distress Ink Pad Rusty…
[ SSS | SBC ]
Mini Ink Blending Foam 1″ 20/Pkg -…
[ STR ]
Craft Tweezers – EK Tools – 5 inch…
[ STR ]
adhesive pick-up square
[ STR ]
Avery Elle Stamp & Die Storage…
[ STR ]
Sizzix Cutting Pads – set of 2 -…
[ STR ]
Sizzix Sidekick Cutting Pads – set of…
[ STR ]
Woodware EasyPick Tool by Creative…
[ STR ]

cards · Christmas · copics · Die Piecing · Memory Box · Poppystamps · Simon Says Stamp · Snowman · Winter

Simon Says Stamp SUPERSTAMPtember 2024 Celebration Cards…

So happy to be here today to share cards I made with the Simon Says Stamp and Memory Box Collaboration stamp set!  It’s so cute and I loved working with it!  I ended up with 3 cards!  * This is a limited edition set and only available while supplies last!!!

I stamped the images with Memento Tuxedo Black ink on Hammermill cardstock and colored with Copic Sketch Markers.  A little white gel pen and black glaze pen on the Nordic snowgirl’s eyes.

I ink blended some Faded Jeans Distress ink onto the background of a white A2 size cardbase and randomly stamped some of the snowflake from the set in the same ink.  I stamped off on a scrap piece of paper first so the snowflakes wouldn’t be too dark.

I stamped the sentiment directly onto the cardbase. Then mounted the colored images with thin mounting tape to the cardbase.

Tied on some Peppermint twine because it adds a little cuteness! lol

Next is the cute little Nordic Winter penguin!

I die cut The Snowflake Hexagon twice, glued them together, then figured out where I wanted to stamp the sentiment.  I used the MISTI stamping tool.  Stamped it in Versafine Onyx Black.

I mounted the Hexagon with thin mounting tape to the A2 size cardbase, then mounted the penguin in the center with thin mounting tape.

Last card I stamped with the Poinsettia border that comes in the set.  I wasn’t sure where I was going with this but I’m really happy with how it turned out!

I used a piece of vellum over the background to make the Merry Christmas stand out and I love the peppermint twine with it again!

I swiped the Red Geranium ink pad over white cardstock and then die cut the Merry Christmas Wave die from that.  I used scor-tape on the back side of the die so I could easy layer in the white letters, then stuck it to the solid die backer. Fun!

Thanks so much for stopping by!  Holler if you have any questions, I’m sure I forgot something.

Links below for fun shopping and remember the free shipping code too!

Memory Box STAMPtember Exclusive…
[ SSS ]
Memory Box So Very Merry STAMPtember…
[ SSS ]
Simon Says Stamp SNOWFLAKE HEXAGON…
[ SSS ]
Memory Box Merry Christmas Wave Dies…
[ SSS ]
MINI MISTI PRECISION STAMPER 6×7…
[ SSS ]
Tsukineko Memento TUXEDO BLACK INK…
[ SSS ]
copic sketch markers at Simon Says…
[ SSS ]
Tsukineko VersaFine ONYX BLACK Ink…
[ SSS ]
Ranger Wendy Vecchi Archival Red…
[ SSS ]
Lawn Fawn PEPPERMINT SINGLE CORD…
[ SSS ]
Sakura BLACK GLAZE Gel Pen sk38395
[ SSS ]
Sakura WHITE MEDIUM POINT Gelly Roll…
[ SSS ]
Memory Box CIRCLE BASICS SET Open…
[ SSS ]
Neenah Classic Crest Ultra Thick 110…
[ SSS ]
Hammermill WHITE 100 LB SMOOTH…
[ SSS ]
Tombow MONO MULTI Liquid Glue Two…
[ SSS ]

cards · Christmas · copics · Die Piecing · Memory Box · Poppystamps · Snowman · Winter

poppystamps Nordic Happy Snowman Card…

Hi everyone!  I know most of us love snowman!  It seems like this cutie should have a name, oh it does!  Happy!

I saw a card made with this sketch and thought it’d work so well with the new Memory Box 6×6 paper pads, Yuletide Cheer and Yuletide Plaid!  I love these pads!  Good thing! lol  24 double sided papers, 12 designs, 2 of each.

I started by die cutting, coloring with Copics and piecing  ‘Happy’ together.  Do you have the R07 Copic marker?  It is one of my favorite reds ever!  If you remember the Basic Gray paper line for Christmas, E07 matched it perfectly!

I also colored the background for Let it Snow with E07 also.

I diecut the Memory Box Nested Globe die in white and the Nested Globe Bases die in white and colored the base with E07 and E09.

The plaid paper is cut 4 in. x 5 ¼ in. and the banner is 2 ¼ x 5 ½ in.  I cut the fishtail end with a scissors. Then I wrapped gold thread around it and tied a box before I glued it to the plaid panel.

That’s about it!  I used my favorite thin mounting foam tape to adhere ‘Happy’ to the globe.

The green Copics I used are G24 and YG99.

Linking to some card challenges…

ABC Christmas – S and T, S is for Stencils and/or T is for Traditional Christmas Colors

Merry Little Christmas #58 – anything Christmas goes

The Paper Funday #69 – Anything Goes with optional twist

I almost wished for snow this week! It was so muggy and hot here in Iowa.  Next week looks more like Fall temperatures.  whew.  So thankful for air conditioning!  I’ve been riding my bike more but these temps put a halt to that.  Maybe this coming week and I can get back to it.

Thank you for stopping by!  I love hearing from you and appreciate your encouraging words!  I still haven’t counted how many Christmas cards I have made.  One of these days I’m gonna say post in the comments how many you have! lol  I think it’d be fun to see and we can encourage each other!  I have birthday cards to throw in the mix this week.  How’d it get to be Sept. 21st anyway! Crazy!  ttul!

Here’s the products I used for this card…

Poppystamps – 2640 Nordic Happy…
[ STR | SSS ]
Poppystamps – 2599 Let it Snow…
[ STR | SSS ]
Memory Box – 94532 Nested Globes…
[ STR | SSS ]
Memory Box – 94675 Nested Globe Bases…
[ STR | SSS ]
Memory Box – PP1032 Yuletide Cheer…
[ STR | SSS ]
Memory Box – PP1031 Yuletide Plaid…
[ STR | SSS ]
Scrapbook Adhesives Crafty Foam Tape…
[ STR ]
Tombow Mono Multi Liquid Glue
[ STR | SSS | SBC ]
Zig 2-Way Glue Pen – Squeeze & Roll…
[ STR | SBC | SSS ]
copic sketch markers at Simon Says…
[ SSS | BLIC ]
Sakura Gelly Roll Glaze Pen – White
[ BLIC ]
Sakura BLACK GLAZE Gel Pen sk38395
[ SSS | BLIC ]

cards · Christmas · Die Piecing · Distress Ink coloring · Embossing Folders · Memory Box · Oxide Inks · Winter

Memory Box Pinecone and Berries 3D Embossing Folder Merry Christmas Wave Card…

Hi everyone! Time to get really serious about getting Christmas cards made and ready to mail!  Preaching to myself for sure! lol

I was excited to use one of the NEW Memory Box 3D Embossing Folders for my card today.

I started out by inking the side,  flat area up, with Evergreen Bough Distress Oxide ink and then running it through the die cutting machine.

I used Canson Montval cold press watercolor paper.  I buy the BIG sheet from Hobby Lobby and then just cut a piece off of it when I need it.  I leave it out, in the way, so I remember to use it.  It’s my favorite watercolor paper.  The price is right too!  $3.29 for the piece… if I cut it up into 9×12, if I’m remembering right, you get 8 pieces!

I spritz one side of the paper very lightly before I put it in the inked up folder.

Then using regular distress ink and the mini ink blending tool, I went over the raised areas with Pine Needles on the pine, Peeled Paint on the leafy branches and Gathered Twigs on the pinecones.

I really like the look of this but it’s so much better in real life than a photo!

I die cut the NEW Drifting Snowflakes die and just used the flakes on my card.  I used the 3 sizes of dots it cuts out too.  I spattered with white ink but it didn’t show up very well.

I die cut the NEW Merry Christmas Wave in kraft and red cardstocks.  Another easy one to put together! I used scor-tape on the back so I could just lay the letters back in and they fit perfectly…EASY!  Love it!

A little bit of twine wrapped around the panel.  This ended up A6 size….a little extra! lol

I layered on red cardstock and then to a white cardbase.

For the inside I used a sentiment from the NEW Holiday Wishes stamp set.  If you only wanted one set with sentiments for the outside and the inside… here it is!

Linking to some challenges…

Can You Handle the Pressure? – anything goes with an embossing folder

Peace On Earth Christmas – anything goes Christmas

Word Power #9 – Sentiment/words as the focus

Merry Little Christmas #58 – anything Christmas goes

Simon Says Stamp Wednesday  – anything goes

Now back to thinking….what’s next!  Thank you so much for stopping by my blog today!  Holler if you have any questions.  I know I forget stuff!

Check out STAMPtember at Simon Says Stamp!  Today is a super cute set from Pink and Main!  The collaboration sets started Tuesday and there’s still some left of most.

and here’s a free shipping code!

Here’s the products I used to make this card… SLS is starlitstudio .net, SSS is Simon Says Stamp,  SBC is Scrapbook .com   Thank you so much for shopping through my links!  I appreciate it!

Memory Box – EF1043 Pinecones and…
[ STR | SSS ]
Memory Box – 94799 Merry Christmas…
[ STR | SSS ]
Memory Box – 94816 Drifting…
[ STR | SSS ]
Memory Box – CL5286D Holiday Wishes…
[ STR | SSS ]
Memory Box Holiday Wishes Clear…
[ SSS ]
Neenah Classic Crest Ultra Thick 110…
[ SSS ]
TE Premium Cardstock – Toffee -…
[ TE ]
TE Premium Cardstock – Cherry Pop -…
[ TE ]
May Arts NATURAL Twine String Burlap
[ SSS ]
Linen Thread – 40 yds – by the spool
[ STR ]
Scor-Tape
[ STR | SSS ]
Scrapbook Adhesives Crafty Foam Tape…
[ STR ]
Tombow Mono Multi Liquid Glue
[ STR | SSS | SBC ]
Tim Holtz Distress Oxide Ink Pad…
[ SSS ]
Tim Holtz Distress Ink Pad Pine…
[ SSS ]
Tim Holtz Distress Ink Pad Peeled…
[ SSS | SBC ]
Tim Holtz Distress Ink Pad Gathered…
[ SSS | SBC ]
Winsor & Newton Drawing Ink – White,…
[ BLIC ]