cards · Christmas · Die Piecing · Memory Box · Poppystamps · Winter

New Memory Box…


PamSparksJoyToTheWorld650-001


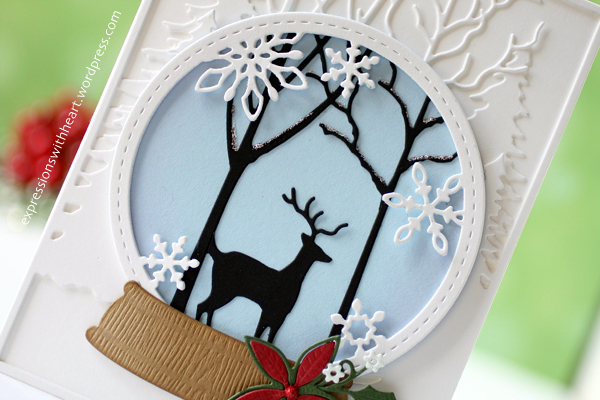
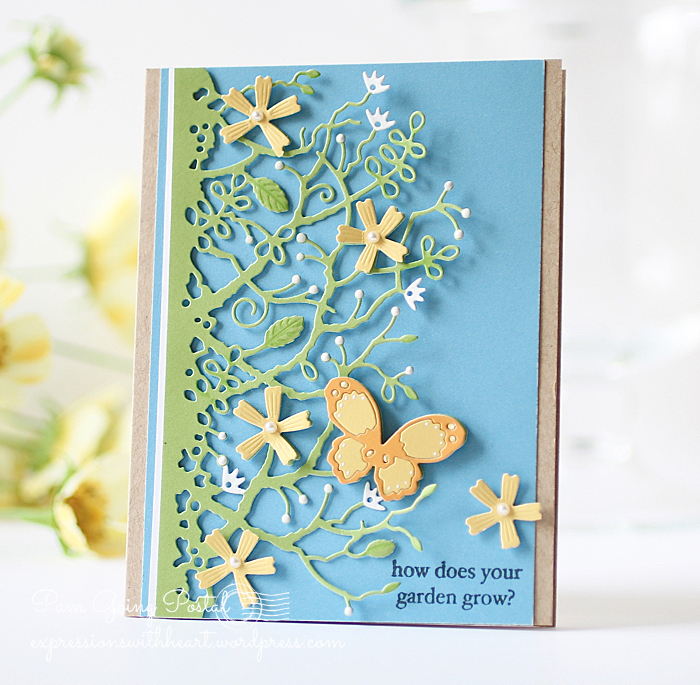
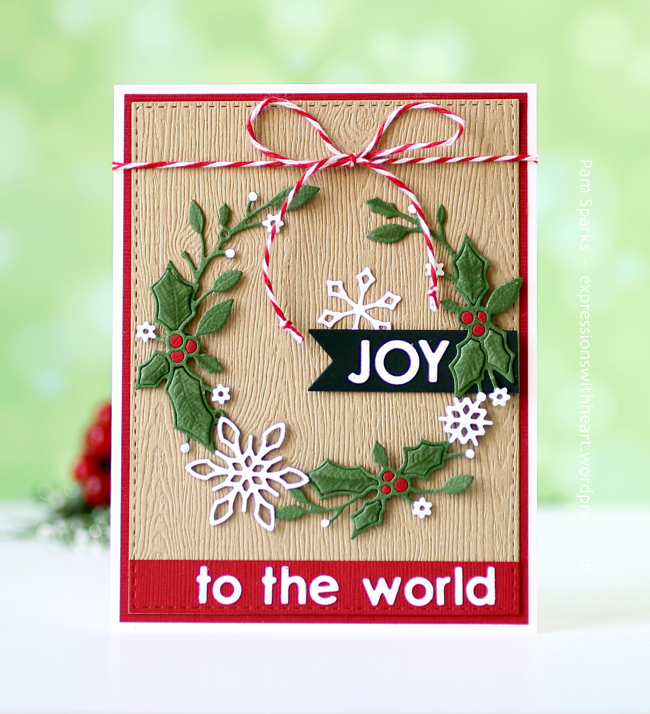
Hi card making friends!  I promise something other than Christmas soon!  Some family birthday cards coming.  I wanted to play a long with the Muse: Christmas Visions Challenge They provide an inspiration card for a jumping off point and yep, I jumped! lol  I’ve got the circle thing going, the colors and a banner.  I positioned my wreath too low though and you know how hard it is to pull up those mounting squares… so I added twine and the words at the bottom! Not exactly what I had in mind but I decided to post it anyway!

and it was a star! Thanks for the votes!

MuseCVStarbadge (1)


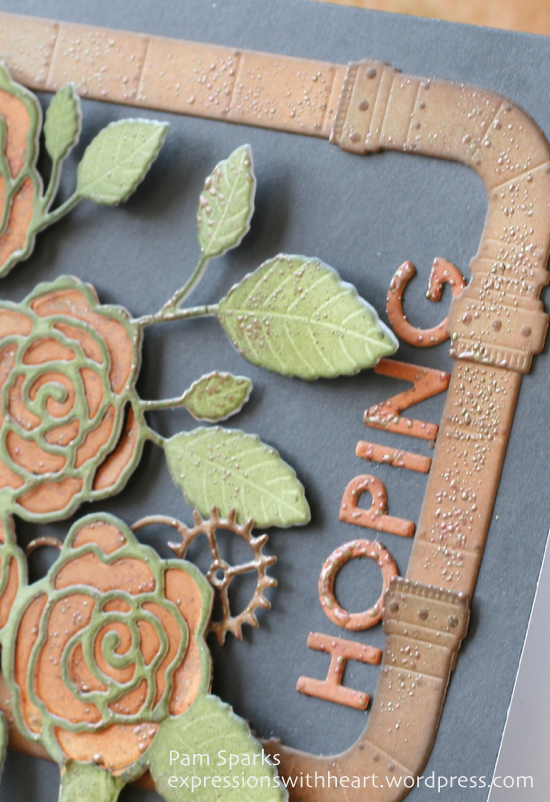
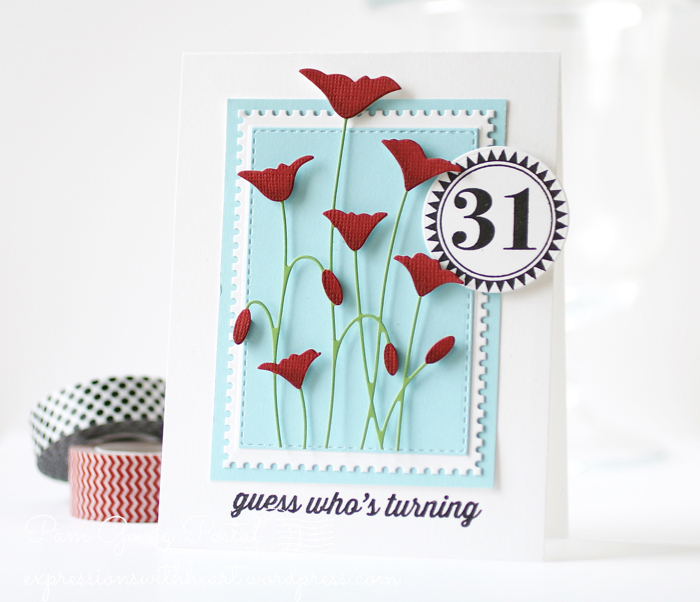
I had another card started, so I decided to go ahead and finish and post it too before I lost the parts.  I love this poppy Seasons Greetings die…such a vintage feel to it.  Another card that didn’t turn out exactly what I had in mind!  I know.. two in a row!  I’ll keep trying! lol


PamSparksSeasonsPoinsettiaWhite700


The Seasons Greetings fit on the card horizontal but the diagonal placement reminded me of the vintage Christmas cards so I went with it instead.

Maybe what it needs is some pattern paper! I’ve gotten to where I hardly want to get into the patterns because I have such a hard time making up my mind what to use.  I guess I tend to cheat and use solids! I love to buy the stuff though!

It was fun playing with more of the NEW Memory Box dies anyway.  It’s that time of year with lots of new product coming out to play with! Watching for CHA photos! I saw the darling Lawn Fawn scarecrow yesterday!  So cute!

I’ll shut up and get some links made.  Thanks for the visit and happy July day to you!


Dies and supplies I used…

cards · CAS · Christmas · Die Piecing · Memory Box · Winter

NEW Memory Box Winter Scenes…


PamSparksSnowglobeWhitte700


Brrrr…it’ll be a Winter Wonderland before we know it! haha!  I love creating Winter scenes!  I started this card with the NEW Stitched Snowflake Circle Frame die. I knew it would work with one of the NEW Open Studio Snowglobe Base dies that I die cut in kraft wood grain card-stock.

I used the NEW Open Studio Pinpoint Circle Layers die set for the blue card-stock circle background.


PamSparksSnowglobeWhiteCloseLeft


The poinsettia is from the NEW Poinsettia Border die cut in green and red card-stock.  I trimmed off the smallest flower and a couple of the flourishes/holly leaf and colored the little flowers with a white gel pen.


PamSparksSnowglobeWhiteCloseRight


Inside the snowglobe circle I die cut the NEW Deer in the Trees die in black card-stock, trimmed it to fit and added some Frosted Lace stickles to the branches.


After I made the snowglobe piece I started working on what to put it on.  I just kept adding because these dies are so cool and build on each other so well!  I ended up with a card under the snowglobe!  An all white card, so I took pictures of it before I put the globe on it!

PamSparksTreesDeerAllWhite675


I die cut everything from white card-stock and then glued the layers down in this order, with Tombow Mono Multi glue.

NEW Simple Evergreen Frame die first, then the NEW Deer in the Trees die and on the top, the NEW Cascade Evergreen Frame die.  They line up perfectly and Mono Multi glue gives you just a little bit of wiggle room to get things adjusted!  I appreciate that! lol


PamSparksTrees:Deer:AllWhiteClose2.600


That was my adventure in card making yesterday!  : )  I hope it sets your mind to racing about all the things you can create with these new dies!  LOVE.THEM.ALL!

After all this ‘snow’, I think I need to go for a bike ride! lol  Thanks again for stopping by! ttul!

Dies and Supplies I used…


cards · Christmas · Die Piecing · Embedded Die Cuts · Memory Box

NEW Memory Box dies!!!


Version 2


I know…Christmas already?!!!  YES!  You are going to love so much of this Memory Box and poppystamps release!  : )

Here’s the NEW Corby Ornament die…I die cut it in green and red card-stocks, trimmed the green branches and leaves from the green cut and glued them on the red cut with Tombow Mono Multi glue.  The red cut stayed intact. It was easy to do because most of the green is connected.

With a gold gel pen, I colored the little flowers and circle buds.

I die cut the NEW Drop Ornament Layers die in metallic gold card-stock and glued the Corby Ornament on top of it.


PamSparksCorbyBlissfulClose.2


The NEW Blissful Bundle die I cut in green card-stock.  For the red berries, I just placed a small piece of red card-stock over the die where the berries were and ran it though my Big Shot. I used a little piece of scotch tape on the back side of the green cut to hold the red berries in place.

I glued the two extra pine branch cuts behind the berries and used a mounting square to adhere the Blissful Bundle to the top of the Corby ornament.

I mounted the ornament to a top folding, A2 size, red card base with mounting squares and added the gold May Arts 1/4 in. wired gold ribbon.

Next I want to die cut these in watercolor paper and watercolor them!

The Corby Ornament is so pretty, it’ll be awesome cut from everything!  Glittery, sparkly, glitzy goodness!


Next up…


PamSparksWeWishYouWhite2.700


I die cut the NEW We Wish You die two times, once in red and once in black cardstock.  I glued the black cut over the red but left the poinsettia petals showing in red. I die cut the medium bow from the  NEW Stitched Bows die in red card-stock and glued it together.  I used thin mounting squares behind the petals, leaves and bow to adhere it to the vellum panel.  Then I put thin mounting squares on the vellum, behind the petals, to adhere it to the white, A2, top folding, card base.

I love Poinsettias so I’m always excited to use these dies! Under the vellum overlay, I embedded the NEW Poinsettia Border die two times.  HERE is the video on how to do this technique….I love it!


PamSparksWeWishYouInside


I added two black enamel dots and then tried to capture it on camera! lol  I think it takes me longer to take pictures than it takes to make a card! lol


PamSparksWeWishYouAngle630


Cindy at Starlitstudio.net will have these in stock tomorrow!  Click over and read her info about  ordering and shipping this time.  She also has the Tombow Mono Multi glue, Score Tape, card-stock, Doodlebug Enamel Dots and lots more!

Thanks for stopping by today!  Thank you for all the wonderful comments… I didn’t get replies made after the last post.  Things kinda went haywire here… I’ll spare you the details! ugh.  I read them all, smile so big and am encouraged to make more cards!  Thank you for being a kindred stamper friend… I appreciate it!  More cards coming soon!

p.s. I saw that Simon Says Stamp has their brand stamps and dies 25% off HERE. Use code ‘simon25’ Ends tonight!  Shopping!!! lol

SIMON-FLASH-SALE-SIMON-25-600X600-

cards · Die Piecing · Memory Box · Spring · Washi Tape

Steampunk Pipes Roses and Splendid Clarkia…


PamSparksSteampunkPipesRoses700


Hi everyone!  Something a little different…I love how the Steampunk Pipes grunged up!  Distressing with Distress Rusty Hinge and Black Soot inks and the ink blending tools.

Then it was what do I put with it! I decided to distress up the new English Rose Bouquet, Gearworks Border, Uppercase Alphabet Soup letters the same way and add them to the frame I made with the die cut pipes.


PamSparksSteampunkPipesRoseClose


I die cut everything from white card-stock, inked completely with Rusty Hinge and then Black Soot Distress inks.  The Rose Bouquet I die cut from white twice.  Inked the roses on one with Rusty Hinge and Black Soot and the other with Peeled Paint and Black Soot.

I pounced a Versamark pad on the pieces to hold the chunky embossing powder while it melted.

On the inside, I stamped a coordinating sentiment from the poppystamps Hope and Thanks clear stamp set. HOPING (on the front)… you have a terrific birthday (on the inside).

Very fun!  I think it’d make a cool man card too, without the Rose Bouquet… maybe just embossing the new clear stamps in the frame.


The next card I made back in February…another one that didn’t make it in the look book on time.  Link under the blog header…


PamSparksClarkiaSylvanCorner


A breathy, Spring-ish card for sure! A dash of this and a dash of that!  Love putting vellum behind butterflies!


PamSparksClarkiaClose


The washi tape I put on card-stock first and then taped it on the card.  Six dies on that one A2 size card! lol   It looks busy in the photo but IRL, it’s really dimensional and pretty.

And pearls… oh how did we ever make cards without pearls! lol

Thanks for stopping by!  I’ll be back Thursday with some Taylored Expressions Release Day cards!  TFL!


Supplies and Dies I used on these cards…

Birthday · cards · CAS · Die Piecing · Memory Box · Poppystamps · Spring · Washi Tape

Memory Box…a three card kind of a day!


 PamSparksAberdeenBranches700


Spring, flowers and Memory Box! Today I’m sharing three cards using more of the Spring collection for this year.

I used the NEW Aberdeen Branches die for my first card…die cut in green, then used scraps of yellow and orange to cut extra flowers and the butterfly.  Trim those cuts and glue in the centers to the green cut.

The sentiment is from the NEW poppystamps clear set ‘Into the Words‘.

I used a white Signo Broad gel pen on the little white flowers and Ranger White Enamel Accents to make the green ‘buds’ white.

Linking my Aberdeen Branches Card to Virginia’s View Challenge – Layers and Dimension


Here’s a close up so you can see a little better…


Version 2


How about a CAS card using the NEW Pennington Rose die and NEW Kindness of People stamp…I love how this turned out. The beauty of a single Rose!


PamSparksPenningtonRose700


Linking my Rose card to the Happy Little Stampers CAS May Challenge – Dies or Punches


And one more card using the NEW Row of Poppies die, the NEW Open Studio Postage Rectangle Layers die set and the NEW Open Sudio Party Time Clear Stamp set. Poppies are layered on one of the Open Studio Stitched Rectangle Layers dies.


PamSparksRowOfPoppiesPostage700


Linking my Poppies card to the Happy Little Stampers CAS May Challenge – Dies or Punches to Virginia’s View Challenge – Layers and Dimension and to Seize the Birthday Challenge – anything goes birthday.

My poppy card made the Top TEN at Virginia’s View Challenge!  Thank you so much Stephanie

Panama-322 - Copy - Copy-001


All three cards are A2 size.

Thanks for stopping by today! I know you’re busy so I kept my chatter to a bare minimum!  lol  Holler if you have a question!  Thanks for all your comments too!  ‘preciate it!