cards · CAS · Christmas · Memory Box · Perfect Layers Tools · rubber stamps

Memory Box Elliana dies…

PamSparksEllianaOrnamentTallWhite-007

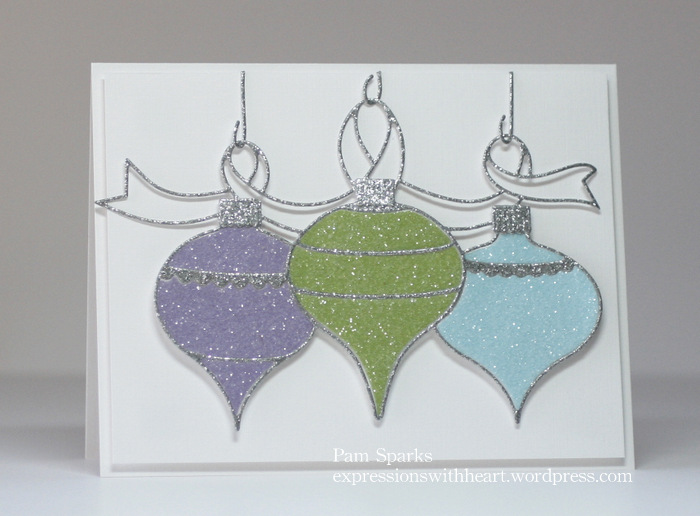
There is just something so dramatic about a tall card!  I love how this turned out! Clean and beautiful!  Memory Box dies are so gorgeous!

Here I used the NEW Sturdy Stem die, Elliana Ornament die and Ornament Hooks and Caps die. All of these were die cut from Silver Glitter Card-stock.

PamSparksElliannaOrnamentClose

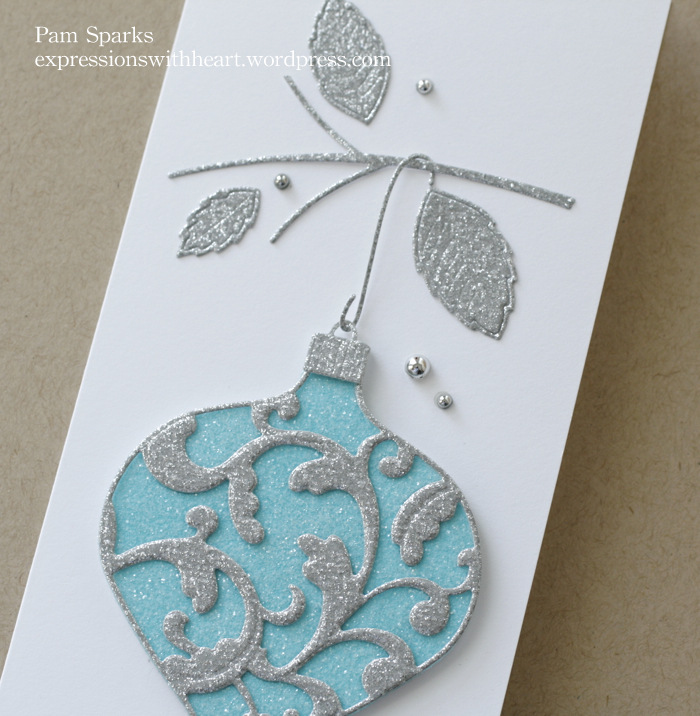
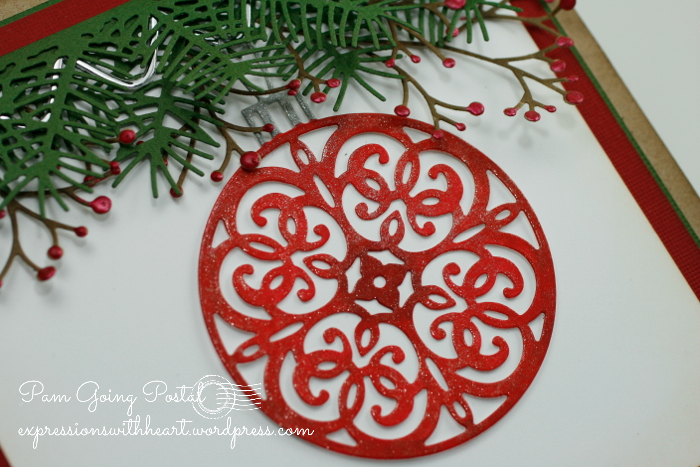
The Drop Ornament is cut from Memory Box Lagoon Card-stock.  I adhered Scor-tape to the color side before I die cut it.  After cutting, remove the release paper (the paper on the tape that keeps it from sticking to everything) and glitter with Clear Rock Candy Distress Glitter.

PamSparksEllianaOrnamentTallClose

And finish it off with the pretty NEW Merry Christmas rubber stamp. I stamped it in Versamagic Turquoise Gem Chalk ink and heat embossed it with Detail Clear Embossing Powder.

Almost makes a gal want to put up her Christmas tree!!!  HOHOHO!

Card Size… 3 3/4 in. x 9 in. fits a #10 business envelope


Have you seen the NEW Elliana Background die and Eliana Detail Plate?  Really, REALLY cool!


6a00d83454a17469e201a511df3496970c-800wi

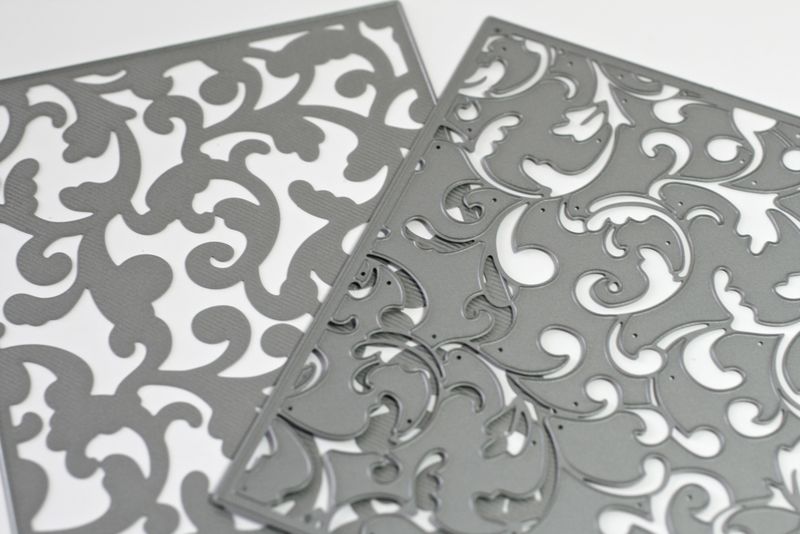
On the left is the Detail plate and on the right is the cutting die…
Look right there in the middle where they overlap and the camera focused…you can see the detail…looks like corduroy!  Click to see it better.


6a00d83454a17469e201a3fd2f7d34970b-800wi

I die cut a Memory Box A2 Parchment Notecard with the Elliana Background die, then embossed the die cut with the Elliana Detail Plate and inked it with Gathered Twigs Distress Ink and the mini ink blending tool.  So pretty!  Going for a vintage look for this card…

PamSparksEllianaPoinsettiaRed700


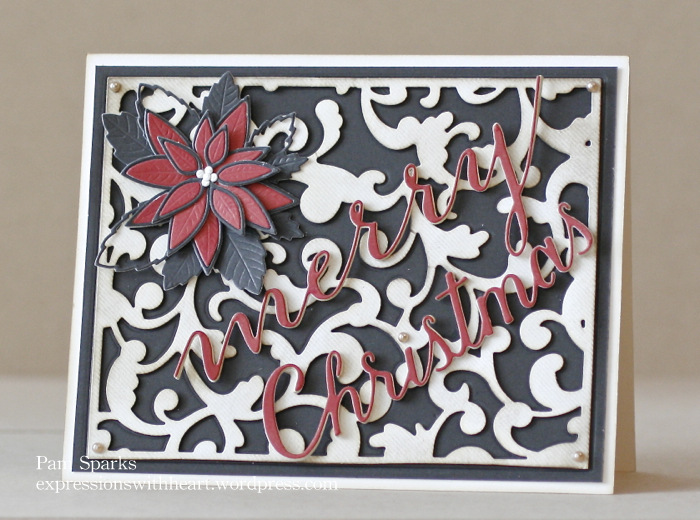
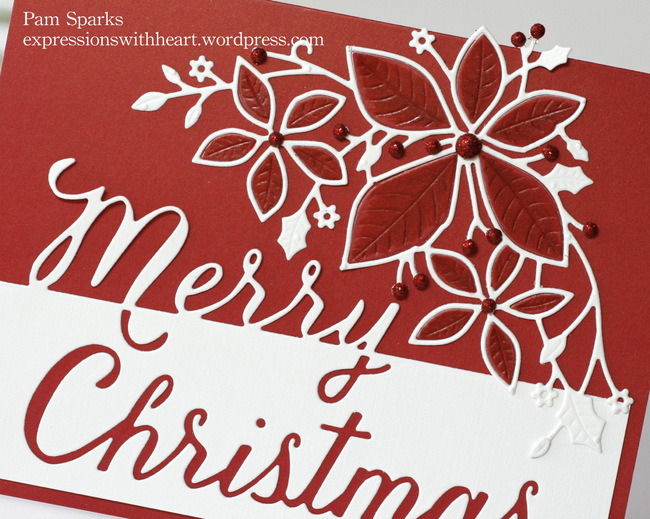
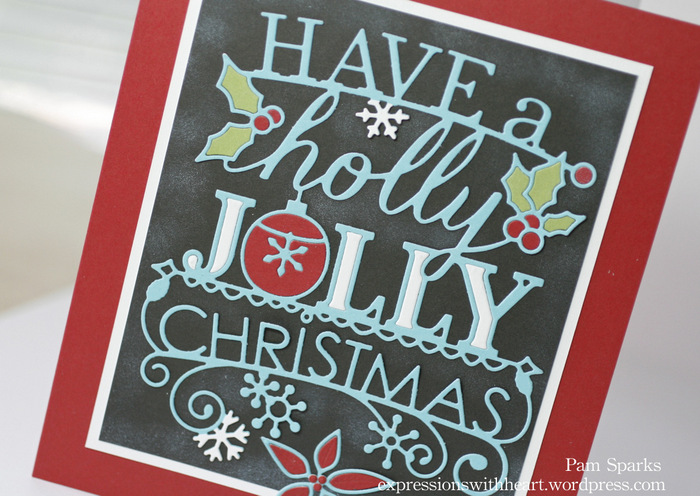
The NEW Poinsettia Bloom Trio die cut from Memory Box Cranberry and Licorice Card-stock just makes me happy! Add the leaves from the NEW Sturdy Stem die, cut in Memory Box Licorice Card-stock and use the pieces separately this time!  Love that!

PamSparksEllianaPoinsettiaRedClose700


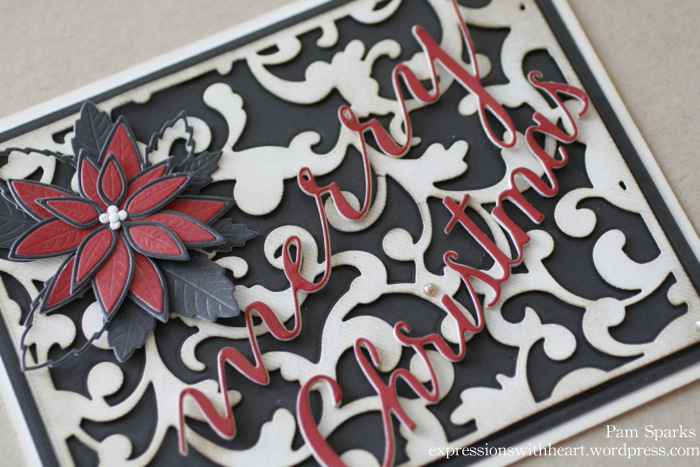
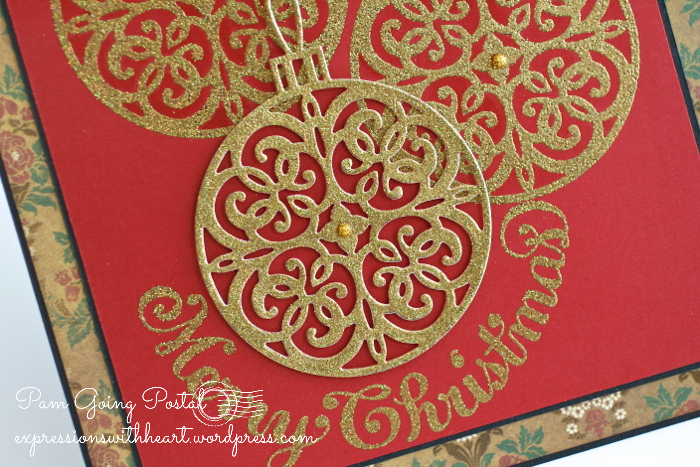
The NEW Merry Cursive die…cut three times from Memory Box Parchment Card-stock, glued together and edged with Gathered Twigs Distress ink.  The word Christmas is from the NEW Grand Merry Christmas Script and also cut three times, glued together and edged with Gathered Twigs Distress ink.

I used my Perfect Layers Tools to cut the mats and the card base… link over on the right.. Special Deal going on right now!!!

Would you like the chance to win the NEW Elliana Ornament die? Click over to the Memory Box Blog, Outside the Box and leave a comment!

Thanks for visiting today!  I hope to be back with a couple more cards but time will tell!  It’s always ticking and ticking faster and faster for me it seems! : )  Have a great and weekend creative friends!

P.S. Cindy aka Starlitstudio.net will be heading out on vacation tomorrow… orders shipping until 9 p.m. eastern time tonight!  Otherwise she will be back home July 20th and orders will ship Monday the 21st!

cards · CAS · Christmas · Memory Box · rubber stamps · Winter

Memory Box Dazzling Snowflake and Limoges Snowflake cards…

PamSparksDazzlingSnowflakeWhiteSilver700

The NEW Dazzling Snowflake die (in the store now) and NEW Merry Christmas rubber stamp, (stamps will be in the store real soon)!  WOW!  I love it! Turned out so cool!

I cut the die in a white panel, embossed the sentiment with Silver embossing powder and layered it, with mounting squares, onto a white A-2 card base that I adhered a piece of Silver glitter card-stock to.

That’s it! CAS it is but so dramatic and lovely!

A CAS Favorite at Splitcoast Stampers!  Thank you ladies!

CAS-Favorite

I’m linking to the Merry Monday Challenge – Create an All White Christmas card (sentiment can be in silver)

and to Simon Says Stamp Monday Challenge – W is for White (both my cards work for this one)


PamSparksLimogesSnowflake700

Will you look at all the detail in this NEW Limoges Snowflake die!  Isn’t it a stunner?!  So pretty!

I die cut in white card-stock, embossed it by running it back through the Big Shot again, then leaving the cut and embossed piece in the die, turn it over, ink through the die, after inking all the open areas, remove the die, cover with embossing powder and heat.  Wow! Beautiful!

PamSparksLimogesSnowflakeClose700

Ink, stamp and emboss the sentiment Walking Winter Wonderland on vellum.

A somewhat CAS, A-2 size card…for a special someone!

Just for fun… a photo of four of the six cards I made this week for Memory Box.   Be watching…next week the 2014 Holiday Memory Box blog blitz starts!

PamSparks2014ChristmasCAS700

See you again soon!  Have fun shopping… I see the NEW Memory Box and poppystamps dies arriving in stores!  YAY!  Thanks for shopping through my links.  I appreciate it so much!

ttul,


cards · CAS · Christmas · copics · Die Piecing · Memory Box · Perfect Layers Tools · rubber stamps

More Christmas in July…

PamSparksCandleLight-001


Three white CAS cards in a row!  At least I got the white part of the holiday weekend in!  I think everyone else is getting ready for the 4th of July and here I am making Christmas cards like crazy!

I’m thinking you want to see the NEW stuff made up though so I’ll just keep making.  Although I think tomorrow is going to be clean out the garage day. ugh.  I’d rather make cards!!! lol

I cut the NEW Tall Taper Candle die out of gold metallic card-stock then again for just the berries out of a scrap of silver metallic card-stock.

I glued this with Tombow Mono Multi glue, green caps, directly to a top folding A-2 size card base. Teeny dots where the lines meet and there is a tad bit bigger area to leave a teeny dot of glue.

*Tip*  Always keep the tip of your glue clean and it won’t clog up on you.

*Tip* and the most important one… always keep your glue laying down. If you keep your glue upside down, it will come out uncontrollable!  eep!

(I did try die cutting this with double sided tape on the back. It didn’t work well for me…too sticky and didn’t hold it’s shape)

Isn’t this Taper Candle die gorgeous?!  Can you just see it made up to look like stained glass?!  awesome!  Can’t wait to do that next!

The holly and berries are from the NEW Cabrini Ornament die.  Three little snips with the scissors and you have the perfect embellishment for the candle!  : )

Did you notice the sentiment?  NEW rubber stamps!!!!  YAY!  This is the NEW Let Your Heart combo rubber stamp.


PamSparksScriptMerryPoinsettiaCorner-001

WOW is right!  LOVE the NEW Grand Merry Christmas Script die!  It’s a beauty!  I paired it with the NEW Plush Poinsettia Corner die. Another beauty!

PamSparksScriptMerryPoinsettiaClose-001

The Grand Merry Christmas is cut from white card-stock and the Plush Poinsettia Corner is cut from white and cranberry card-stock.  The cranberry petals I colored with Copic markers after I glued them in place.  A gal can only go so long without a little colorbook therapy! : )

Several red glitter domes on the berries and this A-2 size card was done.

My last card for today is colorful and picks up the chalkboard trend that has been so popular.

PamSparksHollyJolly-002

Isn’t it fun?!  I love it!  This is the NEW Have a Jolly Christmas die!  FABULOUS!  First I die cut it in white and it was great…but I just had to try some retro-ish colors.  I know…even though I’ve been on a white kick!

So here you have Lagoon, Sage, Cranberry, Licorice and White Memory Box card-stock or notecard colors.

I used my Perfect Layers Mini Tools and Cutting Mat to layer.  The ⅛ th inch ruler for the white mat and the ½ inch ruler on three sides of the card base.  Click HERE. Be sure to use the code Sparks5% at checkout.  The rulers are so awesome!  They save me so much time!  You will love them too!


PamSparksHollyJollyClose-001

See that poinsettia at the bottom?  That is a NEW die too! It’s the smallest flower from the NEW Poinsettia Bloom Trio die.  YAY!  More of everything I love!

Well, this is a lot today…holler if you have any questions!

I’m linking up to some challenges…

Virginia’s View Challenge # 5 – Die Cut

Wonderful Words Challenge – Word Dies

Keep it Simple – lots of turquoise

Thanks for looking, enjoy the holiday weekend and keep coming back to see more NEW * NEW * NEW!!!

Baby · cards · CAS · Christmas · Die Piecing · Memory Box

Christmas in July with Memory Box and Baby!

PamSparksChristmasRibbonOrnaments2


HO HO HO Merry Christmas!  I know, I know… it’s early!  Still…it’ll be nice to have a stash of cards and ideas before the last minute!

Here’s the NEW Memory Box Christmas Ribbon Ornaments die…soon to be HERE!

I broke out the glitter… haha… the Clear Rock Candy Distress Glitter HERE works great for this!  It’s not getting all over everything after!  YAY!  THIS would work also… pretty!

I die cut the ornaments with Scor Tape HERE on the right side of the Memory Box card-stocks.  Peeled off the release paper, dumped on glitter, dumped it off and burnished it on with a bone folder (place a piece of scrap paper on top of the glittered piece and rub).  All without getting it all over me!!!

After you have your pieces cut and glittered,  I lay the main piece right side down on the table, then place the pieces in right side down.   I used Scotch tape this time but you could easy use ⅛ th or ¼ th inch scor tape too.

If you’re mounting it with mounting squares like I did,  the scotch tape works because you don’t need the double stick.

If you are adhering the design directly to the card, scor tape would work great instead of scotch tape.

Linking to the Christmas All Year Round Challenge, non-traditional colors
Craftyhazelnut’s Christmas challenge extra – anything goes
Dies R Us Challenge, Christmas in July
Holly Jolly Christmas Challenge – Glitter
Papertake Weekly – Anything Goes, Make it Christmas-ey

❤ ❤ ❤ ❤ ❤

Here’s a couple Baby cards.  We welcomed Leo to our family in December and Rogan the 1st of June!

PamSparksSweetPeaLeo

I LOVE the Winnie and Walter clear stamp sets HERE!   For this card I used the Big, Bold and the Happy set. I stamped with Versafine Black Ink.

PamSparksSweetPeaLeoClose

Just darling! lol  I love the gingham pea!  I used  Memory Box A Pea in the Pod die HEREGeneva Vine die HEREUrban Upper and Lower Alphabets HERE and HERE and the poppystamps Classic Ribbons die HERE.

PamSparksSweetPeaRogan

Now to finish up the insides and get them mailed!  eek,  I am so bad about that!   So tickled with how these two cards turned out… Cute!  Don’t you love it when you’re happy with what you make?! lol   Memory Box and poppystamps…a great combo!  Win, win!

My baby cards were in the Favorites this week at Splitcoast Stampers!  Thank you ladies!

Weekly-Favorite

Linking my baby cards to… Tuesday Throwdown Challenge – Anything Goes
Papertake Weekly – Anything Goes
Cardz For Guyz – Baby Boy
Lady Bugs Crafts Ink Challenge – Anything Goes
Sweet and Sassy Stamps New Release Challenge – Anything Goes
The Card Concepts – Baby, Freestyle Collage – Winner!  Thank you Kay for choosing my Sweet Pea cards!

Challenge Winner

You know I love Copics too!  Here’s a deal if you’re in the market!

SALE – Simon Says Stamp Copic Sale

1_123

Back to cutting and pasting!   So happy you stopped by!  More Christmas coming at you soon!


Blog Hop · cards · CAS · Christmas · copics · Impression Obsession · Memory Box · Perfect Layers Tools · Poppystamps · rubber stamps · Serendipity Stamps

Blog Hop – Perfect Paper Crafting and Serendipity Stamps…

SerendipityHop

Good morning and WELCOME to the first day of the week long Perfect Paper Crafting with Serendipity Stamps Blog Hop!  So excited to be blogging with this wonderful group of stampers!

If you’ve come from Marybeth’s Blog, you are in the right place.

You will want to hop and comment on all the blogs… AWESOME PRIZES… I mean AWESOME!
Perfect Paper Crafting and Serendipity Stamps are both giving away a $50 Gift Certificate
Two winners will be chosen randomly from the people that have commented on all the blogs!
Winners will be announced on the PPC and Serendipity blogs on March 17th.

PamSparksSerendipityOrnamentIOPine

My first card for the hop is a window card…cut a circle from an A-2 top folding card, die cut the Serendipity Ornament die…lovin’ this die! Poked a couple holes for the twine bow, die cut some pine branches, glued them on and there you have it!  It was hard for me to leave it without a sentiment, but I’ll figure something out! lol

PamSparksSerendipityOrnamentIOPineClose

Up close…that is dark brown card-stock in the background…helped it show up for the photos.

❤ ❤ ❤ ❤ ❤

PamSparksSerendipityOrnaments3

On this card I used the Ornament Stamp and Die set from Serendipity Stamps.  I heat embossed the ornament stamp, twice on the background, then die cut the ornament die, heat embossed it and using mounting squares, adhered it to the card front.  I used black pigment ink to ink up the ornament stamp all three times and Judikins Egyptian Gold embossing powder.  I used the Stamp a ma jig for positioning.

The ornament stamps beautifully and the ornament die cuts perfectly!

Here’s a close up…

PamSparksSerendipityOrnaments3Close

I used my Perfect Layers Rulers to mat the image panel and the base of the card.  I love how perfect and elegant the 1/16th inch ruler cuts the mats.  I’m lovin’ the new shorter rulers and the cutting mat… both are AWESOME and I’m telling you true!  : )

❤ ❤ ❤ ❤ ❤

I was in the mood to color, so I cut the ornament die from white card-stock so I could color it with Copics!  I wanted to use my Wink of Stella Red and Silver Brush pens too!  It’s Christmas…bring on the sparkle!

PamSparksSerendipityOrnamentPineClose

Then I needed some greenery to hang the ornament!  poppystamps Pine Needle Border, Berry Sprig and Memory Box Ribbon Candy Border all combined to make a festive arrangement for it to hang from. Ranger Cranberry Liquid Pearls on the berries.

PamSparksSerendipityOrnamentPineSide

A festive sentiment from Serendipity Stamps, Tis the Season… stamped beautifully with Versafine Onyx Black ink.

❤ ❤ ❤ ❤ ❤

*** Serendipity has a SPECIAL going on right now… Everything in their Easter Category is 20% off until Wednesday March 12, 2014. ***

The HOP will go through Sunday, March 16, Midnight Pacific time. Enjoy, be inspired and comment for a chance at the prizes!

❤ ❤ ❤ ❤ ❤

Your next stop on the HOP is Julie

❤ ❤ ❤ ❤ ❤

Thanks so much for stopping by and see you next time!  Working on a scene card with Serendipity Stamps and Perfect Layers tools..

Supplies I used on my cards…