Birthday · Card Sketch · cards · CAS · Christmas · Die Piecing · Memory Box · Perfect Layers Tools · Poppystamps · Washi Tape · WPlus9

Memory Box and WPlus9…


PamSparksChatsfordWreathJoy700


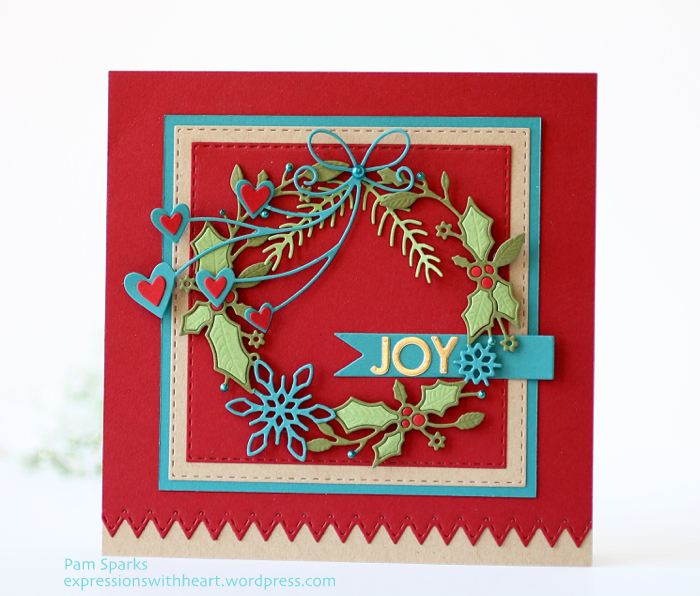
Christmas in July is always so fun! I have two more cards with the Memory Box Chatfords Wreath to share today.  I love how these turned out!  I threw in some teal card-stock to throw me off the traditional Christmas colors path!  But wait…keep scrolling…I hopped back on with the second card!  Another card with this wreath HERE.


PamSparksChatsfordWreathNoel700


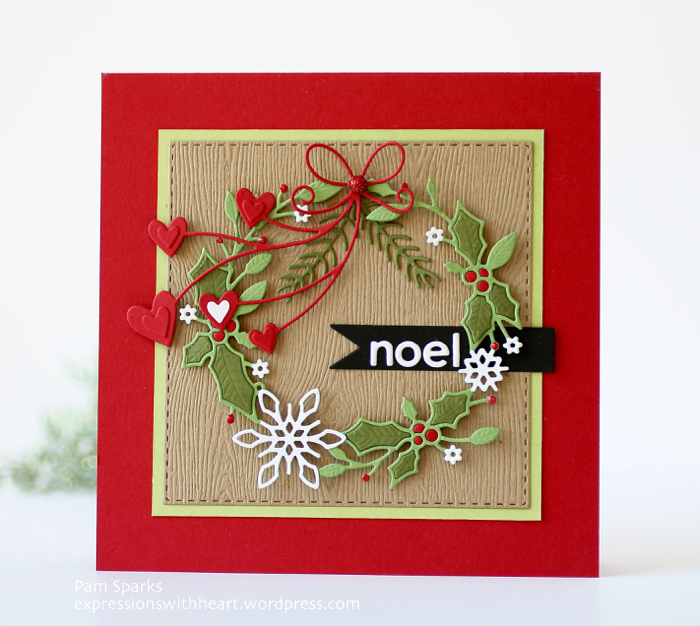
I die cut the wreath two times from two different green card-stocks, kept all the pieces and just interchanged them between the two cards.

I die cut the alphabets with score tape on the wrong side of the card-stock so they’d be stickers. It works so slick!  Easy to line up when you use the smallest size banner too! JOY is cut from metallic gold card-stock.


PamSparksChatsfordWreathNoelClose


The white just makes it pop! Some pearls and Liquid pearls and it’s time to celebrate!  or bust out singing a carol or two!  : )

I’ll link up the dies and everything I used in inlinkz below.

I’m also linking to some challenges…
Merry Monday Christmas Challenges  – Christmas card with a heart on it

Honorable Mention

ABC Christmas Challenge – O is for Off the Edge

Dies R Us Challenge – Christmas in July
Live and Love Crafts – Christmas in July
Pile it On – Christmas in July
Simon Says Stamp Monday Challenge – ‘i scream for’  DIES!
Simon Says Stamp Work it Wednesday – Die cuts
Jingle Belles Challenge – Old Fashioned Christmas 
(my card has a retro feel/colors)


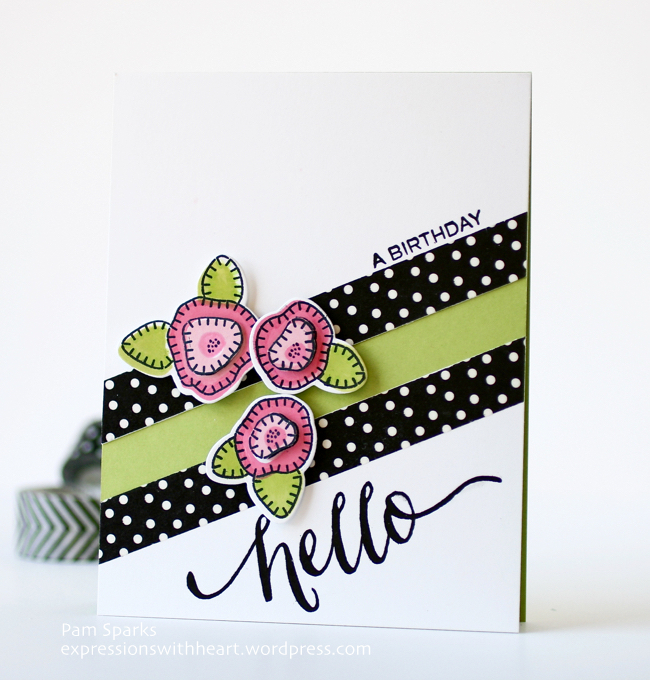
Next I have a birthday card I made for the WPlus9 Challenge and the CAS-ology Challenge…


IMG_0889-001


I used the sketch from the Get Sketchy Challenge at WPlus9HERE

and

the challenge over at CAS-ology is Line – HERE

and

the challenge at Addicted To Stamps is CAS – HERE

I cut a quarter panel with the WPlus9 banner long die… it was the perfect amount of space I wanted for the ‘gap’ and an easy way to get a perfect gap! I lined each side with Washi Tape.  Stamped the Blanket Stitch flowers with chalk inks, the sentiments with Versafine black and all with the MISTI.

Thanks for visiting today!  Happy, creative weekend to you!

Supplies I used on my cards…

cards · Christmas · Die Piecing · Memory Box · Poppystamps · Winter

New Memory Box…


PamSparksJoyToTheWorld650-001


Hi card making friends!  I promise something other than Christmas soon!  Some family birthday cards coming.  I wanted to play a long with the Muse: Christmas Visions Challenge They provide an inspiration card for a jumping off point and yep, I jumped! lol  I’ve got the circle thing going, the colors and a banner.  I positioned my wreath too low though and you know how hard it is to pull up those mounting squares… so I added twine and the words at the bottom! Not exactly what I had in mind but I decided to post it anyway!

and it was a star! Thanks for the votes!

MuseCVStarbadge (1)


I had another card started, so I decided to go ahead and finish and post it too before I lost the parts.  I love this poppy Seasons Greetings die…such a vintage feel to it.  Another card that didn’t turn out exactly what I had in mind!  I know.. two in a row!  I’ll keep trying! lol


PamSparksSeasonsPoinsettiaWhite700


The Seasons Greetings fit on the card horizontal but the diagonal placement reminded me of the vintage Christmas cards so I went with it instead.

Maybe what it needs is some pattern paper! I’ve gotten to where I hardly want to get into the patterns because I have such a hard time making up my mind what to use.  I guess I tend to cheat and use solids! I love to buy the stuff though!

It was fun playing with more of the NEW Memory Box dies anyway.  It’s that time of year with lots of new product coming out to play with! Watching for CHA photos! I saw the darling Lawn Fawn scarecrow yesterday!  So cute!

I’ll shut up and get some links made.  Thanks for the visit and happy July day to you!


Dies and supplies I used…

cards · Christmas · Memory Box · rubber stamps · Techniques · Watercolor

New Memory Box Poinsettia Ribbon card…


PamSparksPoinsettia700


It’s time for the Memory Box Blog Blitz this week.  Click over and comment for chances to win dies from the new 2015 Holiday/Christmas release!

Today I’m using the NEW Poinsettia Ribbon die.  I die cut it in Metallic Gold and Red card-stock and mounted the gold ribbon piece with mounting squares behind the ribbon part and then mounting squares behind each of the red poinsettia petals. A gorgeous die!  I love it!


PamSparksPoinsettiaClose630


I did the ink smooshing watercolor technique for the background in three Distress ink colors, Abandoned Coral, Barn Red and Fired Brick.  A few spatters of gold ink and some pearls to glam it up a little.

I mounted the panel to gold card-stock and then to a 5.5 inch square white card base, that I stamped the Merry Christmas Combo stamp on, and embossed in gold embossing powder.

Challenges…
Deep Ocean Challenge – Christmas in July
Happy Little Stampers – Sketch Challenge


Some shopping news for you…Scrapbook.com is having a free standard shipping special on all orders over $60!!!  AWESOME deal.  Today through the 19th! They have thee best price on the new Big Shots!!!  I love them…so happy with them…while you’re there…the magnetic platform and spare cutting plates are a great deal too!  They carry my favorite mounting squares in regular and thin…in white and in black…by 3L Scrapbook Adhesives.

Top_Header_FREE_Shipping_watercolorfun

While you’re there… get the free tote!


Starlitstudio.net shopping… Cindy will be back packing and shipping orders this weekend!  YAY!


ok – I’m headed to Ankeny IA later this afternoon for a class at Taylored Expressions Studio! Here’s the fb page if you would like to keep up with the fun classes and activities happening there!  August release in a couple weeks!  oh eek!  August…no way!  The year is flying by way toooooo fast!

Happy stamping, die cutting Day to you! It’s ok to track little bits of paper all over the house! lol

Thanks for stopping by!  : )

cards · CAS · Christmas · Die Piecing · Memory Box · Winter

NEW Memory Box Winter Scenes…


PamSparksSnowglobeWhitte700


Brrrr…it’ll be a Winter Wonderland before we know it! haha!  I love creating Winter scenes!  I started this card with the NEW Stitched Snowflake Circle Frame die. I knew it would work with one of the NEW Open Studio Snowglobe Base dies that I die cut in kraft wood grain card-stock.

I used the NEW Open Studio Pinpoint Circle Layers die set for the blue card-stock circle background.


PamSparksSnowglobeWhiteCloseLeft


The poinsettia is from the NEW Poinsettia Border die cut in green and red card-stock.  I trimmed off the smallest flower and a couple of the flourishes/holly leaf and colored the little flowers with a white gel pen.


PamSparksSnowglobeWhiteCloseRight


Inside the snowglobe circle I die cut the NEW Deer in the Trees die in black card-stock, trimmed it to fit and added some Frosted Lace stickles to the branches.


After I made the snowglobe piece I started working on what to put it on.  I just kept adding because these dies are so cool and build on each other so well!  I ended up with a card under the snowglobe!  An all white card, so I took pictures of it before I put the globe on it!

PamSparksTreesDeerAllWhite675


I die cut everything from white card-stock and then glued the layers down in this order, with Tombow Mono Multi glue.

NEW Simple Evergreen Frame die first, then the NEW Deer in the Trees die and on the top, the NEW Cascade Evergreen Frame die.  They line up perfectly and Mono Multi glue gives you just a little bit of wiggle room to get things adjusted!  I appreciate that! lol


PamSparksTrees:Deer:AllWhiteClose2.600


That was my adventure in card making yesterday!  : )  I hope it sets your mind to racing about all the things you can create with these new dies!  LOVE.THEM.ALL!

After all this ‘snow’, I think I need to go for a bike ride! lol  Thanks again for stopping by! ttul!

Dies and Supplies I used…


cards · Christmas · Die Piecing · Embedded Die Cuts · Memory Box

NEW Memory Box dies!!!


Version 2


I know…Christmas already?!!!  YES!  You are going to love so much of this Memory Box and poppystamps release!  : )

Here’s the NEW Corby Ornament die…I die cut it in green and red card-stocks, trimmed the green branches and leaves from the green cut and glued them on the red cut with Tombow Mono Multi glue.  The red cut stayed intact. It was easy to do because most of the green is connected.

With a gold gel pen, I colored the little flowers and circle buds.

I die cut the NEW Drop Ornament Layers die in metallic gold card-stock and glued the Corby Ornament on top of it.


PamSparksCorbyBlissfulClose.2


The NEW Blissful Bundle die I cut in green card-stock.  For the red berries, I just placed a small piece of red card-stock over the die where the berries were and ran it though my Big Shot. I used a little piece of scotch tape on the back side of the green cut to hold the red berries in place.

I glued the two extra pine branch cuts behind the berries and used a mounting square to adhere the Blissful Bundle to the top of the Corby ornament.

I mounted the ornament to a top folding, A2 size, red card base with mounting squares and added the gold May Arts 1/4 in. wired gold ribbon.

Next I want to die cut these in watercolor paper and watercolor them!

The Corby Ornament is so pretty, it’ll be awesome cut from everything!  Glittery, sparkly, glitzy goodness!


Next up…


PamSparksWeWishYouWhite2.700


I die cut the NEW We Wish You die two times, once in red and once in black cardstock.  I glued the black cut over the red but left the poinsettia petals showing in red. I die cut the medium bow from the  NEW Stitched Bows die in red card-stock and glued it together.  I used thin mounting squares behind the petals, leaves and bow to adhere it to the vellum panel.  Then I put thin mounting squares on the vellum, behind the petals, to adhere it to the white, A2, top folding, card base.

I love Poinsettias so I’m always excited to use these dies! Under the vellum overlay, I embedded the NEW Poinsettia Border die two times.  HERE is the video on how to do this technique….I love it!


PamSparksWeWishYouInside


I added two black enamel dots and then tried to capture it on camera! lol  I think it takes me longer to take pictures than it takes to make a card! lol


PamSparksWeWishYouAngle630


Cindy at Starlitstudio.net will have these in stock tomorrow!  Click over and read her info about  ordering and shipping this time.  She also has the Tombow Mono Multi glue, Score Tape, card-stock, Doodlebug Enamel Dots and lots more!

Thanks for stopping by today!  Thank you for all the wonderful comments… I didn’t get replies made after the last post.  Things kinda went haywire here… I’ll spare you the details! ugh.  I read them all, smile so big and am encouraged to make more cards!  Thank you for being a kindred stamper friend… I appreciate it!  More cards coming soon!

p.s. I saw that Simon Says Stamp has their brand stamps and dies 25% off HERE. Use code ‘simon25’ Ends tonight!  Shopping!!! lol

SIMON-FLASH-SALE-SIMON-25-600X600-