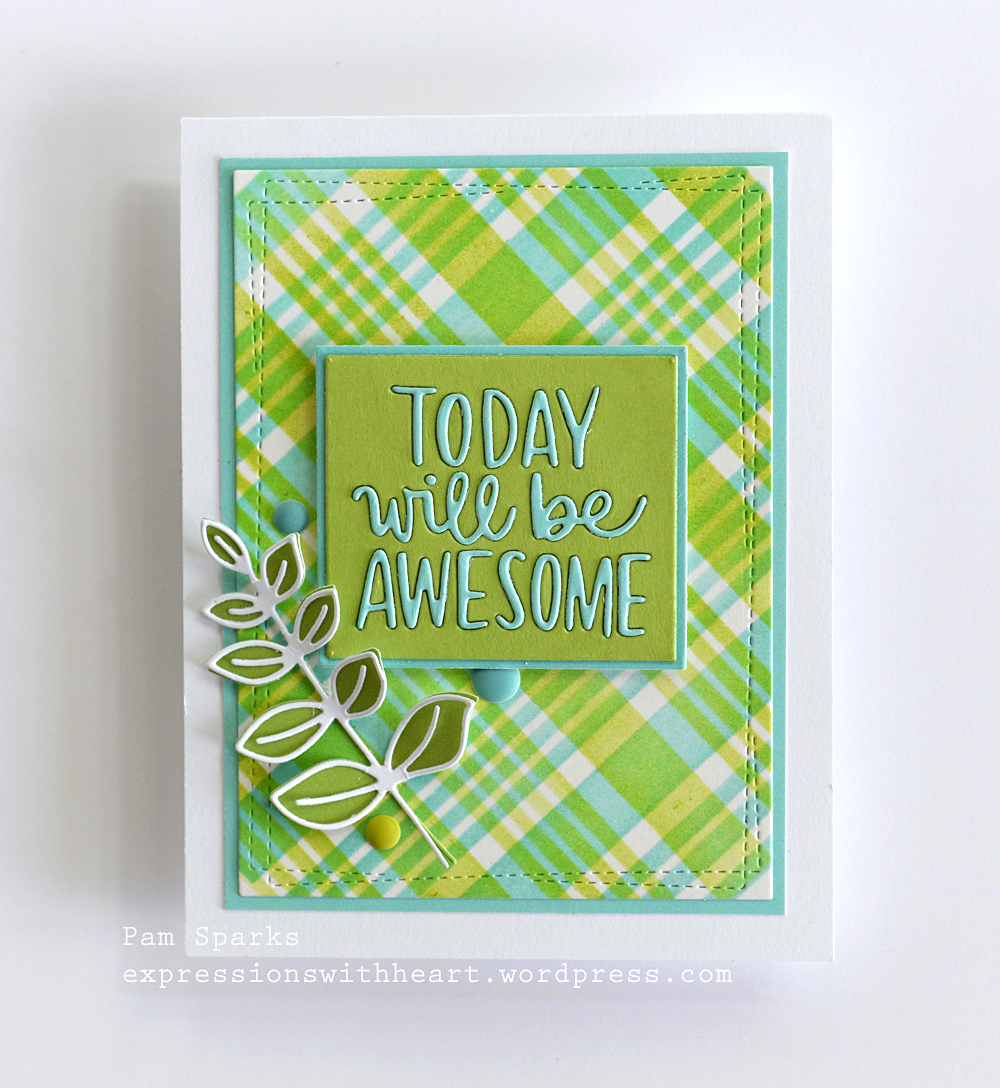
Hi everyone! A floral card with a big thanks to share with you today.
I stamped this beautiful floral image from SSS Sketched Flowers clear stamp set with Archival Black ink in the MISTI on watercolor paper.
I used the most amazing markers to watercolor with! Have you heard of the Karin Markers? They’re from Poland. Just WOW! So cool! I was so surprised and delighted when the pkg arrived at my front door! A birthday present for me?! YES! From an awesome friend!!! 😀 Best Birthday ever!!! 😀
They are awesome markers for lettering too. I’m still working on that… practice, practice!
I spattered and after everything was dry, I die cut the word ‘thanks’ from Altenew’s lower case alphabet set right out of the colored floral piece! :O
That took a couple weeks for me to get up the nerve! lol No big deal after all. haha whew!
I added mounting tape to the back of each of the letters and placed them back in after I backed the piece with black cardstock.
I’ve seen a lot of cardmakers do this and have always loved it. So glad I finally did it! The simple ‘with heartfelt’ is from a Memory Box clear stamp set.
Links below to what I used…
THANK you so much for stopping by and supporting my cardmaking and blogging! I appreciate it so much! YES, with heartfelt thanks! Have a beautiful day! It cooled off here and I even opened the windows because the humidity is low…so unusual! So happy about it! lol
Hi everyone! I’ve been working on these two cards this week using the NEW Spellbinders June Small Die of the Month Club set. (link at the bottom of this post)
Two kinds of stained glass/quilt looking cards!
In the June kit there are three sets of dies that stack/coordinate. A hexagon set, a circle set and a fan looking set. All for a great deal!
I used one layer of the hexagon set for this first card. I die cut a lot of the black one (popped out the waste), then I die cut two of each color cardstock from Taylored Expressions, linked below, all from the same die. The color ones held together well so that made it easy to tape the back (to hole the pieces in) and then glue the black cut on top.
This ended up a ‘Hallmark’ size card. If I was doing it again, I would cut the panel in half and make two cards! 😀
The ‘For You’ sentiment die cut is from the Spellbinders Truckin’ Through the Seasons die set.
My next card is using the circles from the club set.
I lined up the 3 circle dies in a row on top of an A2 card size panel. Taped them in place with removable tape and die cut…repeated it for the next row. It worked slick. I didn’t even measure this time. eek! lol I had six holes in the panel then.
I used mounting tape on the back of the panel and adhered it to a TE Granny Smith A2 size panel so that color would show through when I pieced in the circles.
I die cut the 3 circle dies from white and Taylored Expressions color cardstock. Adhered them together and glued them into the holes in the panel.
I stamped the sentiment with Archival black ink and the MISTI tool. I cut out the word sympathy with the MISTI Cut Align ruler.
I hope I didn’t make it sound complicated because it’s just a matter of cutting enough pieces, after you decide what colors you want to use, gluing and putting them in place. 😀
I wish you could see them in person… so much better! hehe
Thank you for stopping by and holler if you have any questions!
Hi eveyone! Are you enjoying the NEW Memory Box release this time? So many fun flower dies! yay!
Today I die cut everything in white and colored the pieces with Copic Sketch Markers. The flower pieces from the Antique Corner Rose Label die are colored with R81, 83 and the center dots on the two largest with R85. The leaves on both the Antique Corner Rose and Antique Leaf Label die are colored with G24.
I pieced the dies together with the right side face down so I could put mounting tape over the back sides. Small pieces…I always check to make sure there isn’t any hanging over and if there is, I trim from the front and cut the excess at a slant so it doesn’t show. On this one, I left the pieces hanging over on purpose so they’d catch the frames, then trimmed them all… works great!
I used the medium size of the new Pinpoint Butterfly Trio and left it white!
I stamped thank you and terrific from the new Big and Little Words clear stamp set on the label using the MISTI with Ranger Archival black ink.
I ink blended a background with Distress Oxide Peacock Feathers ink. I started out with the mini ink blending tool but then changed to the make up brush oval type brush to get the edges feathered out better.
Spattered it with water, dried it with the heat tool, spattered on some Hero Arts White Watercolor paint, then some black paint, drying in-between colors.
I’m really happy with it and will close with telling you all thank you for being so terrific! Cardmakers are the best!
It’s a sunshiny day here! A rare thing this Spring. Maybe I can get out for a walk! Take care and thanks for stopping by!
Hi everyone! When this cute gal came out awhile back I knew I had to have her! We have one granddaughter that especially loves to swing and she loves cards too! I love it when the idea for personalizing a card comes easy!
Here’s my version of the swinging ‘whee’ girl in action…she’s cute! You can see it a lot better on You Tube, HERE.
I basically followed MFT’s video but I used dies I already owned. I added a tree trunk from the Memory Box Weeping Willow Tree Cutting Plate but I see it’s discontinued. There are other tree dies though that would work… like this one HERE. You could also hand cut one really easy. I haven’t seen anyone else using a tree trunk but I think it makes it look more realistic… when I first saw the cards made up, I thought weird, green clouds! lol
I used poppystamps Stitched Cloudline dies and die cut them and the grass borders from Taylored Expressions Granny Smith cardstock. I’m really happy with how they turned out!
I stamped her in the MISTI with Memento Tuxedo Black ink on Neenah Classic Crest Solar White cardstock and die cut her then colored her with Copic Sketch Markers. Hair E21, E43, 44, 47, Skin E000, YR000, E00, E01, R20, Shirt E02, 04, Shorts B 91, 93, 95, 97, Shoes T1,3, 5, Swing seat and rope E20’s, white space between the swing ropes is colored with B21.
I stamped the sentiment from the set in the MISTI with Black Archival ink.
My cardbase is Gumball cardstock from Bazzill or Taylored Expressions has it also. Links below…
Thanks for ‘swinging’ by today! Holler if you have any questions!
Here’s some links to stuff I used to make this card…thank you so much for supporting me and my blog! I appreciate it!
Hi everyone! Here’s what I’ve been doing so far this week. The new dies from Memory Box arrived and I got busy!
I’ve always liked sunflowers and holly hocks. I suppose because they look free spirited! haha
For this card, I used the NEW Brilliant Sunflower and added the square frame from the Splendid Rose Frame from this year’s earlier release. I LOVE how these mix and match!
I made a short video of how I emboss the detail in the sunflower head…watch it here or on You Tube.
I really like how embossing deepens the detail.
I inked edges with a little Gathered Twigs Distress Ink and the mini round ink blending tools.
I colored the center of the embossed yellow piece with color pencil and added white dots with a white gel pen.
Some quick die piecing in the corners….heat embossed sentiment is from the NEW Memory Box Big and Little Words clear stamp set. It’s made to coordinate with some of the other new dies too so you’ll be seeing it used a lot! yay!
Stamped with Versamark, in the MISTI stamping tool.
You brighten my day! It’s true!
I used the NEW Misti Cut Align tool to cut the sentiment strip… I REALLY like having that tool! Tools are everything!
Some enamel dots…
So then, cuz I had experimented and cut so many sunflowers in different colors, I decided to use the white cut!
I dry embossed the yellow flower head that’s behind the white outline die… I love how it looks, it just gives it a little roundness. I glue it just in the center so the petals can kinda look free-ish.
A Distress Oxide background in Fossilized Amber and Peeled Paint using the cheap make up brushes to blend it on the card-base. I’ll link to the ones the stamp company is selling but I’m using the cheap ones and love them!
A happy, cute card! 😀 We all need a little sunshine in-between rains these days!
The sentiment is from the same NEW set as above… I am loving this set! I had fun making these two cards!
Both cards are 4 ½ inches square. You could mail this size in an A6 envelope or a 5 inch square one.
Thanks for stopping by! Hope you’re enjoying the flowers in paper or in dirt!
Here’s the products I used to make these two cards…