All Occasion · Birthday · cards · Die Piecing · Distress Ink coloring · Embossing Folders · Flowers · Inlaid Diecutting · Memory Box · Poppystamps · Summer

Memory Box Gracious Floral 3D Embossing Folder Version…

Hi everyone!  Someone somewhere is celebrating a birthday and here’s some soft color wishes for you! A pretty card makes a birthday seem better somehow, doesn’t it?  Birthdays just keep coming at ya! ha!

I started out looking at my Memory Box plaid paper pads for a color scheme.  I used the Madras Plaid Blue and Violet PP104 6×6 pad without looking to see if it was still in the stores I link to.  OOPS!  Evidently it’s been discontinued. ugh.

I’m linking to the other three plaid pads in the stores that will make fun color cards too!

It’s hard to see the gold in my pictures so I took a phone picture in front of the upstairs hall door so you can see the gold.  Wish I could show you in person! I know, I know, I’m always saying that! lol

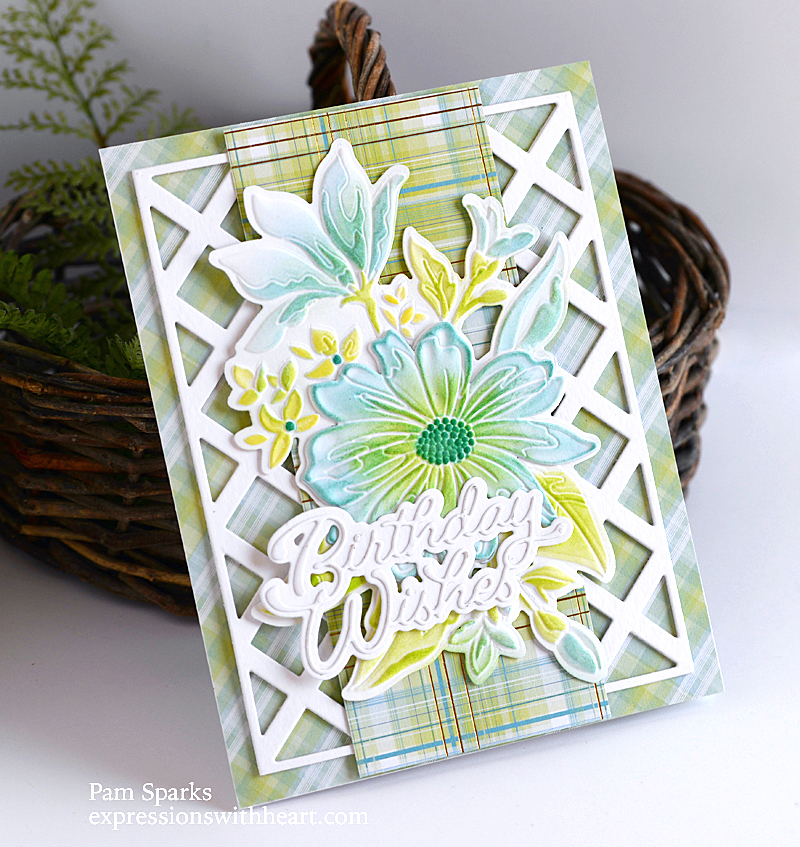
The cardbase for this card is 4 ¾ in. x 6 in. so it’ll need an A7 envelope.

I die cut the poppystamps Lattice plate in white three times and glued them together.  I just really like how it added just enough depth without needing to cut little strips of mounting tape.  I used Tombow Mono Multi sparingly to glue them together and to glue the lattice to the plaid panel.

Then I cut a piece of plaid with gold lines to layer on top of the lattice panel,  It’s 2 ½ in. x 6 in.

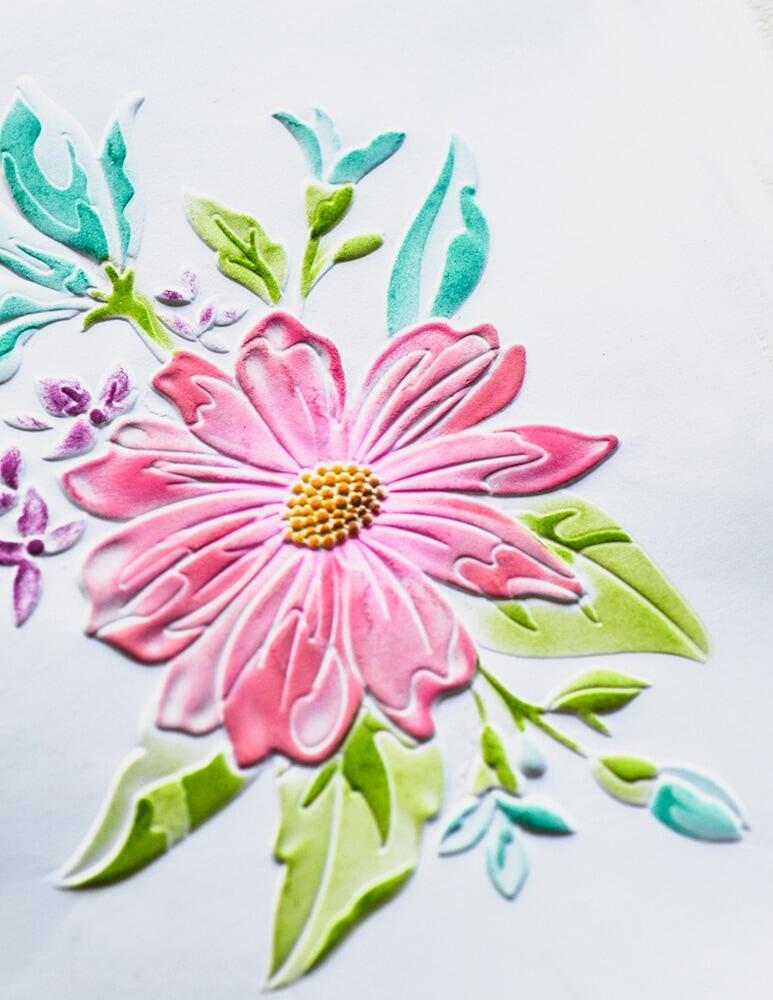
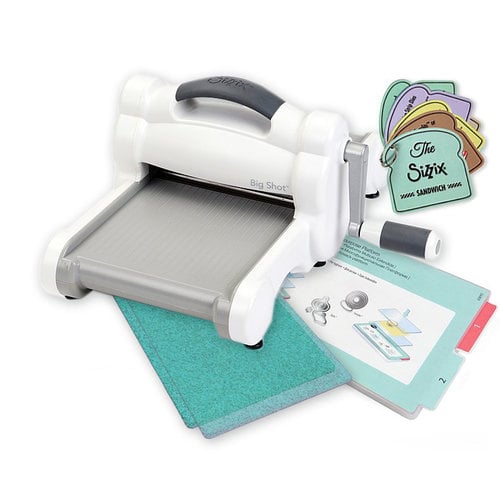
I used the die from the stamp set to cut a piece of white cardstock for the floral bouquet shape.  Then I put the die cut shape in the 3D embossing folder and ran it through the Big Shot following the directions for 3D folders.  (I do add a few cardstock shims for mine)

After I had the big bouquet embossed I die cut just the center flower from the 3D embossing folder set,  ran it through the same embossing folder, then started coloring both embossed pieces with the Stencil set, regular Distress Ink Pads and ink blending brushes.

I’m having fun making cards with these products!  I haven’t inked the stamp and embossed it in the 3D folder yet but I think that would be beautiful too!

If you want some new products to create with on these hot Summer days when it’s better to stay inside in the AC…this release is just the thing you need!

When you tap or click on my links to see these products you’re going to get a surprise!  Cindy@Starlitstudio has been VERY busy and her new store is up and running with new products being added again!  Yay!  So excited!  It’s beautiful!  Be sure to click on the STR abbreviation to check it out!

Thank you so much for stopping by and happy cardmaking to you!


Memory Box – CL5280D Gracious Floral…
[ STR | SSS | SSS ]
Memory Box – 88620 Gracious Floral…
[ STR | SSS ]
Memory Box – EF1026 Gracious Floral…
[ STR | SSS ]
Poppystamps – 2427 Lattice Plate…
[ STR | SSS ]
Poppystamps – 2523 Birthday Wishes…
[ STR | SSS ]
Memory Box – PP1013 Madras Plaid…
[ STR | SSS ]
Memory Box – PP1021 Magnolia Plaid…
[ STR | SSS ]
Memory Box – PP1012 Spring Plaid 6×6…
[ STR | SSS ]
Scrapbook Adhesives Crafty Foam Tape…
[ STR ]
Tombow Mono Multi Liquid Glue
[ STR ]
Fiskars Non-Stick Titanium Softgrip…
[ STR ]
Ranger Ink – Tim Holtz – Distress Ink…
[ SBC | SSS ]
Ranger Ink – Tim Holtz – Distress Ink…
[ SBC | SSS ]
Ranger Ink – Tim Holtz – Distress Ink…
[ SBC | SSS ]
Ranger Ink – Tim Holtz – Distress Ink…
[ SBC | SSS ]
Waffle Flower Crafts – Blending Brushes
[ SBC | SSS ]
Simon Says Stamp Small Detail Flat…
[ SSS ]
Simon Says Stamp Blending Brush SET…
[ SSS ]
Hammermill WHITE 100 LB SMOOTH…
[ SSS ]
Bazzill Card Shoppe
[ STR ]
Sizzix – White and Gray – Big Shot…
[ SBC | SSS | BLIC ]

All Occasion · Die Piecing · Memory Box · Shopping · Simon Says Stamp · Summer

Simon Says Stamp Out of This World Release Card and SALE!


Hi Summer lovin’ friends!  Scorcher here…just in time for fireworks!  Some orange heat happening on my cards with the NEW Mid Century Ethereal Plate from Simon Says Stamp Out of this World Release!

I did some puzzle work with it!  I die cut it in four colors of cardstock and then in white cardstock one time for this first card where I inlaid the pieces.

No rhyme nor reason…I tried to come up with a plan for this shape and that color but it just didn’t work out.  So random it is on all four!

I used two strips of wide scor-tape on the back and inlaid the pieces right in. It’s really fun and enjoyable!  I was surprised!  So I kept going!


The next two cards, I put a die cut frame with peel and stick on the front, face down and added in the pieces right side down.

Then I put a mounting foam square on the back of each shape. Turned the panel over and stuck it to a white A2 card panel.  (If I’d been thinking, I could’ve mounted it directly onto an A2 cardbase.)   Then I pulled off the peel and stick and the die cut background panel I’d used to position the shapes.

I like them popped up like this a lot too.  For some reason the camera kinda blurs them out.  Maybe my phone pictures are better, I’ll add some.

I used sentiments from the NEW Memory Box Gracious Floral Clear Stamp Set.  Stamped and die cut…stamped and heat embossed.  I used a different one on each card.

For this card, I layered the four colored panels that I’d used the shapes from so it’s like a deep frame with the shapes down in.  I hope it shows that in my pictures.

They really turned out nice.  Wish I could show you in person! lol  A fun addition to my stash!

Here’s some more pictures….I took a lot with my Nikon and my phone!

Thank you so much for stopping by!  I love hearing from you and appreciate your comments so much!

Take care and Happy 4th of July!

HERE’S the SALE info I wanted to share if you haven’t already been shopping!

All Occasion · Birthday · Die Piecing · Shape Cards · Spellbinders dies · Summer

Spellbinders Large Die of the Month Club Shape Card…

Hi everyone! An awesome shape card to share with you today!  These club sets are so creative and fun!  Lots of examples from other cardmakers for inspiration too!

This is all dies!  Just cut, glue together and stick to the card!

The perfect Summer day to be underwater! haha The detail is amazing!

Fun to use my white gel pen and white glaze pen for his spots.  A few white gel dots on the rocks too.

So much fun to be had playing with Spellbinders monthly kits…you can check them all out HERE.

The other sentiment that will cut into the tag is HI.  Nice to have choices!

Thanks for hanging with me through three blog posts today!  I appreciate it!


All Occasion · Birthday · cards · Die Piecing · Distress Ink coloring · Embossing Folders · Oxide Inks · Spellbinders dies · Summer

Spellbinders June 3D Embossing Folder Club of the Month Card…

It’s me again! lol  Embossing folders are so much fun!  For this one I inked the smooth side with Vintage Photo Distress Oxide ink, cover it well or like me, I did it three times.  It might shift a little, kinda shows in my photos but in real life you don’t see it as much. I didn’t even notice it until after I took pictures!

After embossing I brushed over it with Antique Linen Distress Oxide ink, then some gold rub on stuff then some Peacock Feathers and Worn Lipstick Distress Oxide Ink!  It was white cardstock to begin with!

I used one of the sentiments from the April Large Die Set of the Month… they kinda look like cookies! lol

Check out all the Spellbinders Club sets of the Month HERE!    Holler if you have any questions!


All Occasion · cards · copics · Die Piecing · Distress Ink coloring · Interactive · Mini Slim Card · Spellbinders dies · Summer

Spellbinders June Die of the Month Set – interactive card…

Hi everyone!  I have three Ocean/Near the Sea cards to share with you today!  So THREE posts!  I know!  Annoying to get three emails but I promise that I have never done this before and probably will never do it again!

Here’s a short video of the tricks this octopus and squid can do!  It can go faster motion but the video going fast did not look good!

This is a mini slimline size.   I’m so tickled with how it turned out!

The background is just my Distress Oxide ink blending brushes on a piece of Hammermill color copy cover cardstock 100#.  I used my peacock feathers brush and my brush for greens.  I think it looks real watery! lol  My brown brush on the bottom.  No added ink for any of it, just the ink left in the brushes.

I colored the squid, starfish and seaweeds with Copic Markers.

Water you up to sentiment is from the Spellbinders Clear Stamp and Die Set of the Month for June!  A super cute set!

So the details for obtaining the Spellbinders Club offers each month is HERE.  So fun!  Huge sets and fun creating!

Thank you so much for stopping by and I’d love it if you checked out my other two posts for today too!  THANK YOU!