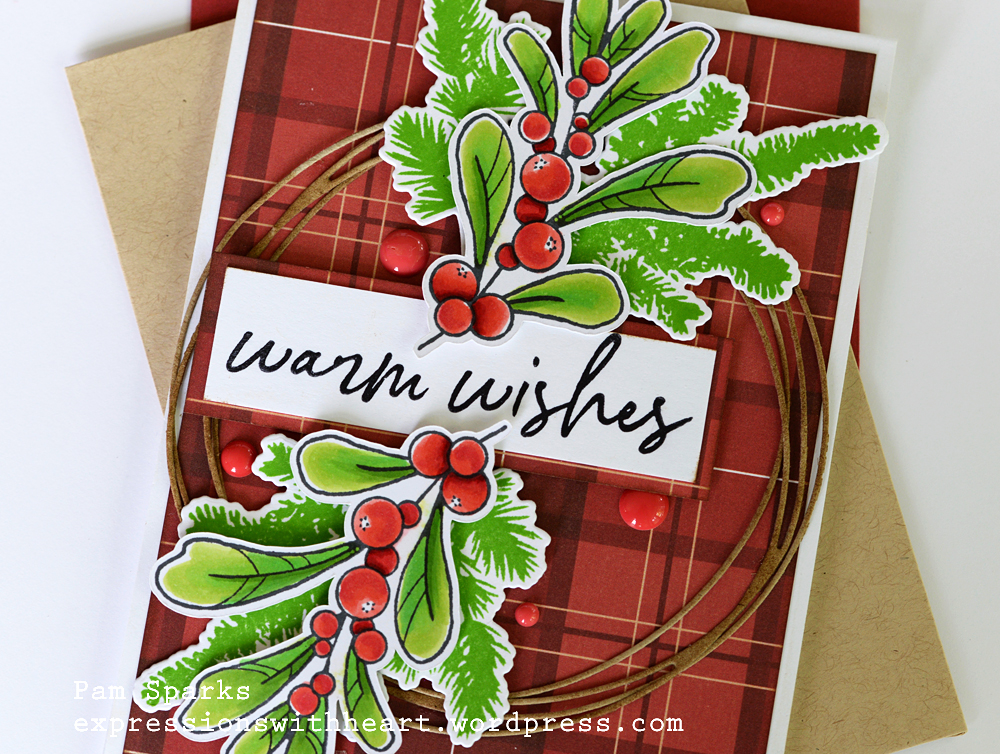
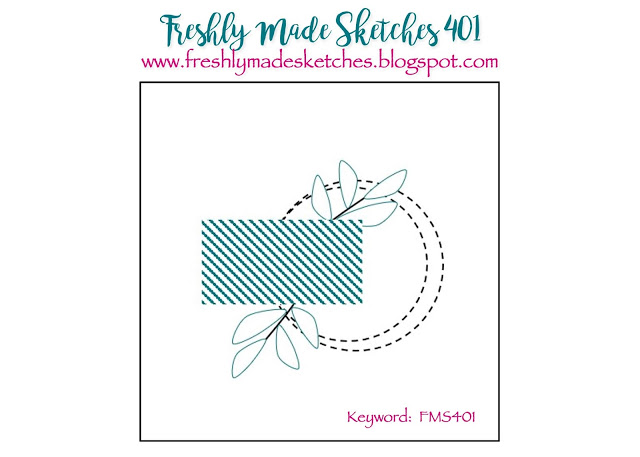
Hi everyone! Pull out some plaid and stick on some greenery! I was inspired by the sketch on one of the current card challenges, link at the end of my post.
I die cut two of the circle from the NEW Stylish Frame Trio set, in Taylored Expressions Toffee cardstock. I inked them a little with Gathered Twigs Distress Ink and the mini ink blending tool. I just kinda ‘stomped’ color onto them.
The plaid is from a couple years ago…I’ll try to find some current plaid to link to.
I stamped 4 of the smaller branch in the NEW Mistletoe Swag clear stamp set with Memento Tuxedo Black ink on Copic x-press it coloring cardstock using the MISTI stamping tool. There aren’t any dies for this stamp set so I used my scan and cut machine but you could easy cut them by hand. I like to cut by hand but the S and C works really nice with the grandkids…I can’t cut fast enough for them! lol
I colored with Copic Sketch Markers…some bright greens! YG03, 06, 09 and 17. The berries are R14, 17, 29 and 59.
I stamped up a bunch of branches from the NEW Winter Greenery stamp set using Lawn Fawn’s Jalapeño ink pad. Then I die cut them all out with the coordinating dies. They matched up and cut really easy and nice. I have some left over for a couple more cards!
The ‘warm wishes’ sentiment is from the Winter Greenery set also… I love this scripty font! So festive! I cut the sentiment with the MISTI Cut Align Ruler and the plaid mat behind it with the ruler also.
Here’s the sketch I was talking about…fun cards/inspiration!
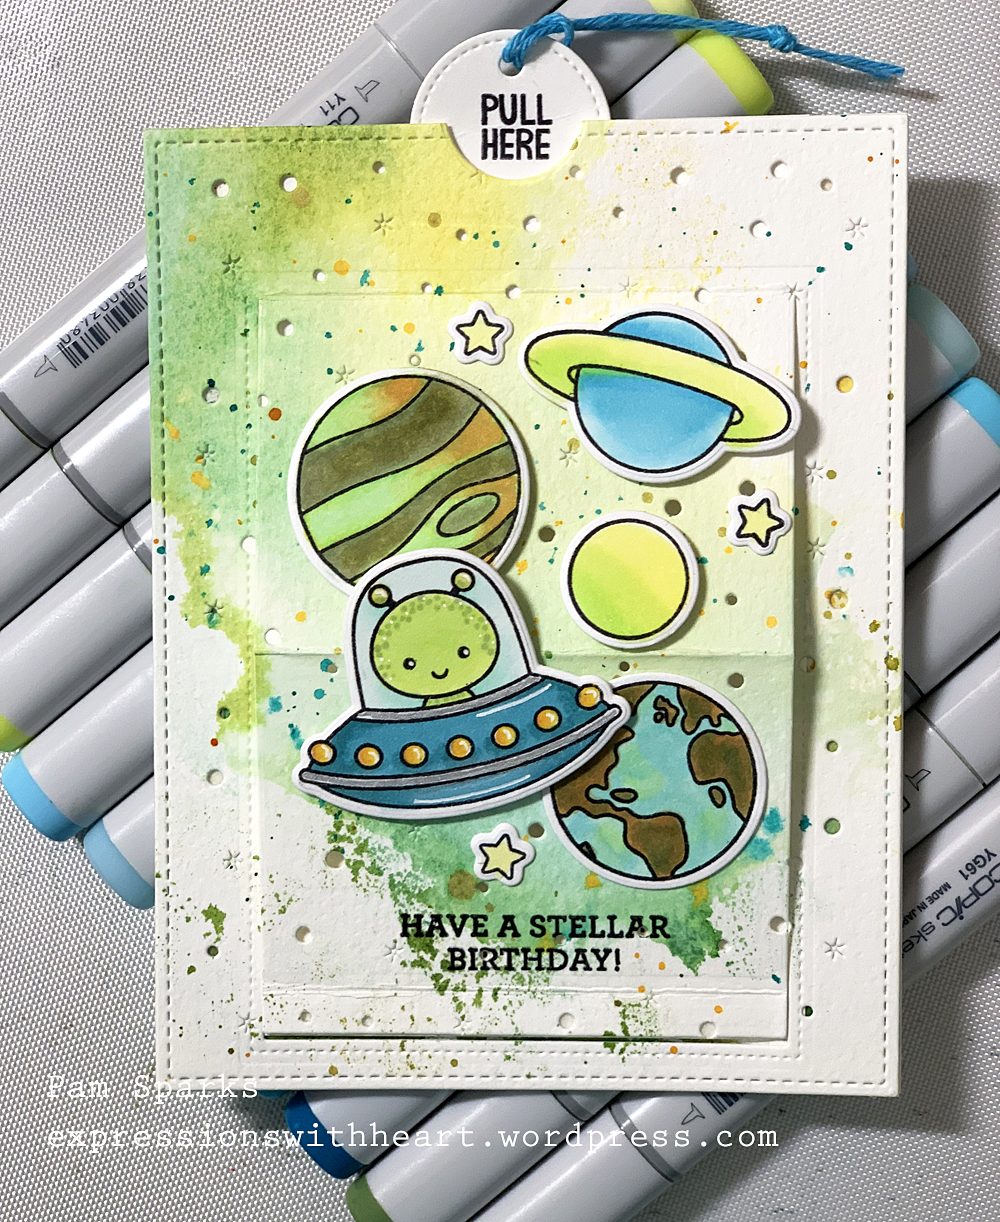
Hi everyone! I have a cute card for you today! This alien has landed at the farm and demands cake! This card was for our grandson Cedryk’s 7th birthday. He loved it!
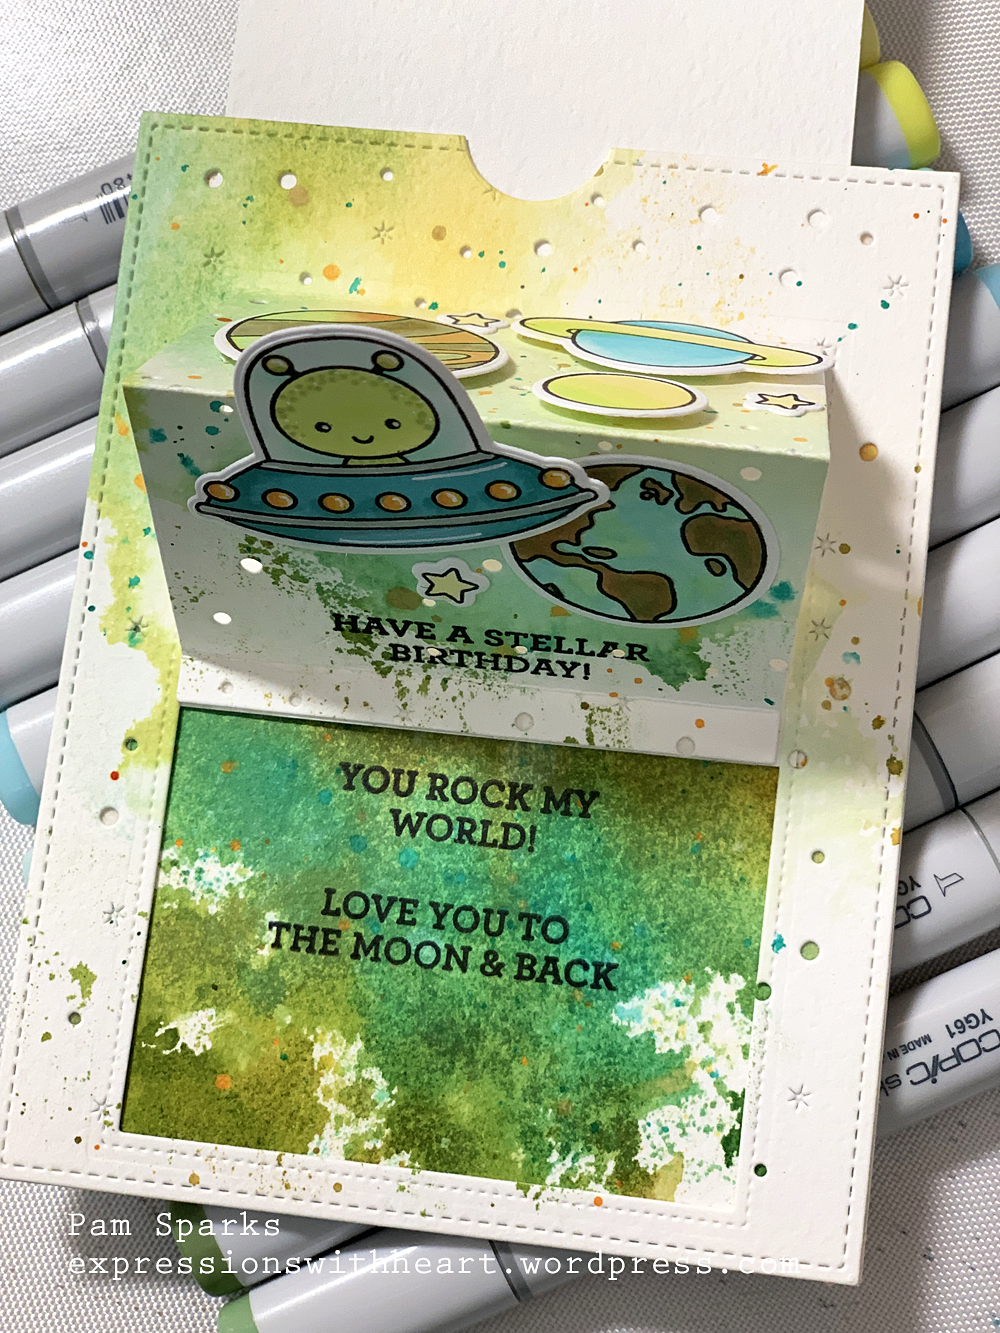
Pull the tab at the top up and the cake rises into the space ship! I have a little video showing how it goes. If you pull the tab out, it’s no problem, just stick it back in and the cake will stick to it again. The cake piece comes off the card. Really cute and so fun!
I stamped with Memento Tuxedo Black ink and colored with Copic Sketch Markers. I inked the grass in the front with Distress oxide inks.
The characters are from the Lawn Fawn Beam Me Up stamps and die set. The farm background is from a clear set by Miss Ink Stamps. I’ll link them up below…
A weird angle to see that I glued the piece of die cut vellum to the bottom of the spaceship.
A little closer to see the cake behind the vellum…
Have you ever seen cuter aliens? haha They seem to like birthday parties! lol And they bring presents! Gotta love that! haha
The inspiration for the slider is from a video I saw on Simon Says Stamp blog HERE.
I stamped the sentiments on black cardstock with Versamark ink and embossed them with Lawn Fawn White embossing powder. I used the MISTI Cut Align Ruler to cut the strips. So far I like it a lot!
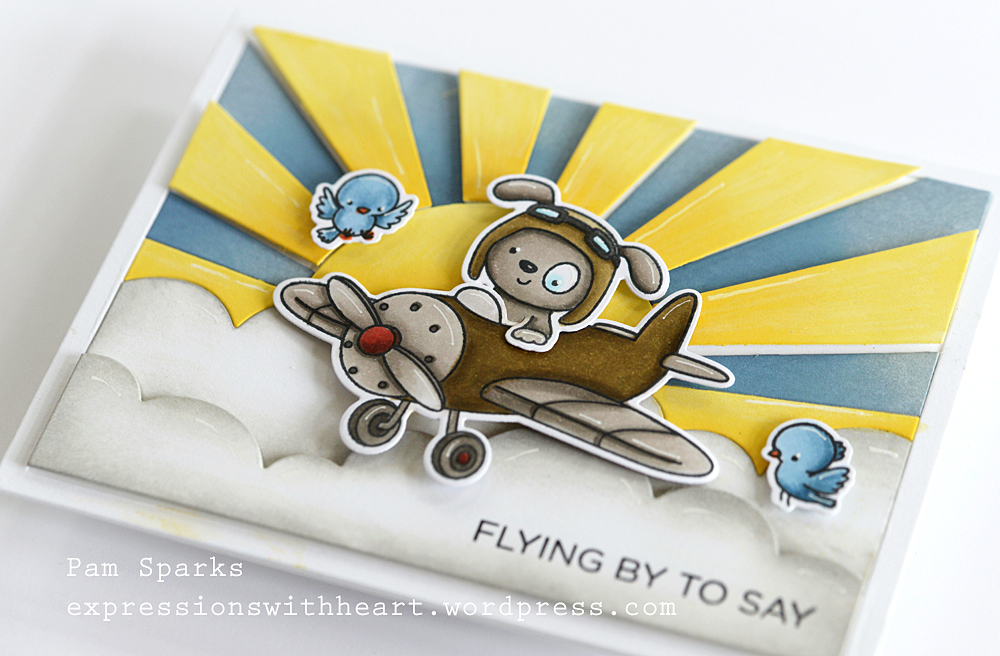
So this cute little pup found an old army plane. hehe Mercy this stamp set is CUTE! I had fun making this card for our grandson Corrin… 10th birthday for him already! Man, these kids grow up fast!
I die cut in white…stamped in Memento Tuxedo Black in the MISTI or TH Platform, can’t remember which… I use them both all the time… and colored with Copic Sketch Markers.
A TIP for you if you buy this Sunshine background die…emboss the die on a panel so you have something to go by for placement. This is a die that all falls apart when you die cut it. So like a puzzle, you need the impression in a panel so you know how to put it back together, like a puzzle!
The Sun and rays are ink blended with Oxide inks. The edges of the clouds with regular Distress ink.
A little white gel pen and the sun and bottom cloud layer are mounted with foam tape.
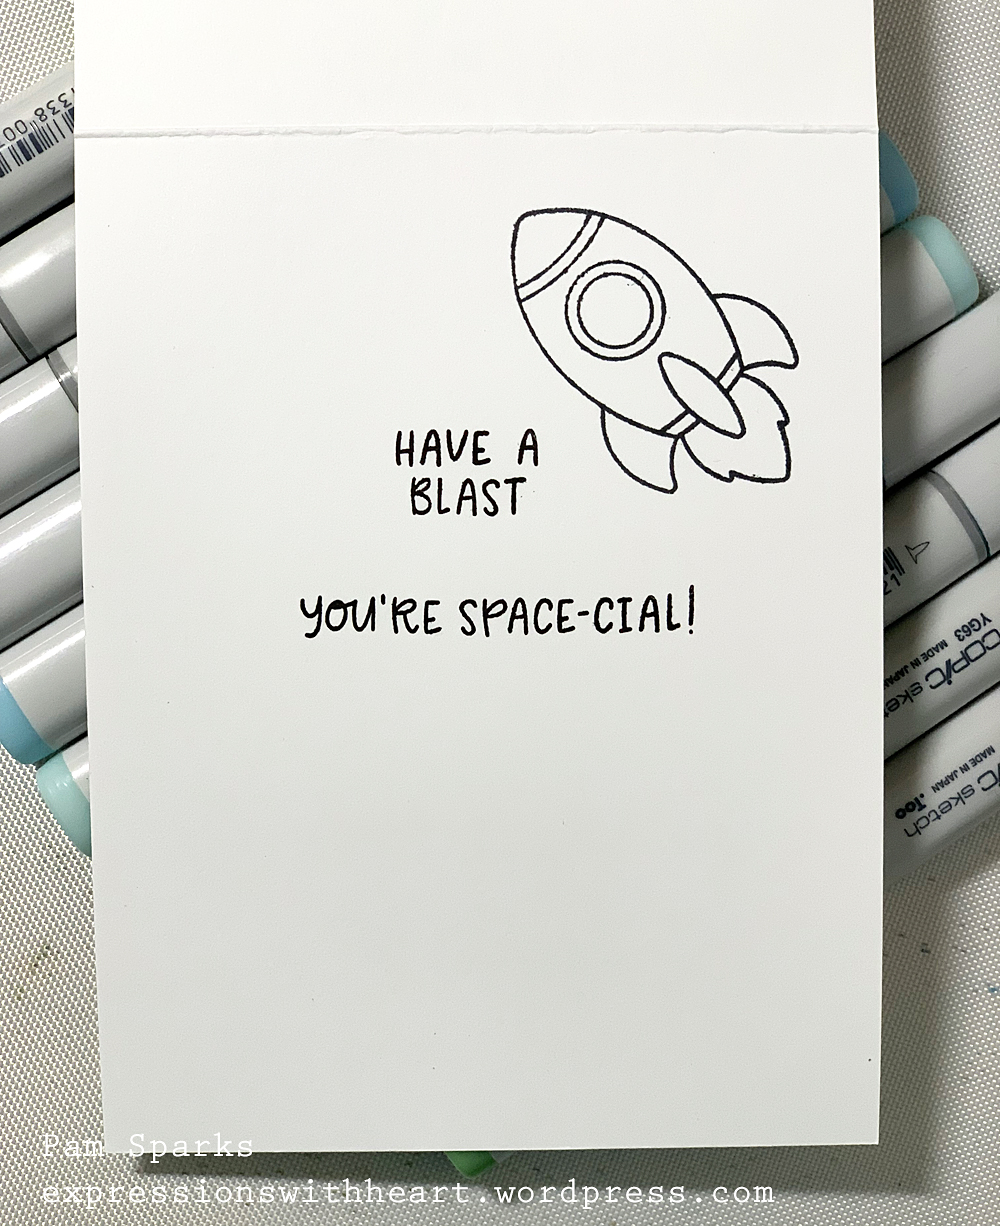
A fun message on the inside…
Before I sign off… I’ll be back tomorrow with my cards for this new Simon Says Stamp release but I wanted to go ahead and link it up today in case you haven’t seen it yet! 😀
Some neat things for every kind of card you might need this time of year! New stamps and dies… dies to go with previously released stamp sets too! So check it out!
Then… there’s THIS! CHRISTMAS IN JULY at Scrapbook.com!!! Through July 29th… details HERE
and here’s what I used to make this cute Maverick card!
I finished up a couple birthday cards for boys. I love how this one turned out.
The backgrounds here are the 2nd and 3rd generation prints from my smooshed background I used for the flower card in my last post!
I stamped and Copic colored on Strathmore Mixed Media cardstock this time. I don’t know why but I liked it fine for coloring. It’s fun to try something different now and then. lol
I stamped the sentiments with Ranger Archival Black ink. I forgot to color the rocket! oh well, maybe Rogan will color it when he gets it! lol
It was fun… years ago I made this type style in card size and ATC size. I should’ve found the ATC size and taken a picture of it! Wonder how long that would’ve taken… lol The collection is so huge from the years I made and swapped. So many treasures!
Thank you for stopping by! Hope your Summer isn’t melting you wherever you are! It’s so hot and humid here…so thankful for AC!
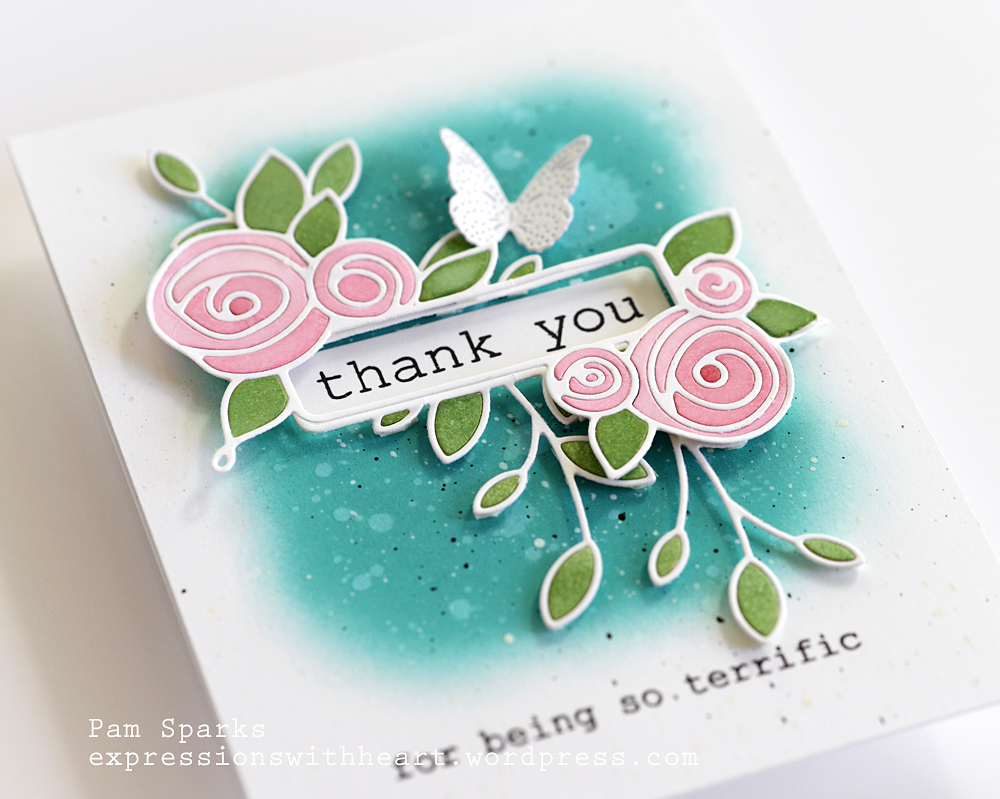
Hi eveyone! Are you enjoying the NEW Memory Box release this time? So many fun flower dies! yay!
Today I die cut everything in white and colored the pieces with Copic Sketch Markers. The flower pieces from the Antique Corner Rose Label die are colored with R81, 83 and the center dots on the two largest with R85. The leaves on both the Antique Corner Rose and Antique Leaf Label die are colored with G24.
I pieced the dies together with the right side face down so I could put mounting tape over the back sides. Small pieces…I always check to make sure there isn’t any hanging over and if there is, I trim from the front and cut the excess at a slant so it doesn’t show. On this one, I left the pieces hanging over on purpose so they’d catch the frames, then trimmed them all… works great!
I used the medium size of the new Pinpoint Butterfly Trio and left it white!
I stamped thank you and terrific from the new Big and Little Words clear stamp set on the label using the MISTI with Ranger Archival black ink.
I ink blended a background with Distress Oxide Peacock Feathers ink. I started out with the mini ink blending tool but then changed to the make up brush oval type brush to get the edges feathered out better.
Spattered it with water, dried it with the heat tool, spattered on some Hero Arts White Watercolor paint, then some black paint, drying in-between colors.
I’m really happy with it and will close with telling you all thank you for being so terrific! Cardmakers are the best!
It’s a sunshiny day here! A rare thing this Spring. Maybe I can get out for a walk! Take care and thanks for stopping by!