Birthday · cards · CAS · Class · Classes · Die Piecing · Memory Box · Poppystamps · rubber stamps

Memory Box and poppystamps Sunflower Card…

PamSparksPSsunflower

I really had a lot of fun creating this card!  I LOVE the poppystamps Bountiful Sunflower die!  I used it here with the Memory Box Toulouse Background die (trimmed off the flower head), the Memory Box Honey Comb Stencil, the Memory Box Happy Birthday Combo stamp and the poppystamps Bountiful Sunflower Background die.

I inked the front of a Memory Box Jack o Lantern A2 Notecard with the Honey Comb stencil, Wild Honey Distress ink and the mini Round Ink Blending tool.


PamSparksPSsunflowerClose

Remember this card and video?

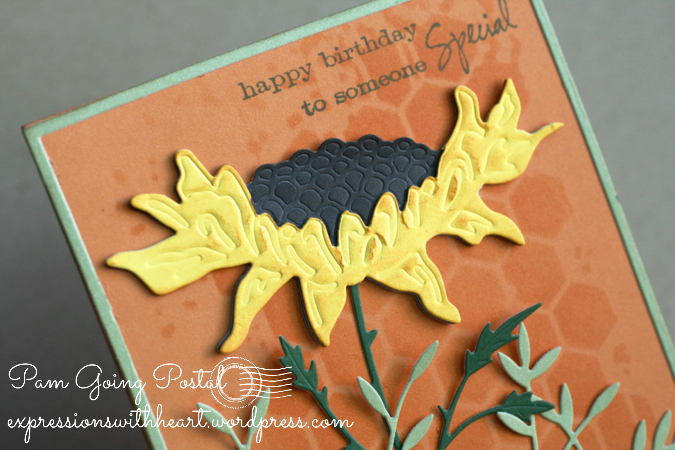
I took the background piece and put it in the outline die, ran it through the Big Shot to emboss the detail into the background piece, that’s what I did here too… LOVE this look!

Then I inked the edges a little with Wild Honey Distress ink and the new mini Round Ink Blending Tool.

There is ONE big difference though… see it?

Instead of putting the background behind… I put it on top!

When I die cut the Bountiful Sunflower outline die in dark brown, I made sure to keep the seeds in the die and inked them with Walnut Stain Distress ink and the mini Round Ink Blending Tool.  TIP – to make sure the seeds stay in after you remove it from the die…tape them on the back side with scotch tape.

Then here is a card I made to show how you would normally think to cut this die and use it…

PamSparksBountifulSunflower

Only instead of lining up the background piece exactly, I decided to place it ‘off’!  I like it a lot this way!  YAY!

PamSparksBountifulSunflowerClose

I inked the edges of the Memory Box Kraft A2 Notecard with Walnut Stain Distress ink, stamped the Journey Collage stamp in black and ended up with a CAS card I’m really happy with too!

New Grandson and Mama are doing great!  Thanks for stopping by!

Still time to link up to the give a way… scroll down…

Supplies I used for these cards…

Baby · Birthday · cards · Give away · Memory Box · Patriotic · Video

Memory Box Star Garlands and a Giveaway…

PamSparksStarGarlandsUSA

I LOVE this NEW Star Garland die!  So wonderful, die cut from Silver Glitter card-stock!  I love the ‘broad stripes and bright stars’ here… I know…now the song is stuck in your head for hours! lol  It’s a good song!

PamSparksStarGarlandsUSAClose

A close up… I used the happy and birthday cloud dies cut from Memory Box Sapphire card-stock and the Classic Uppercase Alphabet set for USA, cut from Memory Box Cranberry card-stock.

The stripes are ¾ inch strips, 4 ¼ inches long, glued on about a ½ inch apart on a Memory Box White A2 Notecard.

It’s ok,  go ahead and bust out singing!  ; )  Oh say can you see…by the dawn’s early light…

The next card…well… it’s kinda birthday in a ‘birth’ day kind of way!  Welcome Baby!

PamSparksStarGarlandsBaby

Here’s the Star Garland die again but I only used half of it.  I ‘hung’ the words in space using the Parker Lowercase Alphabet set and the Alphabet Soup set. So cute!

Memory Box Baby Carriage die, Baby Stuff and the rug is from the Palace Oval Frame Set.

I used a little RV21 Copic marker on the rattle and the center of the carriage wheels.

Dies glued and mounted to a Memory Box Cherry Blossom A2 Notecard.

Won’t this die be awesome for Christmas?!!!  YAY!

NOW for an Awesome Giveaway!  (USA only)
I have a Sizzix Flower Making Tool Kit to give away! (not just for making flowers!!!)

sizzix-flower-making-tool-kit-3.gifretail value $35

Sponsored by Cindy from Starlitstudio.net

Link up below with inlinkz … up to five times…

1. link up
2. link up again for following my blog or if you already follow  (links on the top right)
3. link up again for liking my FB Page or if you already liked it
4. link up again for subscribing to Starlitstudio’s blog (Cindy’s gorgeous creations, sales and coupon codes)
5. link up again for subscribing to my You Tube Channel or if you already subscribed (in case you didn’t see the sad news about it being deleted by Google)

Link up will close next Saturday, June 7th at 9 a.m. CST

Click on the frog to add your links, or leave a comment here and I’ll add you to the draw

CLOSED


Thank you for supporting my blog and shopping at Starlitstudio. good luck!  Winner will be random.

Glad you stopped by and hope you’re still singing a long with me!  waaaahhhh… hahaha

Supplies I used (dies in stock! yay!)

Birthday · cards · Die Piecing · Memory Box · Poppystamps · Summer

Memory Box… NEW! NEW! NEW!

PamSparksYellowKensingtonHalfCircle


MORE of what we love!  Memory Box dies!  YAY!  The 2014 Summer Release!  I’m whispering here… but you know…the Holiday release will follow soon after!  YAY!  I love Christmas!

For this ‘yellow’ card I used the NEW Thank You Garland, Delicate Butterfly Arch, Solid Arch Background, Kensington Branch (I trimmed out two of the butterflies, cut them in white and yellow) from the NEW release and the Peaceful Butterfly Wings from the Spring release.


PamSparksYellowKensingtonHalfCircleClose

Add some baby white pearls and I was done.  Oh,  I did cut the Butterfly Wings twice so I could trim out a few butterflies and layer them over the ones close to the border of the Arch cuts.

❤ ❤ ❤ ❤ ❤


The next card was really fun too!  I used the NEW Fancy Potted Flower and Happy Birthday Garland.


PamSparksBirthdayPot

It just makes me happy!  It almost makes me think I could be a flower gardener!  NOT.  Bummer though.  I do have one hanging flower this year and it’s still alive!  woohoo! lol

Look at the potential with this die!  Use it as it cuts… the flowers in the pot… or trim the flowers out and use them as a row of flowers in the grass,  I love this! Or trim off the flower heads for ground cover!  Sweet!  Of course I had to do all three!

TIP!  Leave the petal pieces in the die and use the Pick up tool (linked below) to place them directly from the die…then you know right where they go!  Great time saver!


PamSparksBirthdayPotTopClose

Love these garland sentiments!  I did cut them three times and glued them up with Tombow Mono Multi.


PamSparksBirthdayPotFlowersClose

See that sprig of green in there?  That’s from the Fabulous Phlox die… love it!  Fresh Cut Grass die from poppystamps!

Memory Box Signature Pattern paper, Notecards and Card-stocks.  Both cards are A2 size.

I’m so excited…can’t wait to show you some more cards!  I’ll be back tomorrow!  Thanks for looking!

Supplies I used to make these cards…

Birthday · cards · CAS · Die Piecing · Memory Box · Perfect Layers Tools · Poppystamps · rubber stamps · Spring

Memory Box Glorious Gerber Daisies and Kensington Border cards…

PamSparksGloriousGerbersKraftPurpleGreenCLOSE
Glorious Gerbers indeed!  I love these flower dies from Memory Box!  I will be posting later next week about the Great Yosemite Stamp Escape but in the meantime, here’s a couple cards I made up while working out what cards to teach.
 
PamSparksGloriousGerbersKraftPurpleGreen


I pieced in the Distress Dots Memory Box Signature pattern papers for the flower petals.  I like to leave the pieces in the die and use the Quikstik to place them them in the holes, easier to keep track of the pieces and faster too!

Memory Box Kraft A-2 notecard for the base, edged with Distress ink and the ink blending tool.

Just can’t get enough of the Kensington Border die!  Love it!

I inked up just the ‘happy birthday’ words from the Happy Birthday Special Combo stamp and stamped them on the poppystamps classic ribbon border die and layered it up.
Here’s a little bit different version…


PamSparksGerberKensingtonDistressDots

and since I couldn’t decide if I liked one photo better than the other…


PamSparksGerberKensingtonDistressDotsSide

Some little purple baby pearls on the border die cut, wish I’d remembered to do that on the first card before photos! lol  If you don’t have purple, you can always color white ones with your Copic markers!

Hemp on the first card and Lawn Fawn trimmings on the second.

THANKS for visiting today!

Supplies I used on these cards…

Birthday · cards · CAS · Die Piecing · Impression Obsession · Memory Box · Perfect Layers Tools · rubber stamps · Techniques · Tutorials · Winter

NEW Memory Box Darling Poppies die and Impression Obsession dies…

PamSparksDarlingPoppies

Another NEW die from the  Spring and Summer release, called Darling Poppies I love this sweet image and thought it’d make a great CAS just thinking of you today card.

PamSparksDarlingPoppiesClose

Here’s what I did…

Die cut the Darling Poppies die in the front of an A-2 size white notecard. You will need to keep a few of the white pieces to put back in.

Then die cut the Darling Poppies die two more times from Memory Box Meadow Green and Cranberry card-stock… by the way, die piecing is a great way to use up scraps!  YAY!

Turn the white card with the die cut hole over so the back side is facing up.

Place the green outline cut in the hole right side facing down.

Then put in the larger white piece that is between the stems, right side down.

Then using scotch tape or packing tape, tape over the back so there will be sticky on the front.

Turn the white card front, right side up.

Finish filling in the spaces with the flower petals and the three white teeny pieces.

End result…a lovely notecard to ‘snail’ mail!

*** Linking to…
The Paper Players Challenge – Clean and Simple Spring
Cards in Envy – Anything Goes with an A2 size card

❤ ❤ ❤ ❤ ❤

I’ve had these two Winter cards waiting for me to just glitter the trees and finish!!! ugh.  I don’t know why I procrastinate getting the glitter out!  I got all these trees glittered without making a terrible mess!  YAY!

Anyway,  I needed a Winter scene swap card for stamp club last Friday…our January swap theme was a Winter Scene card but we had to cancel our January meeting because of the below zero cold.  Then we had to cancel our February meeting because of snow!  March is our catch up month… so finally… the two dreaded glitter cards are done and it wasn’t so bad after-all!

What a bummer though… can you see the glitter in the photos even?????  grrrrr… lol

PamSparksSleddingIOTreesGlitterScene

Love this sweet sledding die and snow laden tree dies … from Impression Obsession…links below in the supplies links.  Background stamp is from Hero Arts and the sentiment from Papertrey Ink.  Layers cut with my Perfect Layers Tools and Mat… links below or in the sidebar.  Videos about them under the header.

*** Linking to…
The Card Concept – Clean and Layering, Create a birthday card

❤ ❤ ❤ ❤ ❤

PamSparksIOWinterSceneFront

Same trees and stamps again and added the Impression Obsession bunnies.  Ranger Black enamel for the eyes.

PamSparksIOWinterSceneClose

The glitter I used is Winter White from the Art Institute Glittering System.  I put sheets of double sided adhesive on my card-stock before I die cut the trees.  After they were die cut, I peeled off the protective sheet, poured glitter on them, layed a scrap paper over the glitter and rubbed it in.  Shook off the extra glitter and put it back in the jar.  It’s a really fine, pretty glitter.

Oh, the hill die cuts are from Papertrey Ink.

*** Linking to…
Simon Says Wednesday Challenge – Glitter it!

Whew… back to flowers and Easter now! Thanks for stopping by and I’ll talk to you later!

Supplies I used on these cards…

Impression Obsession trees, sled and bunny dies are also in stock HERE at Dies R Us