Birthday · cards · copics · Die Piecing · Memory Box · Spring

Memory Box Spring 2015 Release…


PamSparksEnglishRoseBouquetWindham700


Hi everyone!  I’m posting today on the Memory Box blog HERE.  It’s time for the Spring 2015 Release Blog Blitz!  It started on Monday and goes through Friday.  Comment on the blog posts there for chances to win!

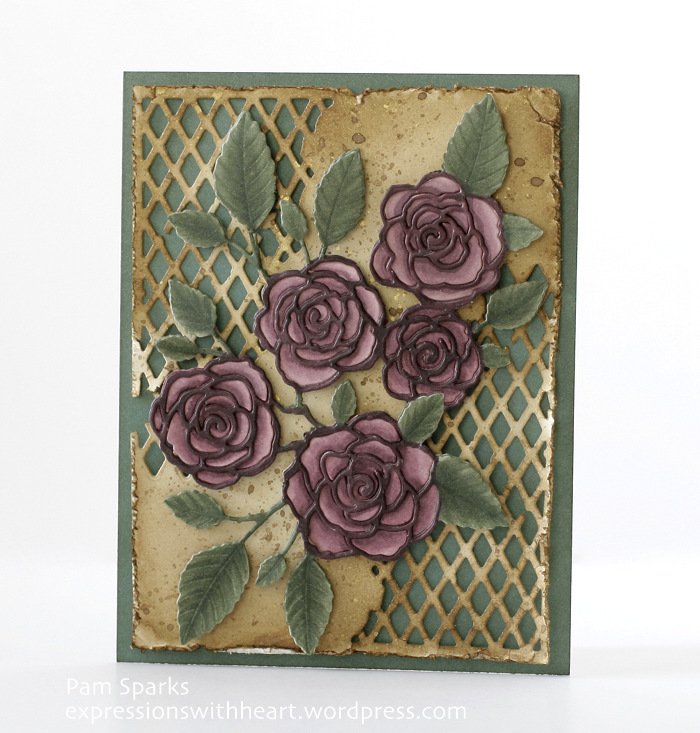
For my card today, I die cut one of the corners from the NEW Open Studio Distressed Windham Collage die set twice.  Once in the upper left corner and then again in the bottom right corner of a 4 in. x 5 1/4 in. piece of parchment card-stock. I distressed the edges with a Tim Holtz paper distresser tool.  Then I inked most of the piece with Gathered Twigs Distress ink and a mini round ink blending tool. I spattered with Walnut ink and Metallic Gold spray ink.


PamSparksWindhamEnglishRoseClose


I die cut the English Rose Bouquet die in Parchment card-stock and colored it with Copic Sketch markers. The flowers are the RV 90 series and the leaves are the BG 90 series.


I hope I can explain what I did without it being confusing.  Here goes…

* I leave the rose cut in the die after I cut it, this is one time I hope the pieces stick in the die (if any of the pieces come out I stick them back in the die)

* With the wide yellow frog tape (painters tape), I put pieces of the tape over the die cut card-stock  I left in the die (tape goes adhesive down on the wrong side of the card-stock and extends over the edges)

* Now I remove the die cut from the die and all the pieces stick to the frog tape

* Take the outline part of the die off the tape and color it

* The flower petals I left on the frog tape and colored

I know, this is getting long…do you want me to carry on?!  : )  ok!

* After coloring lay your outline die cut wrong side up and put mounting squares all over it in strategic places so they will be overlapping all the lines.  I cut mounting squares in half for this and yes, it takes a lot but it’s worth it!

* Now turn your colored outline die cut right side up and you’re ready to place all the colored petals into the rose outline.  The rose petals will all stick to the mounting squares.  YES!

*  Add mounting squares to your leaves and place it on the background piece

* Add mounting squares to the background piece and place it on an A2 Juniper notecard


Here’s the inside!


PamSparksEnglishRoseBouquetWindhamInside


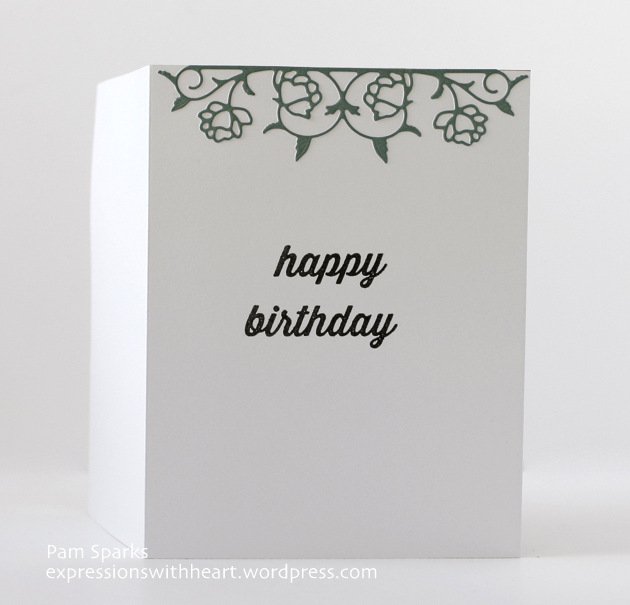
I die cut the NEW Pennington Rose Border die in Juniper card-stock, glued it to the top and  stamped the words, happy birthday from the NEW Party Time stamp set.  

Lots of NEW stamps!  Clear sets, wood mounted and cling!  YAY!  HERE

It’s been a lovely Spring so far in Iowa!  I love this cooler but not cold weather!  I just got a new bike!  So excited! Now to get the sound fixed on my computer… ugh…but how can I go without it?!  I know, a video would’ve been a whole lot easier than explaining this card! lol

Happy Wednesday!  TTYL!

Avery Elle · Birthday · copics · Easter · Reverse Confetti

Birthday card and Easter Baskets…


PamSparksLanes13thBirthday


Hi everyone!  I was so excited to get this stamp and die set from Avery Elle!  Perfect for boys of any age!  The sentiment is stamped on vellum with pigment ink and embossed with clear powder.  The clouds are stamped and inked with Tumbled Glass Distress ink and the buildings are colored with Copic Sketch markers.  A row of chevron washi along the bottom.  I was happy with it and Lane liked it too!  The grandkids are growing up so fast!  This is grandson #2 turning 13!!!  Whoa!

Linking my Birthday card to…

Virginia’s View Challenge #14 – Layers and Dimension


PamSparksEasterBaskets2015ALL


We’ve got grandkids!  Anyone have more than us?! lol  We have 17!  lol  We have so much fun! They range from 15 years old down to 2 months old.  Happy gram!  Saturday I made Easter baskets and Tim filled plastic Easter eggs with dollar bills.  Here’s the box with all 17 baskets  ready to pack in the car for the hunt.  The kids loved them and wanted to keep them too!  YAY!


PamSparksEasterBaskets2015Glory


The girls baskets were lilac with light green tags.  The paper ‘carrot’ is a scallop circle taped in a cone shape and a couple poppystamps  die sprigs stapled with the tiny attacher for the carrot top!

I filled little zip lock bags with ‘Sundrops’. So cute!


PamSparksEasterBaskets2015GloryTag


I googled baskets made from 12×12 paper and was reminded of this basket that we’d made several years ago!  I tried it multiple sizes and it ended up the 7.5 inch square size worked the best for what I had to put in it.  Score your paper in thirds both directions.  Cut up the score lines on two sides then you can position into the basket shape!  Very easy after you decide what size to make! lol


PamSparksEasterBaskets2015Ethan


I stamped and die cut the egg carton and chick from Reverse Confetti’s Carton Cuties stamp and die set.  So cute! Then on the back I stamped ‘from the bunny’, from the same stamp set.

: )


PamSparksEasterBaskets2015EthanTag


Baby Charles is way to little for an egg hunt or to eat.  But he needed something in his carrot!  So I put in a few Late July Organic mini cheddar sandwich cookies.  His basket had his 5 eggs in it instead of the fruit snacks.  Fortunately I had just the right color plastic eggs in the egg collection.  😀


PamSparksEasterBaskets2015Charles


I’m linking my Easter baskets to the following challenges…

Addicted to CAS – Cute

After we had our Easter Basket/egg hunt, we ate supper and sang happy birthday a few times. A beautiful day with family.  It was nice to be able to be outside. Thankful it wasn’t muddy! eek!

Thanks for stopping by!  Have a great week!  I’m prepping for two classes Saturday in Cedar Rapids, Iowa.  Can’t wait to see the gals @ Scrapmania again!

p.s. Next week is the new Memory Box release…be watching!

Shopping links…

Birthday · Card Sketch · cards · Memory Box · Perfect Layers Tools · Reverse Confetti · Washi Tape · Winners

Birthday card, SFYTT and a winner!!!


Hi everyone!  Thank you all for your wonderful comments on the giveaway post! and all your comments all year long!!  So fun to hear from you all and I failed to get replies sent this time!  My computer has the craziest problem right now and I’ve been wasting too much time trying to figure it out on my own.  I think I better just take it to the store! ugh.  Of all things,  MUTE is stuck on!  So I can’t watch the videos of our grandkids or stamping videos!  My videos won’t work in iPhoto either! No sound at all!  Have any of you ever had this happen?


ok – now that I got the complaining out of the way….


the WINNER of the Warm Wishes stamp set and die IS….


#36 Rannah Romps!!!!  

congratulations Rannah!

email me with your snail mail address!


I’m sharing a birthday card today that I made with Reverse Confetti stamps and dies.


Every month Reverse Confetti has a Sketch For You To Try Challenge and I wanted to enter!

SFYTT21_Feb15


I really did make this card for the challenge – I had my computer open to the sketch, made the flowers and look where I ended up!  I’m still linking up though because I played!  : )


PamSparksRCPetalsNPosies700


I used the Petals ‘N Posies stamp and die sets, Roundabout Additions stamp set, Memory Box stitched circle die and Perfect Layers Mini Rulers and Mat. (link in sidebar – be sure to use my code if you shop)


PamSparksRCPetalsNPosiesClose


I used Colorbox Chalk inks for the leaves and flowers, Pink Pastel, Rouge, Lime Pastel and Deep Green.  Black ink for the flower centers is Versafine Onyx Black.  I inked up the birthday wishes stamp with Versamark and embossed it with Ranger Detail Embossing powder.

The card is top folding and 5 1/2 inches square.

and Washi tape!  Two different black patterns.  The dot one is from K & Company, the smash book line and the other I don’t know the brand…sorry about that.

Thanks again for your support of Cindy’s store and my blog!  ‘preciate it so much!  Happy Friday and Happy weekend to you!

Birthday · cards · copics · Give away · Memory Box · MFT · Perfect Layers Tools · Winter

Birthday cards and giveaway!


Hi everyone! Sharing a couple birthday cards today and…

Cindy from Starlitstudio.net set me up with an extra cutie Birdie Brown, Warm Wishes stamp and die set by Torico (MFT) to give away!  YAY!  So leave a comment and I’ll post the winner in my next post!


Here’s my card with it…


PamSparksWarmWishesTorico700


She’s so cute!  love her!  I stamped her with Memento Tuxedo Black ink and colored with Copic Sketch Markers. Her dress, scarf, socks are the RV11, 13, 14, 17, 19 series.

The sentiment on the front and the one on the inside are stamped with Versafine Onyx Black ink.

I used the Perfect Layering Mini Rulers and mat to make the 1/16th inch black mat.  Link in the sidebar!  Be sure to use my code for a great deal going on right now!  10% off and free priority shipping with a $30 order!

The pattern paper is the 6×6 Crush paper pad by Authentique and the pierced rectangle die is from MFT.


Then I have a card to share that I made for our oldest grandson who just turned 15, ( wow! time flies) using the NEW Memory Box die, Steampunk CornerI cut it twice from some pattern paper by Basic Grey and glued them down with Tombow Mono Multi glue… just little dots here and there.


PamSparksGearsEthan15thBday700


The rest of the pattern paper is from the Basic Grey Oxford pad. (probably discontinued now)

Linking up to some challenges…

Seize the Birthday – Anything Goes (2nd card)

Cute Card Thursday – Floral Delight (1st card)

Addicted to Stamps – Make Your Mark

Cindy carries a wonderful selection of My Favorite Things products, in the store HERE and Memory Box HERE.


Here’s the stamp set and die that I’m giving away!  All you need to do is comment for a chance to win!


Screen Shot 2015-02-20 at 12.18.37 PM

Screen Shot 2015-02-20 at 12.19.06 PM


Thanks for stopping by today!  So fun to hear from you and glad you liked the splats the other day!  What to splat next, that is the question! lol  TTUL!

Birthday · cards · copics · Memory Box · rubber stamps

Memory Box – Make a Wish Candles…


PamSparksWishCandles700


Hi everyone!  I made a birthday card using the NEW Make a Wish Candles die set.

I cut the largest candle dies in white cardstock and colored each one with Copic markers and the Clear Wink of Stella Brush Marker.  I used V20, 22, 25, 28, BG11, 32, 34, B00, 01, 02, 04 for the candles,  YR02, 04, 07, 18, 23 for the outer flame and R02, 05, 08 for the center of the flame.  White pen on the embossed lines of the candles.

I made the big splats on a white A2 card-base with Wild Honey Distress Stain and colored them with Clear Wink of Stella Brush Marker after they dried.

I cut ‘happy’ from the NEW Share the Happiness die set three times in black, glued them together with Tombow Mono Multi glue and colored it with Clear Wink Stella Brush Marker.

I mounted the candles to the card-base with 3L mounting squares and glued happy directly to the candles.

The birthday word came from the Happy Birthday Special Combo rubber stamp.  I stamped in Versafine black ink and trimmed around the word. Mounted it to the card with 3L mounting squares.

I love the splats behind the flame! Kinda like a birthday sparkler! lol

Linking up to some challenges…

CASology – Monochrome

Simply Create Too – Anything Goes

Papertake Weekly – Bingo (Die Cut, Free, Glitter)

Seize the Birthday – Anything Goes

Addicted To Stamps – Make Your Mark

Thanks for stopping by! Have a great day!

Dies and Supplies I used for my card…