
Hi everyone! I’m posting today on the Memory Box blog HERE. It’s time for the Spring 2015 Release Blog Blitz! It started on Monday and goes through Friday. Comment on the blog posts there for chances to win!
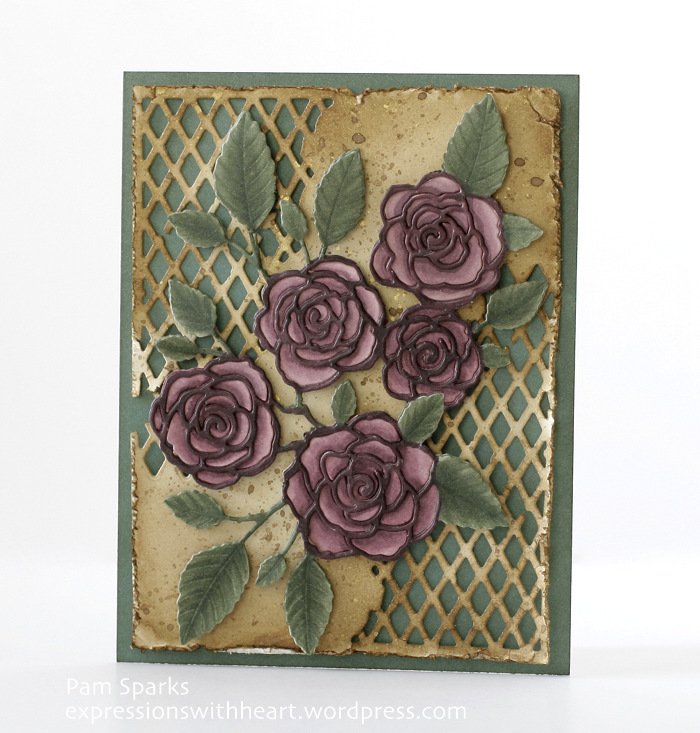
For my card today, I die cut one of the corners from the NEW Open Studio Distressed Windham Collage die set twice. Once in the upper left corner and then again in the bottom right corner of a 4 in. x 5 1/4 in. piece of parchment card-stock. I distressed the edges with a Tim Holtz paper distresser tool. Then I inked most of the piece with Gathered Twigs Distress ink and a mini round ink blending tool. I spattered with Walnut ink and Metallic Gold spray ink.

I die cut the English Rose Bouquet die in Parchment card-stock and colored it with Copic Sketch markers. The flowers are the RV 90 series and the leaves are the BG 90 series.
I hope I can explain what I did without it being confusing. Here goes…
* I leave the rose cut in the die after I cut it, this is one time I hope the pieces stick in the die (if any of the pieces come out I stick them back in the die)
* With the wide yellow frog tape (painters tape), I put pieces of the tape over the die cut card-stock I left in the die (tape goes adhesive down on the wrong side of the card-stock and extends over the edges)
* Now I remove the die cut from the die and all the pieces stick to the frog tape
* Take the outline part of the die off the tape and color it
* The flower petals I left on the frog tape and colored
I know, this is getting long…do you want me to carry on?! : ) ok!
* After coloring lay your outline die cut wrong side up and put mounting squares all over it in strategic places so they will be overlapping all the lines. I cut mounting squares in half for this and yes, it takes a lot but it’s worth it!
* Now turn your colored outline die cut right side up and you’re ready to place all the colored petals into the rose outline. The rose petals will all stick to the mounting squares. YES!
* Add mounting squares to your leaves and place it on the background piece
* Add mounting squares to the background piece and place it on an A2 Juniper notecard
Here’s the inside!
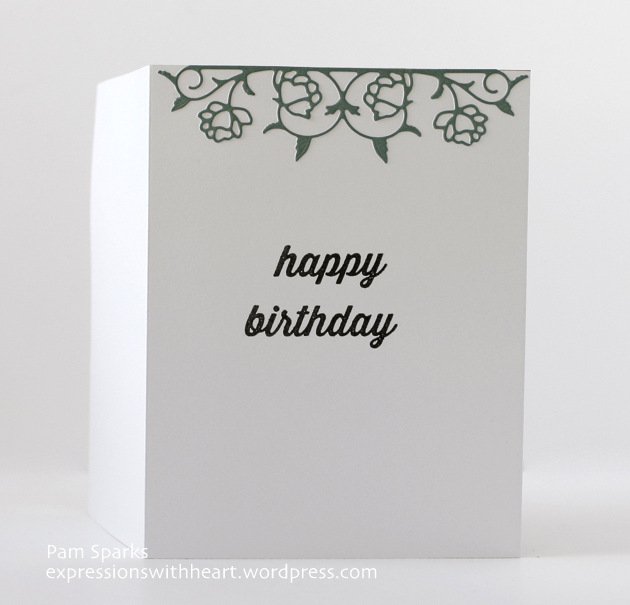
I die cut the NEW Pennington Rose Border die in Juniper card-stock, glued it to the top and stamped the words, happy birthday from the NEW Party Time stamp set.
Lots of NEW stamps! Clear sets, wood mounted and cling! YAY! HERE
It’s been a lovely Spring so far in Iowa! I love this cooler but not cold weather! I just got a new bike! So excited! Now to get the sound fixed on my computer… ugh…but how can I go without it?! I know, a video would’ve been a whole lot easier than explaining this card! lol
Happy Wednesday! TTYL!

Discover more from
Subscribe to get the latest posts sent to your email.


You did a great job of describing your process and I thank you for it. Beautiful coloring and background treatment.
STUNNING STUNNING STUNNING.. I just love it.. thanks for sharing..
Love the roses.
Hanny has it right…stunning. Rich colors and very interesting corners .
Oh my Pam this is beyond gorgeous!!! Can’t wait for these to get here and carve time to play – Love Love Love the English Roses with this background die – just beautiful Pam, as always!!!!
Love it. So beautiful!!!
Wow Pam, that rose one is knock dead gorgeous!! There isn’t a thing I don’t like about it.
Pam, this is a GORGEOUS card with a beautiful die!!! I love your cards and inspiration!!!!
Beautiful card, Pam! Thanks for explaining how you colored and taped the rose die cuts. If I ever decide to buy one of these intricate dies, I will know how to do this technique!! You are SO creative!
Oh my goodness!! This is stunning Pam!! Wowzers!! That is one beautiful card! It indeed looks like you spent hours on it, but I agree, it is very worth it!!
The card is gorgeous !!! My first thought was —–I have never seen you use those colors before and I said WOW !!!! Can’t wait to see it IRL.
Beautiful card. Liked the raised effect of the roses. Stunning colors.
I love love love your card Especially th background. Jeanetta Helmick
i love the card.i love the colors of the flowers it is so beautiful
Wowzers Pam….I’m speechless (for a change). =) Your card is Drop Dead GORGEOUS!!!! Beautiful roses; beautiful dies. I’m so glad I didn’t miss your post! So very nicey done!
Thanks so much for sharing with us!!!
the background is so awesome. i love the rusty effect an the flowers and the background
WOW!!!! Gorgeous card Pam. love how you added all the texture and techniques in the card, it’s the best Memory Box card that I have every seen. Great going gal!
Wow! What a stunning creation! Beautifully done, and totally taken by those colors…Wow!
Hi Patti! I don’t think I’ve used the RV 90’s much at all if ever! It was fun to color again! Thank You! Pam
Pam Sparks https://expressionswithheart.wordpress.com
>
Spectacular as usual. I love your designs and ideas.
Big WOW! This is a wonderful floral die and love the way you’ve combined these dies & colors. Quite a vintage look, and just so beautiful. This process sounds like one that would make a terrific video, (LOL – when you get time). All the effort surely yielded a marvelous look to this card. Well done! TFS
Wow and Wow again absolutely gorgeous!!! hugs, Ruth Ann
Absolutely beautiful! Thank you for taking the time to describe your process. I love the
distress corner dies.
Absolutely awesome!! Loved your process and now I want those dies! Gorgeous card, Pam!
The English Rose card is fabulous! I love all the great effects you created in this card as well as the pretty colors and textures. In a way, sort of a stained glass look too; which I love!
Oh Pam these are gorgeous cards! Love those roses!!! Thanks so much for sharing how you made them for the card!! 🙂
Oh my that is just stunning, and I think I understand what your saying, (I am a visual kind of girl :), the colors in this are so pretty and I see I have some new dies to put on my wish list!!