
Hi everyone! Today I’m posting with some Memory Box and Imagine Crafts goodness!
I started with a Memory Box Parchment A-2 Notecard for my card base.
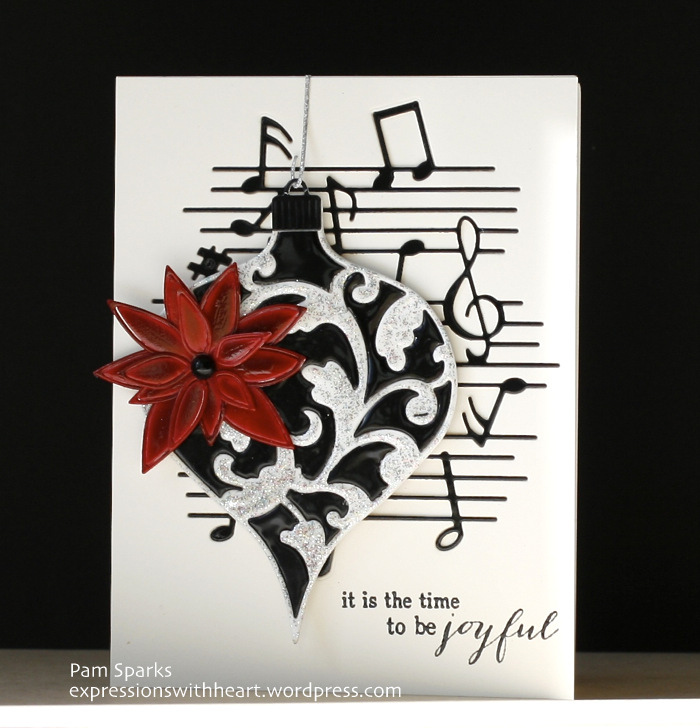
I cut another Parchment A-2 Notecard in half and die cut the Musicality collage die in it. (don’t worry about keeping any of the pieces, you just want the hole)
I die cut the Musicality Collage die in black glossy card-stock and inlaid it into the cut in the parchment piece. Doing it this way keeps the lines straight and everything in place. Because I’m mounting it on the same color card-stock, I don’t need to inlay all the little pieces. Works slick! : ) I scotch tape it in place on the back side.
Adhere the Parchment panel to your notecard.
I stamped the sentiment Joyful Combo with Imagine Crafts Memento Luxe Tuxedo Black Pigment Ink and embossed it with Imagine Crafts Clear Embossing Powder. (I use a stampamajig for stamp placement)
I die cut the Poinsettia Bloom Trio die in Cranberry card-stock and covered all the pieces with Imagine Crafts irRESISTible Love Letter Pico Embellisher. It’s a glossy color finish that comes with a fine line applicator.
Add a black pearl in the center of the poinsettia.
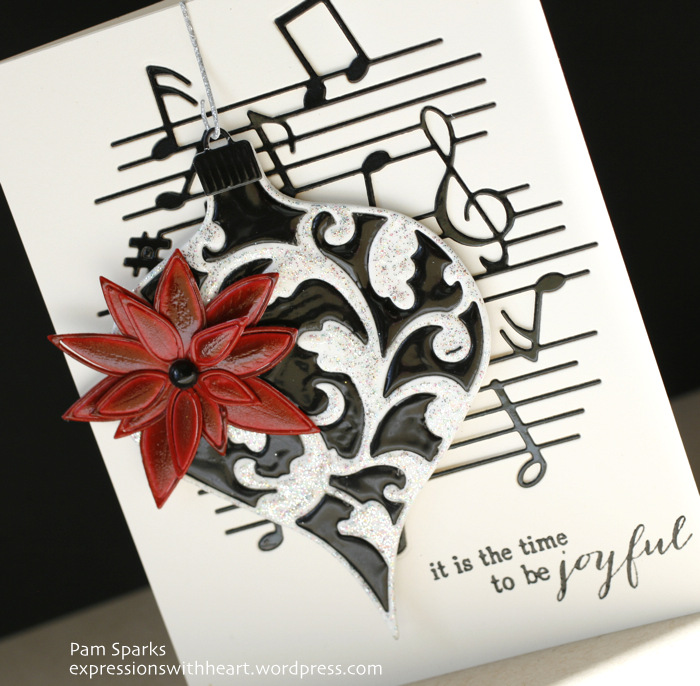
I die cut the Elliana Ornament die in White card-stock. I inked all the pieces with Imagine Crafts Versamark ink and embossed them with multiple coats of Imagine Crafts Black and Sparkle Embossing Powders to get an ornament that ‘looks like glass’ effect. (You might want the background ornament too… it’s HERE)
I die cut the Ornament Hooks and Caps die in Black glossy card-stock for the cap and from Silver Glitter card-stock for the hook.
Wish I could show it to you IRL!
I’m linking up to some challenges…
House of Cards Challenge – use a die or punch or both
Christmas Card Challenges – Anything Goes
Allsorts Challenge – Christmas
Here’s another card I made because I wanted to use some more inks and spray… as if I hadn’t made a big enough mess already! haha
I started with an A-2 top folding White card base.
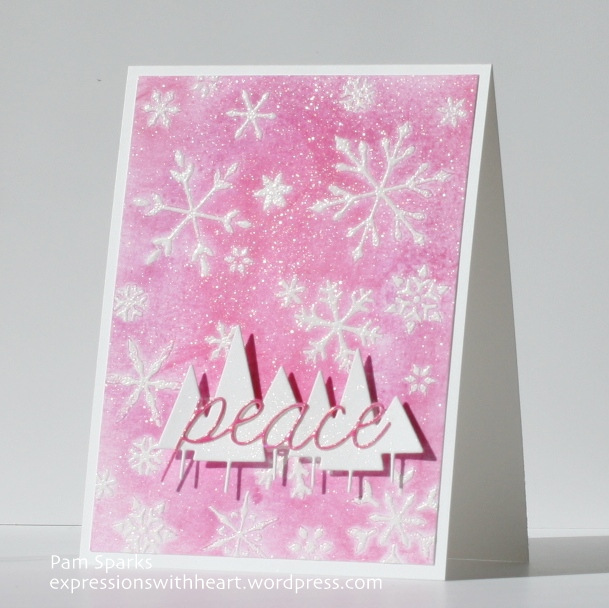
I cut a white card-stock panel and embossed the panel with the new Large Snowflakes Stencil by running it through my Big Shot. (I show this on a couple videos. Click on the video tab under the header)
Leaving the stencil in place, I adhered it to my desk with removable tape and using Imagine Crafts finger daubers, I inked the snowflakes with Imagine Crafts Memento Luxe Wedding Dress pigment ink. Remove the stencil and emboss with Imagine Crafts White Embossing Powder.
Using three Imagine Crafts Versacolor square ink pads, Opera Pink, Peony and Raspberry, I rubbed ink over the snowflakes.
Then I sprayed on Imagine Crafts Sparkle Shimmer Spritz and rubbed the inked surface to blend and wipe the ink off the snowflakes.
I die cut the Peace Script die in White card-stock, smeared it with Versacolor Opera Pink ink and embossed it with Imagine Crafts Iridescent Embossing Powder.
I die cut the Pine Border Background die in White card-stock also. I adhered the Peace Script cut to the trees with little dots of Tombow Mono Multi glue, then sprayed them with the Sparkle Shimmer Spritz and mounted the trees to the card with mounting squares.
I hope you can see the sparkle in the photo. I took the picture in full sunlight, hoping it would show up. I really like all of Imagine Crafts products.. hard to say what is my favorite because they are all FABULOUS!!!
THANKS so much for stopping by today! It’s sunny and beautiful here in IA… yay!

Supplies I used on these cards…


Discover more from
Subscribe to get the latest posts sent to your email.


Both of these cards are beautiful but the first one BLEW MY MIND! Absolutely stunning!! I am in love with the black and white ornament and background with the gorgeous poinsettia POPPING in a wonderful explosion of color! TFS!
Oh my goodness! The Be joyful card is stunning! I absolutely love it! and the pink card is sooo sweet! I love all that sparkle. Really beautiful cards today:)
OMG, Pam, that first card is gorgeous beyond belief! It is also so very elegant. You already have a beautiful collection of Christmas cards and I have barely started!!!! The second card is also beautiful…love the pink background and the stunning glittery snowflakes.
I love the red, black and white combo. As someone already said, it looks so elegant.
The technique in pink sounds like something fun to try.
Beautiful cards !!! To bad I won’t be at club so I can see them IRL.
Awesome! Absolutely LOVE that glossy finish on the first one & the second one is such a beautiful card with that gorgeous pink and all that glitter! You did GOOD!!! ha ha
Both of these are glorious. I confess #1 grabs my eye most though, with the black & white shine & that Pico finish on the poinsettia. What a good idea – I’m always thrilled when I see you’ve used a die that I have. (Don’t have the music one though!) Really outstanding – each of these beauties. TFS & Hugs
Oh my heavenly goodness!! These are stunning Pam! The first one is so detailed and gorgeous! Love the black and red together and the shiny looks wonderful! The second one is so sweet! Love the glittery pink background! Pure loveliness!!
Oh Pam, the musical die is one I have just ordered, love how you decorate it the simplicity is wonderful and elegant, That die has so many possibilities
I too am in love with the first card… hope you don’t mind if I ask a question….? When you said:
“I inked all the pieces with Imagine Crafts Versamark ink and embossed them with multiple coats of Imagine Crafts Black and Sparkle Embossing Powders to get an ornament that ‘looks like glass’ effect.”
How did you keep track of all the small pices… did you stick them on something before you started the Versa and embossing…?
Thanks!
Hi Dotty! Yes I did! I didn’t at first but they were flying everywhere and SO was the powder.. oh ugh. I had my box for that right there but I’d forgotten! I ended up sticking them to painters tape. whew. Then it worked fine.. I just kept throwing little pinches of powder on it where it needed it with my right hand and the heat gun in my left. : ) Thanks for commenting! ‘preciate it so much! Pam
these are so cool, just love the glossy look of the first card and the pink shimmer is just lovely on the second!
FREAKIN AWESOME!!!! Thank You So Much For Sharing!
I’m in total LOVE with your first card. Just beautiful and right up my alley. Those are my FAVE die’s. Wow….I LOVE the glossy, glassy look. So elegant and stunning Pam!!!! If you don’t have a recipient in mind for this card, I’m here for ya’ Girl. =)
The new MB stencils are amazing. I love those snowflakes. It’s so neat putting the PEACE over the tree’s. A great look.
Thanks for sharing with us! So very, very nicely done! I’m picking my jaw up off the floor now! =)
simply gorgeous Pam!
Your bauble card is amazing, the bauble really does look like glass. Some very good techniques here, very clever. Thank you for sharing them with us at HOC.
These are both absolutely stunning! LOVE the gloss on the first card and the pink on the second–gorgeous! Thanks for joining us at House of Cards! HUGS! 🙂 Mynn xx
Stunning projects! I love them both!
Thanks for joining us at Christmas Card Challenges this week!
Monica – CCC DT
Just seeing these now, Pam. They are beautiful. I really love the first one with the ornament. So elegant.
I cant speak
this is STUNNING!!!!!
I love all on your card the color the design
so festive and ADORABLE
LOVE THIS
thanks for joining with us at HOC challenge this month
hugs, Monika DT
Oh such pretty cards! They are both just gorgeous! 🙂 Nancee