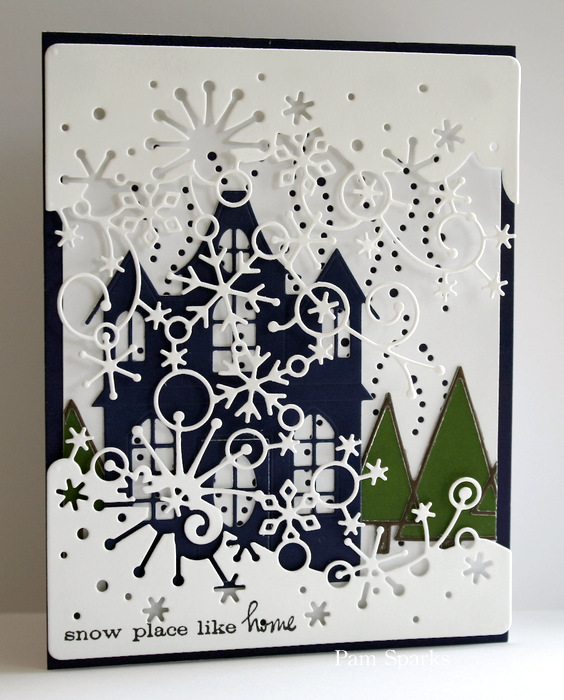
cards · Memory Box · Perfect Layers Tools

Memory Box Chrysanthemum Happy Birthday card…

_MG_8108 copy

Happy Monday everyone! My Chrysanthemum Happy Birthday card features the new Chrysanthemum Outline die, Chrysanthemum Background die and Happy Birthday script dies.  I used the Dogwood Blossom Outline die and Dogwood Blossom die for the stems and leaves.

Happy Birthday is die cut from Licorice card-stock,  the flowers are cut from Bubblegum dots card-stock, the stems and leaves are cut from Key Lime Dots and the accent paper border is Key Lime Gingham.

How to get perfect placement for the happy and birthday words…
* after die cutting, keep the negative piece from the cut  (the part you would usually throw away)
* place it over your card where you want your word to be
* put adhesive on your word die cut
* place your word back in the negative piece, press it in place
* then slowly, carefully remove the negative piece so all that is left in place, is the word

_MG_8126
In this photo you can see I die cut the florals in the white card base then cut them out of the colored card-stock too and inserted them in the cuts in the white card base.

A fun technique for using Memory Box dies…cutting, layering them with different colors for a little different look.  I did this on my Jasper Leaves card,  HERE.

Thanks for stopping by today! Happy stamping and die cutting!

Shopping Links… (some of these links are for the card I posted yesterday, scroll down for that card, thx!)

cards · Memory Box · Perfect Layers Tools · Poppystamps · Spring

Memory Box Lamp post Frame card…

_MG_8083

A happy Spring scene using all Memory Box and Poppystamps dies and card-stock.  Makes a gal want to go live here!  Imagine…gingham grass and polka dot butterflies!

_MG_8099

I used parts of a couple dies… the leaves in the tree are from the Lavish Branch die and the grass is just the scallop part of the Spring Border die with the flowers cut off.

_MG_8091

I die cut the Lamp post frame out of Vanilla Bean card-stock and the Debutante background is die cut out of Water card-stock.

The Lavish Branch is die cut from the Lime Green Gingham and the Cranberry Dots Card-stock.  I cut the red flowers off and glued them on top of the Lime Green flowers with Tombow Mono Multi glue.

The little butterflies are from the new Dancing Butterflies die.

I used a woodgrain stamp to make the wood grain on the tree trunk…

Thanks for stopping by today!  I appreciate it!  I’ll be back tomorrow with another Memory Box card.

Shopping Links…

Birthday · cards · Easel · Memory Box · Multi Easel · Poppystamps · Tutorials · Video

Memory Box Easel card and video…

So excited to share an Easel card with you today… it’s a multiple easel, Easel card!  I love working with Memory Box and Poppystamps dies and papers…to really see the card well in the video, change the ‘gear’ to HD and click the full screen.  It’s so much better BIG!  : )   This was my 3rd take… the first two…well,  I got the measurements and names right but messed up with construction!  oh well…be sure to note the ‘notes’!  Hope it inspires you to use your dies… hehe

I show the construction process and tell the sizes in the video…

I LOVE the addition of the kite to this scene!   It’s a beautiful day in the neighborhood!

_MG_8013

You can swing for awhile… grab a friend and go for a bike ride and even rest for awhile on the awesome park bench!

PamSparksEaselLeft700

Here’s a closeup of that FUN bike!

_MG_8017

I used all Memory Box card-stocks… Water, Dill, Granny Smith, Vanilla Bean, Licorice, Crimson and White.  So much fun!  Holler if you have any questions… I think between the video and the photos it’s pretty much self explanatory!

Linking up to some challenges…
Simon Says Stamps – Anything Goes
Word Art Wednesday – Anything Goes
Papertake Weekly – Anything Goes
The ABC Challenge – O is for Open

Here’s another multiple easel, Easel card I made… love it too!  HERE  and HERE is one with just one mini easel, Easel card.

Thanks for stopping by!  I love hearing from you and appreciate it so much!  I hope you’re inspired… I love to share!
ttul!

Shopping links for dies and supplies…

Birthday · cards · copics · Distress Ink coloring · Magnolia · Perfect Layers Tools · rubber stamps · Tilda's Town

Magnolia, Tilda’s Town Challenge…

o

Let’s Celebrate!  This week’s challenge @ Tilda’s Town.

I colored Birthday Tilda with Distress ink pad reinkers on Canson Montval cold press watercolor paper.  The pattern paper is from the Basic Grey Blush 6×6 paper pad.  I used two DooHickeys dies,  Twisted Swirl and Heart Flower Lace Border.

I edged the papers with Walnut Stain Distress ink and the ink blending tool.  Stickles on the candles!

Tilda is such a cutie with her yummy chocolate cake!  A Viva Decor pearl pen for the dots in the background and the pearl is from Magnolia too.

I used the Perfect Layer Tools 1/16th inch ruler for matting… link and discount code in my sidebar…

Click over to Tilda’s Town ChallengesHERE and enjoy the inspiration from the Design Team and enter the weekly challenge!  We’d love to have you!  Each week there is a random winner, chosen by Inlinkz, for a $10 gift certificate to Tilda’s Town.com!

logo1

Tilda’s Town is a most magical shop specializing in Magnolia Stamps. Over 1,100 stamps in stock at all times. Tilda’s Town offers FREE worldwide shipping on every order, every day. You can also save up to an additional 20% on your purchase by using one of the famous coupon codes. Shop at Tilda’s Town.com and live the magic.

Linking up to Midweek Magnolias Challenge blog – Make it sparkle/glitter and bling!

Thanks for stopping by and hope you can play along with us this week @ Tilda’s Town!

Perfect Layers Tools · Video

The NEW Perfect Ruler from Perfect Paper Crafting… I LOVE it!!!

and you will too!  Watch Julia’s demo video and click over to order… HERE!  Click shop and scroll down a bit for the NEW Perfect Ruler… so excited about it!!!  Be sure to use the code ‘Sparks5% ‘ when you checkout to receive 5% off your order!

What an awesome tool… this is right up there with the stamp a ma jig!  I love the non-slip feature!!!!  I love the centering ruler feature!  I’m forever trying to get things centered!  woohoo!!!  It will stay on my desk for sure!

What do you think?  Are you as excited as I am?  I love time saving tools that work!!! : )