

Hi cardmakers and friends! Two cards made with the poppystamps Blooming Rose die as the focal point. I always like to see what other dies I can use with a die too!
This is a flat, A2 size card. No stress… it’ll mail…no foam and only little white Nuvo drops! So inlay die cutting and ink blending make this card.

Die cut the poppystamps Blooming Rose die in green and in pink. I used Memory Box notecards for this…Sage and I’m not sure what the pink is but it matches Altenew’s Cotton Candy ink pad. Piece the two together (I do this right side down on my table) and scotch tape the pieces in on the back side. Lay this aside for now.
Die cut the front panel with the largest rectangle from the Memory Box Wrapped Stitched Rectangle die set. Then die cut a circle in the same panel with the Memory Box Wrapped Stitched Circle die set.
Do your ink blending on the edges, fit the circle back in the panel and use scotch tape on the back to hold it in place.
Die cut the poppystamps Blooming Rose die in the panel next…you’ll need to keep a few of the pieces for putting the ‘puzzle’ back together so don’t throw anything away.
Place the color Blooming Rose piece into the hole you cut in the panel…piece in the pieces you saved. Tape on the back. Adhere to the card-base.
Stamp the sentiment from the Memory Box Birthday Sentiments set, I used the MISTI.
My next card is inlay too…no little pieces though.

I had a hard time deciding which front picture to use so you have two! RME
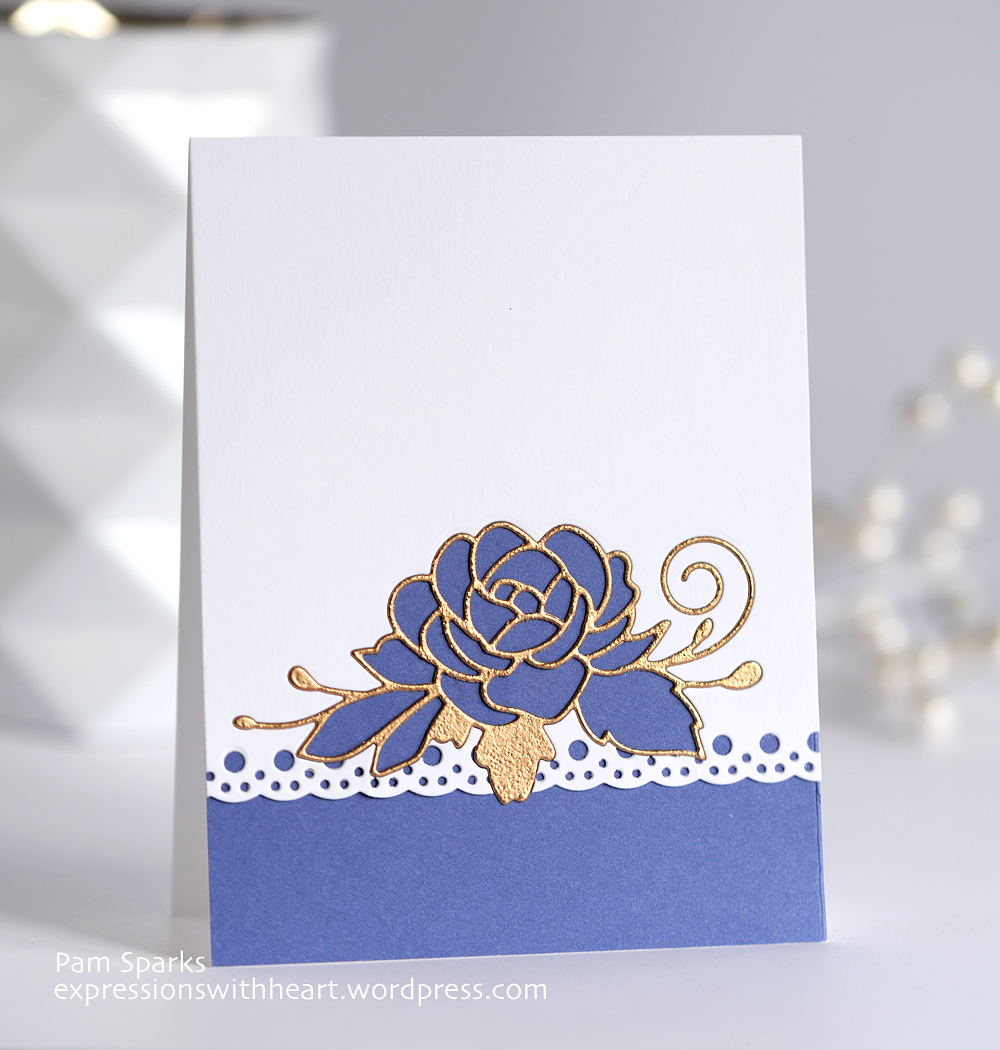
First I die cut the border from the poppystamps Pierced Borders set in a white card-stock panel. Then I die cut the poppystamps Blooming Rose in the panel. You can go as far down or as far up as you want into the border you already cut, because you’re just cutting the hole to place the gold piece into.
In another piece of card-stock die cut the Blooming Rose again, ink it with Versamark ink or any pigment ink pad and emboss it with gold embossing powder.
Piece it into the white panel, I work with the right side down and then use scotch tape in a few places to hold the rose in place. On this one it was pretty much just the branch and swirl things off the side that got the tape on the back.
Then I glued the white panel to a purple piece and then to a white A2 size card-base.

A clean and simple card that you could add any sentiment to before you send or gift it!
Nothing spectacular today but just some fun things to do with dies, ink and paper! So glad you clicked over!

Some shopping links for these two cards!
|


Discover more from
Subscribe to get the latest posts sent to your email.


oh pam! first, i love the purple color with the gold inlay….those are my colors! but that pink and green card is SO SWEET!!!! both are really beautiful and with my favorite inlay technique! good job, friend!
sandyh
I agree with Sandy on the pink card. I love it. The purple on is gorgeous too. I love the simplicity of both cards. Great job.
Both are gorgeous cards Pam…but the last two…WOW..so crisp and elegant…loving them big time.
I’m a sucker for anything Rose themed!! These are beautiful!
Hello from Salt Lake City! These are both beautiful, my friend! I especially love the gold on the second card! Now I’m eager to get home to my craft room! Hugs…
Oh!!!!!!!! Love both of these cards. The pink and green card are my colors but the regal look of the blue one is gorgeous. Outstanding job on both of these cards. Love the simplicity of the second one!
these are both beautiful and so elegant, pam! pink and green is a long time fave colour combo but i also love the gold and purple and those tiny white dots on the first card are perfect!
Pam these are stunning – I adore those tiny Nuvo drops, and the purple one is so majestic!!!
Beautiful CAS cards. The pink and green one is my favorite.
Gosh! Pam, those are both so pretty. Would hate to have to pick a fave. Just beautiful!
cool technique, like the inlay into the panel, love the idea of embossing the outline!
Oh how pretty are these cards! I really love the pink and green one! Beautiful! I love how you “piece” everything together. 🙂
Stunning! These are beautiful, Pam. Do have a good Sunday.
Both cards are gorgeous!
Oooh, you ARE rockin’ the flower cards! This hardly looks like the same die with the different ways you’ve used it. Love both! I keep scrolling back up, sigh… Soooo pretty!