ATS · ATS Preview · cards · CC Designs · Christmas · copics · Doohickey's Dies · rubber stamps

All That Scraps May Preview, day 1…

That time of the month… NEW stamp release from All That Scraps!  Today the DT is showcasing the new images,  Cute Birgitta, Stone Wall and Lamppost. Click HERE to go the the All That Scraps blog to see the other DT gal’s fabulous creations! Be sure to add your name to the linky tool for a chance to win these stamps!

I used the new Lamppost for a Christmas card!  I know, crazy! lol  I just associate lampposts with carolers at Christmas… so my next card with the post will be for Spring,  since I got the Christmas one out of my head! lol  I used the bow from a Sugarplums stamp kit, I don’t see it in the store anymore and a couple sentiments from  Amy R’s Christmas sentiment sets… I’ll link them below.

The bow is colored with R02, 05, 08 and E07,  the post is colored with the Warm Grays.  The pattern paper and card-stock stickers are from Basic Grey’s Jovial pack.  I used the largest Labels One die from the newest size set. Edged everything with ink and the ink blending tool.  Added a couple pine branches from the Martha Stewart punch.

Inside I cut the Magnolia Doohickey’s Vintage tag die (link below) and stamped the sentiment on it and used a few of the card-stock stickers again from the Jovial paper kit.

I’m linking my card to the Crafty Hazelnuts Christmas Challenge blog… use a little yellow.

Stamp “stuff” I used on this card…

Thanks for stopping by!  Don’t panic… lots of days before Christmas! : ))

ATS · ATS Review · cards · CC Designs · copics · rubber stamps

Penelope and Fibonacci…

I LOVE Amy Young’s Sweet November Penelope and Darby images…now there is Briar too! Three new wonderful, charming and delightful images (and their pals) in the April CC Designs release.  You can see more of the fabulous design team creations HERE and HERE. I used Penelope and Fibonacci… link at the end of my post.

I stamped on Beckett Expression Super Smooth 80# cover Card-stock  with Memento Tuxedo Black Ink and colored with Copic Sketch Markers… ok – I got a little carried away with that E87  around the stem… I am loving the new E80’s markers… crazy… I know,  they weren’t “quite” the right colors for this pattern paper but… I’m stuck in a rut of using the YG90’s and the two new E80’s! ugh!  oh well, she’s a doll and I’ll have to do her up in more girly, sweet colors another time!  You’ll see when you go look at the links above!

copic colors used…

  • skin – E000, E00, E21
  • cheeks – R20 diluted with R00 refill and E00 to soften the edges
  • hair – YR30, 31, 21, 23, 24
  • dress – E81, YG93, 95, E87
  • shoes – E81, 87
  • stem – E43, 44, 47
  • toadstool head – E 40, 41, 42, 43 and R02, 05, 08
  • Fibonacci – E40’s and E80’s

The sentiment is from Amy R’s Get Well sentiment set… link below. Not sure why I couldn’t get the sentiment to photo clearly but it stamps and looks wonderful IRL!

I edged all the papers with Antique Linen Distress Ink and the Ink Blending Tool.

Linking up to the following… Cute Card Thursday Challenge blog… Weather Inspired is their theme right now… FUN!  Stamp Something Weekly Challenge blog…April Showers is their theme. Copic Creations Challenge blog… your favorite copic coloring card-stock.

THANKS for stopping by!  Thanks for all the comments and your wonderful friendships!  I love kindred stampers!  The internet has sure been awesome for bringing us together!  Take care!

ATS Magnolia Challenge · cards · copics · Doohickey's Dies · Just Magnolia · Magnolia · rubber stamps · Step card

It’s a Butterfly Dreams post!

Some super sweet stamps from Magnolia on my stair step card today!  The latest collection, Butterfly Dreams…they just keep getting cuter!  I also used a few Magnolia Doohickey’s dies… I’ll link to them all in the photos below.

I made this a back panel stair step.  I didn’t take time to search to see if anyone has already done this.  I didn’t like it as tall either so I did some changing.  The pattern paper is from the Webster’s Pages 6×6 pad called Spring Market/Yacht Club.  Some really neat designs in the collection… link below.

Linking up to the Just Magnolia Challenge for this week, they’re celebrating birthdays! It’s HERE!  Linking to the Wee Memories Challenge post, HERE, the challenge is “All Things Adorable”… well, that’d be Tilda and Edwin! : )

Here’s a side view to see the stair step…

And some close ups…

Made ‘ya smile! Thanks for stopping by… links below take you to the products I used when you click on the pictures!  Happy Weekend!

ATS · ATS Review · cards · CC Designs · copics · rubber stamps · Spring

April NEW Review…

Here’s Tulip Birgitta on the Spring Bench…both are new stamps for April from CC Designs at All That Scraps.com. I stamped them on PaperTrey Ink white card-stock with Memento Black Ink and colored with Copic  Sketch Markers and a couple Promarkers on the Tulip.  The image is die cut with Rectangle nestabilities. Have you tried the new Copic Sketch Marker colors yet?  I love them!  Today I used two, E81 and 87… love them!  They blend in great with the YG 90’s!

  • Hair – E50, 53, 55, itty bitty touches of 57
  • Skin – E000, 00, 01, 21
  • Cheeks – diluted R20 (diluted with R00 refill)
  • Dress – E81, YG 90’s, E87
  • Shoes – E 42, 43, 44
  • Bench – E 40’s
  • Grass – YG 90’s and E 80’s
  • Pinks – Promarkers Bush and Sunkissed Pink and Copic R22

Martha Stewart Butterfly punch…punched twice out of green and pink and layered…very thin strip of brown card-stock for the body and antennae…Parisian Accents Spellbinders border cut four times and layered up for a chipboard effect.  I embossed the top one while still in the die and then touched it with the Blush Promarker on the high points.  The pattern paper is from the new Butterfly Garden set by Pink Paislee.

I’m linking my card up to the Lollipop Crafts Challenge blog…this week the theme is “all girl”! Sweet!

Stamps and stuff I used to make this card…


Hope you’re having a great week!   Our Central air for the main floor went out so we’re getting a new one installed…that means cleaning the basement! blech!  It will be SO worth it in the end! : )  Gotta keep cool! lol

ATS Magnolia Challenge · cards · Distress Ink coloring · Magnolia · rubber stamps

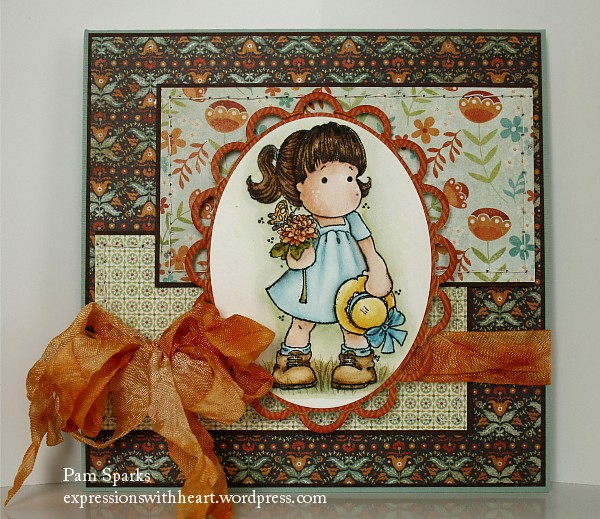
Tilda with Straw Hat…

She is so precious!  I love her… wish I had time to take my photos over though… just didn’t quite capture her charm! boohoo! I will forever be trying to get better photos! ugh!

This is Tilda with Straw Hat from the Butterfly Dreams Collection!  I colored her with Distress ink refills on cold press watercolor paper.  The pattern papers are from the Stella Rose line from My Minds Eye called Mabel… they just…go together!  EASY! gotta love that!  whew!

I used the new Lacy Oval Nestabilites die to frame her and back stitched between the loops… can you see it? I also hand stitched and I’ll tell you what I’ve learned from trying this a few times now.  I emailed some bloggers but didn’t get replies or else their products weren’t in the USA.  So I will share what I’ve found from trial and error as you’ll see here!!! haha! I love to sew and hand sew.  It’s just therapeutic I guess.

  • Finally found the thread I like… Coats and Clark Button/Carpet thread.
  • pierce your holes with the needle you’re going to sew with,  then your holes won’t be so huge!
  • figure out the size of your paper with the ruler/tool you are going to use that has the holes guide for piercing in it… notice here that I didn’t do this and I have extra holes in a few places and had to cut my layers down…all of life is education…that’s my excuse and I’m stickin’ to it! : )
  • the other trick is keeping the pierced holes straight… gotta work on that! haha  But,  you’ll notice on commercially made items that their stitching isn’t always perfect either,  so go w/the charm of crooked! lol

To dye the seam binding,  I was in a hurry,  so I just cut off 3 yards (yes, I cheated and measured the nose to stretched out arm length way),  laid the cut length on my craft mat in a loose scattered pile and started pouncing on it with my Rusty Hinge Distress ink pad.  After I had ink pretty much on most of it,  I spritzed it with water to blend the ink but leaving dark and light areas.  Not sopping wet though.  Squashed it in a plastic bag to get it good and wrinkled.  Pulled it out and dried it with my heat tool.  Worked great!

Linking my Tilda card to the new German Magnolia Mania Challenge blog – Happy Easter!

Getting ready for stamp club this afternoon…looking forward to some fun with my stamping friends! Thanks for stopping by !

Here’s the links to the products I used on my card…