

Hi everyone! Here’s my first creating with Concord and 9th Turnabout stamps. It took me an afternoon to get everything figured out. The right ink on the right cardstock, etc. I don’t like it when the ink bleeds and you can’t read the words, like the “sent with love” and “hello”, no bleeding allowed! So I soldiered on until I found cardstock and ink that performed!
The other ‘trick’ is making sure to get the ink cleaned off the stamp before the next color. I used my Tim Holtz Travel stamp platform. I love that thing! I use all my stamp platforms but some just work better for some things than others so I’m glad I have them all.
In this case, because the lid comes off, I could just take it to the sink with the stamp still on the lid and wash it under the running water with a little hand soap. Dried it with a towel. No ink color transfer! yay!
The other thing I absolutely love about using the TH travel platform is that I added the Sizzix Sticky Sheet to the base of it and I don’t have to use the magnets then! So amazing AND it shims just a tad bit and stamps better IMO. YAY! I’ll link to this below. If you need a picture, email me and I’ll send you a picture from my iPhone.
You can kinda see a peek of the inside of the card. You end up with a stamped 6×6 piece and it sure is hard to chop it down! lol I took the piece I cut off and glued it inside! lol
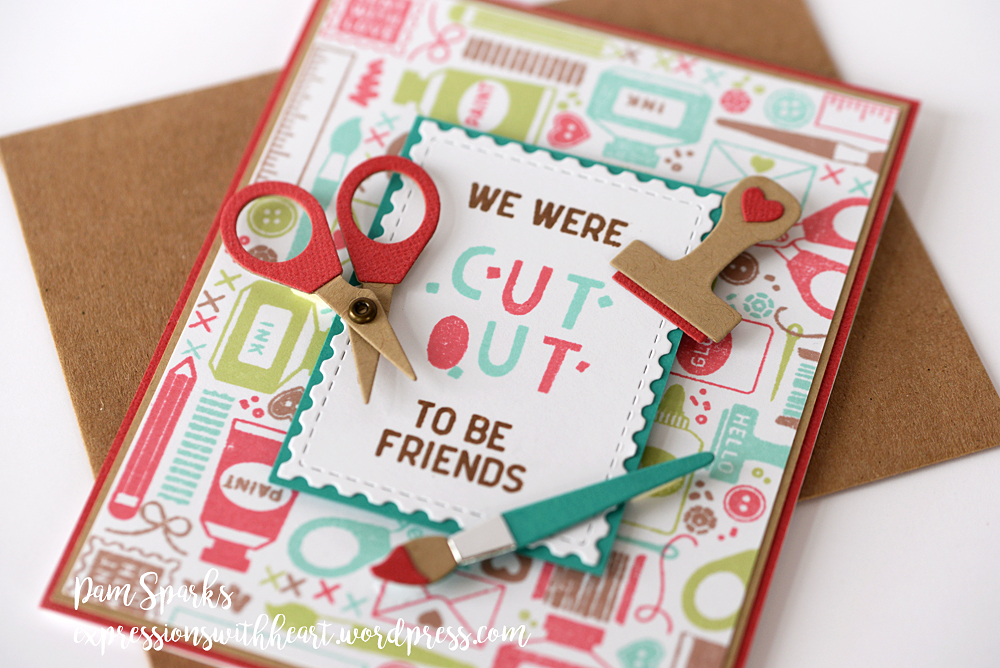
Here’s a couple close ups. I used two different colors for the base panel, that’s why I put in two close up photos. I love how they turned out and my fellow cardmaking friends loved them too! YAY!
I used Lawn Fawn inks on 80# Neenah Solar White Classic Crest smooth cardstock. A lot of times I use the heavier but in this case, there is a difference between stamping on the two and the 80# didn’t bleed like the 110# did! Maybe that’s just an Iowa thing! lol
I’m curious what everyone else uses for this type of color with stamp pad stamping?! I’d love to hear what you like if you have time to comment!

So I stamped a few extra backgrounds while I was at it because I loved it so much when I finally succeeded. hehe
Such an awesome sentiment! For the scissors I had some eyelet brads so I used them but an eyelet would’ve worked perfectly also.
Everything I used for these cards are from the Crafty sets… I’ll link below.
Thanks for stopping by! Happy paper crafting/cutting!

Links to what I used to make these cards…click the abbreviations to see them in the stores.
|


Discover more from
Subscribe to get the latest posts sent to your email.


Darn! When I saw Concord and Ninth, I almost scrolled on past, because I don’t have any of their products, and was afraid you would enable me to want some. Well…guess what? You did!!! Oh, Pam, this is just the cutest card ever, and our workshop ladies would love it! Thanks (I think) for sharing and inspiring!!!
Wow Pam you did an awesome job on this card thank goodness for the stamp positioned. Love your little scissors looks like a lots of work on the card but well worth it when you see the final product. Christine
This is the neatest card!! I was wild about scissors, paintbrush,etc on front.
When I opened my birthday card I at first thought it was designer paper.
It was a turn about card!! Love it !!
Oh, WOW, that turnabout stamp and the backgrounds you made with it are AMAZING! It must have taken some time to get all those different colors on there, but it turned out utterly fantastic! I’d be happy if I had designer paper like this and plenty of it to go with the other awesome stamps and dies. Ack, those scissors and paint brush and the sentiments! LOVE how you added the eyelet brad to the scissors. They look absolutely authentic!
Pam this is absolutely darling – genius touch with the eyelet brad!!!!
What a great card Pam! I, too, don’t like it when my inks bleed. I think sometimes it is more the paper than the ink, but I’m not sure. I often stamp the inside of my cards and find that the ink bleeds. I then need to re-stamp what I was stamping on another piece of card stock and glue it over the “messy” stamping. 🙂