Birthday · cards · copics · Masculine · rubber stamps · Taylored Expressions

Taylored Expressions May Release Day…


PamSparksUnderTheToadstoolThurs


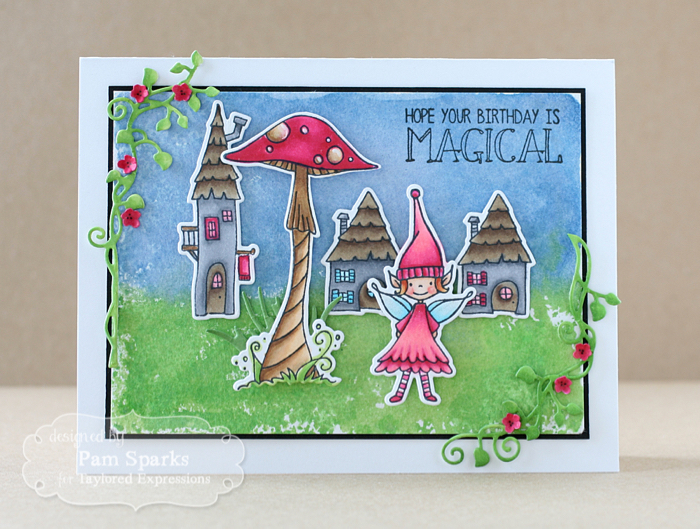
Hi everyone!  It’s Release Day at Taylored Expressions today!  My first card is a new stamp and die combo called Under the Toadstool. Super cute and whimsical with the little glittery fairy and her magical kingdom.


PamSparksUnderTheToadstoolThursClose


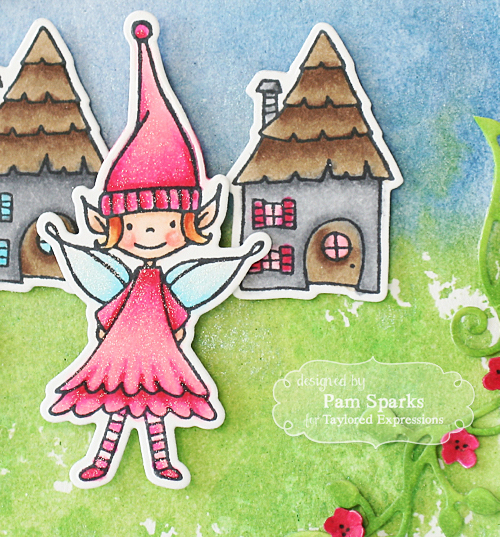
I inked up an acrylic block with Distress ink pads, spritzed with water and smooshed a piece of watercolor paper onto it for the background.  The images are stamped with Memento Tuxedo Black ink and colored with Copic Sketch markers.  Then die cut with the coordinating dies.  The dies are very easy to use because you can see where to position them!  YAY! A coat of Wink of Stella Clear Brush Marker finished her off.


To complement the scene I used the TE Wispy grass and Arbor Accessories dies. I colored the stems and flowers with Copic Sketch markers, shaped with a mat and stylus then glued them to the corners.


This month’s release has us looking ahead to Father’s Day!


PamSparksPunnyManThurs


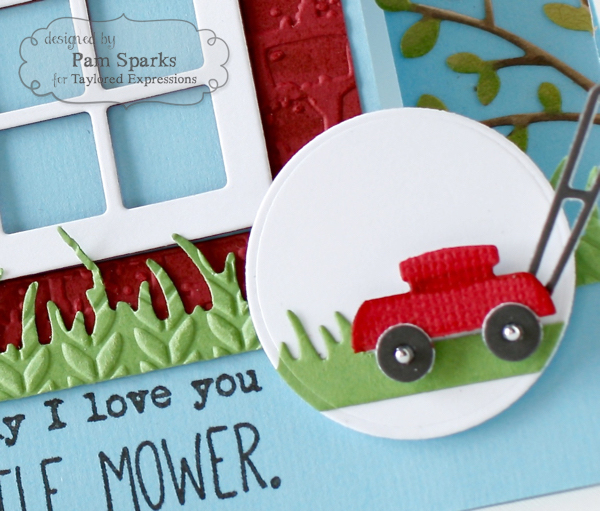
I made an A2 size Center Panel Step Card.  Don’t you love that cute Little Bits lawn mower die?!  The window, well, it’s really a new die called Gridlocked!  Love the new Brick Embossing Folder too!


Version 2


I die cut the Shades of Thanks tree in white card-stock and colored with Copic Sketch markers.

The Wispy Grass die I cut from green card-stock and embossed it with the Cable Knit Embossing Folder.

The cute sentiments on the front and inside are from the new Punny Man stamp set… so fun!

and here’s the inside…


PamSparksPunnyManMowerInsideThurs


So glad you stopped by today! If you’d like to see more projects and new product information, please head over to the TE Blog for a complete blog roll of the participating designers!


Hope you’re inspired to create some cards with TE stamps and dies!  😀

See ‘ya!


All of the new products are available for purchase at the TE web store today!

cards · Die Piecing · Memory Box · rubber stamps · Spring

Memory Box Forest Archway Scene…


PamSparksForestArchwayButterfly675


Hi Everyone! The NEW Archway Forest dies…are so neat! When I first saw them, I knew, I had to have them for scenes!  : )   Then I decided I had to make them up for Spring!

My next idea was to inlay the NEW Small Forest Archway die so I could stamp over the top of it!  Awesome, right?!  Don’t you love it?!  I do!  You have to try it!


o


Photos just don’t do it justice!

The stamp I used is the NEW Happiness stamp.

I die cut the NEW Grand Forest Archway die, popped it up by just putting mounting squares, that I cut in half on the tree trunks, top to bottom.

Die cut and shape the flowers from the Blooming Border die and glue them on here and there for the blooms on the trees.

Yes, it had to have a butterfly! I die cut and shaped with my fingers, the smallest butterfly from the Leavenworth Butterfly Trio die.


I’m so glad to you checked out my post today!  Thanks so much for all your encouraging comments too!  I appreciate it so much!

Shopping links to what I used on my card today…

cards · Taylored Expressions · Washi Tape

Taylored Expressions News!


PamSparksShadesThanks650


It’s a beautiful day in the neighborhood and I’ve got exciting news to share!   Taylor from Taylored Expressions emailed and invited me to be on her Creative Team!  Of course I said, “YES”!!!  What’s really fun is that her business is only an hour away from me!  Road trip! lol  What a girl will do for more new stamps and dies!  😀


thumbnail


Click over to the TE blog for more exciting news!  I’m so delighted to work with Taylor and her stamps and dies!  The May release is coming soon! YAY!

Thanks for stopping by today!  I always look forward to hearing from you and thank you so much for taking time out of your busy day to talk to me!

Dies I used… Shades of Thanks from TE,  Wispy Grass Border from TE and Cable Knit Embossing Folder from TE

Other… Doodlebug Happy Clouds Washi tape, Distress ink and Distress markers and various card-stocks

p.s. one of the grass cuts I ran though the Big Shot in the Cable Knit embossing folder… isn’t that fun?!  love this folder!

Birthday · cards · Class · Classes · Die Piecing · Memory Box · Shabby Chic · Spring

Memory Box Shabby Chic Spring class…


Scrapmania April 11 Shabby Chic Spring


Hi everyone! Just wanted to share the cards from my Shabby Chic Spring class.  I had nine awesome stampers in the a.m. class, April 11th at Scrapmania in Cedar Rapids, IA and we had a great time!


Here I am giving instructions…

IMG_8854


Ready, set, go!  machines lined up and ready!

IMG_8859


I was so happy with these cards…Memory Box dies, pool, natural and dark brown notecards and pattern papers…so pretty!

PamSparksFairytaleOvalBirthday700


PamSparksFloriaThanks700


PamSparksFlutteringCornerBirthday700


I wish you all could’ve been there! 😀  Thank you Scrapmania for having me come!

I have a couple kits left if anyone is interested.

Thanks for stopping by my blog today!  I’m working on some more fun stuff to share soon!

Dies, Machines and Supplies I used to make these cards…

Birthday · cards · copics · Die Piecing · Memory Box · Spring

Memory Box Spring 2015 Release…


PamSparksEnglishRoseBouquetWindham700


Hi everyone!  I’m posting today on the Memory Box blog HERE.  It’s time for the Spring 2015 Release Blog Blitz!  It started on Monday and goes through Friday.  Comment on the blog posts there for chances to win!

For my card today, I die cut one of the corners from the NEW Open Studio Distressed Windham Collage die set twice.  Once in the upper left corner and then again in the bottom right corner of a 4 in. x 5 1/4 in. piece of parchment card-stock. I distressed the edges with a Tim Holtz paper distresser tool.  Then I inked most of the piece with Gathered Twigs Distress ink and a mini round ink blending tool. I spattered with Walnut ink and Metallic Gold spray ink.


PamSparksWindhamEnglishRoseClose


I die cut the English Rose Bouquet die in Parchment card-stock and colored it with Copic Sketch markers. The flowers are the RV 90 series and the leaves are the BG 90 series.


I hope I can explain what I did without it being confusing.  Here goes…

* I leave the rose cut in the die after I cut it, this is one time I hope the pieces stick in the die (if any of the pieces come out I stick them back in the die)

* With the wide yellow frog tape (painters tape), I put pieces of the tape over the die cut card-stock  I left in the die (tape goes adhesive down on the wrong side of the card-stock and extends over the edges)

* Now I remove the die cut from the die and all the pieces stick to the frog tape

* Take the outline part of the die off the tape and color it

* The flower petals I left on the frog tape and colored

I know, this is getting long…do you want me to carry on?!  : )  ok!

* After coloring lay your outline die cut wrong side up and put mounting squares all over it in strategic places so they will be overlapping all the lines.  I cut mounting squares in half for this and yes, it takes a lot but it’s worth it!

* Now turn your colored outline die cut right side up and you’re ready to place all the colored petals into the rose outline.  The rose petals will all stick to the mounting squares.  YES!

*  Add mounting squares to your leaves and place it on the background piece

* Add mounting squares to the background piece and place it on an A2 Juniper notecard


Here’s the inside!


PamSparksEnglishRoseBouquetWindhamInside


I die cut the NEW Pennington Rose Border die in Juniper card-stock, glued it to the top and  stamped the words, happy birthday from the NEW Party Time stamp set.  

Lots of NEW stamps!  Clear sets, wood mounted and cling!  YAY!  HERE

It’s been a lovely Spring so far in Iowa!  I love this cooler but not cold weather!  I just got a new bike!  So excited! Now to get the sound fixed on my computer… ugh…but how can I go without it?!  I know, a video would’ve been a whole lot easier than explaining this card! lol

Happy Wednesday!  TTYL!