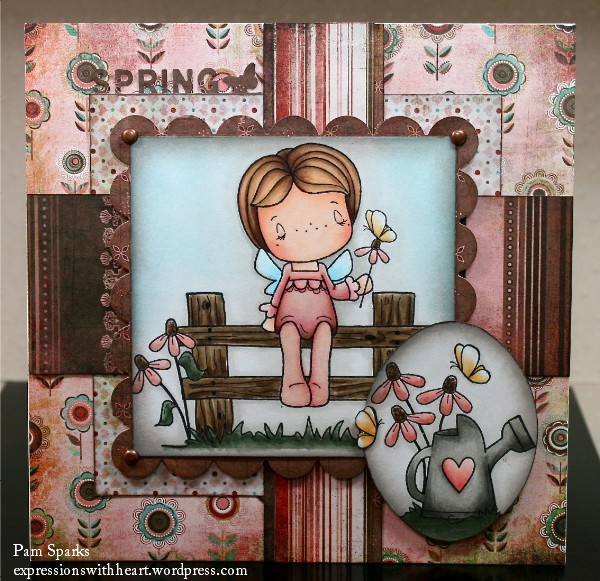
Close up…
This gal is dreamin’…enjoying the day for sure!
- She’s inked with Memento Tuxedo Black ink
- Colored with Copic Sketch Markers
- Nestabilities standard square and scallop square dies
- Masked with Eclipse tape
- Positioned with the Stamp a ma jig
- Making Memories brads
- Basic Grey pattern paper 6×6 pad – Blush (old pattern)
- Distress inks – Tumbled Glass, Pumice Stone, Black Soot for aging the papers
- Ink Blending Tool for aging the papers
- Martha Stewart border punch – Spring
- Tonic trimmer
- Martha Stewart scoring board
I’m linking my card to Sketch For You To Try, Our Creative Corner, Sweet Stampin Challenge Blog, Magical Crafts Fortnightly Challenge blog
Now…on to my masking and positioning tutorial! FINALLY! I’ve been thinking of doing this forever! Holler if you have any questions. (photos will all enlarge if you click)
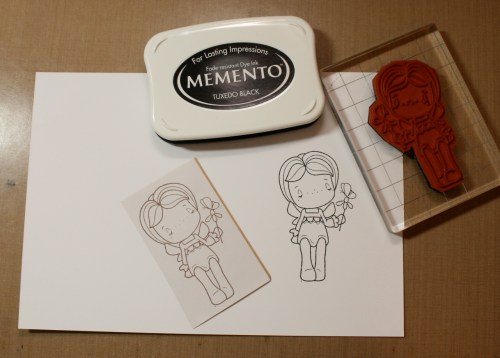
1. Start by stamping your main image on your card-stock and on a piece of Eclipse tape (thin paper with adhesive on the back, wonderful for masking because it is so thin)…
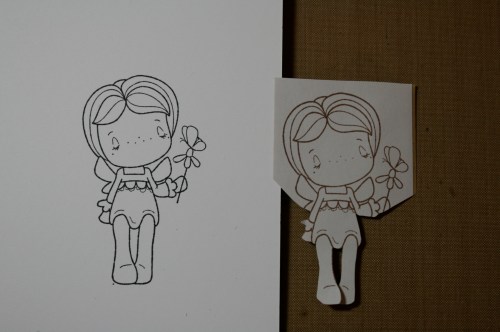
2. Next you will want to cut out the image you stamped on the Eclipse tape, CUT ON THE INSIDE OF THE STAMPED LINE, when you place this mask over your image you want to barely see the stamped line of the image you stamped on the card-stock, trust me, you want to!!! I only needed to cut out her bottom half for this card.
3. Peel the backing off your mask and place it over the image you stamped on your card-stock.
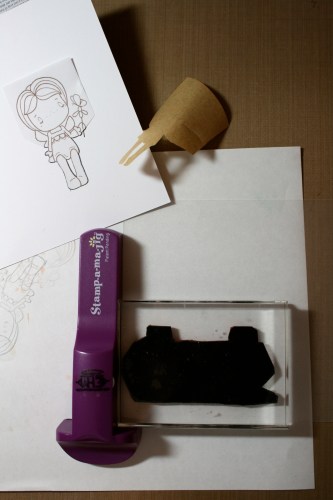
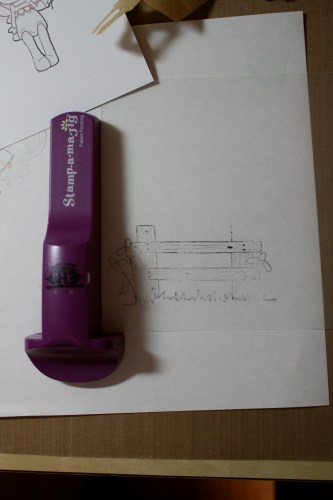
Take your Stamp a ma jig and place the imaging sheet into the corner just like you see in the photo. (the imaging sheet is translucent plastic, a little rough on one side, stamp on the rough side)
Ink up your stamp and stamp it on the imaging sheet while holding the stamp a ma jig in place with your left hand. Making sure the imaging sheet stays tucked into the corner.
Another “trust me”, you get good at this the more you do it and will never stamp again without it! It is so nice to stamp things right where you want them in the first place!
Your imaging sheet will look like this…
4. Now you are ready to stamp your fence OVER the little girl image…gear up your courage…hehe…
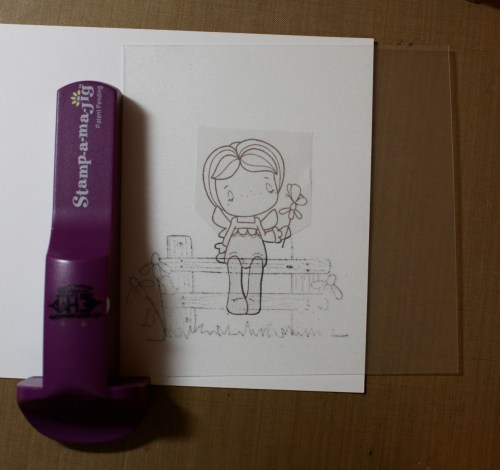
Place your imaging sheet w/the fence stamped on it over the little girl and move it around until you find where you want to stamp it.
Hold the imaging sheet down with your right hand and with your left hand bring the Stamp a ma jig up to the bottom left corner and fit it to the imaging sheet, making sure it fits perfectly, keeping the fence right where you want it.
5. Ink the fence stamp again….with your left hand hold that Stamp a ma jig right in place and “take away the imaging sheet”.
Bring the fence stamp up to the Stamp a ma jig (left hand still holding it in place), making sure the block is fitting right into the corner straight on… I touch it to the stamp a ma jig and then take it down to stamp the card-stock… it will make sense as soon as you do it.
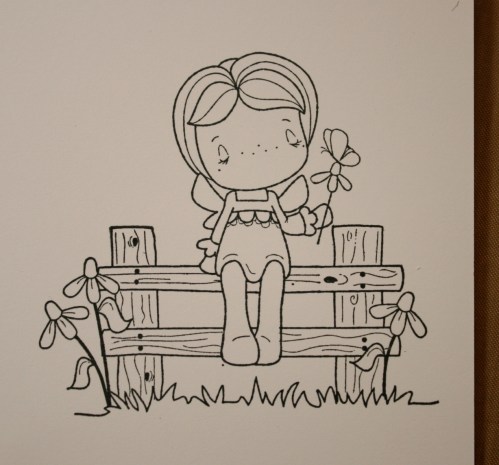
The finished stamped image…ready to color!
Can’t wait to hear how you get along with this… I hope you try it and love it as much as I do!!! I have every stamp positioner that was ever created and I LOVE this stamp a ma jig… it is so easy and the non slip base is part of the reason it works so great. I buy extra imaging sheets but for the most part I just clean them off after I finish…sometimes I even use it for stamping names with alphabets… a letter in each corner of the sheet…however many sheets it takes…it really is slick!!! I LOVE it! My stamp a ma jig is one of the original ones, now they are a light tealish color…
Have a great rest of the week – stamping off!
Discover more from
Subscribe to get the latest posts sent to your email.



Great tutorial, Pam! I need to use the masking technique more than I do. What was I waiting for? This great tutorial! 🙂
I love this card, Pam! The design and papers are perfect and your coloring is AMAZING! Awesome tutorial too, very easy to follow and learn! 🙂
Pam this is soooo cute! I love that Spring punch. Coloring is awesome too.
Great tutorial on masking.
Thank you for that great tutorial. A Stampamajig is on my want list and now I’ll know how to use it when I get it.
I really need to get a stampamajig!! Awesome card and a great tutorial!
Pam, what a gorgeous card! Your colouring is just amazing!
very cute card! thanks for the tutorial, too!
Great masking Pam! Love the tutorial for those who haven’t tried this technique yet!
Pam, she is adorable! I love the scenes you create for your cards and I think you did a fabulous tutorial too!! I LOVE ATS! =)
Hugs
Jodi =)
Fabulous tutorial, Pam! I have a stampamajig and never used it… :o)
Beautiful coloring on this image and I love the scene you created! She is so sweet!
hugs, Angela
I love your card! I also think it’s great that you did that tutorial! I love my Stamp-a-ma-jig for placing my sentiments straight! For some reason,I hate masking though and would rather cut out images and layer them to get my scene! My way is probably a much bigger pain though! :-)Traci
Awesome card Pam! I just love how you combine more than one image. Thanks for the tutorial, I really need to come back to visit! Thank you.
pp.s. – I’ve started to add everyone to my RSS feed to cut down on my emails… please know that I’ve “unsubscribed” BUT definitely added you to my RSS! You know I’m your No. 1 fan!
Great tutorial Pam, I must try this one day soon. Love your pink and brown card, this image is so adorable and your card design is wonderful! I also love your distressing, that is one thing I’m still working on, wish I could do it like you!
Wow this is stunning, wonderful tutorial too. Thank you for joining us at MCFC, hope to see you again soon xxx
I love pink- the papers are lovely and love your coloring! Thanks for a great tutorial too.
This is a lovely card. Love everything about it. Thanks for joining in with us on Sweet Stampin.
Jayne xx
This card is STUNNING! Great tutorial too. Your coloring is so beautiful. Wonderful post!
Gorgeous, gorgeous card Pam! I love those dp’s and the little word Spring with the butterfly. Your coloring style is just stunning! Thanks for tutoria. Even though I’ve masked images in the past, it sure doesn’t hurt to read it over one more time. You did a super job…
Hugs,
Barb
Fantastic job on your tutorial Pam!
Your card is just beautiful! Your coloring is so fabulous! Thanks for sharing!
What a beautiful card, your colourng is stunning. Thanks for playing at Sweet Stampin. x
Gorgeous card Pam and love your cute coloring. Your tutorial is awesome :o)
Hugs,
Cabio
This is just adorable! So lovely! I love the color combo! So subtle yet so gorgeous! Great image and I love your DP! Thank you for joining us for this weeks “Sweet Stampin” challenge! I look forward to seeing more of your SUPER FABULOUS crafty works in the future!
I invite you to hop on over and celebrate my DT positions with me by entering in my candy giveaway!
HUGS
Rach ~ Queen La Rubba
Pam it is your fault that I spend 50 dollars..I loved your card and went and ordered the spring kit…
Thanks
Elly
Wow Pam, another stunner. What a cutie, the scene you’ve created is wonderful and coloured and masked so perfectly. Love the papers and everything about it. Great tutorial also, I have a repositioner floating around somewhere, I need to dig it out. Thanks hugs Jodie from Oz
Great tutorial. The card turned out so pretty.
Thanks for the tute! Love this card!
Pam, oh my my my this is precious!!!! Love, the papers and your coloring with those copics just blows me away every time. I just ordered this set on the last day. I can’t wait for it to get here. So adorable!
Hugs, Dena
Very very pretty card!!!
Nadine
Pam, love love love your card. One of my favorite colour combos. And you know what I think of your awesome colouring technique.
Great tutorial. would like to give it a try if I can only find that stamp a ma jig in our local stores. Haven’t seen it yet. Might have to get on-line. Have been doing my masking with the hit-and-miss method…LOL.
Hugs.
Norma
Love the tutorial I bookmarked 🙂
Wow, wonderful blog layout! How long have you been blogging for? you make blogging look easy. The overall look of your site is excellent, let alone the content!. Thanks For Your article about Masking and Stamp-a-ma-jig tutorial& .